
Method 1: Using Keyboard Shortcuts
Windows Media Player provides convenient keyboard shortcuts that allow you to easily change the playback speed of your media files. These shortcuts can be a time-saving and efficient way to adjust the speed of your videos or audio tracks. Here are the steps to change the playback speed using keyboard shortcuts:
- Open the Windows Media Player by clicking on the Start menu, selecting “Windows Media Player,” and launching the program.
- Play the media file that you want to adjust the playback speed for.
- While the media file is playing, press the “+” key on your keyboard to increase the playback speed.
- Alternatively, you can press the “-” key on your keyboard to decrease the playback speed.
- If you want to reset the playback speed to the default setting, press the “0” key on your keyboard.
Using these keyboard shortcuts, you can quickly and easily modify the playback speed of your media files to suit your preferences. Whether you need to speed up a lecture or slow down a tutorial, these shortcuts offer a convenient way to control the playback speed without having to navigate through the player’s interface.
It’s important to note that the effectiveness of these keyboard shortcuts may vary depending on the version of Windows Media Player you are using. Some older versions might not support these shortcuts, so it’s advisable to check the documentation or support resources specific to your version.
Method 2: Using the Playback Speed Option
Another way to change the playback speed in Windows Media Player is by using the built-in playback speed option. This method allows you to adjust the speed using the player’s interface. Here are the steps to utilize this feature:
- Launch Windows Media Player by clicking on the Start menu, selecting “Windows Media Player,” and opening the program.
- Open the media file you wish to modify the playback speed for.
- Once the file is playing, navigate to the bottom of the Windows Media Player window and locate the playback controls.
- Next to the play/pause button, you will find a small button with an arrow pointing downwards. Click on this button to reveal additional options.
- In the dropdown menu, you will see a “Playback Speed” option. Click on it to view a list of available playback speeds.
- Choose the desired playback speed from the list. You can select options like 1.0x (normal speed), 1.5x (1.5 times faster), or 0.5x (half speed), among others.
- The media file will now play at the selected playback speed.
Using the playback speed option gives you greater control over the speed settings in Windows Media Player. This method offers a visual and intuitive approach to adjusting the playback speed of your media files.
It is worth mentioning that not all versions of Windows Media Player may have the exact same interface or menu options. Though the playback speed option should be available in most versions, the steps to access it may differ slightly.
Method 3: Using the Enhancements Tab
Windows Media Player offers an Enhancements tab that allows you to adjust various settings, including the playback speed. This method provides more advanced customization options for modifying the playback speed of your media files. Follow these steps to utilize this feature:
- Launch Windows Media Player by clicking on the Start menu, selecting “Windows Media Player,” and opening the program.
- Open the media file you want to adjust the playback speed for.
- While the file is playing, navigate to the Menu bar at the top of the application window and click on “View” to reveal a dropdown menu.
- In the dropdown menu, locate and click on the “Enhancements” tab.
- A new window will open with various enhancement options. Look for the “Play Speed Settings” option and click on it.
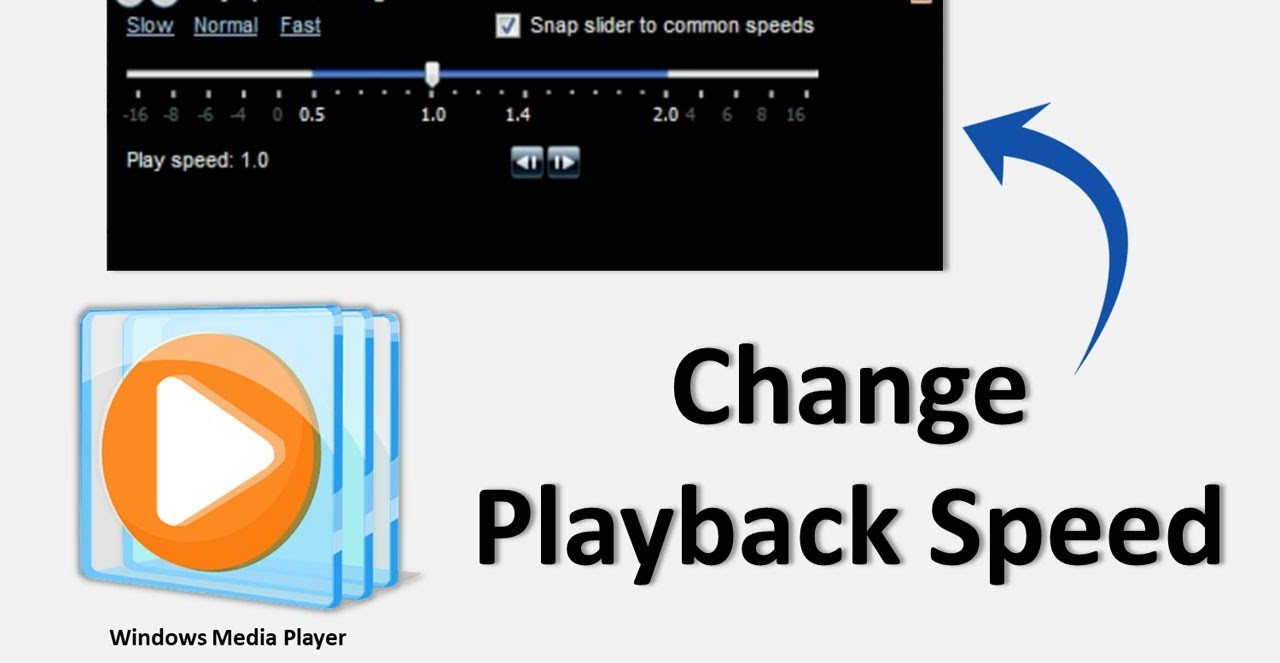
- In the Play Speed Settings window, you will find a slider that allows you to adjust the playback speed. Slide it to the left to decrease the speed or slide it to the right to increase the speed.
- Additionally, you can manually enter a specific playback speed value in the text box next to the slider if you have a specific speed in mind.
- Once you’ve set the desired playback speed, click on the “Apply” button to save the changes.
Using the Enhancements tab provides a more comprehensive control panel for adjusting the playback speed in Windows Media Player. It allows you to fine-tune the speed settings to your exact preferences.
Please note that the availability of the Enhancements tab may vary depending on the version of Windows Media Player. If you cannot find the tab in your version, you may need to consult the player’s documentation or support resources.
Method 4: Using the Play Speed Settings
Windows Media Player provides a dedicated Play Speed Settings window that allows you to adjust the playback speed of your media files with precision. This method offers more granular control over the speed settings, giving you the ability to set specific values. Here’s how you can use the Play Speed Settings:
- Launch Windows Media Player by clicking on the Start menu, selecting “Windows Media Player,” and opening the program.
- Open the media file for which you want to modify the playback speed.
- While the media file is playing, navigate to the Menu bar at the top of the application window and click on “Playback” to reveal a dropdown menu.
- In the dropdown menu, locate and click on the “Play Speed Settings” option.
- A new window will appear, displaying a slider that allows you to adjust the playback speed. Move the slider to the left to decrease the speed or to the right to increase the speed.
- If you have a specific playback speed value in mind, you can also manually enter it in the text box next to the slider.
- Once you’ve set the desired playback speed, click on the “OK” button to save the changes.
Using the Play Speed Settings window gives you precise control over the playback speed of your media files. You can fine-tune the speed settings to match your preference, making it ideal for situations where you require specific playback speeds.
It’s important to note that the availability and location of the Play Speed Settings option may vary depending on the version of Windows Media Player you are using. If you’re unable to find the option, refer to the player’s documentation or support resources.
Method 5: Using Third-Party Software
If you’re looking for more advanced playback speed options or additional features, you can consider using third-party software to modify the playback speed of your media files. There are several reliable software options available that offer enhanced flexibility and customization. Here’s how you can use third-party software to change the playback speed:
- Research and choose a reputable third-party software that suits your needs. There are various options available, such as VLC Media Player, PotPlayer, or KMPlayer.
- Download and install the chosen software onto your computer.
- Launch the software and open the media file you want to modify the playback speed for.
- Once the file is playing, look for the playback speed options within the software’s interface.
- Most third-party software provides dedicated playback speed controls, such as sliders or buttons, allowing you to adjust the speed as desired.
- Experiment with different playback speed settings until you find the speed that suits your preference.
- Save the changes, if applicable, and enjoy the media file at the adjusted playback speed.
Utilizing third-party software can offer a wider range of features and options for modifying the playback speed of your media files. These software options often provide additional functionalities, such as the ability to change speed increments, apply speed changes to specific sections, or even sync audio with subtitles.
When choosing third-party software, it’s important to ensure that you download from trusted sources to avoid any security risks. Additionally, familiarize yourself with the specific instructions and features offered by the software you choose, as they may vary between applications.