
Why Change the Name of Your Kindle?
When you first purchase a Kindle, it will come with a default name assigned by Amazon. For many users, this generic name may be sufficient. However, if you want to personalize your Kindle and give it a unique identity, changing its name can be a simple and effective way to achieve that.
Changing the name of your Kindle can have several advantages. Firstly, it allows you to create a more personalized experience with your device. By giving it a name that reflects your interests, personality, or even just a fun nickname, your Kindle becomes an extension of yourself.
Furthermore, a customized Kindle name can make it easier to identify your device, especially if you own multiple Kindles or if you regularly share your Kindle with others. With a distinctive name, you can quickly distinguish your device from others, preventing any mix-ups or confusion.
Changing the Kindle’s name can also be a practical decision. For example, if you plan to connect your Kindle to a Wi-Fi network, renaming it can help you easily identify it when selecting devices from a list. This eliminates the guesswork and ensures you connect the correct Kindle to the network.
Moreover, if you’re someone who enjoys giving gifts or lending your Kindle to friends and family, changing the name can add a personal touch. Your loved ones will appreciate the thoughtfulness behind the custom name and feel a greater sense of ownership when using the device.
Overall, changing the name of your Kindle is a small but significant step towards personalization and convenience. It allows you to make your device your own, preventing mix-ups, and adding a touch of uniqueness to your reading experience.
Step 1: Accessing the Menu
To change the name of your Kindle, you need to access the settings menu. The specific steps may vary slightly depending on the model of your Kindle, but the general process remains the same.
Start by turning on your Kindle and ensuring that you are on the home screen. From there, locate the menu icon, which is usually represented by three vertical dots or lines. It can typically be found at the top right or bottom of the screen.
Tap on the menu icon to open the settings menu. On some Kindle models, you may need to swipe down from the top of the screen to reveal the menu options. Once the menu is open, you’ll see a list of settings and options.
Scroll through the menu until you find the “Settings” option and tap on it. This will take you to the settings page, where you can make various changes to your Kindle’s configuration.
Now that you have accessed the settings menu, you’re one step closer to changing the name of your Kindle. In the next section, we will guide you through the process of choosing your Kindle and locating the option to edit its name.
Step 2: Choosing Your Kindle
After accessing the settings menu on your Kindle, you’ll need to choose the specific device for which you want to change the name. This step is essential if you own multiple Kindles or if you regularly use a shared Kindle with others.
On the settings page, look for the option that displays the name or model of your Kindle. It is typically listed at the top of the settings menu. Tap on this option to access the device-specific settings.
If you have multiple Kindles registered to the same Amazon account, you may see a list of devices on the screen. Choose the Kindle that you want to rename by tapping on its name or selecting it from the list.
In case you only have one Kindle registered, the device-specific settings should appear automatically without any additional steps. Ensure that you have selected the correct Kindle from the settings page.
Once you have chosen the specific Kindle for which you want to change the name, you can proceed to the next step, which involves editing the existing name and entering a new, personalized name for your Kindle. This will be covered in detail in the following section.
Step 3: Editing the Name
Now that you have chosen the Kindle for which you want to change the name, you can proceed to edit the existing name and enter a new, personalized name for your device. Follow the steps below to complete this process:
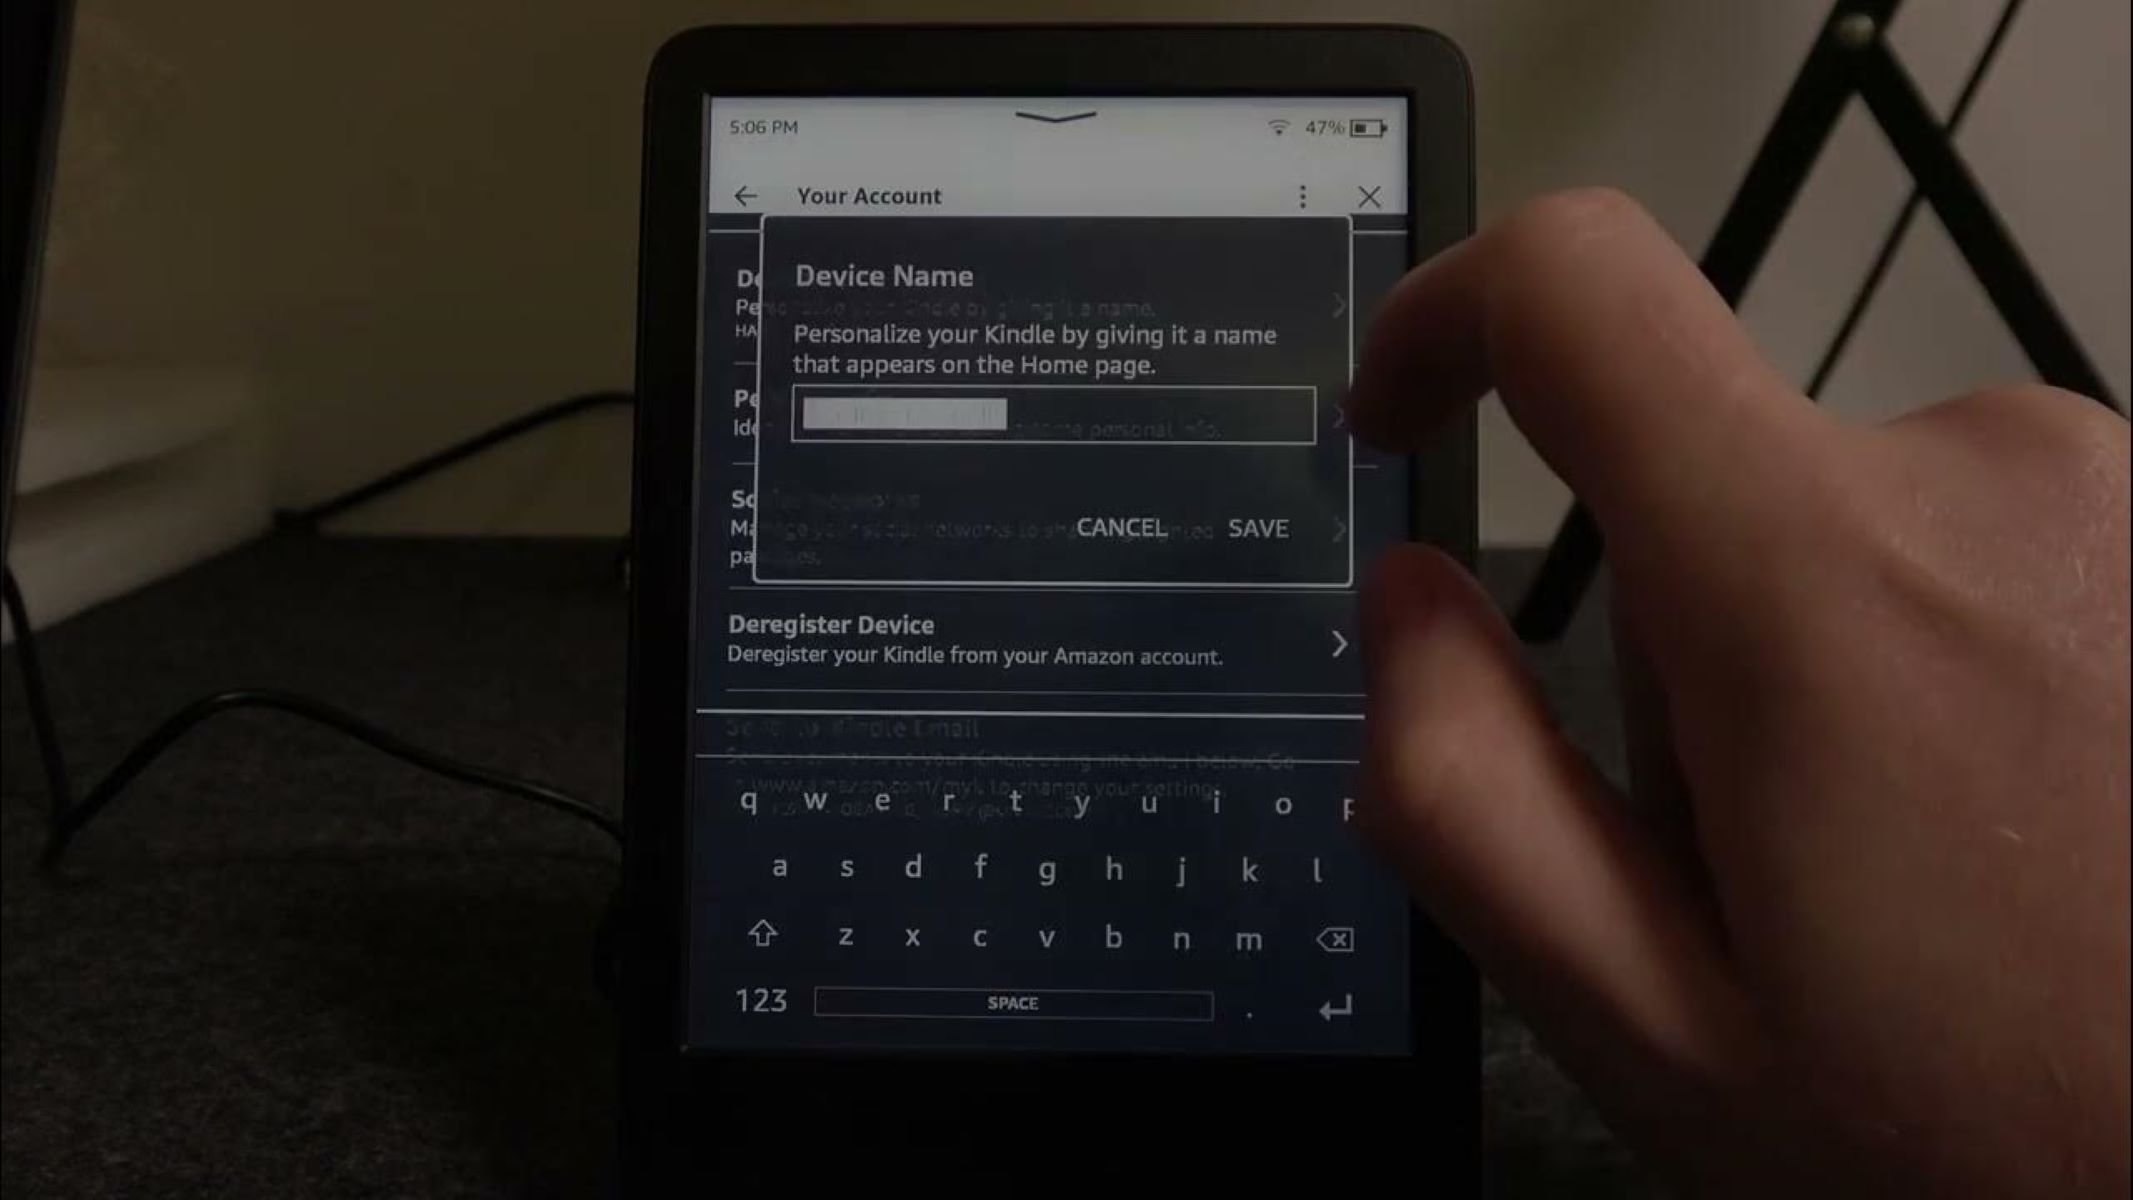
- Once you have accessed the device-specific settings on your Kindle, locate the option that allows you to edit the name. This option is usually labeled as “Device Name,” “Name,” or something similar.
- Tap on the edit option, and you will be presented with a text field where you can modify the name of your Kindle. This field is typically pre-filled with the current name of the device.
- Erase the existing name and enter the new name that you wish to give your Kindle. You can be as creative as you want, using a name that reflects your personality, interests, or even a fun nickname.
- Take some time to ensure that you have entered the new name correctly, as it will be displayed on your Kindle and associated with the device.
Keep in mind that some Kindle models may have character limitations for the device name. If your chosen name exceeds the limit, you may need to shorten it or choose a different name that fits within the allowed character count.
Once you have edited the name to your liking, you are ready to save the changes and apply the new name to your Kindle. The next section will guide you through the process of saving the changes that you have made.
Step 4: Saving the Changes
After editing the name of your Kindle, it’s important to save the changes to ensure that the new name is applied to your device. Follow the steps below to successfully save the changes:
- Once you have entered the new name for your Kindle, look for a “Save” or “Apply” button on the screen. This button is usually located at the bottom of the settings page or next to the text field where you edited the name.
- Tap on the “Save” or “Apply” button to confirm and save the changes that you have made to the Kindle’s name.
- Wait for a moment as the Kindle processes the changes and updates the name associated with the device.
- Once the changes are successfully saved, you should see a confirmation message or an indication that the new name has been applied to your Kindle.
It’s crucial to ensure that you complete this step to avoid losing the changes you made to the Kindle’s name. Skipping this step may result in the device reverting to its previous name or not displaying the new name at all.
With the changes saved, you can move on to the next step to verify that the new name has been successfully applied to your Kindle. The following section will guide you through this process.
Step 5: Verifying the New Name
After saving the changes to the name of your Kindle, it’s important to verify that the new name has been successfully applied to your device. Follow the steps below to confirm the new name:
- Return to the home screen on your Kindle by pressing the home button or navigating back from the settings menu.
- Locate the device name displayed on the home screen. It is usually located at the top of the screen, near the battery indicator.
- Check if the new name you entered is now being displayed instead of the previous default name. This will confirm that the changes have been successfully applied.
- If you don’t see the new name displayed on the home screen, try restarting your Kindle and repeating the previous steps to edit and save the name again.
Verifying the new name is crucial to ensuring that the changes you made are reflected on your Kindle. It also helps to confirm that you have correctly followed the previous steps in the renaming process.
Once you have verified that the new name is being displayed on your Kindle’s home screen, you can move on to the next steps. The following sections will guide you through syncing your Kindle and registering it with the new name.
Step 6: Syncing Your Kindle
Syncing your Kindle after changing its name is an important step to ensure that the new name is updated across all your devices and Amazon services. By syncing, you will also ensure that any changes made to your Kindle’s content, settings, or reading progress are reflected on all your devices. Follow the steps below to sync your Kindle:
- Connect your Kindle to a Wi-Fi network. This is essential for the syncing process to work effectively.
- On your Kindle, go to the home screen and tap on the menu icon to access the settings menu.
- Scroll through the menu and find the “Sync” option. This option may also be labeled as “Sync Now” or “Update All.”
- Tap on the “Sync” option to initiate the syncing process. Your Kindle will connect to the Amazon servers and update any changes made to content, settings, or the device name.
Be patient as your Kindle syncs. Depending on the number of changes and updates, it may take a few moments for the process to complete. Once syncing is finished, your Kindle will be up to date, and the new name will be synced across your devices and Amazon services.
It’s recommended to perform a sync regularly, even if you haven’t made any recent changes. This ensures that your Kindle remains up to date and that any new books, documents, or settings are added to your device.
Now that you have successfully synced your Kindle, you can proceed to the final step – registering your Kindle with the new name. The next section will guide you through this process.
Step 7: Registering Your Kindle with the New Name
Registering your Kindle with the new name is the final step to complete the process of changing the device’s name. Registering your Kindle allows you to access Amazon services, such as the Kindle Store and cloud storage, as well as sync your content and settings across devices. Follow the steps below to register your Kindle with the new name:
- Ensure that your Kindle is connected to a Wi-Fi network before you proceed with the registration process.
- On your Kindle, go to the home screen and tap on the menu icon to access the settings menu.
- Scroll through the menu and find the “Registration” or “My Account” option. This option may also be listed as “Amazon Account” or “Account Settings.”
- Tap on the “Registration” or “My Account” option to continue with the registration process.
- Follow the on-screen prompts to sign in to your Amazon account or create a new account if you don’t have one already.
- When prompted, enter the necessary information, including your name, email, and password, to register your Kindle with your Amazon account.
- During the registration process, you may be asked to confirm your device name. Ensure that the new name you entered earlier is displayed correctly.
- Once the registration process is complete, your Kindle will be registered with the new name, allowing you to access Amazon services and enjoy a personalized reading experience.
Registering your Kindle is essential for taking full advantage of its features and capabilities. It enables seamless synchronization, access to the Kindle Store, and other benefits associated with your Amazon account.
Congratulations! You have successfully changed the name of your Kindle and registered it with the new name. Enjoy your personalized reading experience!
Additional Tips and Considerations
While changing the name of your Kindle is a straightforward process, there are a few additional tips and considerations to keep in mind:
- Character Limit: Be mindful of the character limit when entering the new name for your Kindle. Some Kindle models have restrictions on the number of characters allowed for the device name, so ensure that your chosen name fits within the limit.
- Unique Name: Select a unique name for your Kindle to make it easily distinguishable from other devices, especially if you own multiple Kindles or use a shared Kindle with others.
- Privacy: When choosing a personalized name, consider any privacy concerns. Avoid using your full name or any personal information that you wouldn’t want to be displayed publicly on your Kindle.
- Symmetry: If you have multiple Kindle devices, consider using a naming convention that reflects the content or purpose of each device. This can help you quickly identify the specific Kindle you want to use or manage.
- Custom Screensavers: Some Kindle models allow you to customize the screensavers displayed when your device is idle. You can further personalize your Kindle by adding screensavers that reflect your interests or preferences.
- Restarting: If you encounter any issues with the new name not being displayed correctly or syncing properly, try restarting your Kindle. Sometimes, a simple restart can resolve minor glitches or refresh the device’s settings.
Remember, changing the name of your Kindle is a personalization option that lets you add a touch of uniqueness to your device. Embrace the opportunity to make your Kindle truly your own and enjoy a more personalized reading experience.
By following these additional tips and considerations, you can ensure a smooth and successful journey in changing the name of your Kindle.