
Reasons to Change the Font on Android
When it comes to personalizing your Android device, changing the font can make a significant impact on the overall appearance and user experience. Here are a few reasons why you might consider changing the font on your Android:
- Enhancing readability: The default font on Android may not be the most readable for everyone. By changing the font to one that suits your preferences, you can improve readability and reduce eye strain.
- Expressing your style: Fonts play a crucial role in conveying a specific mood or style. By changing the font, you can showcase your personality and make your device feel more personalized.
- Improving accessibility: Different fonts have varying levels of accessibility. By selecting a font with clearer and more distinct characters, you can make it easier for individuals with visual impairments to use your device.
- Refreshing the interface: Changing the font can give your device an instant makeover. It can breathe new life into the user interface, making it feel fresh and exciting.
- Matching your theme: If you have customized your Android device with a specific theme, changing the font can ensure that the text complements the overall aesthetic.
These are just a few reasons why you might want to change the font on your Android device. Whether it’s for readability, personalization, or accessibility, the ability to choose your own font can greatly enhance your overall Android experience.
Precautions before Changing the Font on Android
Before you dive into changing the font on your Android device, it’s important to keep a few precautions in mind. Here are some things you should consider:
- Compatibility: Not all Android devices support font customization. Before attempting to change the font, ensure that your device and operating system version are compatible with font modifications.
- Backup: Changing fonts can sometimes cause system instability or unexpected issues. It is always recommended to back up your device to protect important data and settings.
- Legitimate sources: Be cautious when downloading fonts from external sources. Stick to reputable websites or app stores to ensure that the fonts you install are safe and won’t compromise your device’s security.
- System apps: Changing fonts may not have a consistent effect on system apps, as they often use their own predefined fonts. Keep in mind that the font change may not be applied universally across all apps on your device.
- Font size: Different fonts have varying character sizes, which can affect the overall look and feel of your device’s interface. Consider testing different font sizes to find the one that suits your needs best.
By keeping these precautions in mind before changing the font on your Android, you can minimize the risk of encountering issues and ensure a smoother transition. Remember to always be cautious and take necessary steps to protect your device and data.
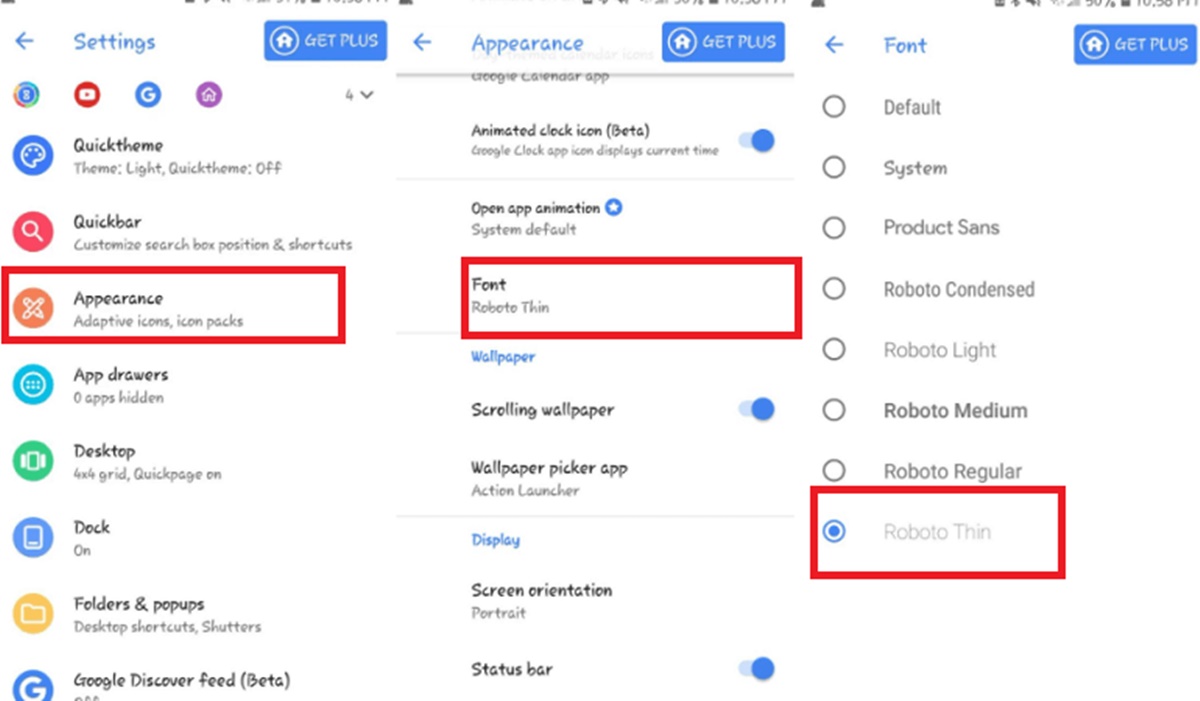
Method 1: Using Native Android Settings
Changing the font on your Android device can be done using the native Android settings. Here’s a step-by-step guide on how to do it:
- Unlock your Android device and go to the Settings menu.
- Scroll down and look for the Display or Appearance option.
- Tap on Font Style or Font depending on your device’s settings.
- You will be presented with a list of available font options. Scroll through and select the font you want to use.
- Once you have selected the font, the changes will be applied immediately. You can preview the font on your device’s interface.
- Exit the settings menu, and the new font will be applied to the system and supported apps.
It’s important to note that the available font options may vary depending on your device’s manufacturer and Android version. The native Android settings offer a convenient and straightforward way to change the font without the need for third-party apps.
Experiment with different fonts to find the one that suits your style and enhances readability. Keep in mind that the font change may not be applied universally, and certain system apps may continue to use their predefined fonts.
Take advantage of the native Android settings to personalize your device and make it truly unique to your preferences.
Method 2: Using a Third-Party App
If the font options available in the native Android settings are limited or you’re looking for more customization, using a third-party app is an excellent alternative. Here’s how you can change the font on your Android device using a third-party app:
- Open the Google Play Store or any other trusted app store on your Android device.
- Search for “font changer” or “font installer” to find a suitable third-party app.
- Select a reputable app with positive reviews and high ratings.
- Download and install the app on your device.
- Launch the app and follow the provided instructions to browse and select the font you want to install.
- Once the font is installed, exit the app.
- Go to the native Android settings and navigate to the Display or Appearance section.
- Tap on Font Style or Font and select the newly installed font from the list.
- Preview the font to ensure it meets your expectations.
- Finally, exit the settings, and the new font will be applied to your device’s system and supported apps.
Using a third-party app gives you access to a wide range of fonts, styles, and customization options that you may not find in the native Android settings. It’s important to select a reputable app and be cautious while granting any permissions requested by the app.
Experiment with different fonts to find the perfect one that matches your style and enhances your Android device’s overall appearance.
Method 3: Using a Custom ROM
If you’re looking for a more advanced and extensive font customization experience, you can consider using a custom ROM on your Android device. Custom ROMs offer a variety of features, including the ability to change the font system-wide. Here’s how you can change the font on your Android device using a custom ROM:
- Research and choose a custom ROM that supports font customization. Popular custom ROMs such as LineageOS, Pixel Experience, and Paranoid Android typically offer this feature.
- Make sure your device is compatible with the custom ROM you have chosen and follow the installation instructions provided by the ROM’s developer.
- Once you have successfully installed the custom ROM, navigate to the ROM’s settings.
- Look for the Font or Interface section within the ROM’s settings.
- Select the font you want to use from the available options or import a custom font file if supported.
- Preview the font to ensure it meets your preferences.
- Apply the font changes, and the new font will be applied system-wide, including the user interface and supported apps.
Changing the font using a custom ROM gives you more control and flexibility over the appearance of your Android device. However, it’s important to note that installing a custom ROM requires technical knowledge and may void your device’s warranty. Proceed with caution and make sure to follow the installation instructions carefully.
Custom ROMs offer not only font customization but also many other features and enhancements that can significantly transform your Android experience.
Method 4: Using a Custom Launcher
If you’re looking for a simpler way to change the font on your Android device without the need for custom ROMs or rooting, using a custom launcher is a great option. Custom launchers provide a unique interface and allow you to customize various aspects of your device, including the font. Here’s how you can change the font using a custom launcher:
- Download and install a custom launcher from the Google Play Store, such as Nova Launcher, Apex Launcher, or Microsoft Launcher.
- Once the launcher is installed, go to your device’s Settings.
- Tap on Apps & notifications, then select the Default apps option.
- Choose the custom launcher you installed as the default launcher for your device.
- Return to the home screen, and you will notice a new interface provided by the custom launcher.
- Long-press on an empty area of the home screen to enter the launcher’s settings.
- Look for the Font or Appearance section within the launcher’s settings.
- Select the font you want to use from the available options or import a custom font file if supported.
- Preview the font to ensure it meets your preferences.
- Apply the font changes, and the new font will be applied to the launcher’s interface and app icons.
Using a custom launcher allows you to change the font without affecting the system or other apps on your Android device. It provides a convenient and non-intrusive way to personalize your device’s appearance.
Experiment with different custom launchers and font options to find the combination that best reflects your style and preferences.
Method 5: Using a Rooted Android Device
If you have a rooted Android device, you can unlock even more font customization options by gaining access to system files. Rooting allows you to make system-level changes and gives you greater control over various aspects of your device, including the font. Here’s how you can change the font on a rooted Android device:
- Ensure that your Android device is rooted. Rooting methods can vary depending on the device model and Android version. Research and follow a reliable rooting guide specific to your device.
- Download and install a file explorer app with root access, such as ES File Explorer, Root Explorer, or Solid Explorer.
- Open the file explorer app and navigate to the system font directory, usually located at
/system/fonts/. - Make a backup of the existing fonts by copying and storing them in a safe location.
- Download the font file you want to use (.ttf or .otf format) and copy it to the system font directory.
- Rename the font file to match the name of the default font you are replacing. (e.g.,
Roboto-Regular.ttforNotoSans-Bold.ttf) - Set the correct permissions for the font file. Long-press the file, select “Properties” or “Permissions,” and ensure that the permissions are set to rw-r–r–.
- Reboot your device for the changes to take effect.
By using a rooted Android device, you can customize the system fonts to a much broader extent, as you have full control over system files. However, rooting your device can void the warranty and may have security implications if not done carefully.
Be cautious when modifying system files and ensure that you have a backup of the original fonts in case any issues arise. Take advantage of rooted access to explore various font options and create a unique visual experience on your Android device.
Troubleshooting Font Changes on Android
Changing the font on your Android device can sometimes lead to unexpected issues or inconsistencies. If you encounter any difficulties or problems after changing the font, try these troubleshooting steps to resolve the issue:
- Restart your device: A simple restart can often resolve minor glitches and ensure that font changes are applied correctly.
- Clear cache and reboot into recovery: In some cases, clearing the cache partition and rebooting into recovery mode can help fix font-related issues. Refer to your device’s documentation or search online for instructions on how to perform this action.
- Reinstall the font: If the font isn’t displaying correctly or causing compatibility problems, try reinstalling it or choose a different font altogether. Make sure to download the font from a trusted source.
- Check app compatibility: Certain apps may not support custom fonts or may have their own font settings. Verify if the font change is applied universally or if it’s limited to specific apps.
- Reset font settings: If you’re using a custom launcher or third-party app for font changes, try resetting the font settings within the app’s settings menu.
- Restore default font: If all else fails, you can restore the default font on your Android device by selecting the default font option in the font settings or by reverting any system modifications you made.
Keep in mind that font changes may not always apply consistently across the entire system or all apps. Certain system apps may use their predefined fonts, and individual app settings may override system fonts.
If you continue to experience font-related issues after attempting the troubleshooting steps, consider reaching out to the developer of the font app or the custom ROM developer for further assistance.
Take a systematic and cautious approach when troubleshooting font changes to identify and resolve any issues you may encounter.
Restoring Default Font on Android
If you’ve changed the font on your Android device and wish to revert to the default font, you can easily do so by following these steps:
- Go to your device’s Settings menu.
- Scroll down and look for the Display or Appearance option.
- Tap on Font Style or Font.
- Within the font settings, you should find an option to restore or revert to the default font. It may be labeled as Default or System font.
- Select the default font option.
- Preview the default font to ensure it is the one you want to restore.
- Exit the settings menu, and the default font will be applied to your Android device’s system and supported apps.
By restoring the default font, you revert any changes made to the font settings and return your device to its original font appearance. This can be useful if you encounter compatibility issues, want a fresh start, or simply prefer the default font.
Keep in mind that restoring the default font may not apply universally across all apps. Some system apps may continue to use their predefined fonts, and individual apps may have their own font settings. Verify the font changes in different apps to ensure consistency.
If you changed the font using a custom ROM, custom launcher, or third-party app, you may need to return to the respective settings of those apps to revert the font changes.
Restoring the default font is a straightforward process that allows you to go back to the original font appearance on your Android device.