
Ways to Change the Font Size on Windows
Windows offers several methods for adjusting the font size on your screen, allowing you to tailor the display to your preferences and improve readability. Whether you have difficulty reading small text or simply want to customize the appearance of your computer, here are a few ways to change the font size on Windows.
1. Display Settings: One of the easiest ways to change the font size is through the Display Settings. Right-click on your desktop and select “Display settings.” From there, you can adjust the size of text, apps, and other items by moving the slider under “Scale and layout.”
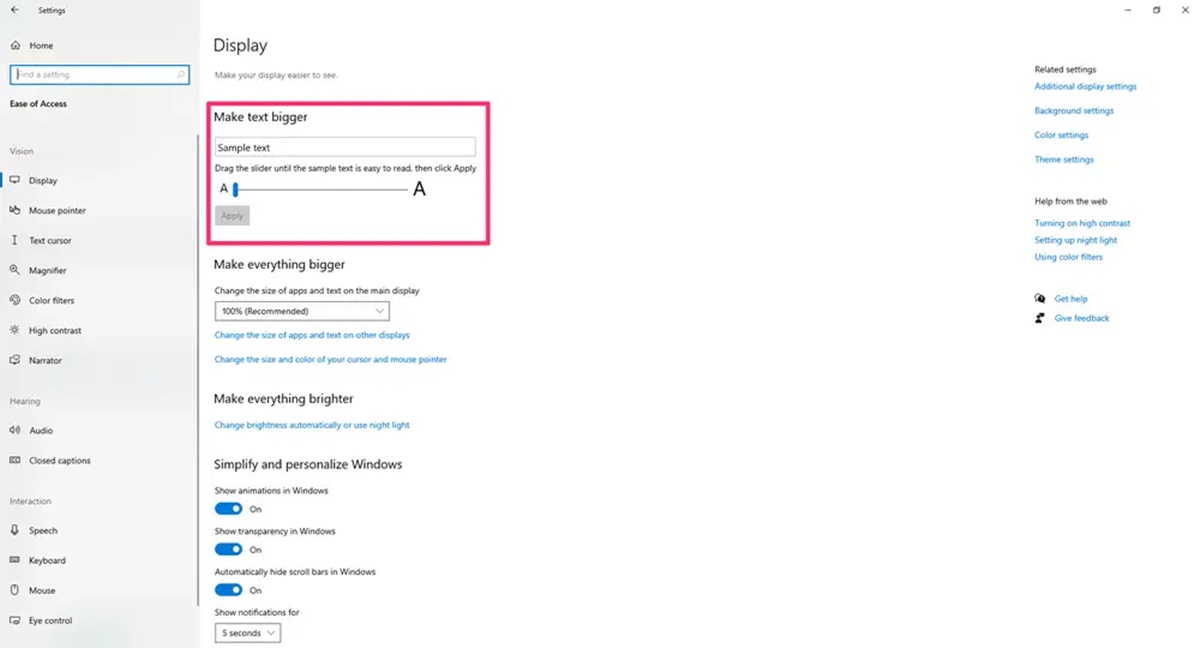
2. Ease of Access: Windows provides an Ease of Access feature that allows you to increase the font size system-wide. To access this, go to the Start menu and open the “Settings” app. Then, navigate to “Ease of Access” and choose “Display.” Under “Make everything bigger,” you can select a preset size for text, apps, and other items.
3. Change Font Size in Specific Applications: Some applications allow you to change the font size within their interface. For example, many web browsers offer options to adjust the default font size. Look for a settings menu or options panel within the application and search for font-related settings.
4. Accessibility Features: Windows also provides additional accessibility features that can further enhance the font size customization. One such feature is the magnifier, which zooms in on the screen and makes text larger. Press the “Windows” key and the “+” key simultaneously to activate the magnifier.
5. Third-Party Software: If the built-in options are not sufficient, you can explore third-party software solutions for font size customization. These software programs often offer more advanced features and greater flexibility in adjusting the font size throughout the operating system.
By utilizing these methods, you can easily change the font size on your Windows computer to suit your preferences and enhance your overall computing experience.
Steps to Change the Font Size on Mac
If you’re a Mac user and want to adjust the font size on your screen, you have several options available to customize your viewing experience. Here are the steps you can take to change the font size on a Mac.
1. System Preferences: Start by clicking on the Apple menu in the top-left corner of your screen and selecting “System Preferences.” From there, click on “Displays” and navigate to the “Display” tab. You’ll find a slider labeled “Resolution” that you can adjust to change the font and icon size. Experiment with different settings until you find the size that suits you.
2. Accessibility Settings: Mac offers a comprehensive range of accessibility settings that allow you to enhance the font size for maximum readability. To access these settings, go to “System Preferences” and click on “Accessibility.” From there, select “Display” in the left sidebar. In the “Vision” section, you can adjust the font size using the slider labeled “Cursor Size.” You can also enable the zoom feature to magnify different areas of your screen.
3. Individual Application Settings: Some applications have their own settings that allow you to customize the font size within their specific interface. Look for a preferences or settings menu within the application and search for options related to fonts or display. You can typically adjust the font size to your liking by selecting a larger or smaller value from the available options.
4. Keyboard Shortcuts: Mac also provides a handy keyboard shortcut that allows you to instantly increase or decrease the font size in certain applications. Hold down the “Command” key and press the “+” or “-” key to adjust the font size accordingly. This shortcut works in applications like Safari, Pages, and TextEdit.
5. Zoom and Magnify: If you need to temporarily enlarge a specific area of your screen, you can use the built-in zoom feature on your Mac. Simply go to “System Preferences,” click on “Accessibility,” and select “Zoom” in the left sidebar. From there, you can customize the zoom options to suit your needs.
By following these steps, you can easily change the font size on your Mac and create a more comfortable and personalized viewing experience.
Changing the Font Size on Android Devices
Android devices offer various options for adjusting the font size, allowing you to customize the display and improve readability. Whether you find the default font too small or simply want to personalize your device, here are the steps to change the font size on Android.
1. Settings Menu: Start by accessing the Settings menu on your Android device. You can typically find it in the app drawer or by swiping down from the top of the screen and tapping the gear icon.
2. Display Settings: Once you’re in the Settings menu, look for the “Display” or “Accessibility” option, depending on your device. Tap on it to access the display-related settings.
3. Font Size: In the Display or Accessibility settings, you should see an option for “Font Size” or “Text Size.” Tap on it to adjust the font size. You may be presented with a slider or a list of preset options to choose from. Slide the bar or select the desired size to set your preferred font size.
4. Font Style: Some Android devices also offer the option to change the font style in addition to the size. Look for an option called “Font Style” or “Font Family” in the Display settings. You can select from a variety of pre-installed font styles to customize the appearance of the text.
5. Accessibility Features: Android devices come with built-in accessibility features that can further enhance the font size and overall readability. In the Accessibility settings, you might find options like “Magnification” or “Large text” that can be enabled to make the font even larger.
6. Third-Party Apps: If the built-in options are not sufficient, you can explore third-party apps available on the Google Play Store that offer additional font customization features. These apps often provide a wide range of font styles and sizes to choose from, allowing you to fully personalize your device’s display.
By following these steps, you can easily adjust the font size on your Android device and ensure that the text is more comfortable to read and suits your preferences.
Adjusting the Font Size on iOS Devices
iOS devices offer various options for adjusting the font size, allowing you to customize the display and improve readability. Whether you find the default font too small or simply want to personalize your device, here are the steps to adjust the font size on iOS.
1. Settings: Start by accessing the Settings app on your iOS device. You can find it on the home screen, usually represented by a gear icon.
2. Display & Brightness: In the Settings app, scroll down and tap on “Display & Brightness” to access the display-related settings.
3. Text Size: Under the Display & Brightness settings, you should see an option for “Text Size.” Tap on it to adjust the font size. You will be presented with a slider that allows you to increase or decrease the font size. Slide the bar to the left for a smaller font or to the right for a larger font.
4. Larger Text: In addition to the Text Size setting, there is also a option called “Larger Text” in the Display & Brightness settings. Tapping on it will take you to a menu where you can enable “Larger Accessibility Sizes.” This feature makes the text even larger throughout your device, including apps that support dynamic type.
5. Bold Text: iOS devices also offer the option to enable “Bold Text,” which increases the thickness of the font. This can make the text more legible for some users. To enable it, go to the Display & Brightness settings and toggle on the “Bold Text” option. Note that enabling this feature will require your device to restart.
6. Accessibility: If you need further customization options, iOS provides accessibility features that can enhance the font size and overall readability. In the Settings app, go to “Accessibility” and explore the options available under “Display & Text Size.” You may find features like “Zoom” or “Larger Text” that allow you to further adjust the font size to your liking.
By following these steps, you can easily adjust the font size on your iOS device and ensure that the text is more comfortable to read and suits your preferences.
Modifying the Font Size on Web Browsers
Web browsers offer various options for modifying the font size, allowing you to customize your browsing experience and improve readability. Whether you want to increase the font size for better legibility or decrease it to fit more content on the screen, here are the steps to modify the font size on popular web browsers.
1. Google Chrome: In Google Chrome, click on the three-dot menu icon in the top-right corner of the browser window. Go to “Settings” and scroll down to find “Appearance.” Under Appearance, you can adjust the “Font size” slider to increase or decrease the font size on web pages.
2. Mozilla Firefox: In Mozilla Firefox, click on the three-line menu icon in the top-right corner of the browser window. Go to “Options” and select “General” in the left sidebar. Under “Fonts and Colors,” you can adjust the “Size” dropdown menu to change the font size. You can also customize other font-related settings in this section.
3. Microsoft Edge: In Microsoft Edge, click on the three-dot menu icon in the top-right corner of the browser window. Go to “Settings” and click on “Appearance” in the left sidebar. Under the “Page zoom” section, you can increase or decrease the zoom level to modify the font size on web pages.
4. Safari: In Safari, click on the “Safari” menu in the top-left corner of the screen and select “Preferences.” Go to the “Advanced” tab and check the box next to “Never use font sizes smaller than” to prevent websites from displaying text in smaller sizes. You can also adjust the “Default font size” dropdown menu to modify the font size in Safari.
5. Opera: In Opera, click on the three-line menu icon in the top-left corner of the browser window. Go to “Settings” and select “Advanced” in the left sidebar. Under “Web pages,” you can adjust the “Page zoom” slider to change the font size on web pages. You can also customize other font-related settings in this section.
By following these steps, you can easily modify the font size in your preferred web browser, ensuring a more comfortable and personalized browsing experience.
Customizing the Font Size in Microsoft Office
Microsoft Office applications, such as Word, Excel, and PowerPoint, allow you to customize the font size to suit your needs and preferences. Whether you’re creating documents, spreadsheets, or presentations, here are the steps to customize the font size in Microsoft Office.
1. Microsoft Word: To customize the font size in Microsoft Word, open the document and select the text you want to modify. Then, go to the “Home” tab in the ribbon at the top of the screen. In the “Font” section, there is a dropdown menu where you can choose the desired font size. You can either select a preset size or manually enter a specific size.
2. Microsoft Excel: In Microsoft Excel, you can customize the font size to make your spreadsheet easier to read and navigate. Select the cells with the text you want to modify, and then go to the “Home” tab in the ribbon. Look for the “Font” section and adjust the font size using the dropdown menu or by manually entering a specific size.
3. Microsoft PowerPoint: When creating or editing a PowerPoint presentation, you can easily change the font size to ensure your text stands out on the slides. Select the text you want to modify, and then go to the “Home” tab in the ribbon. In the “Font” section, adjust the font size using the dropdown menu or by manually entering a specific size.
4. Format Painter: Microsoft Office applications also offer the convenient Format Painter tool, which allows you to apply the same font size to multiple sections of your document or presentation. Simply select the text with the desired font size, click on the Format Painter button in the toolbar, and then select the text you want to apply the same formatting to.
5. Default Font Size: If you prefer to use a specific font size consistently throughout your Microsoft Office applications, you can change the default font settings. Go to the “File” tab or the “Office” button, depending on the version of Microsoft Office you’re using. From there, select “Options” or “Word Options” and navigate to the “Advanced” or “General” section. Look for options related to default font or default font size, and make the necessary adjustments.
By following these steps, you can easily customize the font size in Microsoft Office to ensure that your documents, spreadsheets, and presentations are visually appealing and easy to read.
Changing the Font Size in Google Docs
Google Docs provides a simple and straightforward way to change the font size of your documents. Whether you want to make the text more legible or create emphasis, here are the steps to change the font size in Google Docs.
1. Select Text: Start by opening your document in Google Docs and select the text you want to modify. You can highlight a few words, a sentence, a paragraph, or the entire document.
2. Font Size Dropdown: Once you have selected the text, go to the “Toolbar” at the top of the screen. In the “Formatting” options, look for the “Font size” dropdown menu. Click on it to display a list of available font sizes.
3. Choose Font Size: From the dropdown menu, select the desired font size for the selected text. You can choose from a range of preset sizes, such as 8, 10, 12, 14, and so on. You can also manually enter a specific font size by selecting “Custom” at the bottom of the dropdown list.
4. Apply Font Size: After selecting the font size, Google Docs will immediately apply the change to the selected text. You can see the modified font size in real-time as you make the selection.
5. Format Painter: If you want to apply the same font size to multiple sections of your document, you can use the Format Painter tool. Simply select the text with the desired font size, click on the Format Painter button in the toolbar, and then select the text you want to apply the same formatting to.
6. Default Document Styling: Google Docs also allows you to set a default font size for all new documents. To change the default font size, go to the “Tools” menu, select “Preferences,” and navigate to the “General” tab. In the “Default Style” section, adjust the font size to your desired preference.
By following these steps, you can easily change the font size in Google Docs, ensuring your documents are visually appealing and easy to read.
Adjusting the Font Size in Adobe Acrobat Reader
Adobe Acrobat Reader allows you to adjust the font size for a better reading experience when viewing PDF documents. Whether you want to make the text larger or smaller, here are the steps to adjust the font size in Adobe Acrobat Reader.
1. Open PDF Document: Start by opening the PDF document you want to read or modify in Adobe Acrobat Reader.
2. Zoom Options: In the toolbar at the top of the screen, you will find the zoom options. There are several ways you can access these options:
- You can click on the magnifying glass icon and select a preset zoom level.
- You can use the zoom slider located on the right side of the toolbar to increase or decrease the zoom level.
- You can use the keyboard shortcuts: “Ctrl +” to zoom in or “Ctrl -” to zoom out on Windows, or “Cmd +” to zoom in or “Cmd -” to zoom out on Mac.
3. Fit Page: If you prefer to adjust the font size while maintaining the page layout, you can use the “Fit Page” option. Click on the “View” menu at the top of the screen and select “Zoom.” From there, choose the “Fit Page” option to resize the page so that it fits your screen.
4. Read Mode: Adobe Acrobat Reader offers a “Read Mode” that optimizes the font size and layout for reading. To access this mode, go to the “View” menu and select “Read Mode.” You can also use the keyboard shortcut “Ctrl + H” on Windows or “Cmd + H” on Mac. In Read Mode, you can further adjust the font size using the zoom options mentioned above.
5. Accessibility Tools: If you require additional accessibility options, Adobe Acrobat Reader provides various tools to aid in adjusting the font size. Under the “View” menu, you can access the “Accessibility” options, which include features like text magnification, reflow, and custom zoom settings.
By following these steps, you can easily adjust the font size in Adobe Acrobat Reader to enhance your reading experience and make the text more comfortable to read.
Modifying the Font Size on E-readers
E-readers, such as Kindle, Nook, and Kobo, provide various options for modifying the font size to suit your reading preferences. Whether you prefer larger text for better readability or a smaller font to fit more content on the screen, here are the steps to modify the font size on e-readers.
1. Access Reading Settings: Start by opening the book or document you want to read on your e-reader.
2. Font Size Options: Most e-readers offer dedicated font size options that you can access from the reading settings menu. Look for an icon or menu item that allows you to adjust the font size.
3. Adjust Font Size: Once you’ve accessed the font size options, you can increase or decrease the font size according to your preference. Depending on the e-reader, you may have the option to choose from a range of preset font sizes or manually adjust the size using a slider or arrows.
4. Preview Changes: As you modify the font size, the text on the screen will automatically adjust to reflect the changes. Take a moment to preview the modified font size and ensure that it provides the desired reading experience.
5. Fine-tune Settings: Some e-readers offer additional options to fine-tune the reading experience. These options may include adjusting the line spacing, margins, or boldness of the text, which can further enhance readability. Explore the reading settings menu to see if there are any additional customization options available.
6. Set Defaults: If you frequently prefer a specific font size, you can often set it as the default for future reading. Check the e-reader’s settings or preferences menu to see if there is an option to save your preferred font size as the default setting.
By following these steps, you can easily modify the font size on your e-reader, ensuring a comfortable and enjoyable reading experience.
Changing the Font Size on Social Media Platforms
Social media platforms provide various options for changing the font size of text on their interfaces. Whether you want to increase the font size for improved readability or simply prefer a different aesthetic, here are the steps to change the font size on popular social media platforms.
1. Facebook: Unfortunately, Facebook does not offer an official way to change the font size of the main interface. However, you can use the browser’s zoom feature to increase the overall size of the entire webpage, including the text on Facebook.
2. Twitter: Twitter allows you to change the font size of the text within its mobile app. On both iOS and Android devices, go to the “Settings and privacy” menu and tap on “Display and sound.” From there, you can adjust the “Font size” slider to make the text larger or smaller.
3. Instagram: Similar to Facebook, Instagram does not provide an option to manually change the font size within the app. However, you can use the device’s accessibility features, such as the screen zoom or text size settings, to increase the font size of all apps, including Instagram.
4. LinkedIn: LinkedIn’s desktop version allows you to increase the font size for better readability. Go to your profile picture in the top-right corner, click on “Settings & Privacy,” and select “Accessibility” from the left sidebar. Under “Display,” you can choose a larger font size using the dropdown menu.
5. YouTube: YouTube’s font size is not customizable within the app or website. However, you can use the browser’s zoom feature to increase or decrease both the video player and the text surrounding it.
6. Snapchat: Snapchat does not offer an official way to change the font size. However, you can use the accessibility settings of your device to increase the font size system-wide, including the text displayed within the Snapchat app.
7. Pinterest: Pinterest does not provide an option to change the font size within the app or website. However, you can use the screen zoom or text size settings of your device to increase the font size of all apps, including Pinterest.
While social media platforms might not offer extensive font size customization options, you can still enhance readability by adjusting the display options of your device or using accessibility features.
Adjusting the Font Size in Email Applications
Email applications, whether on desktop or mobile devices, provide options for adjusting the font size to ensure readability and customization. Whether you need to increase the font size for better visibility or prefer a smaller font for a more compact view, here are the steps to adjust the font size in popular email applications.
1. Gmail: In Gmail, open the email you want to read or compose. At the bottom right corner of the email, you will find a settings icon represented by three vertical dots. Click on it and select “Zoom” to increase or decrease the font size of the email contents.
2. Outlook: In Microsoft Outlook, adjust the font size by going to the “File” tab and selecting “Options.” From there, navigate to the “Mail” section and click on “Stationery and Fonts.” You can customize the font size by selecting the desired settings under the “Font” section.
3. Apple Mail: In Apple Mail, open the email you want to read or compose. From the top menu, click on “View” and select “Customize Toolbar.” Drag the “Zoom” button to the toolbar. Click on the “Zoom” button to adjust the font size of the email contents.
4. Thunderbird: In Mozilla Thunderbird, adjust the font size by going to “Tools” and selecting “Options.” From there, navigate to the “Display” section and click on “Fonts.” You can customize the font size by selecting the desired settings for “Fonts & Colors.”
5. Mobile Email Applications: On mobile devices, email applications often provide options to adjust the font size within the app’s settings menu. Open the app and look for settings related to display, appearance, or text size. Adjust the font size settings to your preferred size.
By following these steps, you can easily adjust the font size in your preferred email application, ensuring that you can comfortably read and compose emails.
Modifying the Font Size in Messaging Apps
Messaging apps provide users with various options for modifying the font size to personalize their messaging experience. Whether you want to increase the font size for better visibility or prefer a smaller size for a more compact view, here are the steps to modify the font size in popular messaging apps.
1. WhatsApp: In WhatsApp, open the app and go to “Settings” by tapping on the three dots in the top right corner. Then, select “Chats” and navigate to “Font size.” Here, you can choose to increase or decrease the font size for your messages.
2. Facebook Messenger: In Facebook Messenger, open the app and tap on your profile picture in the top left corner. From there, go to “Settings & Privacy” and select “Settings.” In the “Chat Settings” section, you can adjust the font size by tapping on “Text Size” and selecting the desired size.
3. Apple iMessage: In Apple iMessage, you can change the font size through your device’s settings. Go to “Settings,” then tap on “Display & Brightness.” From there, you can select “Text Size” and adjust the font size using the slider provided.
4. Google Messages: In Google Messages, open the app and tap on the three dots in the top right corner to access the menu. Go to “Settings” and select “Font size.” You can then adjust the font size to your preference by selecting the desired option.
5. Signal: In Signal messaging app, open the app and tap on your profile picture in the top left corner. From there, go to “Appearance” and select “Choose Font Size.” You can then adjust the font size by selecting the desired size.
It’s important to note that font size options may vary among messaging apps and across different operating systems. Make sure to explore the app’s settings to find the font size adjustment options available to you.
By following these steps, you can easily modify the font size in your preferred messaging app, allowing for a personalized and comfortable messaging experience.
Changing the Font Size on Streaming Services
Streaming services offer a wide range of entertainment options, but they also provide ways to adjust the font size to enhance the viewing experience. Whether you want to increase the font size for better readability or decrease it for a more immersive experience, here are the steps to change the font size on popular streaming services.
1. Netflix: Netflix allows you to customize the font size within its app. Open the Netflix app and go to “Settings” by tapping on the profile icon in the top right corner. Select “Account” and then choose “Profile & Parental Controls.” Under your profile, click on “Subtitle appearance.” Here, you can change the font size along with other subtitle settings.
2. Amazon Prime Video: Amazon Prime Video offers font customization options for its subtitles. Open the Amazon Prime Video app and go to “Settings” by tapping on the profile icon. From there, select “Language & Captions” and navigate to “Subtitles.” You can customize the font size along with other subtitle settings.
3. Hulu: Hulu allows you to adjust the font size for subtitles on its platform. Open the Hulu app and go to “Settings” by tapping on the profile icon. Select “Accessibility” and toggle on the “Increase Subtitle Size” option. This will increase the font size of the subtitles.
4. Disney+: Disney+ has customization options for subtitles, including font size. Open the Disney+ app and go to “Settings” by tapping on the profile icon. From there, select “Language,” and then choose “Subtitle Preferences.” Here, you can adjust the font size along with other subtitle settings.
5. HBO Max: HBO Max offers font customization features for its subtitles. In the HBO Max app, tap on the profile icon and select “Settings.” From there, choose “Accessibility” and toggle on the “Subtitles – Customize” option. Here, you can adjust the font size along with other subtitle settings.
Remember that font size customization options may vary among streaming services and across different devices. Explore the settings or accessibility options in your preferred streaming service to find the font size adjustment tools available to you.
By following these steps, you can easily change the font size on your preferred streaming service, ensuring a more comfortable and enjoyable viewing experience.
Adjusting the Font Size on Gaming Platforms
Gaming platforms offer a variety of options for adjusting the font size to enhance the gaming experience, particularly for in-game menus, dialogue boxes, and subtitles. Whether you want to increase the font size for better readability or decrease it for a more immersive experience, here are the steps to adjust the font size on popular gaming platforms.
1. PC Gaming: If you’re playing games on your PC, you can often adjust the font size within the game settings or through the display settings of your operating system. In the game settings, look for a “Display” or “Graphics” section where you can customize the font size. Alternatively, you can adjust the overall display scaling in your computer’s display settings to increase or decrease the size of all on-screen text.
2. PlayStation: On PlayStation consoles, you can adjust the font size for in-game texts and subtitles. Go to the “Settings” menu on your PlayStation home screen and navigate to “Accessibility.” From there, you can find options to adjust the system font size or customize subtitles to make the text larger and more readable as per your preference.
3. Xbox: Xbox consoles also provide options to adjust the font size for improved readability. On your Xbox home screen, go to “Settings” and select “Ease of Access.” Under the “Display & sound” section, you can find options to adjust text size and customize subtitle settings.
4. Nintendo Switch: Nintendo Switch offers limited options for adjusting the font size within games. Some games may provide font size customization directly within their settings, while others rely on the system-wide settings. To access the system-wide settings, go to the “System Settings” from your home screen, select “System,” and navigate to “Zoom.” From there, you can enable or adjust the zoom feature, which increases the size of all on-screen text.
It’s important to note that font size customization options may vary among game titles and platforms. In some cases, developers may not provide explicit options to adjust the font size. However, you can still explore system-wide accessibility settings to find options for improving visual accessibility that may indirectly affect font size.
By following these steps, you can easily adjust the font size on your gaming platform, ensuring better readability and a more enjoyable gaming experience.
Troubleshooting Font Size Issues
Font size issues can occasionally occur across various devices, applications, and platforms. If you’re experiencing problems with font sizes that are too small, too large, or inconsistent, here are some troubleshooting steps you can take to address the issues.
1. Device Settings: Check the display settings on your device. Increase or decrease the overall font size in the device settings to see if it affects the font size in the application or platform that you’re using. Adjusting the device’s font size settings can have a system-wide impact.
2. Application or Platform Settings: Explore the settings within the specific application or platform you’re using. Look for options related to font size, text display, or accessibility. Adjusting these settings can help you customize the font size according to your preferences.
3. Zoom or Magnifier Tools: If the font size is still small despite adjusting settings, try using the zoom or magnifier tools available on your device. These features allow you to zoom in on the screen, making the text larger and more readable.
4. Accessibility Options: Utilize the accessibility options provided by your device or application. Many devices and applications offer accessibility features specifically designed for users with visual impairments. These features may include options to enlarge text, change font styles, or adjust contrast for improved readability.
5. Display Resolution: Check your display resolution. If the resolution is set too high, it may make the font appear smaller. Adjusting the resolution to a more suitable level can help improve the readability of the text on your screen.
6. Clear Cache/Data: In some instances, font size issues can be resolved by clearing the cache or data of the application or platform. This can help refresh the settings and potentially resolve any glitches that may be causing font size problems.
7. Update Software: Ensure that your device’s operating system and the application or platform you’re using are up to date. Developers often release updates that address bugs and improve user experience, including font size issues.
If your font size issues persist despite trying these troubleshooting steps, it may be worth reaching out to customer support or seeking assistance from technical forums or communities dedicated to the specific device, application, or platform you’re using. They can provide further guidance and help resolve the font size problems you’re encountering.