
Why Change Mouse Speed or Sensitivity?
When it comes to using a computer, the mouse is an essential tool for navigating and interacting with the interface. However, not everyone may be satisfied with the default settings for mouse speed or sensitivity. There are several reasons why someone might want to change these settings to better suit their preferences or needs.
One of the main reasons to adjust mouse speed is personal comfort. People have different preferences when it comes to how fast or slow they want their cursor to move across the screen. Some users may find the default speed to be too sluggish, while others might find it too fast for precise control. By changing the mouse speed, individuals can fine-tune it to a level that feels most comfortable and natural to them.
Another motivation to modify mouse sensitivity is to improve productivity and efficiency. Fine-tuning the sensitivity settings allows users to have more control over the cursor’s movement, which can lead to faster and more accurate navigation. This is particularly important for tasks that require precision, such as graphic design or video editing. By adjusting the sensitivity, users can reduce the distance the mouse needs to move to reach specific elements on the screen, which can help save time and effort.
Furthermore, adjusting mouse speed or sensitivity can also be beneficial for individuals with physical limitations or disabilities. For example, someone with a motor impairment may find it difficult to move the mouse swiftly or accurately at the default settings. By customizing the speed or sensitivity, they can make the necessary adjustments to accommodate their specific needs and enhance their overall user experience.
Whether you’re seeking comfort, productivity, or accessibility, the ability to change mouse speed or sensitivity offers a valuable solution. By tailoring these settings to your preferences, you can optimize your interaction with the computer and have a more enjoyable and efficient user experience.
Mouse Speed vs Mouse Sensitivity: What’s the Difference?
When it comes to adjusting the settings for your mouse, you may come across terms like “mouse speed” and “mouse sensitivity.” While these terms are often used interchangeably, they actually refer to slightly different aspects of your mouse’s performance.
Mouse speed refers to how fast the cursor moves across the screen when you move the physical mouse. It determines the distance the cursor travels in relation to the physical movement of your mouse. Increasing the mouse speed will make the cursor move more quickly, while decreasing it will slow down the cursor’s movement.
On the other hand, mouse sensitivity refers to how responsive the mouse is to your physical movements. It affects how the cursor reacts to your mouse movements, particularly the small and subtle ones. Higher sensitivity means that even slight movements of your mouse will result in a significant cursor movement on the screen, while lower sensitivity requires more substantial mouse movements to achieve the same cursor movement.
In practical terms, adjusting the mouse speed is useful for controlling the cursor’s overall movement across the screen, allowing you to set a comfortable and appropriate speed for your needs. If you find that the cursor moves too slowly or too fast for your liking, adjusting the mouse speed can rectify the issue.
On the other hand, tweaking the mouse sensitivity is more relevant for tasks that require precision and accuracy, such as graphic design or gaming. It allows you to fine-tune the responsiveness of the cursor to match your desired level of control. Increasing the sensitivity can make the cursor more responsive to subtle movements, which is ideal for precise tasks. Conversely, lowering sensitivity can help reduce overreactions or erratic cursor movements.
How to Change Mouse Speed on Windows
Changing the mouse speed on Windows is a simple process that allows you to customize the cursor’s movement according to your preferences. Follow these steps to adjust the mouse speed:
- Open the Control Panel by typing “Control Panel” in the Windows Search bar and selecting the corresponding result.
- In the Control Panel, navigate to the “Hardware and Sound” category and click on “Mouse.”
- In the Mouse Properties window that appears, go to the “Pointer Options” tab.
- Under the “Motion” section, you will find a slider labeled “Select a pointer speed.” Moving the slider to the right will increase the mouse speed, while moving it to the left will decrease it. You can adjust the speed by moving the slider and checking the preview cursor movement in the box below.
- Once you have found the desired speed, click “Apply” and then “OK” to save the changes.
By following these steps, you can easily tweak the mouse speed on your Windows system to better match your preferences. Experimenting with different levels of speed will help you find the optimal setting that feels comfortable and responsive to your mouse movements.
Note that some advanced mice, such as gaming mice or specific models, may have additional software that allows further customization of the mouse speed. If you have such a mouse, it’s advisable to refer to the manufacturer’s instructions or software for more detailed customization options.
How to Change Mouse Sensitivity on Windows
Adjusting the mouse sensitivity on Windows can greatly improve your control and precision when using the mouse. If you find that the cursor is either too responsive or not responsive enough to your movements, here’s how you can change the mouse sensitivity:
- Open the Control Panel by typing “Control Panel” in the Windows Search bar and selecting the corresponding result.
- In the Control Panel, navigate to the “Hardware and Sound” category and click on “Mouse.”
- In the Mouse Properties window that appears, go to the “Pointer Options” tab.
- Under the “Motion” section, you will find a slider labeled “Select a pointer speed.” This controls the mouse speed, not the sensitivity.
- To adjust the mouse sensitivity, you need to enable the “Enhance pointer precision” option located just below the slider.
- Once the option is enabled, you can fine-tune the mouse sensitivity by moving the slider labeled “Pointer Speed.”
- Move the slider to the right to increase the sensitivity or to the left to decrease it. As you adjust the sensitivity, you can check the preview cursor movement in the box below.
- When you have found the desired sensitivity level, click “Apply” and then “OK” to save the changes.
By following these steps, you can easily modify the mouse sensitivity on your Windows system to match your preferences. Increasing the sensitivity can make the cursor respond more quickly to your movements, while decreasing it can make the cursor less sensitive for more precise control.
It’s worth noting that some mice may come with additional software or drivers that provide more advanced settings for sensitivity customization. If you have such a mouse, you may want to consult the manufacturer’s instructions or software for more extensive sensitivity options and customization features.
How to Change Mouse Speed on Mac
If you’re using a Mac and want to adjust the mouse speed to your liking, you can easily do so through the System Preferences. Follow these steps to change the mouse speed on your Mac:
- Click on the Apple menu located in the top-left corner of your screen and select “System Preferences” from the drop-down menu.
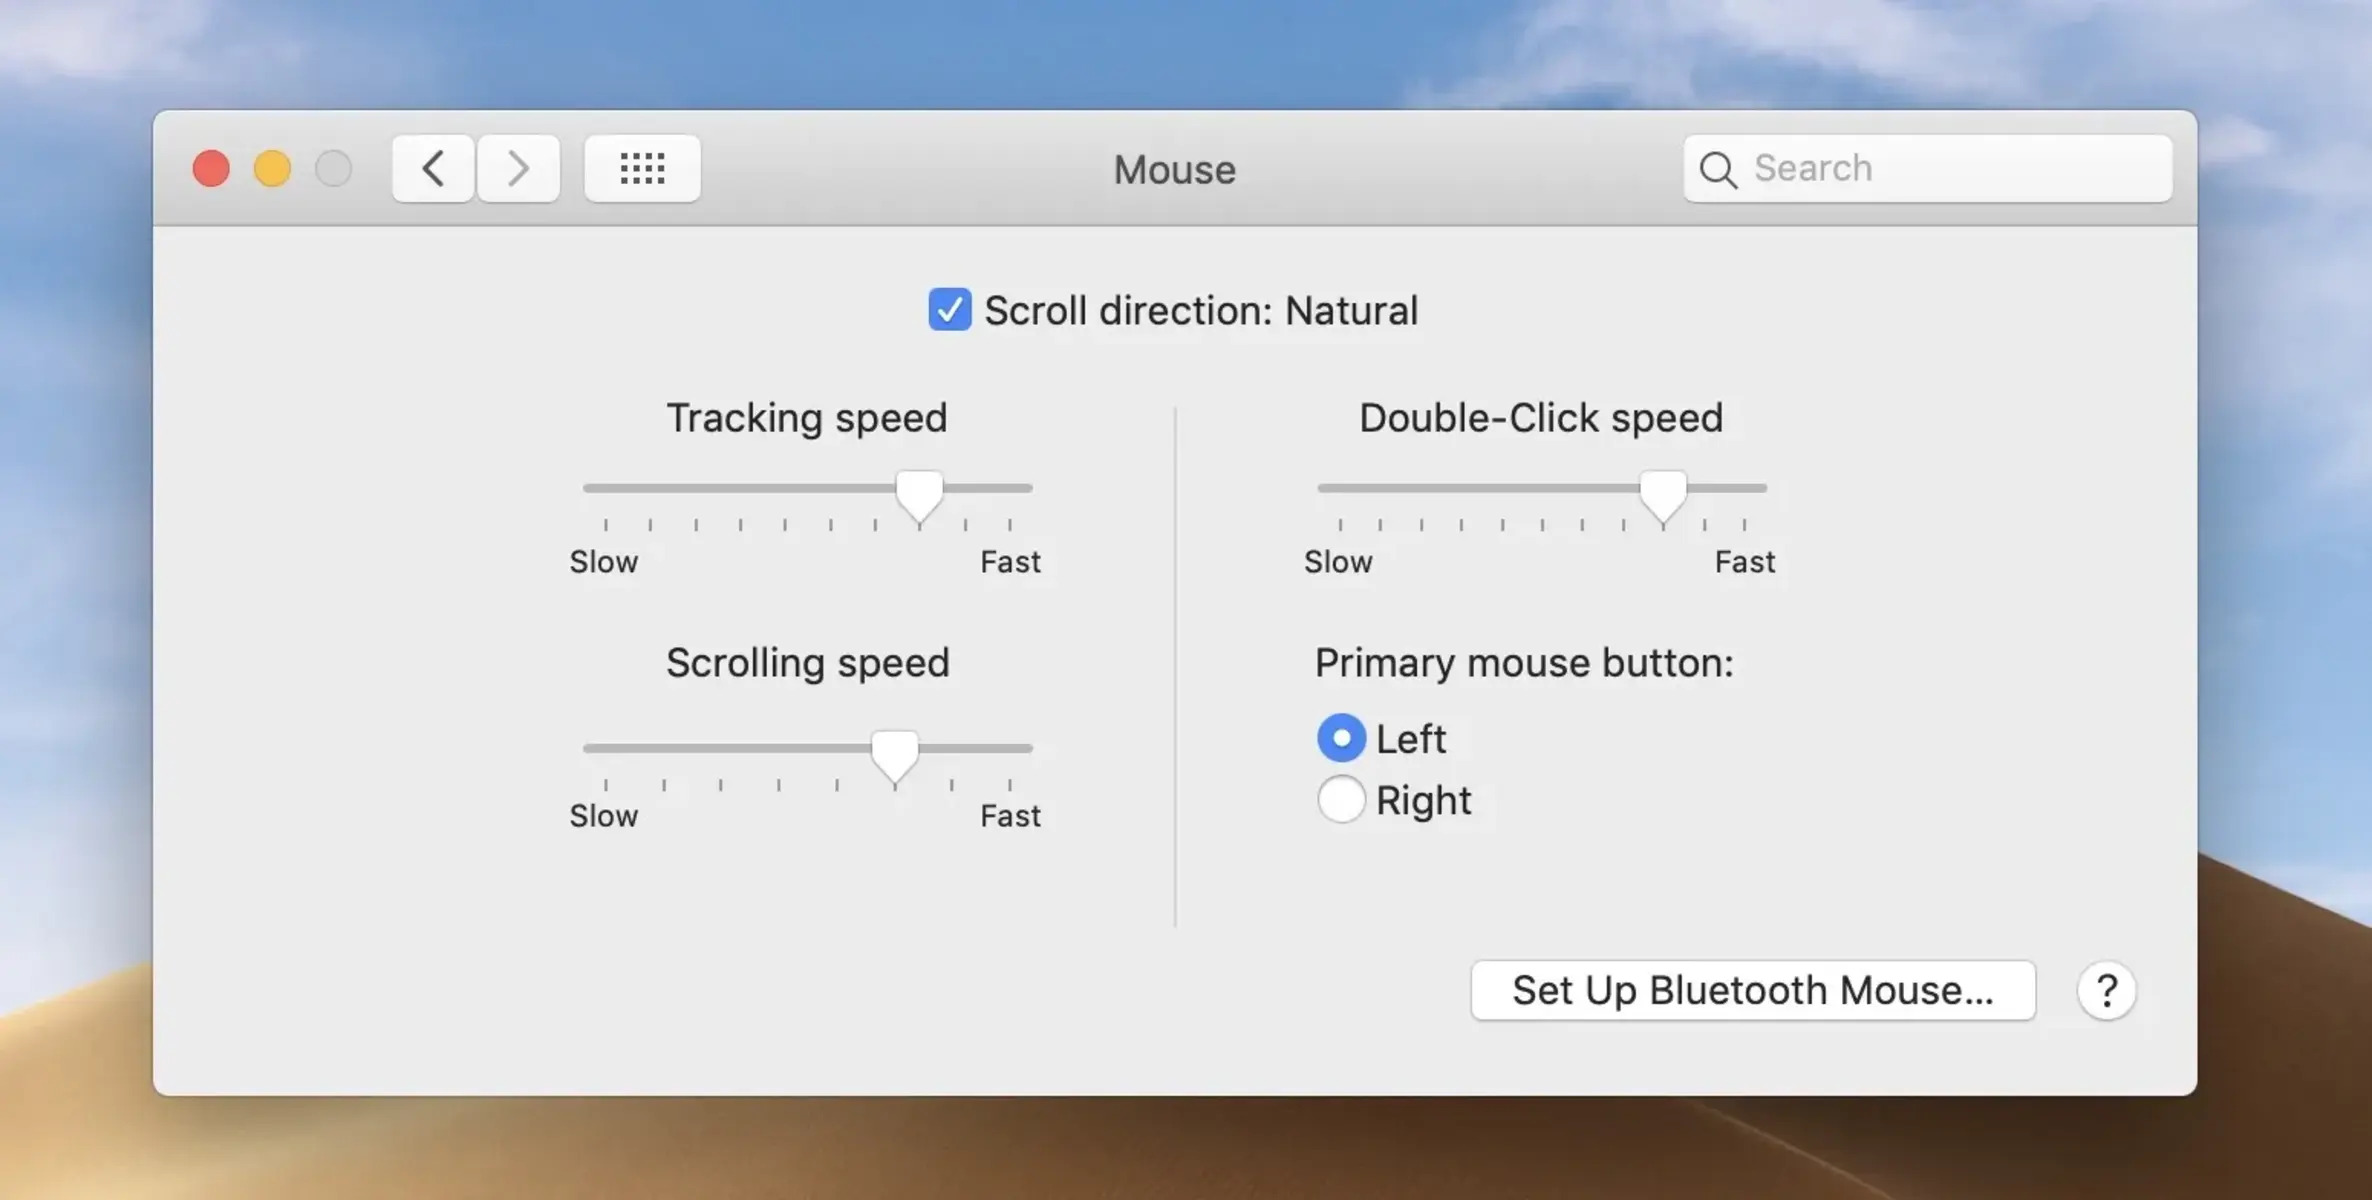
- In the System Preferences window, click on the “Mouse” icon.
- In the Mouse preferences pane, you’ll see a slider labeled “Tracking Speed.” Moving the slider to the right will increase the mouse speed, while moving it to the left will decrease it.
- As you adjust the slider, you can test the cursor movement in the box provided to the right of the slider to see the changes in real-time.
- Experiment with different speeds until you find the one that suits your preferences.
Once you’re satisfied with the mouse speed, simply close the System Preferences window. Your new settings will be applied immediately.
It’s important to note that the default settings on a Mac usually provide a great balance in terms of mouse speed. However, individual preferences may vary, and that’s where the flexibility to adjust the speed comes in handy.
If you’re using a mouse with additional buttons or programmable features, you may have more customization options available through the mouse’s software or drivers. Check the manufacturer’s instructions or website for more information on advanced customization settings.
How to Change Mouse Sensitivity on Mac
If you’re using a Mac and want to fine-tune the mouse sensitivity for smoother cursor control, you can do so easily via the System Preferences. Here’s a step-by-step guide on how to change the mouse sensitivity on your Mac:
- Click on the Apple menu in the top-left corner of your screen and select “System Preferences” from the drop-down menu.
- In the System Preferences window, click on the “Accessibility” icon.
- In the left sidebar, select “Pointer Control.”
- In the Pointer Control preferences pane, you’ll find a slider labeled “Mouse & Trackpad Speed.” Moving the slider to the right will increase the mouse sensitivity, while moving it to the left will decrease it.
- As you adjust the slider, you can test the cursor movement in the box provided to see the changes in real-time.
- Continue adjusting the slider until you reach the desired sensitivity that feels most comfortable and responsive for your needs.
Once you’re satisfied with the mouse sensitivity, simply close the System Preferences window. Your new settings will take effect immediately.
It’s important to note that the default mouse sensitivity settings on a Mac are typically set to a level that provides a good balance for most users. However, everyone has different preferences and requirements, so customizing the sensitivity can enhance your overall user experience.
If you’re using a third-party mouse with additional buttons or features, you might have more customization options available through the mouse’s software or drivers. Refer to the manufacturer’s instructions or website for more information on advanced sensitivity settings specific to your mouse model.
Adjusting Mouse Speed and Sensitivity for Gaming
When it comes to gaming, having precise control over your mouse is crucial for accurate aiming, quick reflexes, and smooth movements. To optimize your gaming experience, it’s important to adjust both the mouse speed and sensitivity to suit your gaming style and preferences. Here’s how you can do it:
Mouse Speed:
Mouse speed refers to how fast the cursor moves across the screen in relation to the physical movement of your mouse. In gaming, having the right mouse speed can greatly impact your ability to track targets and react swiftly. Here are a few steps to adjust the mouse speed:
- Open the settings specific to your gaming mouse, either through the manufacturer’s software or drivers.
- Look for an option to adjust the mouse speed or DPI (Dots Per Inch). DPI refers to the sensitivity of the mouse and generally correlates to the mouse speed. Increasing the DPI value will increase the mouse speed, while reducing it will slow it down.
- Experiment with different DPI settings to find one that feels comfortable for you. It’s often recommended to start with a lower DPI and gradually increase it until you reach a level that provides the desired speed without sacrificing control.
Mouse Sensitivity:
In gaming, mouse sensitivity determines how responsive the cursor is to your physical movements. Finding the right sensitivity level can result in accurate and smooth aim, getting that edge in fast-paced games. Here’s how you can adjust the mouse sensitivity:
- Access the settings of your gaming mouse, either through the manufacturer’s software or drivers.
- Look for an option to adjust the mouse sensitivity. This may be labeled as sensitivity, acceleration, or something similar.
- Start with a moderate sensitivity setting and test it out in your game. If you find that your movements are not translating well or are too twitchy, gradually decrease the sensitivity. Conversely, if your movements feel sluggish or unresponsive, increase the sensitivity until you find a sweet spot.
Remember that finding the optimal mouse speed and sensitivity for gaming may require some trial and error. Each game and player preference can vary, so it’s essential to experiment and find what works best for you.
Additionally, some gaming mice come with additional features such as adjustable weights or customizable profiles. These features allow even more fine-tuning to suit your gaming needs. Take advantage of these options if your mouse has them and leverage them to further enhance your gaming performance.
Troubleshooting Mouse Speed or Sensitivity Issues
While adjusting the mouse speed and sensitivity can greatly enhance your user experience, sometimes you may encounter issues or unexpected behavior. Here are a few troubleshooting steps to resolve common mouse speed or sensitivity issues:
1. Check for driver and software updates:
If you’re experiencing problems with your mouse speed or sensitivity, it’s a good idea to ensure that you have the latest drivers and software installed. Visit the manufacturer’s website to check for any available updates, as they may include bug fixes or improvements that could address the issues you’re facing.
2. Clean your mouse and mouse pad:
Dirt, dust, and debris can affect the performance of your mouse, leading to inaccurate tracking or erratic behavior. Clean the mouse’s sensor and the surface of your mouse pad regularly using a soft cloth or a specialized cleaning solution. This can help improve the overall accuracy and responsiveness of your mouse.
3. Adjust the surface and lighting conditions:
The surface and lighting conditions can inadvertently affect the performance of your mouse. Ensure that you’re using a suitable mouse pad or surface that provides consistent tracking. Additionally, check the lighting conditions in your environment, as excessive glare or bright lights could interfere with the mouse’s optical or laser sensors.
4. Try different USB ports:
If you’re using a wired mouse, try connecting it to different USB ports on your computer. Sometimes, certain USB ports may not provide sufficient power or communication for optimal mouse performance. By switching ports, you can troubleshoot whether the issue lies with a specific port.
5. Replace the batteries (for wireless mice):
If you’re using a wireless mouse and experiencing speed or sensitivity issues, it may be time to replace the batteries. Low battery levels can lead to reduced responsiveness and inconsistent performance. Swap out the old batteries for fresh ones and see if it resolves the problem.
6. Check for conflicting software:
In some cases, other software running on your computer can interfere with the mouse’s performance. Check for any programs or utilities that may affect the mouse settings and temporarily disable them to see if it resolves the problem. Additionally, make sure that no accessibility features or settings are conflicting with your desired mouse speed or sensitivity.
If the issue persists despite trying these troubleshooting steps, it may be worth contacting the mouse’s manufacturer for further assistance or considering a replacement if the mouse is faulty.