
Understanding File Associations
When you double-click on a file in Windows, it typically opens in a specific program that has been assigned to handle that type of file. This association between file types and programs is known as a file association.
File associations play a crucial role in determining how files are opened and handled on your computer. Each file type has a unique file extension, such as .docx for Microsoft Word documents or .jpg for image files. These extensions help Windows identify the file type and direct it to the appropriate program.
For example, if you have a file with a .docx extension, Windows will automatically associate it with Microsoft Word. So, when you double-click on the file, it will open in Word by default. Similarly, if you have an image file with a .jpg extension, Windows will associate it with an image viewer or editor.
It’s important to note that file associations are not limited to specific file types. They can also be applied to specific protocols or actions. For instance, you can associate an email program with the “mailto” protocol to open email links directly in that program.
Understanding file associations is essential because it allows you to control how different files are opened and handled on your computer. By changing file associations, you can choose which programs should be used to open specific file types or perform certain actions.
Now that you have a basic understanding of file associations, let’s explore why you might want to change them in the next section.
Why Change File Associations?
Changing file associations can be a useful task for several reasons. Here are some common scenarios in which you might want to change file associations on your Windows computer:
- Preferred Programs: You may have installed a new program that you prefer to use for opening specific file types. By changing the file associations, you can ensure that these file types open in your preferred program by default.
- Incompatibility: Sometimes, you may encounter a situation where a file type is associated with a program that doesn’t handle it correctly or doesn’t support all its features. By changing the file association to a more compatible program, you can ensure smooth and error-free handling of files.
- Customization: Changing file associations allows you to customize how your computer handles different files and actions. For example, you can associate a video player of your choice with all video file types, or set a specific web browser as the default for opening web links.
- Workflows and Efficiency: By changing file associations, you can streamline your workflow and improve efficiency. For example, if you work with multiple file formats, associating each file type with a specific program can save you time by eliminating the need to manually open files in the desired program every time.
- Security and Privacy: Changing file associations can also play a role in enhancing computer security and privacy. For instance, if you want to open potentially risky file types, such as executable files (.exe), you can associate them with a virus scanner to ensure they are checked for threats before opening.
By understanding the reasons for changing file associations, you can make informed decisions about which associations to modify and how it can benefit your computing experience.
Changing File Associations through the Default Apps Settings
Windows provides a straightforward way to change file associations through the Default Apps settings. Here’s how you can do it:
- Click on the “Start” button and select “Settings” (the gear icon).
- In the Settings window, select “Apps.”
- In the left sidebar, click on “Default apps.”
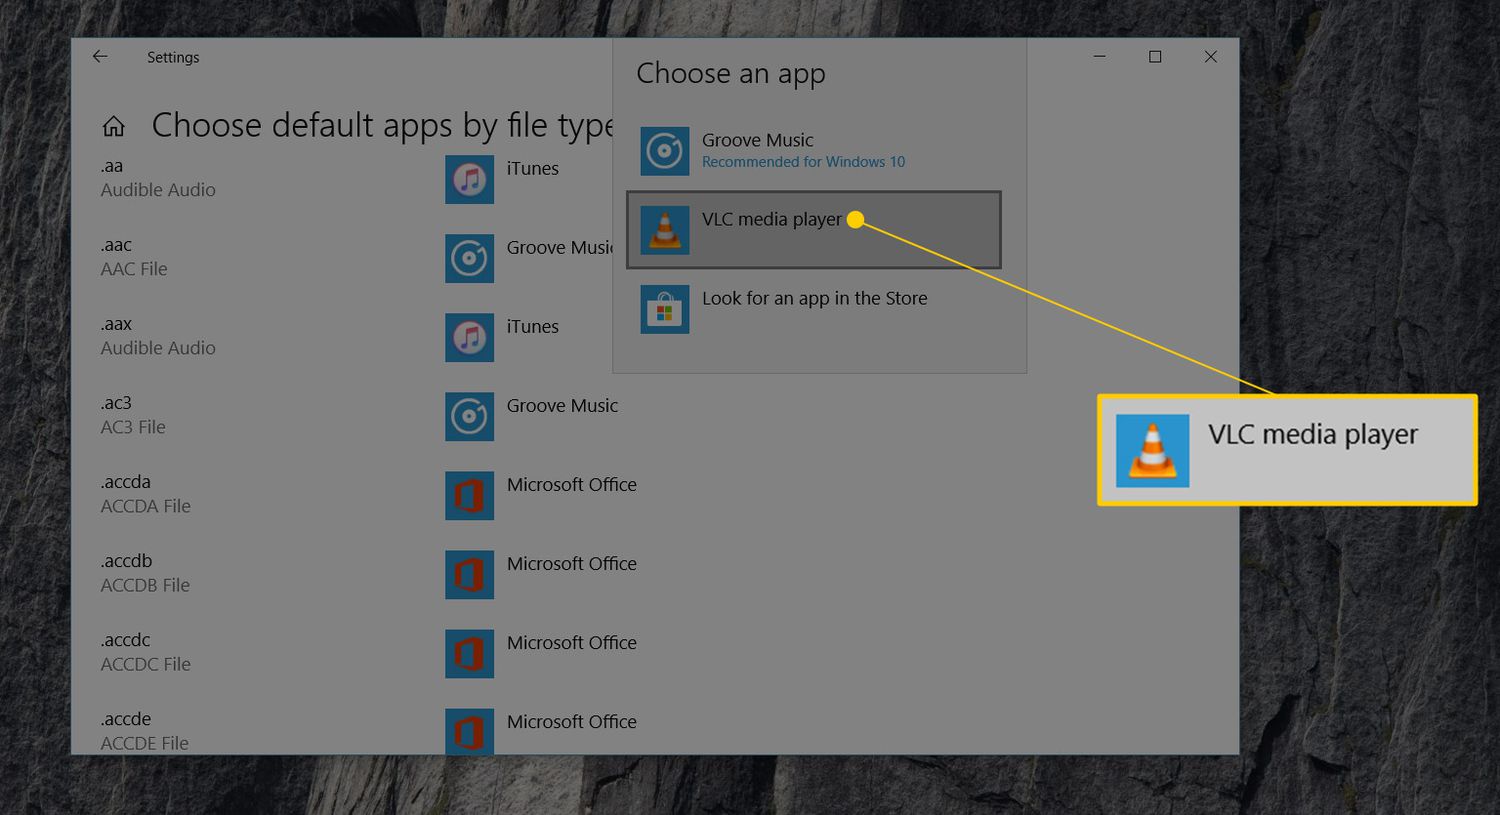
- Scroll down and click on “Choose default apps by file type.”
- A list of file extensions and their current associated programs will be displayed. Scroll through the list or use the search bar to locate the file type you want to change.
- Click on the currently associated program, and a menu will appear with a list of available programs.
- Select the program you want to associate with the file type. If your desired program is not listed, click on “More apps” and choose from the list or click on “Look for another app on this PC” to manually locate the program’s executable file.
- After selecting the desired program, the file type will now be associated with it.
By following these steps, you can easily change file associations through the Default Apps settings in Windows. Remember that any changes you make here will apply system-wide, affecting how the file type is handled by default on your computer.
Next, let’s explore another method to change file associations through the Control Panel.
Changing File Associations through the Control Panel
If you prefer to use the Control Panel to change file associations in Windows, follow these steps:
- Open the Control Panel by searching for it in the Windows search bar or accessing it through the Start menu.
- In the Control Panel, select “Default Programs.”
- Click on “Set your default programs.”
- A list of installed programs will be displayed. Scroll through the list or use the search bar to locate the program you want to associate with a file type.
- Select the desired program from the list, and then click on “Set this program as default” to set it as the default program for all associated file types.
- If you want to associate only specific file types with the selected program, click on “Choose defaults for this program.”
- A list of file extensions and protocols will be shown. Check the box next to each file type or protocol you want to associate with the program, and then click on “Save.”
The selected program will now be associated with the chosen file types or protocols, as configured through the Control Panel.
Using the Control Panel provides another method to change file associations on your Windows computer. It offers flexibility in customizing which programs are associated with specific file types, allowing you to personalize your computing experience.
Next, we’ll explore an alternative way to change file associations by leveraging the File Properties menu.
Changing File Associations through the File Properties Menu
The File Properties menu in Windows provides a convenient way to change file associations for individual files. Here’s how you can do it:
- Locate the file for which you want to change the file association.
- Right-click on the file and select “Properties” from the context menu.
- In the Properties window, navigate to the “General” tab.
- Under the “General” tab, you will find the “Opens with” section, displaying the currently associated program for the file type.
- Click on the “Change” button next to the associated program.
- A list of available programs will be displayed. Select the program you want to associate with the file type.
- Click “OK” to save the changes and apply the new file association.
By following these steps, you can change the file association for a specific file. This method is particularly useful when you want to associate a different program with a specific file type without changing the default program for all files of that type.
Keep in mind that changing the file association through the File Properties menu only applies to the selected file and won’t affect other files of the same type on your computer.
Now, let’s move on to another method that involves making changes using the Registry Editor.
Changing File Associations through the Registry Editor
Editing the Windows Registry offers a more advanced method to change file associations. Here’s how you can do it:
- Press the Windows key + R on your keyboard to open the Run dialog box.
- Type “regedit” in the Run dialog box and press Enter.
- The Registry Editor window will open. Navigate through the following path:
- Replace “.file_extension” with the actual file extension you want to change the association for. For example, if you want to change the association for .txt files, the path will be
HKEY_CLASSES_ROOT\.txt. - In the right-hand pane, locate the “Default” value. This contains the current file association.
- Right-click on the “Default” value and select “Modify”.
- In the “Value data” field, enter the desired file type association. For example, if you want to associate .txt files with Notepad, enter “Notepad”, or the path to the desired program.
- Click “OK” to save the changes to the Registry.
HKEY_CLASSES_ROOT\.file_extension
By accessing and modifying the Registry Editor, you can directly change the file association for a specific file extension. However, it is important to exercise caution when making changes in the Registry, as incorrect modifications can cause system instability or errors. It is recommended to back up the registry or create a system restore point before proceeding with any changes.
Now that you’ve learned about changing file associations through the Registry Editor, let’s explore how to reset file associations to their default settings.
Resetting File Associations to Default
If you ever want to revert your file associations back to their default settings, Windows provides a built-in option to reset them. Here’s how you can do it:
- Open the Settings menu by clicking on the “Start” button and selecting “Settings” (the gear icon).
- In the Settings window, select “Apps.”
- In the left sidebar, click on “Default apps.”
- Scroll down and click on “Reset to the Microsoft recommended defaults.”
- A confirmation message will appear, informing you that this action will reset all your default apps. Click on “Reset” to proceed.
Windows will then reset all your file associations to their default settings, meaning each file type will be associated with the Microsoft-recommended program or app.
It’s worth noting that resetting file associations to default will affect all file types on your computer, so any customizations you have made will be reverted. Make sure to back up any necessary settings or preferences before performing a reset.
Resetting file associations is a useful option if you’ve made multiple changes and want to start fresh with the original default settings.
That concludes our exploration of how to change and reset file associations in Windows. Whether you want to associate specific file types with preferred programs, ensure compatibility, or customize your workflow, understanding and effectively managing file associations can enhance your computing experience.