
What is the HOSTS file?
The HOSTS file, also known as the host file, is a plain-text file in your computer’s operating system that maps hostnames to IP addresses. It acts as a local DNS (Domain Name System) resolver, allowing you to manually override the DNS resolution for specific domain names. When you try to access a website, your computer first checks the HOSTS file to see if there is a specific IP address associated with the domain name you are trying to reach. If there is a match, your computer will use that IP address to connect to the website, bypassing the DNS lookup process.
The HOSTS file is an essential component of the networking infrastructure on your computer. It is present in various operating systems, including Windows, macOS, and Linux. However, the file path and format may differ between operating systems. In this article, we will focus on editing the HOSTS file in Windows.
The primary purpose of the HOSTS file is to associate IP addresses with domain names. This enables you to access websites or services using a memorable hostname, rather than a complex numerical IP address. Additionally, the HOSTS file can be used to block access to specific websites by redirecting their domain names to a different IP address, such as the loopback address (127.0.0.1), which effectively prevents your computer from reaching the blocked site.
The HOSTS file can also be utilized for local development and testing purposes. By adding entries to the file, you can create custom mappings between domain names and IP addresses on your local machine. This can be useful when working on web development projects, allowing you to test how your website behaves when accessed through a specific domain name without modifying DNS settings or accessing the real internet.
Why would you want to edit the HOSTS file?
Editing the HOSTS file can be a powerful tool for various reasons. Here are a few common scenarios where you might want to modify the HOSTS file on your Windows computer:
- Website Blocking: The HOSTS file allows you to block access to specific websites. By redirecting their domain names to an invalid or loopback address, you can prevent your computer from reaching those sites. This can be useful for blocking distracting or harmful websites, protecting yourself and others from accessing inappropriate content, or preventing access to known malicious domains.
- Website Redirection: You can use the HOSTS file to redirect domain names to different IP addresses. This can be practical for testing purposes or when you want to access a specific version of a website that is hosted on a different server or location.
- Local Development: When working on web development projects, you may need to test websites using custom domain names before they are live. By adding entries to the HOSTS file, you can map domain names to your local machine’s IP address, allowing you to access your website using a desired hostname without modifying DNS settings.
- Network Troubleshooting: In some cases, editing the HOSTS file can help resolve issues related to domain name resolution. By adding an entry with the correct IP address for a troublesome website, you can bypass DNS lookup problems and establish a connection to the site.
- Privacy and Security: By editing the HOSTS file, you can enhance your privacy and security by blocking access to certain websites or preventing your computer from communicating with known malicious servers.
It is important to note that editing the HOSTS file requires administrative privileges on your Windows computer. This is to ensure the file’s integrity and prevent unauthorized modifications. Always exercise caution when modifying the HOSTS file and make sure you have a backup before making any changes.
Locating the HOSTS file in Windows
In Windows, the HOSTS file is located in the “C:\Windows\System32\drivers\etc” directory. This is the default location for the file, and it can be accessed using the File Explorer or Command Prompt. Here are the steps to locate the HOSTS file in Windows:
- Open File Explorer by pressing the Windows key + E on your keyboard.
- Navigate to the “C:\Windows\System32\drivers\etc” directory.
- You will find various files in the directory, including the HOSTS file named “hosts”.
- Click on the HOSTS file to select it.
- Right-click the selected file and choose “Open with” from the context menu.
- Select a text editor, such as Notepad or Notepad++, to open the HOSTS file.
Alternatively, you can use the Command Prompt to access the HOSTS file. Here’s how:
- Press the Windows key + R to open the Run dialog box.
- Type “cmd” and press Enter to open the Command Prompt.
- In the Command Prompt window, type “cd C:\Windows\System32\drivers\etc” and press Enter to navigate to the directory.
- Finally, type “notepad hosts” and press Enter to open the HOSTS file in Notepad.
Please note that editing the HOSTS file requires administrative privileges. If prompted, confirm the action and provide the necessary permissions to modify the file. Remember to save any changes you make to the HOSTS file before exiting the text editor.
Accessing and editing the HOSTS file
Once you have located the HOSTS file in Windows, you can proceed to access and edit its contents. Here’s how you can do it:
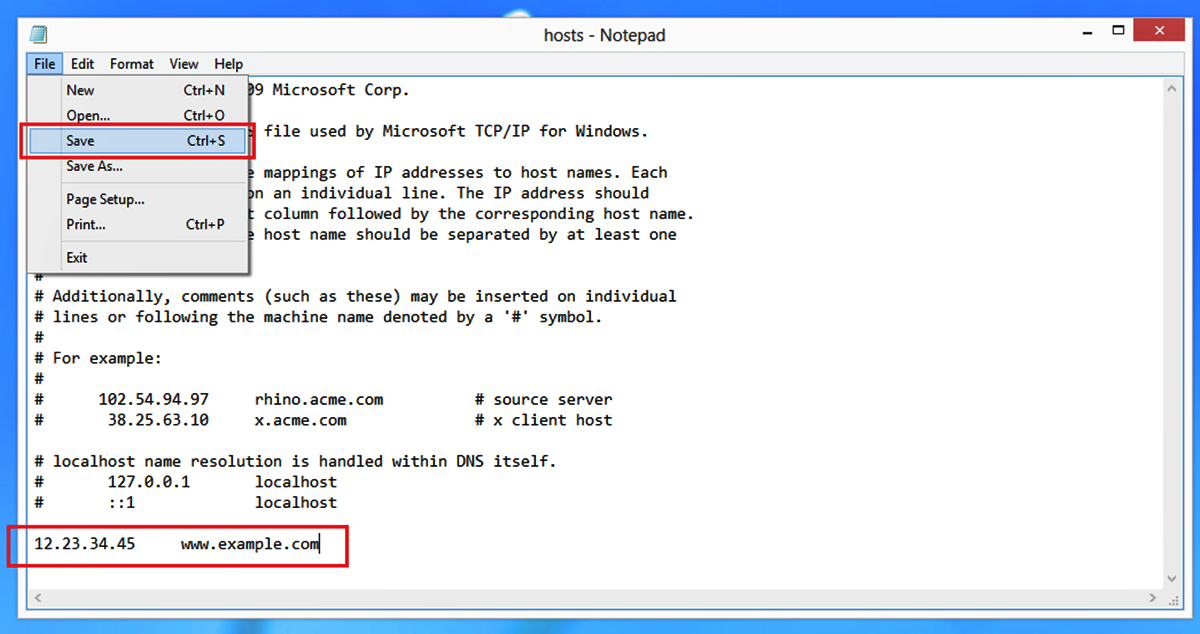
- Open the HOSTS file in a text editor, such as Notepad or Notepad++.
- Review the existing entries in the file. Each entry consists of an IP address followed by one or more domain names, separated by spaces or tabs.
- To add a new entry, go to a new line at the end of the file.
- Enter the desired IP address followed by one or more domain names, separated by spaces or tabs.
- Save the changes to the HOSTS file.
When editing the HOSTS file, there are a few important considerations to keep in mind:
- Format: Each entry in the HOSTS file should be on a separate line. The IP address and domain name(s) should be separated by spaces or tabs.
- Commenting: You can add comments to the HOSTS file by starting a line with the “#” symbol. These comments are for informational purposes and do not affect the functioning of the file.
- IP Address: Ensure that the IP address you add is valid and corresponds to the correct domain(s).
- Order of Entries: The HOSTS file is read from top to bottom, so if there are multiple entries for the same domain name, the entry at the top will take precedence.
- Administrative Privileges: To save changes to the HOSTS file, you need administrative privileges. If prompted, confirm the action and provide the necessary permissions to modify the file.
Remember to use caution when editing the HOSTS file and make sure to save any changes you make before closing the text editor. Test the functionality of the modified entries by accessing the associated domain names in a web browser or using other network-reliant applications.
Adding an entry to the HOSTS file
To add an entry to the HOSTS file in Windows, follow these steps:
- Open the HOSTS file in a text editor with administrative privileges. You can locate the file in the “C:\Windows\System32\drivers\etc” directory.
- Scroll to the bottom of the file to add a new entry.
- On a new line, type the IP address followed by one or more domain names that you want to associate with that IP address. Ensure that there is a space or tab between the IP address and the domain names.
- Save the changes to the HOSTS file.
For example, if you want to add the domain “example.com” and map it to the IP address 192.168.0.100, your entry in the HOSTS file would be:
192.168.0.100 example.com
After saving the changes, any requests to “example.com” from your computer will be directed to the IP address specified in the HOSTS file.
Remember that for the changes to take effect, you might need to flush your DNS cache. This can be done by opening the Command Prompt as an administrator and running the command “ipconfig /flushdns”. This clears the DNS cache and allows your computer to retrieve the updated mapping from the HOSTS file.
It’s important to note that when adding entries to the HOSTS file, they will override the DNS lookup for the specified domain names. This means that your computer will always use the IP address specified in the HOSTS file for those domains, regardless of the actual DNS records associated with them.
Make sure to save a backup of the original HOSTS file before making any changes. This allows you to revert back if needed and ensures that you don’t accidentally remove or modify any essential entries.
Removing an entry from the HOSTS file
If you no longer need an entry in the HOSTS file and want to remove it, follow these steps in Windows:
- Open the HOSTS file in a text editor with administrative privileges. The file is located in the “C:\Windows\System32\drivers\etc” directory.
- Locate the entry in the file that you want to remove.
- Delete the entire line containing the entry.
- Save the changes to the HOSTS file.
For example, if you want to remove the entry mapping the domain “example.com” to the IP address 192.168.0.100, you would delete the following line from the HOSTS file:
192.168.0.100 example.com
After saving the changes, the entry will be removed from the HOSTS file, and your computer will now follow the default DNS resolution process for the specified domain.
Remember that after modifying the HOSTS file, it may take a while for the changes to take effect. If you still see the effects of the removed entry after saving the file, try flushing the DNS cache on your computer. Open the Command Prompt as an administrator and run the command “ipconfig /flushdns” to clear the DNS cache and apply the changes immediately.
It’s important to be cautious when removing entries from the HOSTS file and double-check that you are deleting the correct line. Additionally, make sure to keep a backup of the original HOSTS file in case you need to revert any changes or encounter issues with the modified file.
Common issues and troubleshooting tips
While editing the HOSTS file in Windows, you may encounter some common issues. Here are a few troubleshooting tips to help you resolve them:
- Permissions: Make sure you have the necessary administrative privileges to edit the HOSTS file. Without proper permissions, you may not be able to save changes to the file.
- File format: Ensure that the HOSTS file is saved in plain text format without any file extensions. If you accidentally save it with a different extension, such as “.txt”, it may not function correctly.
- Incorrect syntax: Pay attention to the correct syntax when adding or removing entries from the HOSTS file. Each entry should have an IP address followed by one or more domain names, separated by spaces or tabs.
- Cache issues: After making changes to the HOSTS file, your computer may still use the cached DNS records. To overcome this, clear your DNS cache by running the command “ipconfig /flushdns” in the Command Prompt with administrative privileges.
- Order of entries: Keep in mind that the HOSTS file is read from top to bottom. If there are multiple entries for the same domain name, the first entry will take precedence. Make sure the desired entry is at the top or delete conflicting entries.
- Network connectivity: If you are experiencing issues accessing websites or network services after modifying the HOSTS file, ensure you have a stable internet connection. Check your network settings and try accessing the same websites from different devices to rule out any connectivity issues.
If you encounter persistent issues or are unsure about modifying the HOSTS file, it is recommended to seek assistance from a knowledgeable professional or consult online resources and forums for further guidance specific to your situation.
Remember to proceed with caution when making changes to the HOSTS file and keep a backup of the original file to revert any unintended modifications.
Best practices for editing the HOSTS file
When editing the HOSTS file in Windows, it’s important to follow some best practices to ensure smooth functionality and prevent any unintended issues. Here are some recommended practices to consider:
- Use administrative privileges: Always open and edit the HOSTS file with administrative privileges. This ensures that you have the necessary permissions to modify the file and helps maintain the integrity of your computer’s networking infrastructure.
- Make backups: Before making any changes to the HOSTS file, it’s a good practice to create a backup of the original file. This allows you to revert back to the original state in case of any issues or mistakes.
- Keep the file tidy: Maintain a clean and organized HOSTS file by removing unnecessary entries. This helps improve readability and reduces the chances of conflicts or errors.
- Document your changes: If you make modifications to the HOSTS file, document them for future reference. This can be helpful, especially if you are managing multiple entries or need to troubleshoot any issues that may arise later.
- Verify IP addresses: Double-check the accuracy of IP addresses before adding or modifying entries in the HOSTS file. Using incorrect IP addresses can lead to DNS resolution issues and prevent access to websites or services.
- Regularly review and update: Periodically review the entries in the HOSTS file and update them as needed. Websites may change their IP addresses or you may no longer require certain custom mappings, so it’s important to keep the file up to date.
- Test functionality: After making changes to the HOSTS file, test the functionality by accessing the associated domain names in a web browser or using other network-dependent applications. This ensures that the modified entries are working as expected.
By following these best practices, you can effectively manage the HOSTS file and avoid potential issues or conflicts. Remember that editing the HOSTS file should be done with caution and only if you have a clear understanding of the changes you are making. If you are unsure, consult with a knowledgeable professional for guidance.
Additional resources and tools for managing the HOSTS file
Managing the HOSTS file in Windows can become easier with the help of additional resources and tools. Here are a few recommendations to assist you in effectively managing and maintaining the file:
- Text editors with syntax highlighting: Using a text editor that supports syntax highlighting can greatly improve readability and make it easier to spot errors or inconsistencies in the HOSTS file. Notepad++ and Visual Studio Code are popular choices that offer syntax highlighting for various programming and markup languages.
- HostsMan: HostsMan is a powerful and user-friendly tool that provides a graphical interface for managing the HOSTS file. It allows you to easily add, edit, or remove entries, and provides a backup and restore feature. HostsMan also provides options for enabling or disabling the HOSTS file for an enhanced management experience.
- Hosts File Editor: Hosts File Editor is another tool specifically designed for managing and editing the HOSTS file. It offers an intuitive interface, making it convenient to add, modify, or remove entries. It also allows for searching and grouping of entries, making the management process more efficient.
- Online resources and communities: There are various online resources and communities dedicated to the management and troubleshooting of the HOSTS file. Websites, forums, and discussion boards such as Stack Overflow or online tech communities can be valuable sources of information, tips, and troubleshooting solutions.
- Documentation and guides: Microsoft’s official documentation on managing the HOSTS file for different versions of Windows can provide detailed instructions and information. It is recommended to refer to these resources for specific guidance and understanding of how the HOSTS file works in your specific operating system.
By utilizing these additional resources and tools, you can streamline the process of managing the HOSTS file in Windows. Always remember to exercise caution and make backups before making any changes to ensure the integrity and functionality of your networking environment.