
Why Change DNS Servers?
When it comes to browsing the internet, many users don’t give much thought to the Domain Name System (DNS) servers that translate website URLs into IP addresses. However, the DNS servers you use can have a significant impact on your browsing experience. Here are a few reasons why you might want to consider changing your DNS servers:
- Improved Speed and Performance: The DNS servers provided by your internet service provider (ISP) may not always be the fastest or most efficient. By switching to faster and more reliable DNS servers, you can experience faster webpage loading times and smoother browsing.
- Bypassing Geographic Restrictions: Some DNS servers can help you bypass geographic restrictions imposed by certain websites or streaming platforms. By using DNS servers located in different regions, you can access region-specific content that would otherwise be unavailable to you. This can be particularly useful for accessing streaming services or websites that are region-restricted.
- Enhanced Privacy and Security: The DNS servers provided by your ISP may log your browsing history and could potentially expose your online activities to third parties. By switching to DNS servers that prioritize privacy and security, you can reduce the risk of your data being tracked or intercepted.
- Filtering Unwanted Content: Some DNS servers offer optional content filtering features that can help prevent access to malicious or adult content. This can be particularly useful if you have children or want to maintain a safe and secure browsing environment.
- Reliability and Redundancy: If your ISP’s DNS servers experience service disruptions or become overloaded, you may experience difficulties accessing websites. By configuring alternate DNS servers, you can ensure a backup system is in place to keep your internet connection functioning even if your ISP’s servers encounter issues.
Changing DNS servers in Windows is relatively simple and can be done in just a few steps. In the following sections, we will guide you through the process of changing DNS servers in different versions of Windows, from Windows 10 to Windows XP.
Finding the Best DNS Server for You
With multiple DNS servers available, it’s important to find the one that best meets your needs. Here are a few steps to help you find the right DNS server:
- Research reputable DNS providers: There are several popular DNS providers to choose from, including Google DNS, OpenDNS, Cloudflare, and Comodo Secure DNS. Take the time to research each provider and understand their strengths, such as speed, security features, and privacy policies.
- Consider your priorities: Determine which factors are most important to you. Do you prioritize speed and performance, privacy and security, or content filtering? This will help you narrow down your choice of DNS providers.
- Check for server locations: If you’re aiming to bypass geographic restrictions, ensure that your chosen DNS provider has server locations in the regions you’re interested in accessing.
- Consider user reviews and recommendations: Look for user reviews and recommendations from trusted sources to gain insights into the performance and reliability of different DNS providers.
- Test multiple DNS servers: It’s recommended to test multiple DNS servers to find the one that works best for you. You can do this by changing the DNS server settings on your device and assessing the speed and performance of your internet connection.
Keep in mind that the best DNS server for one person may not necessarily be the best for another. Factors such as your geographical location and internet service provider can also impact the performance of different DNS servers.
Once you’ve identified the DNS server that suits your needs, you can proceed with changing the DNS settings on your Windows operating system. The following sections will provide step-by-step instructions for changing DNS servers in Windows 10, Windows 8/8.1, Windows 7, Windows Vista, and Windows XP.
Changing DNS Servers in Windows 10
If you’re using Windows 10 and want to change your DNS servers, follow these simple steps:
- Open the Network Connections settings: Right-click on the Start button and select “Network Connections” from the context menu.
- Select your active network connection: In the Network Connections window, locate the network connection you’re currently using and right-click on it. Choose “Properties” from the dropdown menu.
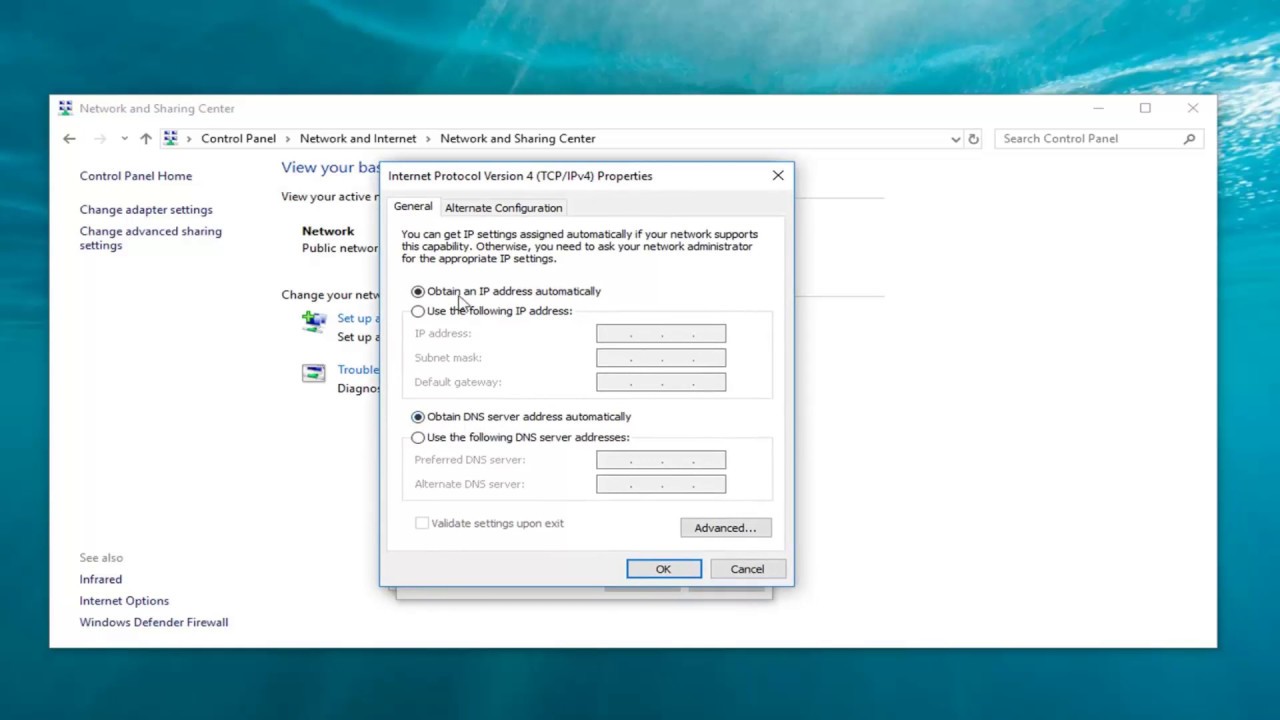
- Access the Internet Protocol Version 4 (TCP/IPv4) properties: In the Properties window, find the “Internet Protocol Version 4 (TCP/IPv4)” option and double-click on it.
- Specify the DNS server addresses: In the Internet Protocol Version 4 (TCP/IPv4) Properties window, select the “Use the following DNS server addresses” option. Enter the preferred and alternate DNS server addresses provided by your chosen DNS provider. If you want to use Google DNS, for example, enter “8.8.8.8” as the preferred DNS server and “8.8.4.4” as the alternate DNS server.
- Save your changes: Click “OK” to save the changes you’ve made to the DNS server settings.
- Flush DNS cache: To ensure that your system starts using the newly configured DNS servers, open the Command Prompt as an administrator and type “ipconfig /flushdns” (without the quotes). Press Enter to execute the command.
- Verify DNS server changes: Open a web browser and visit a website to confirm that the DNS server changes have taken effect. You can also use online tools to check your DNS server configuration.
By following these steps, you can easily change the DNS servers on your Windows 10 device and enjoy the benefits of a faster, more secure, or region-unrestricted browsing experience.
Changing DNS Servers in Windows 8 and 8.1
If you’re using Windows 8 or 8.1 and want to change the DNS servers, you can follow these steps:
- Access the Control Panel: From the Start screen, type “Control Panel,” and click on the Control Panel app in the search results.
- Go to Network and Internet Settings: In the Control Panel window, select “Network and Internet.”
- Open the Network and Sharing Center: In the Network and Internet Settings window, click on “Network and Sharing Center.”
- Access the network connection properties: In the Network and Sharing Center, click on the network connection that you want to change the DNS servers for.
- Open the Properties window: In the Network Connection Status window, click on the “Properties” button.
- Find the Internet Protocol Version 4 (TCP/IPv4) option: In the Wi-Fi Properties or Ethernet Properties window, find the “Internet Protocol Version 4 (TCP/IPv4)” option and double-click on it.
- Specify the DNS server addresses: In the Internet Protocol Version 4 (TCP/IPv4) Properties window, select the “Use the following DNS server addresses” option. Enter the preferred and alternate DNS server addresses provided by your chosen DNS provider. For example, if you want to use OpenDNS, enter “208.67.222.222” as the preferred DNS server and “208.67.220.220” as the alternate DNS server.
- Save the changes: Click “OK” to save the changes you’ve made to the DNS server settings.
- Flush DNS cache: To ensure that your system starts using the newly configured DNS servers, open the Command Prompt as an administrator and type “ipconfig /flushdns” (without the quotes). Press Enter to execute the command.
- Verify DNS server changes: Open a web browser and visit a website to confirm that the DNS server changes have taken effect. You can also use online tools to check your DNS server configuration.
By following these steps, you can change the DNS servers on your Windows 8 or 8.1 device and experience faster, more secure, or region-unrestricted browsing, depending on your chosen DNS provider.
Changing DNS Servers in Windows 7
If you’re using Windows 7 and want to change your DNS servers, you can follow these simple steps:
- Open the Control Panel: Click on the Start button and select “Control Panel” from the menu.
- Go to Network and Internet: In the Control Panel window, select “Network and Internet.”
- Open the Network and Sharing Center: In the Network and Internet window, click on “Network and Sharing Center.”
- Access the network connection properties: In the Network and Sharing Center, click on the active network connection for which you want to change the DNS servers.
- Open the Properties window: In the Network Connection Status window, click on the “Properties” button.
- Find the Internet Protocol Version 4 (TCP/IPv4) option: In the Local Area Connection Properties or Wireless Network Connection Properties window, find the “Internet Protocol Version 4 (TCP/IPv4)” option and double-click on it.
- Specify the DNS server addresses: In the Internet Protocol Version 4 (TCP/IPv4) Properties window, select the “Use the following DNS server addresses” option. Enter the preferred and alternate DNS server addresses provided by your chosen DNS provider. For example, if you want to use Cloudflare DNS, enter “1.1.1.1” as the preferred DNS server and “1.0.0.1” as the alternate DNS server.
- Save your changes: Click “OK” to save the changes you’ve made to the DNS server settings.
- Flush DNS cache: To ensure that your system starts using the newly configured DNS servers, open the Command Prompt as an administrator and type “ipconfig /flushdns” (without the quotes). Press Enter to execute the command.
- Verify DNS server changes: Open a web browser and visit a website to confirm that the DNS server changes have taken effect. You can also use online tools to check your DNS server configuration.
By following these steps, you can easily change the DNS servers on your Windows 7 device and enjoy the benefits of a faster, more secure, or region-unrestricted browsing experience.
Changing DNS Servers in Windows Vista
If you’re using Windows Vista and want to change your DNS servers, you can follow these steps:
- Open the Control Panel: Click on the Start button and select “Control Panel” from the menu.
- Go to Network and Internet: In the Control Panel window, select “Network and Internet.”
- Open the Network and Sharing Center: In the Network and Internet window, click on “Network and Sharing Center.”
- Access the network connection properties: In the Network and Sharing Center, click on “Manage network connections.”
- Open the Properties window: In the Network Connections window, locate the network connection you want to change the DNS servers for and right-click on it. Choose “Properties” from the context menu.
- Find the Internet Protocol Version 4 (TCP/IPv4) option: In the Local Area Connection Properties or Wireless Network Connection Properties window, find the “Internet Protocol Version 4 (TCP/IPv4)” option and double-click on it.
- Specify the DNS server addresses: In the Internet Protocol Version 4 (TCP/IPv4) Properties window, select the “Use the following DNS server addresses” option. Enter the preferred and alternate DNS server addresses provided by your chosen DNS provider. For example, if you want to use Google DNS, enter “8.8.8.8” as the preferred DNS server and “8.8.4.4” as the alternate DNS server.
- Save your changes: Click “OK” to save the changes you’ve made to the DNS server settings.
- Flush DNS cache: To ensure that your system starts using the newly configured DNS servers, open the Command Prompt as an administrator and type “ipconfig /flushdns” (without the quotes). Press Enter to execute the command.
- Verify DNS server changes: Open a web browser and visit a website to confirm that the DNS server changes have taken effect. You can also use online tools to check your DNS server configuration.
By following these steps, you can easily change the DNS servers on your Windows Vista device and enjoy the benefits of a faster, more secure, or region-unrestricted browsing experience.
Changing DNS Servers in Windows XP
If you’re using Windows XP and want to change your DNS servers, you can follow these steps:
- Open the Control Panel: Click on the Start button and select “Control Panel” from the menu.
- Go to Network Connections: In the Control Panel window, double-click on the “Network Connections” icon.
- Access the network connection properties: In the Network Connections window, locate the network connection you want to change the DNS servers for and right-click on it. Choose “Properties” from the context menu.
- Find the Internet Protocol (TCP/IP) option: In the Local Area Connection Properties or Wireless Network Connection Properties window, find the “Internet Protocol (TCP/IP)” option and double-click on it.
- Specify the DNS server addresses: In the Internet Protocol (TCP/IP) Properties window, select the “Use the following DNS server addresses” option. Enter the preferred and alternate DNS server addresses provided by your chosen DNS provider. For example, if you want to use OpenDNS, enter “208.67.222.222” as the preferred DNS server and “208.67.220.220” as the alternate DNS server.
- Save your changes: Click “OK” to save the changes you’ve made to the DNS server settings.
- Flush DNS cache: To ensure that your system starts using the newly configured DNS servers, open the Command Prompt, and type “ipconfig /flushdns” (without the quotes). Press Enter to execute the command.
- Verify DNS server changes: Open a web browser and visit a website to confirm that the DNS server changes have taken effect. You can also use online tools to check your DNS server configuration.
By following these steps, you can easily change the DNS servers on your Windows XP device and enjoy the benefits of a faster, more secure, or region-unrestricted browsing experience.
Verifying DNS Server Changes
After changing DNS servers on your Windows device, it’s important to verify that the changes have been implemented correctly. Here are a few methods to verify DNS server changes:
- Visit websites: Open a web browser and visit a few different websites to ensure they load correctly. If web pages load faster or you can access region-restricted content, it indicates that the DNS server changes have taken effect.
- Perform a DNS lookup: You can use the Command Prompt to perform a DNS lookup on a specific domain. Open Command Prompt and type “nslookup domain.com” (replace “domain.com” with the actual domain you want to test). If the resolved IP address matches the expected IP address, it means the DNS server changes are working correctly.
- Check DNS server settings: Open the network connection properties again to ensure that the preferred and alternate DNS server addresses are correctly inputted. Double-check that you have saved the changes properly.
- Use online DNS testing tools: There are various online DNS testing tools available that can help validate your DNS server changes. These tools can provide detailed information about the DNS servers being used and check for any errors or misconfigurations.
Verifying DNS server changes is crucial to ensure that your internet connection is using the desired DNS servers. It confirms that you are experiencing the benefits, such as improved speed, better security, or access to region-specific content, that the new DNS servers offer.
Remember, DNS changes might take a little time to propagate across the network. If you don’t see immediate results, give it some time and revisit the verification methods mentioned until you are confident that the DNS server changes have been successfully applied.