
Checking Your Current Subscriptions
Before you can cancel any subscriptions on your Roku device, it’s important to first identify which subscriptions you are currently subscribed to. Roku provides a convenient way to check your active subscriptions, allowing you to have a clear overview of your monthly expenses.
To check your current subscriptions, follow the steps below:
- From your Roku home screen, navigate to the “Settings” option and select it.
- Next, choose “My Account” and then click on “Manage Subscriptions.”
- A list of your active subscriptions will be displayed, including the subscription name, billing cycle, and price.
- Take a moment to review the list of subscriptions and verify if there are any that you no longer wish to keep.
By following these simple steps, you can easily identify which subscriptions you have and make informed decisions about which ones you want to cancel. It’s a good idea to review your subscriptions regularly to ensure you’re only paying for what you actually use.
Now that you have checked your current subscriptions, let’s move on to the various methods available to cancel them on your Roku device.
Steps to Cancel Subscriptions Through the Roku Device
If you have identified a subscription that you no longer wish to keep after checking your current subscriptions, you can easily cancel it directly from your Roku device. Just follow these simple steps:
- From your Roku home screen, go to “Settings” and select it.
- Choose “My Account” and click on “Manage Subscriptions.”
- Locate the subscription you want to cancel in the list of active subscriptions.
- Select the subscription to open its details.
- On the subscription details page, you will find an option to “Cancel Subscription.” Click on it.
- A prompt will appear asking you to confirm the cancellation. Verify the details and select “Cancel Subscription” again to proceed.
- Once confirmed, the subscription will be successfully cancelled, and you will no longer be charged for it.
It’s important to note that cancelling a subscription through the Roku device will only prevent further charges. It does not entitle you to any refunds for previous payments. Additionally, some subscriptions may have cancellation restrictions or require you to follow specific procedures, so always review the cancellation terms and conditions provided by the service.
Now that you know how to cancel subscriptions directly from your Roku device, let’s explore another method — managing subscriptions through your Roku account online.
Managing Subscriptions from Your Roku Account Online
In addition to canceling subscriptions directly from your Roku device, you can also manage your subscriptions through your Roku account online. This method allows you to conveniently review and make changes to your subscriptions from the comfort of your computer. Here’s how:
- Open a web browser on your computer and go to the Roku website.
- Click on “Sign In” and enter your Roku account credentials to log in.
- Once logged in, click on your account name in the top right corner of the screen and select “My Account” from the dropdown menu.
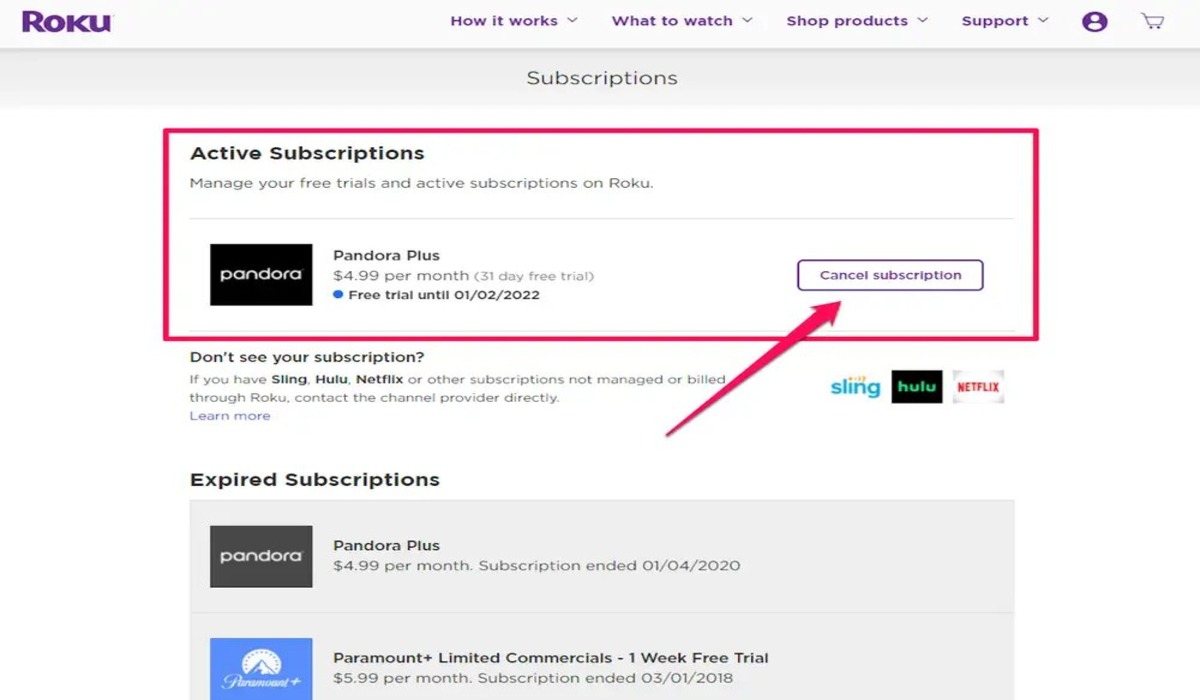
- In the Account Information section, find and select the “Manage your subscriptions” option.
- A list of your active subscriptions will be displayed, similar to what you saw on your Roku device.
- Identify the subscription you wish to cancel and click on the “Cancel Subscription” button next to it.
- A confirmation prompt will appear. Review the details and select “Cancel Subscription” to proceed with the cancellation.
- After confirming the cancellation, you will receive a notification indicating that the subscription has been successfully canceled.
Managing your subscriptions through your Roku account online provides a convenient alternative to canceling subscriptions directly from your device. It allows you to access and modify your subscriptions from any device with internet access.
Now that you are familiar with canceling subscriptions through both the Roku device and your Roku account online, let’s explore another method — cancelling subscriptions through the Roku mobile app.
Cancelling Subscriptions Through the Roku Mobile App
If you prefer managing your subscriptions on the go, you can easily cancel subscriptions through the Roku mobile app. The mobile app provides a convenient and user-friendly interface to navigate and modify your subscriptions. Here’s how you can cancel subscriptions using the Roku mobile app:
- Ensure that you have downloaded and installed the Roku mobile app on your smartphone or tablet from the respective app store.
- Launch the Roku mobile app and sign in using your Roku account credentials.
- Tap on the “Settings” tab located at the bottom right corner of the screen.
- Scroll down and select “Manage Subscriptions” from the list of options.
- A list of your active subscriptions will be displayed, similar to what you saw on your Roku device or online account.
- Find the subscription you want to cancel and tap on it to open the subscription details.
- Within the subscription details page, you will find an option to “Cancel Subscription.” Tap on it.
- A confirmation prompt will appear. Review the details and tap on “Cancel Subscription” again to confirm.
- Once confirmed, the subscription will be successfully canceled, and you will not be charged for it anymore.
With the Roku mobile app, you have the freedom to cancel subscriptions from anywhere, making it a convenient option for those who prefer managing their subscriptions on their mobile devices.
Now that you know how to cancel subscriptions through the Roku mobile app, let’s move on to troubleshooting common issues you may encounter while attempting to cancel a subscription.
Troubleshooting Common Issues
While canceling subscriptions on your Roku device is generally a straightforward process, you may encounter some common issues along the way. Here are a few troubleshooting tips to help you overcome these obstacles:
1. Subscription not appearing: If you cannot find a subscription you wish to cancel, ensure that you are logged into the correct Roku account. Sometimes, multiple Roku accounts may be associated with different devices. You can check your account details and subscriptions on the Roku website or contact Roku support for assistance.
2. Error messages: If you receive error messages while attempting to cancel a subscription, make sure you have a stable internet connection. Try restarting your Roku device or clearing the cache in the Roku settings. If the issue persists, contacting the subscription provider or Roku support can help resolve the problem.
3. Subscription not canceled: If you receive a confirmation message for cancellation but still get charged, ensure that you have followed the cancellation process correctly. Double-check the subscription status to confirm if it has been successfully canceled. If you continue to experience billing issues, reach out to the subscription provider’s customer service for assistance.
4. Forgotten credentials: If you have forgotten your Roku account credentials, you can initiate the password reset process through the Roku website. Follow the prompts to reset your password and regain access to your account.
If you encounter any other issues or have specific questions regarding canceling subscriptions on your Roku device, it’s recommended to reach out to Roku support or the subscription provider’s customer service for personalized assistance.
Now that we have explored troubleshooting common issues, let’s cover some important tips and considerations for canceling subscriptions on your Roku device.
Important Tips and Considerations
When canceling subscriptions on your Roku device, it’s essential to keep the following tips and considerations in mind:
1. Review subscription terms: Before canceling a subscription, take a moment to review the terms and conditions provided by the service. Some subscriptions have specific cancellation policies or may require you to follow certain procedures.
2. Billing cycles: Be mindful of the billing cycle for your subscriptions. Cancelling a subscription mid-cycle does not usually entitle you to a refund for the remaining days. It only prevents future charges.
3. Manage subscriptions regularly: Regularly review your subscriptions to ensure you’re only paying for the ones you actually use. By keeping track of your subscriptions, you can manage your expenses more effectively.
4. Keep cancellation confirmations: Once you cancel a subscription, it’s a good practice to save or take a screenshot of the cancellation confirmation for future reference. This can help resolve any billing discrepancies that may arise.
5. Double-check billing statements: After canceling a subscription, thoroughly review your billing statements to ensure that you are no longer being charged for that subscription. If you notice any discrepancies, contact the subscription provider’s customer service promptly.
6. Seek customer support: If you encounter any difficulties or have specific questions during the cancellation process, contact Roku support or the subscription provider’s customer service. They can guide you through the steps or address any concerns you may have.
By following these important tips and considerations, you can navigate the cancellation process smoothly and ensure that you are in control of your subscriptions on your Roku device.
Now, armed with the knowledge of how to check and cancel subscriptions on Roku, you can confidently manage and tailor your subscriptions to meet your needs and preferences. Enjoy the flexibility and convenience that Roku provides in controlling your entertainment options.