
Reasons for Canceling Netflix
Netflix has been one of the leading streaming services for years, offering a vast library of movies and TV shows at your fingertips. However, there may come a time when you decide to cancel your Netflix subscription. Let’s explore some common reasons why people choose to do so:
- Limited Content: While Netflix has an extensive collection of movies and TV shows, it may not always have the specific content you’re looking for. If you find yourself regularly disappointed by the lack of variety or new releases in your preferred genre, canceling Netflix may be a sensible choice.
- Cost: Subscriptions can add up quickly, especially if you’re subscribed to multiple streaming services. If you’re looking to cut down on expenses or reallocate your entertainment budget, canceling Netflix can help you save some extra money each month.
- Competing Platforms: With the rise of other streaming platforms such as Amazon Prime Video, Hulu, Disney+, and HBO Max, there’s now a vast selection of alternatives to choose from. If you’ve found another platform that offers the content you enjoy at a more reasonable price or provides a better user experience, canceling Netflix may make sense.
- Time Commitment: Binge-watching can be addicting, and it’s easy to find yourself spending hours in front of the screen. If you feel like you’re spending too much time on Netflix and neglecting other activities or responsibilities, canceling your subscription can help you regain control of your time.
- Quality of Original Content: Netflix has gained recognition for its original series and movies. However, if you feel that the quality of these productions has declined or no longer appeals to your taste, canceling Netflix can be a logical step to explore other platforms with content more aligned with your preferences.
While Netflix has undoubtedly revolutionized the way we consume entertainment, it’s important to consider your personal needs and preferences when deciding whether to cancel your subscription. By evaluating the content, cost, competing platforms, time commitment, and quality of original productions, you can make an informed decision that aligns with your entertainment goals.
How to Cancel Netflix on Your Phone or Tablet
If you’ve decided to cancel your Netflix subscription and want to do so on your phone or tablet, follow these easy steps:
- Open the Netflix App: Locate the Netflix app on your device and tap to open it.
- Sign In: If you aren’t already signed in, enter your Netflix email and password to access your account.
- Access Account Settings: Look for the menu icon (usually represented by three horizontal lines or dots) in the top-left or top-right corner of the screen. Tap on it to access the account settings.
- Select Account: Within the account settings menu, you should see an option that says “Account” or your profile name. Tap on it to proceed.
- Scroll Down: Scroll down the account settings page until you see a section titled “Membership & Billing.” This is where you’ll find the option to cancel your subscription.
- Tap on Cancel Membership: Within the “Membership & Billing” section, you should see a link or button that says “Cancel Membership” or something similar. Tap on it to initiate the cancellation process.
- Follow Prompts: Depending on your device and app version, you may be asked to provide a reason for canceling or to confirm your decision. Follow the on-screen prompts to proceed with the cancellation.
- Confirmation: Once you’ve completed the cancellation process, you should receive a confirmation message indicating that your Netflix subscription has been successfully canceled.
It’s important to note that canceling your Netflix subscription on your phone or tablet only applies to the device in question. If you have Netflix installed on other devices or use it through a web browser, your subscription will still be active unless you cancel it on those devices as well.
By following these steps, you can easily cancel your Netflix subscription directly from your phone or tablet. Take a moment to ensure that you won’t lose any of your favorite shows or movies by completing the cancellation process.
How to Cancel Netflix on Your Computer
If you’ve made the decision to cancel your Netflix subscription and prefer to do so on your computer, follow these simple steps:
- Open a Web Browser: Launch your preferred web browser on your computer.
- Go to Netflix Website: In the address bar of your web browser, enter www.netflix.com and press Enter to visit the Netflix website.
- Sign In: If you’re not already signed in, click on the “Sign In” button located in the top-right corner of the Netflix homepage. Enter your Netflix email and password to log in to your account.
- Account Settings: After signing in, click on your profile icon in the top-right corner of the page. From the dropdown menu, select “Account” to access your account settings.
- Membership & Billing: On the account settings page, scroll down until you see the “Membership & Billing” section. This is where you’ll find the option to cancel your subscription.
- Cancel Membership: Within the “Membership & Billing” section, click on the “Cancel Membership” button or link. It may be labeled as “Cancel Subscription” or similar.
- Provide Feedback: Netflix may ask you to provide a reason for canceling your subscription. Select the appropriate option or provide feedback if desired.
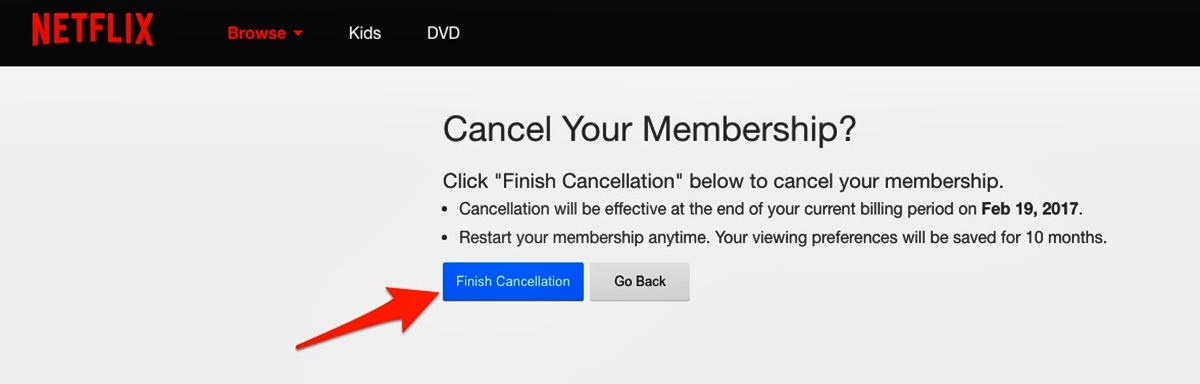
- Confirm Cancellation: Once you’ve provided any necessary feedback, click on the “Finish Cancellation” or “Complete Cancellation” button to finalize the process.
After completing these steps, you should receive confirmation that your Netflix subscription has been successfully canceled. Please note that your cancellation will take effect immediately, and you won’t be charged for any future billing cycles.
Remember to double-check that your cancellation applies to all devices you use to access Netflix. If you have the Netflix app installed on your mobile devices, smart TVs, or streaming devices, you’ll need to cancel your subscription through those respective platforms as well.
By following these straightforward steps, you can easily cancel your Netflix subscription right from your computer. Take a moment to ensure you won’t lose any saved shows or movies and consider alternative streaming options that align better with your preferences.
How to Cancel Netflix on Your Smart TV or Streaming Device
If you’ve decided to cancel your Netflix subscription and want to do so on your smart TV or streaming device, follow these steps:
- Access the Netflix App: Turn on your smart TV or streaming device and navigate to the Netflix app. Launch the app by selecting it.
- Sign In: If you’re not already signed in, enter your Netflix email and password to log in to your account.
- Open the Menu: Look for the menu icon on your remote control or on-screen interface. It is usually represented by three lines or dots arranged horizontally or vertically. Press the menu button to open the Netflix menu.
- Select Account: Within the Netflix menu, locate and select the “Account” option. This will take you to the account settings.
- Go to Membership & Billing: Scroll through the account settings until you find the “Membership & Billing” section. Click on it to access the options related to your subscription.
- Cancel Membership: Look for the “Cancel Membership” button or link within the “Membership & Billing” section. Click on it to initiate the cancellation process.
- Provide Feedback: Netflix may prompt you to provide a reason for canceling your subscription. Select the appropriate option or provide feedback if desired.
- Confirm Cancellation: Once you’ve provided any necessary feedback, confirm the cancellation by selecting the “Finish Cancellation” or “Complete Cancellation” button.
After completing these steps, your Netflix subscription will be successfully canceled, and you won’t be charged for any future billing cycles. Keep in mind that canceling on your smart TV or streaming device only applies to that specific device. If you have Netflix installed on other devices, such as your phone or computer, you’ll need to cancel your subscription on those devices as well.
Make sure to check your smart TV or streaming device’s user manual or consult the manufacturer’s website if you encounter any difficulties during the cancellation process. Each device may have slight variations in its interface and menu options.
By following these instructions, you can easily cancel your Netflix subscription on your smart TV or streaming device. Take a moment to ensure that your cancellation is reflected on all devices and consider exploring alternative streaming options that better suit your preferences.
How to Cancel Netflix through Your Cable/Satellite Provider
If you subscribed to Netflix through your cable or satellite provider and want to cancel your Netflix subscription, you’ll need to follow the steps specific to your provider. Although the process may vary slightly depending on your provider, here is a general guide to canceling Netflix through your cable or satellite provider:
- Contact Customer Support: Look up the customer support number for your cable or satellite provider. You can likely find this information on your monthly bill, their website, or by doing a quick internet search.
- Call Customer Support: Dial the provided customer support number and follow the prompts to reach a representative. Let them know that you want to cancel your Netflix subscription that is billed through your cable or satellite provider.
- Provide Account Information: The representative may ask you for account verification details, such as your name, address, or account number. Be prepared to provide this information to proceed with the cancellation process.
- Request Cancellation: Once your account is verified, clearly state that you want to cancel your Netflix subscription and that it’s billed through your cable or satellite provider. The representative will guide you through the necessary steps to cancel.
- Confirm Cancellation: Before ending the call, ask the representative to confirm that your Netflix subscription has been successfully canceled. Take note of any confirmation number or reference information for your records.
It’s important to note that the cancellation process may vary depending on your cable or satellite provider. Some providers allow you to manage your subscriptions through an online account portal or mobile app, while others require you to call customer support to make any changes to your subscription.
If you’re unsure about the cancellation process for your specific provider, it’s recommended to reach out to their customer support for further guidance.
By following these general steps and contacting your cable or satellite provider’s customer support, you can cancel your Netflix subscription billed through them. Ensure to verify the cancellation and confirm that you won’t be charged for Netflix on your future bills.
How to Cancel Netflix through iTunes or Google Play Store
If you subscribed to Netflix through the iTunes or Google Play Store and want to cancel your Netflix subscription, you can do so directly through your iTunes or Google Play account. Follow these steps to cancel Netflix through iTunes or Google Play:
Cancel Netflix through iTunes:
- Open your iTunes Account: Launch the iTunes Store on your iPhone, iPad, or computer.
- Sign In: If you’re not already signed in, sign in with your Apple ID and password.
- Manage Subscriptions: On your iOS device, tap on your profile icon located at the top-right corner of the screen. Then, select “Subscriptions.” On your computer, click on “Account” in the menu bar, then choose “View My Account.” Scroll down to the “Settings” section and click on “Manage” next to “Subscriptions.”
- Choose Netflix Subscription: Locate and select your Netflix subscription from the list of active subscriptions.
- Cancel Subscription: Click or tap on “Cancel Subscription” and follow the prompts to finalize the cancellation.
Cancel Netflix through Google Play Store:
- Open Google Play Store: Launch the Google Play Store on your Android device.
- Sign In: Ensure that you’re signed in with the Google account used for the Netflix subscription.
- Access Subscriptions: Tap on the menu icon (usually represented by three horizontal lines) located at the top-left corner of the screen. Then, select “Subscriptions” from the menu.
- Locate Netflix Subscription: In the list of subscriptions, find and select your Netflix subscription.
- Cancel Subscription: Tap on “Cancel” and follow the prompts to confirm the cancellation.
After canceling your Netflix subscription through iTunes or Google Play Store, you’ll receive a confirmation message indicating the cancellation. It’s essential to ensure that the cancellation is properly processed to avoid any future charges.
Please note that canceling through iTunes or Google Play only applies to the respective platform. If you have Netflix installed on other devices, such as a smart TV or gaming console, you’ll need to cancel your subscription through those devices as well.
By following these steps, you can easily cancel your Netflix subscription through iTunes or Google Play Store. Take a moment to verify the cancellation and consider alternative streaming options that better suit your needs.
How to Cancel Netflix through Amazon
If you subscribed to Netflix through Amazon and want to cancel your Netflix subscription, you can do so directly through your Amazon account. Follow these steps to cancel Netflix through Amazon:
- Go to Your Amazon Account: Open a web browser and navigate to www.amazon.com. Sign in with your Amazon account credentials.
- Access Your Prime Video Channels: From the Amazon homepage, hover over the “Accounts & Lists” section and click on “Your Prime Video” from the dropdown menu.
- Choose Channels: On the Prime Video page, click or tap on “Channels” located at the top of the screen. This will display a list of the channels you’re subscribed to through Amazon.
- Locate Netflix Subscription: Scroll through the list of channels and locate your Netflix subscription. It should be labeled as “Netflix” or a similar name.
- Cancel Subscription: Next to the Netflix subscription, you should see an option to manage or cancel the subscription. Click or tap on this option to proceed with canceling Netflix.
- Confirm Cancellation: Follow the prompts to confirm the cancellation of your Netflix subscription. You may be asked to provide a reason for canceling before finalizing the cancellation.
After completing these steps, your Netflix subscription billed through Amazon will be successfully canceled. You will no longer have access to Netflix content through your Amazon account.
Remember to double-check that your Netflix cancellation is reflected in your Amazon account and that you won’t be charged for any future billing cycles.
It’s important to note that canceling through Amazon applies specifically to Netflix subscription billed through Amazon. If you have Netflix installed on other devices or have a separate Netflix subscription, you’ll need to cancel those separately.
By following these steps, you can easily cancel your Netflix subscription through Amazon. Take a moment to ensure the cancellation is processed correctly and consider exploring alternative streaming options that align better with your preferences.
How to Cancel Netflix through Roku
If you subscribed to Netflix through Roku and want to cancel your Netflix subscription, you can do so using your Roku device. Follow these steps to cancel Netflix through Roku:
- Turn on Your Roku Device: Ensure your Roku device and your TV are turned on and properly connected.
- Go to the Home Screen: Using your Roku remote, press the Home button to navigate to the Roku home screen.
- Access Channel Store: Scroll up or down on the home screen to find the “Streaming Channels” option and press OK.
- Find and Select Netflix: Navigate through the channel store to find the Netflix channel. Once located, highlight it and press OK to open the Netflix channel.
- Go to Options: Within the Netflix channel, press the * button on your Roku remote to access the options menu.
- Select Manage Subscription: From the options menu, choose “Manage Subscription” or a similar option. This will redirect you to the Netflix account management page.
- Sign In: If prompted, enter your Netflix email and password to sign in to your Netflix account.
- Cancel Subscription: On the Netflix account management page, locate and select the option to cancel your subscription. Follow the prompts to proceed with canceling Netflix.
- Confirm Cancellation: After completing the cancellation process, verify that you receive a confirmation indicating that your Netflix subscription has been successfully canceled.
Cancelling Netflix through Roku ensures that your subscription will be stopped and you won’t be charged for any future billing cycles. It’s important to note that this cancellation only applies to Netflix through Roku. If you have Netflix installed on other devices or have a separate subscription, you’ll need to cancel those separately.
By following these steps, you can easily cancel your Netflix subscription through Roku. Take a moment to ensure that the cancellation is successfully processed and explore alternative streaming options that better suit your needs.
How to Cancel Netflix through Xbox or PlayStation
If you subscribed to Netflix through Xbox or PlayStation and want to cancel your Netflix subscription, you can do so directly through your gaming console. Follow these steps to cancel Netflix through Xbox or PlayStation:
Cancel Netflix through Xbox:
- Turn on Your Xbox: Power on your Xbox console and ensure it is connected to your TV or monitor.
- Go to the Home Screen: Navigate to the home screen by pressing the Xbox button on your controller.
- Access “My Games and Apps”: Scroll left to the menu bar and find the “My games and apps” option. Select it to open the “My games and apps” screen.
- Find Netflix: On the “My games and apps” screen, navigate to the “Apps” tab and locate the Netflix app. Highlight it and press the menu button on your controller (three lines button) to open the options menu.
- Select “Manage App”: In the options menu, choose “Manage app” or a similar option. This will open the Netflix app management screen.
- Go to Subscriptions: On the Netflix app management screen, navigate to the “Subscriptions” tab. This will display your active subscriptions.
- Cancel Netflix Subscription: Locate your Netflix subscription and select it. Follow the prompts to cancel your subscription.
- Confirm Cancellation: After completing the cancellation process, verify that you receive confirmation that your Netflix subscription has been successfully canceled.
Cancel Netflix through PlayStation:
- Turn on Your PlayStation: Power on your PlayStation console and ensure it is connected to your TV or monitor.
- Go to the Home Screen: Navigate to the home screen by pressing the PS button on your controller.
- Access the Settings: Scroll to the right on the menu bar and find the “Settings” option. Select it to open the “Settings” screen.
- Open “Account Management”: On the “Settings” screen, find and select the “Account Management” option.
- Go to “Account Information”: Within the “Account Management” menu, select the “Account Information” option.
- Access “Services List”: Scroll down and choose the “Services List” option. This will display your active subscriptions.
- Cancel Netflix Subscription: Locate your Netflix subscription and select it. Follow the prompts to cancel your subscription.
- Confirm Cancellation: After completing the cancellation process, verify that you receive confirmation that your Netflix subscription has been successfully canceled.
Cancelling Netflix through Xbox or PlayStation ensures that your subscription will be stopped, and you won’t be charged for any future billing cycles. It’s important to note that this cancellation only applies to Netflix on your Xbox or PlayStation. If you have Netflix installed on other devices or have a separate subscription, you’ll need to cancel those separately.
By following these steps, you can easily cancel your Netflix subscription through Xbox or PlayStation. Take a moment to ensure that the cancellation is successfully processed and explore alternative streaming options that better suit your needs.
How to Cancel Netflix through T-Mobile or Verizon
If you subscribed to Netflix through T-Mobile or Verizon and want to cancel your Netflix subscription, you can do so using the respective carrier’s account management system. Follow these steps to cancel Netflix through T-Mobile or Verizon:
Cancel Netflix through T-Mobile:
- Access T-Mobile’s Website: Open a web browser and go to www.t-mobile.com.
- Sign In: Sign in to your T-Mobile account using your T-Mobile ID and password.
- Go to Plan & Add-Ons: Once logged in, navigate to the “Plan & Add-Ons” section of your T-Mobile account.
- Manage Services: Look for an option to manage your subscribed services or add-ons. Click or tap on this option to proceed.
- Locate Netflix Subscription: Within the managed services or add-ons section, find your Netflix subscription. It may be labeled as “Netflix” or something similar.
- Cancel Netflix subscription: Select the option to cancel your Netflix subscription. Follow the prompts to confirm and finalize the cancellation.
- Confirm Cancellation: After completing the cancellation process, verify that you receive a confirmation indicating that your Netflix subscription has been successfully canceled.
Cancel Netflix through Verizon:
- Access Verizon’s Website: Open a web browser and go to www.verizon.com.
- Sign In: Sign in to your Verizon account using your Verizon ID and password.
- Go to Manage Add-Ons: Once logged in, navigate to the “Manage Add-Ons” or “Manage My Products” section of your Verizon account.
- Find Netflix Subscription: Within the managed add-ons or products section, locate your Netflix subscription. It should be labeled as “Netflix” or a similar name.
- Cancel Netflix subscription: Select the option to cancel your Netflix subscription. Follow the prompts to confirm and finalize the cancellation.
- Confirm Cancellation: After completing the cancellation process, verify that you receive a confirmation indicating that your Netflix subscription has been successfully canceled.
Cancelling Netflix through T-Mobile or Verizon ensures that your subscription will be stopped, and you won’t be charged for any future billing cycles. It’s important to note that this cancellation only applies to Netflix through your mobile carrier. If you have Netflix installed on other devices or have a separate subscription, you’ll need to cancel those separately.
By following these steps, you can easily cancel your Netflix subscription through T-Mobile or Verizon. Take a moment to ensure that the cancellation is successfully processed and explore alternative streaming options that better suit your needs.
How to Cancel Netflix without Losing Your Watchlist
If you’ve decided to cancel your Netflix subscription but don’t want to lose your carefully curated watchlist, there are a few options you can consider. Follow these steps to cancel Netflix without losing your watchlist:
- Create a Netflix Profile: If you don’t already have one, create a separate Netflix profile dedicated to your watchlist.
- Sign in to Your Netflix Account: Visit the Netflix website or open the Netflix app and sign in to your account.
- Access Profile Settings: In your Netflix account, go to the profile settings or manage profiles section.
- Add New Profile: Click or tap on the option to add a new profile and enter a name for your watchlist profile.
- Transfer Content to Watchlist Profile: Switch to the new watchlist profile and browse through your existing Netflix content. Add desired movies or TV shows to your watchlist under this profile.
- Cancel Your Subscription: Once you have transferred your watchlist to the dedicated profile, proceed with canceling your Netflix subscription as per the instructions provided in the previous sections.
- Suspend Your Account: If canceling your subscription isn’t desirable at the moment, consider temporarily suspending your Netflix account. This allows you to retain your watchlist and reactivate your subscription at a later time.
- Reactivate When Needed: If you decide to reactivate your Netflix subscription in the future, sign in to your account and choose the watchlist profile to access your saved content.
By following these steps, you can cancel your Netflix subscription without losing your carefully curated watchlist. Whether you choose to create a dedicated watchlist profile or suspend your account temporarily, these options give you the flexibility to maintain your favorite shows and movies while taking a break from your Netflix subscription.
Remember, if you decide to cancel your Netflix subscription, ensure that you have access to your watchlist profile or consider alternative streaming platforms to continue enjoying the content you love.
How to Cancel Netflix and Get a Refund
If you’ve recently paid for your Netflix subscription but have changed your mind and want to cancel it, you may wonder if it’s possible to get a refund. Here are some steps you can take to cancel your Netflix subscription and potentially receive a refund:
- Review Netflix’s Refund Policy: Start by reviewing the refund policy on the Netflix website. Netflix typically does not offer refunds for partially used billing cycles, but it’s worth taking a look to understand their specific terms.
- Check Eligibility for a Refund: Verify if you meet any criteria outlined in the refund policy that may make you eligible for a refund. For example, if you were mistakenly charged or experienced a technical issue, you might qualify for a refund.
- Contact Netflix Customer Support: Reach out to Netflix customer support through their website or by phone. Explain your situation and inquire about the possibility of receiving a refund. Be prepared to provide relevant details, such as your account information and the reason for your cancellation.
- Follow Customer Support Instructions: Netflix customer support will provide guidance on how to proceed with a refund request. They may ask for additional information or documentation to assess your eligibility for a refund. Follow their instructions carefully.
- Submit a Refund Request: If you believe you meet the criteria for a refund, submit a formal refund request following the instructions given by Netflix customer support. Provide any necessary documentation or evidence to support your claim.
- Escalate the Issue, if Necessary: If your initial refund request is denied and you still believe you are entitled to a refund, escalate the issue with Netflix customer support. Ask to speak with a supervisor or manager who may have the authority to review your case.
- Consider Disputing the Charge: If your efforts to obtain a refund are unsuccessful, and you believe you have valid grounds for dispute, you may contact your credit card company or payment provider to report the issue and request a chargeback.
Please note that receiving a refund from Netflix is not guaranteed, as their refund policy is generally strict. However, it’s always worth reaching out to their customer support to explain your situation and explore the possibility of receiving a refund.
Remember to be polite and patient when dealing with customer support representatives, as they are there to assist you and help find a resolution. Keep records of all communication and documentation related to your refund request for future reference.