
Create a Playlist in iTunes
Creating a playlist in iTunes allows you to group your favorite songs together and conveniently organize them for burning onto a CD. Follow these steps to create a playlist:
- Launch iTunes on your computer and ensure that your music library is visible.
- Click on the “File” tab at the top left corner of the iTunes window.
- In the drop-down menu, select “New” and then choose “Playlist.”
- A new playlist will appear in the sidebar. Give it a descriptive name by right-clicking on it and selecting “Rename.”
- To add songs to your playlist, simply drag and drop the desired tracks from your music library into the playlist.
- Continue adding songs until your playlist contains all the music you want to burn onto the CD.
Creating a well-curated playlist can be a fun and creative process. You can arrange songs in a specific order or group them according to a theme or genre. Additionally, you can personalize your playlist by adding album art or album names to make it more visually appealing.
Once you have created your playlist and arranged your songs to your liking, you are ready to move on to the next step, which is inserting a blank CD into your computer.
Insert a Blank CD into Your Computer
Before you can burn your carefully crafted playlist onto a CD, you need to ensure that you have a blank CD ready. Follow these steps to insert a blank CD into your computer:
- Locate the CD/DVD drive on your computer. It is usually located on the front panel of a desktop computer or on the side of a laptop.
- Press the eject button to open the CD/DVD drive tray.
- Take the blank CD and carefully place it onto the tray, ensuring that it rests securely in the center.
- Gently push the tray back in, and you will hear a clicking sound as it closes.
It is essential to use a blank CD to ensure that there is enough space to burn your playlist onto. Make sure the CD is compatible with your computer and the appropriate format for audio burning, such as CD-R. CD-RW discs allow for rewriting and erasing, but not all CD players can read them.
It’s worth noting that CDs can only hold a limited amount of music, typically around 80 minutes or 700MB. If your playlist exceeds the capacity of the CD, you may need to trim it down or split it across multiple discs.
Once the blank CD is inserted, you can proceed to the next step of selecting your playlist in iTunes.
Select Your Playlist
After inserting the blank CD into your computer, it’s time to select the playlist you want to burn onto the CD. Follow these steps to choose your playlist in iTunes:
- Open iTunes on your computer and make sure the music library is displayed.
- Click on the “Playlist” tab located in the left sidebar.
- Scroll through the list of playlists until you find the one you created earlier.
- Click on the playlist to select it.
If you have a large number of playlists, you can use the search bar at the top of the iTunes window to quickly find the desired playlist by typing in the name.
By selecting your specific playlist, you ensure that only the songs within that playlist will be burned onto the CD. This allows you to have better control over the content you want to listen to on your CD.
It’s essential to double-check that you have chosen the correct playlist before proceeding to the next step. Making sure the right songs are selected will help prevent any disappointment later on.
With your playlist selected, you are now ready to dive into the process of burning the playlist onto the CD.
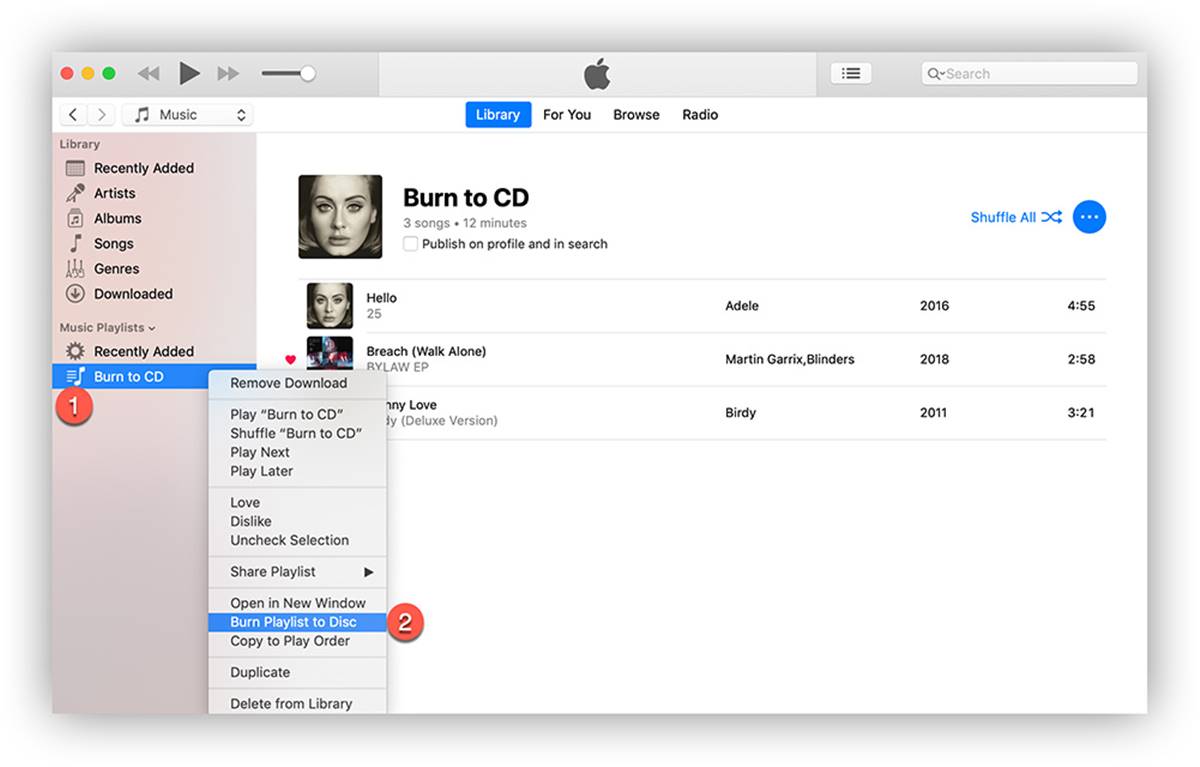
Burn the Playlist to the CD
Now that you have inserted the blank CD and selected your desired playlist in iTunes, it’s time to burn the playlist onto the CD. Follow these steps to complete the burning process:
- Ensure that the selected playlist is still highlighted in iTunes.
- Click on the “File” tab at the top left corner of the iTunes window.
- In the drop-down menu, select the “Burn Playlist to Disc” option.
- A dialog box will appear, providing you with different burning options:
- Preferred Speed: Choose the burning speed that suits your needs. Higher speeds may result in quicker burning, but lower speeds can provide more reliable results.
- Disk Format: Select the appropriate format for your CD. If it’s solely for audio purposes, choose “Audio CD” format.
- Gap Between Songs: Decide if you want gaps between each track on the CD.
- Use Sound Check: This feature ensures consistent volume levels across all the tracks on the burned CD.
- Once you have adjusted the settings according to your preferences, click the “Burn” button.
- iTunes will now start the burning process, and you will see a progress bar indicating the status.
- Once the process is complete, iTunes will eject the CD automatically.
It is important to avoid interrupting the burning process by closing iTunes or removing the CD prematurely. Wait until the process is fully completed before taking any action.
With these simple steps, you can easily burn your playlist onto a CD using iTunes. Now it’s time to adjust the burning preferences in iTunes for future use.
Adjust Burning Preferences in iTunes
iTunes provides you with the flexibility to customize your burning preferences to suit your specific needs. By adjusting these settings, you can enhance the quality of your burned CDs and personalize your audio experience. Follow these steps to adjust the burning preferences:
- Open iTunes on your computer and ensure that your music library is visible.
- Click on the “Edit” tab at the top left corner of the iTunes window.
- In the drop-down menu, select “Preferences.”
- A new window will appear with a range of options.
- Click on the “Advanced” tab at the top of the window.
- Under the “Burning” section, you will find several options that you can modify:
- Burning Speed: Adjust the speed at which CDs are burned. Higher speeds may save time but could potentially result in errors or lower audio quality.
- Gap Between Songs: Set the desired length of silence between tracks on the burned CDs, or choose to have no gap at all for a seamless transition.
- Use Sound Check: Enable or disable the Sound Check feature, which ensures consistent volume levels across all tracks.
- Once you have customized the settings to your liking, click the “OK” button to save the changes.
By adjusting the burning preferences, you can fine-tune the quality and presentation of the burned CDs according to your preferences. Whether it’s controlling the gap between songs or ensuring consistent volume levels, these settings allow you to create a more enjoyable listening experience.
It’s worth mentioning that the burning preferences you set in iTunes will be applied to all future CD burning sessions. However, you can always go back and adjust them as needed.
With your burning preferences set, you are now ready to troubleshoot any potential issues that may arise during the burning process.
Troubleshooting Tips
While burning music to CDs in iTunes is usually a straightforward process, you may encounter some issues along the way. Here are some troubleshooting tips to help you overcome common problems:
- Verify CD Compatibility: Ensure that the blank CD you are using is compatible with your computer and the CD format supported by iTunes. CD-R discs are widely accepted, but not all devices can read CD-RW discs for rewriting.
- Check Available Space: If your playlist exceeds the capacity of the CD, you may need to remove some songs or split the playlist across multiple discs. Make sure you have enough space to accommodate your selected songs.
- Update iTunes: Ensure that you have the latest version of iTunes installed on your computer. Updates often include bug fixes and improvements that can resolve burning issues.
- Restart Your Computer: Sometimes, a simple restart can resolve minor software glitches. Try restarting your computer before attempting to burn the CD again.
- Check Permissions: Make sure you have sufficient permissions to access and write to the CD drive. Check your computer’s settings to ensure there are no restrictions that may prevent burning.
- Verify Playlist Selection: Double-check that the correct playlist is selected in iTunes before initiating the burning process. Select the desired playlist again to ensure accuracy.
- Adjust Burning Preferences: If you are experiencing consistent issues, try modifying the burning preferences in iTunes. Experiment with different burning speeds or disable certain settings like the gap between songs to see if it improves the outcome.
- Clean CD Drive: Dust and debris can sometimes interfere with the burning process. Gently clean the CD drive with a soft, lint-free cloth to remove any dirt or particles that may be affecting its performance.
By following these troubleshooting tips, you can overcome common obstacles when burning music to CDs in iTunes. Remember, perseverance and patience are key. If the problem persists, consider seeking additional support from Apple’s official documentation or customer support.