
What is an ISO Image File?
An ISO image file, commonly abbreviated as ISO, is an exact copy of the data stored on an optical disc, such as a DVD or CD. It contains all the files, folders, and data necessary to recreate the entire disc’s structure and content. The term “ISO” refers to the International Organization for Standardization, which originally defined the specifications for this disc image format.
ISO files are particularly useful for several reasons. First, they provide a convenient way to distribute and share large amounts of data in a single file. Instead of having to copy each individual file or folder from a disc, you can simply create an ISO image and share it digitally. Second, ISO files allow for easy backup and archival of important data, as they preserve the entire disc’s contents in one accessible file. Finally, ISO files are commonly used for creating bootable media, such as installation discs or recovery drives.
The ISO format is widely supported across various operating systems, making it versatile and compatible with a range of software applications. This compatibility extends to burning ISO image files onto physical media, such as DVDs.
To summarize, an ISO image file is a digital replica of the data contained on an optical disc. It offers a convenient method for distributing, backing up, and creating bootable media. Understanding the purpose and functionality of ISO image files is crucial before learning how to burn them onto a DVD.
Why Burn an ISO Image File to a DVD?
Burning an ISO image file to a DVD provides several benefits and serves various purposes. Let’s explore why you might want to burn an ISO image file to a DVD:
- Installing or reinstalling operating systems: Many operating systems, such as Windows or Linux distributions, are often distributed in the form of ISO image files. By burning these ISO files to a DVD, you can create a bootable disc that allows for easy installation or reinstallation of the operating system.
- Creating a backup copy: Burning an ISO image file to a DVD ensures that you have a physical backup of important data, software, or multimedia content. DVDs offer a reliable and enduring medium for storing data, making them an ideal choice for creating backups in case of any unforeseen data loss.
- Sharing large files or software: If you have a large file or software application that you want to share with others, burning the ISO image file to a DVD allows you to distribute it easily. This eliminates the need for individuals to download the file individually or have access to a reliable internet connection.
- Preserving data integrity: Burning an ISO image file to a DVD ensures that the contents remain unchanged. DVDs are read-only media, meaning that the data cannot be deleted or modified once burned. This guarantees the integrity of the data, making it an ideal solution for archiving important files or projects.
- Overcoming compatibility issues: Some older systems or devices may not have the capability to read USB drives or other storage media. Burning an ISO image file to a DVD provides a universal solution, as DVDs can be read by a wide range of devices, including older computers, gaming consoles, and DVD players.
Choose the Right DVD Burning Software
When it comes to burning an ISO image file to a DVD, selecting the right DVD burning software is crucial for a smooth and successful process. Here are some factors to consider when choosing the right DVD burning software:
- User-friendly interface: Look for DVD burning software that offers a user-friendly interface, making it easy to navigate and understand the burning process. Intuitive software will save you time and frustration.
- Compatibility: Ensure that the DVD burning software is compatible with your operating system. Whether you’re using Windows, macOS, or Linux, make sure the software supports your platform.
- Reliability: Opt for well-known and reputable DVD burning software to ensure reliable results. Check user reviews or seek recommendations from trusted sources to gauge the software’s performance and stability.
- Burning speed: Consider the burning speed capabilities of the software. Look for options that offer efficient burning speeds without compromising the quality of the burned DVD.
- Additional features: Some DVD burning software provides additional functionalities beyond basic ISO burning. These features may include the ability to create audio CDs, video DVDs, or customizing disc labels. Evaluate your specific needs and choose software that offers the desired features.
- Technical support: In case you encounter any issues or have questions during the DVD burning process, it’s essential to have access to reliable technical support from the software provider. Check if the software offers readily available customer support channels, such as online documentation, FAQs, forums, or direct customer assistance.
- Cost: Consider your budget when choosing DVD burning software. While some software options are free, others may require a one-time purchase or subscription. Evaluate the features and capabilities of the software in relation to its cost to determine the best value for your needs.
By carefully considering these factors, you can choose DVD burning software that meets your specific requirements and ensures a seamless process when burning ISO image files to a DVD.
Prepare Your DVD and Image File
Before you can burn an ISO image file to a DVD, it’s important to properly prepare both the DVD and the image file. Follow these steps to ensure a smooth and successful burning process:
- Choose a blank DVD: Select a blank DVD that matches the format and capacity requirements of the ISO image file you intend to burn. DVD formats include DVD-R, DVD+R, DVD-RW, and DVD+RW. Check the size of the ISO file and the capacity of the DVD to ensure compatibility.
- Gather the necessary tools: Make sure you have the required tools on hand, including a computer with a DVD burner, the ISO image file you want to burn, and DVD burning software. Ensure that your DVD burner is in working condition and that you have the necessary cables or connections for proper DVD burning.
- Verify the ISO image file: It’s essential to ensure the integrity and validity of the ISO image file before burning it. Use a checksum tool to verify the MD5 or SHA-1 hash value of the ISO file against the provided hash value from the official source or website. This step helps confirm that the image file hasn’t been corrupted or tampered with.
- Extract the contents (if needed): If the ISO image file contains compressed files or folders, extract them to a specific location on your computer. Most DVD burning software allows you to select the individual files and folders you want to burn from the extracted contents.
- Prepare the DVD burner: Insert the blank DVD into the DVD burner drive on your computer. Ensure that the DVD burning software is installed and running correctly. Double-check that the DVD burner drive is recognized by your computer’s operating system.
- Select the ISO image file: Open the DVD burning software and navigate to the option to burn an ISO image file. Locate the ISO file on your computer and select it as the source for burning. Some DVD burning software may also allow you to configure burning settings such as burning speed and file system.
- Configure the burning settings: Before initiating the burning process, review and adjust the burning settings according to your preferences. These settings may include the burning speed, disk format (such as ISO 9660 or UDF), and label for the DVD.
- Start the burning process: Once you have configured the burning settings, initiate the burning process through the DVD burning software. Sit back and allow the software to complete the burning process, which may take some time depending on the size of the ISO image file and the speed of your DVD burner.
By properly preparing your DVD and ISO image file, you set the stage for a successful burning process and ensure that the resulting DVD contains an accurate copy of the original ISO image file.
Burn the ISO Image File to DVD
After preparing your DVD and ISO file, it’s time to burn the ISO image file to a DVD. Follow these steps to successfully burn the ISO image file:
- Open the DVD burning software: Launch the DVD burning software that you have installed on your computer. Make sure it recognizes the DVD burner drive and is ready for the burning process.
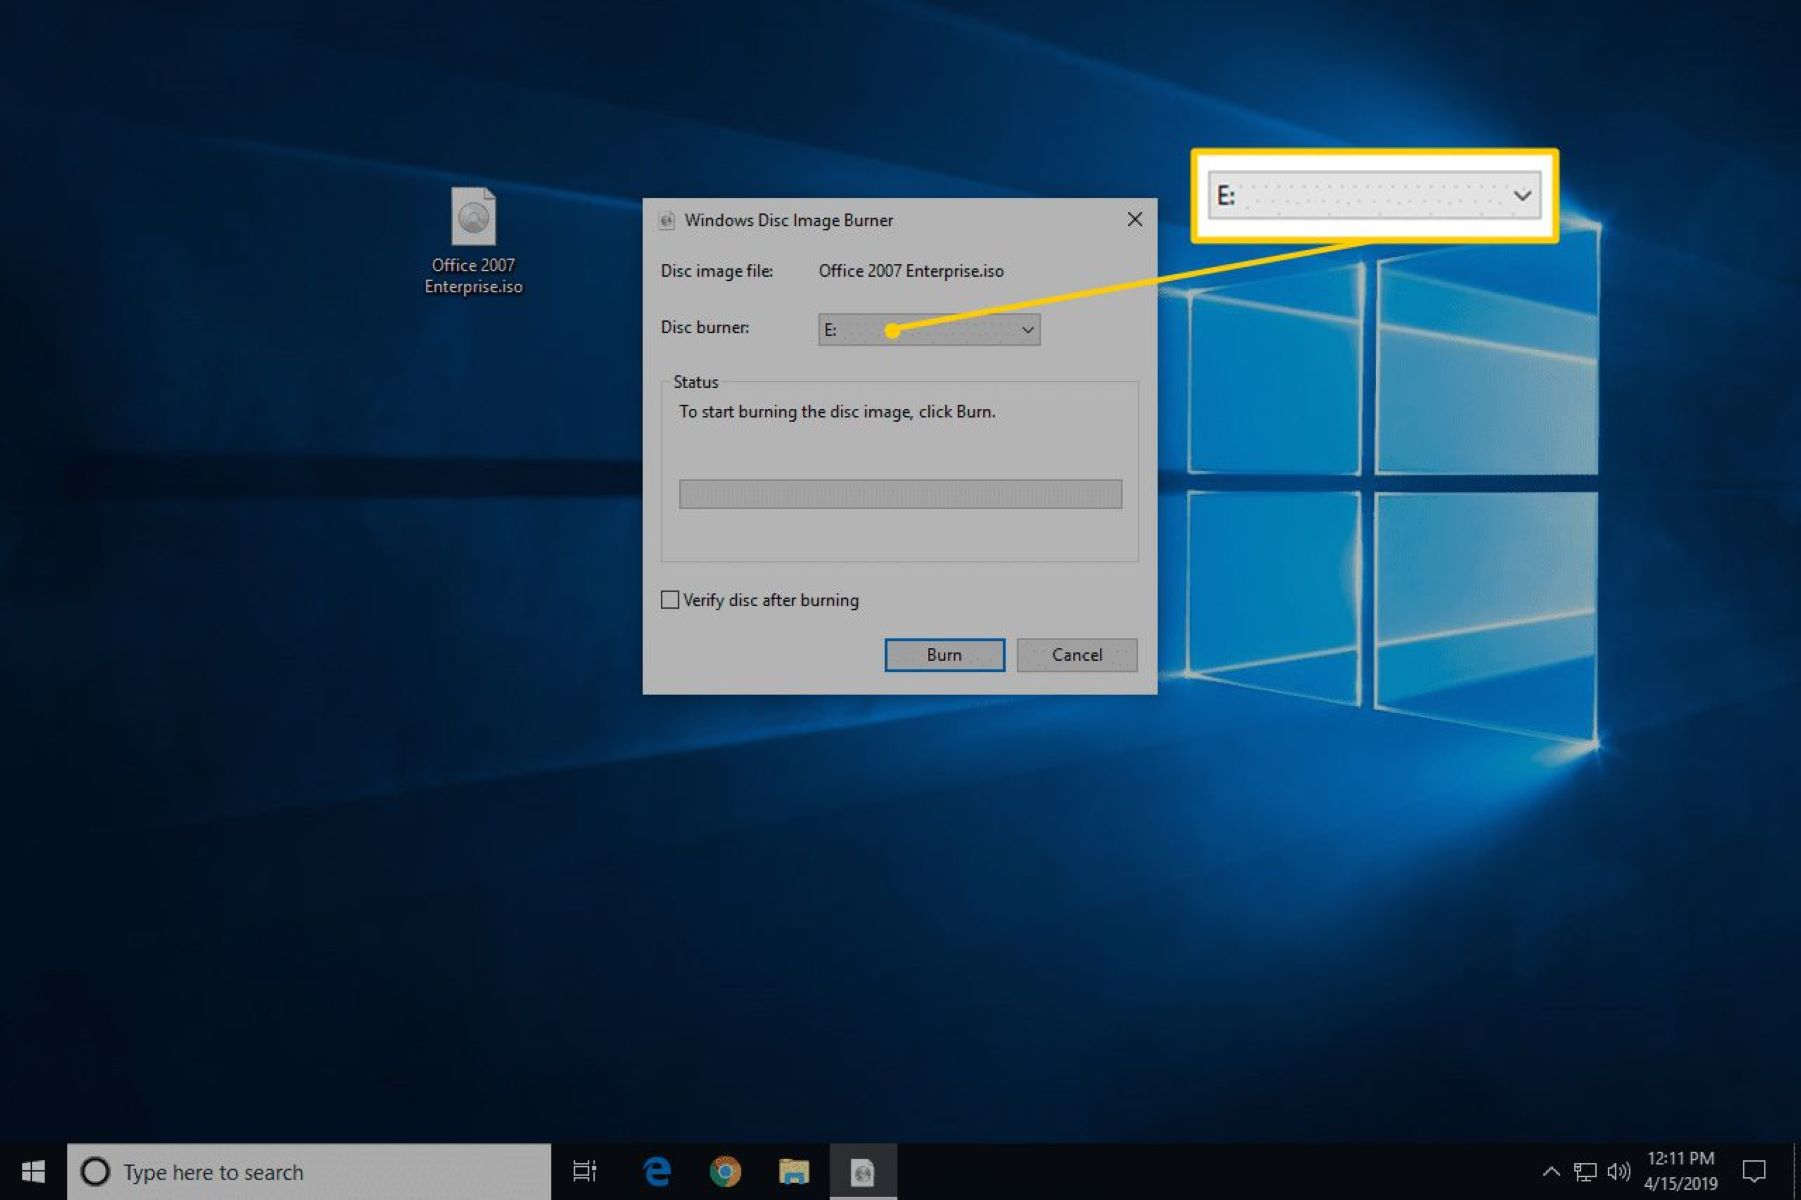
- Select the burning mode: Depending on the DVD burning software you are using, you may have several burning modes available. Choose the appropriate mode for burning an ISO image file, such as “Burn Image,” “Write Image,” or a similar option.
- Locate the ISO image file: Navigate through the DVD burning software to select the ISO image file. Ensure that you choose the correct file and verify its authenticity to avoid burning the wrong data onto the DVD.
- Choose the burning speed: Select the desired burning speed according to the capabilities of your DVD burner and the quality of the DVD media. Higher speeds may result in faster burning, but it’s recommended to use a moderate speed to reduce the risk of errors.
- Configure the burning settings: Review the burning settings provided by the DVD burning software. These settings may include the disc label, file system format (such as ISO 9660 or UDF), and any additional options for verification or finalization of the DVD.
- Start the burning process: Once you have verified all the settings, click the “Burn” or similar button to begin the burning process. The DVD burning software will start writing the ISO image file onto the DVD. Monitor the progress indicator to ensure that the burning process completes successfully.
- Eject the DVD: Once the burning process is complete, the DVD burning software will notify you. Eject the burned DVD from the DVD burner drive and carefully remove it.
Congratulations! You have successfully burned the ISO image file to a DVD. The resulting DVD contains an exact copy of the original content stored in the ISO file. You can now use the DVD for various purposes, such as installing operating systems, creating backups, or sharing data.
Verify the Burned DVD
After burning an ISO image file to a DVD, it’s important to verify the burned DVD to ensure that the data was successfully written and the disc is readable. Follow these steps to verify the burned DVD:
- Inspect the physical appearance: Start by examining the physical appearance of the burned DVD. Check for any visible scratches, smudges, or irregularities on the disc surface. These physical imperfections can affect the readability of the data.
- Insert the DVD: Carefully insert the burned DVD into a DVD drive, such as a computer’s DVD drive or a standalone DVD player. Ensure that the DVD drive can read the disc properly and that it is recognized by the operating system or the DVD player.
- Access the contents: Open the file explorer on your computer or navigate through the menus on your DVD player to access the contents of the burned DVD. Ensure that you can see all the files and folders that were originally present in the ISO image file.
- Play any multimedia files: If the ISO image file contained multimedia files, such as videos or audio tracks, try playing them from the burned DVD. Pay attention to any playback issues, such as stuttering, freezing, or audio/video synchronization problems.
- Verify file integrity: Use file comparison tools or checksum verification methods to compare the files on the burned DVD with the files in the original ISO image file. This helps ensure that the data on the disc is an exact copy of the original and that no errors or corruptions occurred during the burning process.
- Test installation (if applicable): If the burned DVD was created for installing an operating system or software, perform a test installation to ensure that it proceeds without any errors or issues. Make sure all the necessary files are copied correctly during the installation process.
- Check for any errors or warnings: Monitor for any errors or warnings that may appear during the verification or testing processes. These indications can highlight potential issues with the burned DVD, such as unreadable or corrupted data.
By carefully verifying the burned DVD, you can confirm the integrity and readability of the data and ensure that the disc is usable for its intended purposes. If any errors or issues are detected, it may be necessary to reburn the ISO image file to a new DVD using the appropriate DVD burning software.
Troubleshooting Common Issues
While burning an ISO image file to a DVD, you may encounter some common issues. Understanding and troubleshooting these issues can help ensure a successful burning process. Here are some common problems and their possible solutions:
- Verification errors: If the verification process indicates errors or fails, it could be due to a problem with the ISO image file, the DVD media, or the burning software. Try verifying the ISO file integrity again or consider burning the ISO to a different DVD media using a different burning program.
- Burning process failures: If the burning process fails or encounters errors, it could be caused by a variety of factors. Ensure that your DVD burner is functioning properly, check for any software conflicts, and try burning the ISO file at a lower speed. Updating the DVD burning software or using a different brand of DVD media may also help resolve the issue.
- Compatibility issues: In some cases, the burned DVD may not be compatible with certain devices or operating systems. Ensure that you are using the appropriate DVD format (such as DVD-R or DVD+R) and file system format (ISO 9660 or UDF) that are supported by the target device or operating system.
- Unreadable DVD: If the burned DVD is not being recognized or read by the DVD drive or player, it may be due to a dirty or damaged disc. Clean the DVD surface gently using a soft cloth and try again. If the problem persists, the DVD media may be faulty or incompatible, and it may be necessary to burn the ISO image file onto a new DVD.
- Incomplete or missing files: If the burned DVD has missing or incomplete files compared to the original ISO image file, it could be due to errors during the burning process. Ensure that you are using reliable DVD media and a stable burning environment. Double-check the burning settings to ensure that all the necessary files are selected for burning.
- Slow burning speed: If the burning process is taking an unusually long time, it could be due to several factors. Try closing unnecessary applications and processes running in the background to free up system resources. Additionally, using a lower burning speed can result in a more reliable and efficient burning process.
By troubleshooting common issues encountered during the DVD burning process, you can overcome obstacles and achieve successful results. Remember to follow the recommended solutions and seek further assistance if necessary to ensure a smooth DVD burning experience.
Final Thoughts and Additional Tips
Burning an ISO image file to a DVD can be a convenient and reliable way to distribute, backup, or create bootable media. Here are some final thoughts and additional tips to enhance your DVD burning experience:
- Use high-quality DVD media: Ensure that you use high-quality DVD media from reputable brands. The quality of the DVD can impact the longevity and readability of the burned data.
- Store DVDs properly: Place burned DVDs in protective cases or sleeves to prevent scratches and damage. Store them in a cool and dry environment away from direct sunlight to preserve their integrity.
- Keep your DVD burning software updated: Regularly update your DVD burning software to take advantage of bug fixes, new features, and improved compatibility with different operating systems and devices.
- Verify the source of the ISO image file: When downloading or obtaining an ISO image file, ensure that it comes from a trusted source. Verify the authenticity, integrity, and safety of the file to avoid burning any malicious or corrupted data.
- Read and follow instructions: Whether it’s the DVD burning software’s user guide or specific instructions provided with the ISO image file, carefully read and follow the instructions to ensure a successful burning process.
- Consider alternative methods: While burning ISO image files to DVDs is a common method, consider alternative methods such as using USB drives, network-based installations, or virtual discs if they better suit your needs or provide additional benefits.
- Keep backups of important ISO files: Create backups of the original ISO image files on reliable storage devices to prevent data loss. This ensures that you can always recreate and burn the ISO image file if needed.
- Test the burned DVD: After burning the ISO image file to a DVD, perform thorough testing of the disc to ensure that it functions as expected and contains all the necessary files and data.
By following these tips and taking the necessary precautions, you can successfully burn ISO image files to DVDs and utilize them effectively for various purposes. Enjoy the flexibility and convenience offered by DVD burning, and always strive for accurate and reliable data reproduction.