
How to Access iCloud Mail
iCloud Mail is a reliable and convenient email service provided by Apple. With iCloud Mail, you can access your emails, send and receive messages, and manage your inbox from any device with an internet connection. Here’s how you can access iCloud Mail:
- On Mac: If you’re using a Mac, simply click on the Mail icon in the dock or open the Mail app from the Applications folder. Once the Mail app is open, click on “Mail” in the top menu bar and select “Preferences.” From there, choose the “Accounts” tab and select your iCloud account. This will give you access to your iCloud Mail inbox.
- On iPhone or iPad: To access iCloud Mail on your iPhone or iPad, go to the home screen and tap on the “Settings” app. Scroll down and tap on “Mail” and then select “Accounts.” Tap on your iCloud account and make sure that the Mail toggle switch is turned on. This will enable you to access your iCloud Mail from the Mail app on your device.
- On iCloud.com: Another way to access iCloud Mail is through the iCloud website. Open a web browser and go to www.icloud.com. Sign in with your Apple ID and password. Once you’re logged in, click on the “Mail” icon to access your iCloud Mail inbox. This method allows you to access iCloud Mail from any computer with internet access.
By following these simple steps, you can easily access your iCloud Mail and stay connected with your emails no matter where you are or which device you’re using.
Open an Email in iCloud Mail
Once you have accessed your iCloud Mail account, you can easily view and read your emails. Here’s how you can open an email in iCloud Mail:
- On Mac: In the iCloud Mail app on your Mac, simply click on the email you want to open in the inbox. The selected email will open in a new window, allowing you to read its contents.
- On iPhone or iPad: To open an email on your iPhone or iPad, open the Mail app and navigate to your iCloud Mail inbox. Tap on the email you want to read, and it will open in a new window. You can easily scroll through the email to view its contents and any attachments.
- On iCloud.com: If you are accessing iCloud Mail through the iCloud website, click on the email you want to open in the inbox. The email will open in a new tab or window, depending on your browser settings. You can read the email and interact with its contents.
When you open an email in iCloud Mail, you have several options available to you. You can reply to the email, forward it to someone else, or delete it if it’s no longer needed. Additionally, you can mark the email as unread if you want to come back to it later or flag it for follow-up if it requires your attention.
Opening emails in iCloud Mail is a straightforward process, allowing you to stay organized and keep up with your messages effortlessly. Whether you’re using a Mac, iPhone, iPad, or accessing iCloud Mail via the website, accessing and reading your emails is quick and convenient.
How to Block a Sender in iCloud Mail
If you’re receiving unwanted emails or spam from a particular sender in your iCloud Mail inbox, you can easily block them to prevent them from sending you further messages. Here’s how you can block a sender in iCloud Mail:
- On Mac:
- Open iCloud Mail on your Mac.
- Select the email from the sender you want to block.
- Click on the “Flag” icon in the Mail toolbar.
- From the dropdown menu, select “Block Sender”. A confirmation message will appear.
- Click on “Block Sender” to confirm. The sender will now be blocked, and any future emails from them will be automatically moved to the Junk folder.
- On iPhone or iPad:
- Open the Mail app on your iPhone or iPad.
- Find the email from the sender you want to block.
- Swipe left on the email to reveal the options.
- Tap on the “More” button (represented by three dots).
- Tap on “Block this Contact” or “Block this Sender”. A confirmation message will appear.
- Tap on “Block Contact” or “Block Sender” to confirm. The sender will now be blocked.
- On iCloud.com:
- Go to iCloud.com and sign in to your iCloud Mail account.
- Select the email from the sender you want to block.
- Click on the “Flag” icon in the Mail toolbar.
- From the dropdown menu, select “Block Sender”. A confirmation message will appear.
- Click on “Block Sender” to confirm. The sender will now be blocked, and any future emails from them will be automatically moved to the Junk folder.
Blocking a sender in iCloud Mail is an effective way to prevent unwanted emails from cluttering your inbox. Whether you’re using a Mac, iPhone, iPad, or accessing iCloud Mail via the website, you have the ability to take control of your email experience and block senders with ease.
Blocking a Sender on Mac
If you’re using a Mac and want to block a sender in your iCloud Mail, you can easily do so by following these steps:
- Open iCloud Mail on your Mac by clicking on the Mail icon in the dock or opening the Mail app from the Applications folder.
- Select the email from the sender you want to block. You can do this by clicking on the email in your inbox.
- In the Mail toolbar, find and click on the “Flag” icon. This will open a dropdown menu.
- From the dropdown menu, select “Block Sender”. A confirmation message will appear.
- Click on “Block Sender” to confirm your decision. The sender will now be blocked, and any future emails from them will be automatically moved to the Junk folder.
By blocking a sender on your Mac, you can effectively prevent their emails from cluttering your inbox and protect yourself from spam or unwanted communication. This feature is particularly useful if you find yourself regularly receiving emails from a specific sender that you no longer wish to receive.
It’s important to note that blocking a sender only applies to the specific email address associated with them. If the sender uses a different email address in the future, you may need to repeat the steps to block them again.
Whether you’re dealing with persistent spammers or simply trying to filter out unwanted emails, blocking a sender on your Mac is a handy tool in managing your iCloud Mail inbox and ensuring a more organized and streamlined email experience.
Blocking a Sender on iPhone or iPad
If you’re using an iPhone or iPad and want to block a sender in your iCloud Mail, you can easily do so by following these steps:
- Open the Mail app on your iPhone or iPad.
- Navigate to your iCloud Mail inbox and find the email from the sender you want to block.
- Swipe left on the email to reveal additional options.
- Tap on the “More” button (represented by three dots).
- From the options menu, tap on “Block this Contact” or “Block this Sender”. A confirmation message will appear.
- Tap on “Block Contact” or “Block Sender” to confirm your decision. The sender will now be blocked.
By blocking a sender on your iPhone or iPad, you can effectively prevent their emails from appearing in your iCloud Mail inbox. This allows you to filter out unwanted communication and maintain a more organized email experience.
It’s important to note that blocking a sender only applies to the specific email address associated with them. If the sender uses a different email address in the future, you may need to repeat the steps to block them again.
Blocking a sender on your iPhone or iPad is a useful feature to have, especially if you receive spam or unwanted emails from specific individuals. It gives you more control over your inbox and ensures that you only receive messages from senders you want to hear from.
Remember, the process of blocking a sender on iPhone or iPad may slightly vary depending on the version of iOS you’re using. However, the overall steps should remain fairly consistent across different versions.
Blocking a Sender on iCloud.com
If you prefer to access your iCloud Mail through the iCloud website, you can still block a sender to prevent their emails from cluttering your inbox. Here’s how you can block a sender on iCloud.com:
- Go to iCloud.com and sign in to your iCloud Mail account using your Apple ID and password.
- In your iCloud Mail inbox, select the email from the sender you want to block.
- Locate the “Flag” icon in the Mail toolbar and click on it. This will open a dropdown menu.
- From the dropdown menu, select “Block Sender”. A confirmation message will appear.
- Click on “Block Sender” to confirm your decision. The sender will now be blocked, and any future emails from them will be automatically moved to the Junk folder.
Blocking a sender on iCloud.com enables you to have more control over your inbox and helps you filter out unwanted emails. By using this feature, you can reduce distractions and focus on the important messages that matter to you.
It’s important to note that blocking a sender only applies to the specific email address associated with them. If the sender uses a different email address in the future, you may need to repeat the steps to block them again.
Whether you’re dealing with spam, unwanted communications, or simply want to declutter your iCloud Mail inbox, blocking a sender on iCloud.com is an effective way to manage your email flow and maintain an organized digital workspace.
It’s worth mentioning that the process may slightly vary depending on the version of the iCloud website you are using. However, the overall steps to block a sender should remain consistent and easy to follow.
How to Unblock a Sender in iCloud Mail
If you have previously blocked a sender in your iCloud Mail but have changed your mind or want to start receiving emails from them again, you can easily unblock them. Here’s how you can unblock a sender in iCloud Mail:
- On Mac:
- Open iCloud Mail on your Mac.
- Click on the “Mail” menu in the top menu bar and select “Preferences”.
- In the Preferences window, click on the “Rules” tab.
- In the left sidebar, locate and select the rule that includes the sender you want to unblock.
- Click on the “-” (minus) button at the bottom of the sidebar to delete the rule.
- Click on “OK” to save the changes. The sender will now be unblocked, and you will start receiving their emails in your inbox again.
- On iPhone or iPad:
- Open the Settings app on your iPhone or iPad.
- Scroll down and tap on “Mail”.
- Tap on “Blocked”, which is located under the “Threading” section.
- Locate and select the sender you want to unblock.
- Tap on “Edit” in the top-right corner.
- Tap on the red “-” (minus) icon next to the sender.
- Tap on “Unblock” to confirm. The sender will now be unblocked, and you will start receiving their emails again.
- On iCloud.com:
- Go to iCloud.com and sign in to your iCloud Mail account.
- Click on the “gear” icon in the top-right corner and select “Preferences”.
- In the Preferences window, click on the “Rules” tab.
- In the left sidebar, locate and select the rule that includes the sender you want to unblock.
- Click on the “-” (minus) button at the bottom of the sidebar to delete the rule.
- Click on “Done” to save the changes. The sender will now be unblocked, and you will start receiving their emails in your inbox again.
By following these simple steps, you can easily unblock a previously blocked sender in iCloud Mail and resume receiving emails from them. It’s a useful feature if you have mistakenly blocked someone or if you have resolved any previous issues with that sender.
Remember, unblocking a sender will allow their emails to appear in your inbox again. If you change your mind in the future, you can always follow the steps outlined earlier to block them again if necessary.
Unblock a Sender on Mac
If you have previously blocked a sender in your iCloud Mail on Mac but want to start receiving emails from them again, you can easily unblock them. Here’s how you can unblock a sender on Mac:
- Open iCloud Mail on your Mac by clicking on the Mail icon in the dock or opening the Mail app from the Applications folder.
- In the top menu bar, click on “Mail” and select “Preferences” from the dropdown menu.
- In the Preferences window, click on the “Rules” tab.
- In the left sidebar, locate and select the rule that includes the sender you want to unblock.
- Click on the “-” (minus) button at the bottom of the sidebar to delete the rule.
- Click on “OK” to save the changes. The sender will now be unblocked, and you will start receiving their emails in your inbox again.
By following these steps, you can easily unblock a previously blocked sender on your Mac and allow their emails to appear in your iCloud Mail inbox again. It’s a convenient feature if you want to reestablish communication with someone or if you have resolved any previous issues with that sender.
Remember, unblocking a sender will revert back to the default settings, and their emails will be delivered to your inbox. If you ever change your mind in the future and want to block the sender again, you can go through the steps to block them as outlined earlier.
Managing your blocked senders list on your Mac helps you have better control over your iCloud Mail inbox and ensures that you only receive emails from senders you want to hear from. It’s a useful feature in maintaining an organized and clutter-free email experience.
Unblock a Sender on iPhone or iPad
If you have previously blocked a sender in your iCloud Mail on your iPhone or iPad but want to start receiving emails from them again, you can easily unblock them. Here’s how you can unblock a sender on iPhone or iPad:
- Open the Settings app on your iPhone or iPad.
- Scroll down and tap on “Mail”.
- Under the “Threading” section, tap on “Blocked”.
- Locate and select the sender you want to unblock.
- Tap on “Edit” in the top-right corner.
- Tap on the red “-” (minus) icon next to the sender.
- Tap on “Unblock” to confirm your decision. The sender will now be unblocked, and you will start receiving their emails again.
By following these steps, you can easily unblock a previously blocked sender on your iPhone or iPad and allow their emails to appear in your iCloud Mail inbox again. Whether you have resolved any previous issues or simply changed your mind, unblocking a sender on your iPhone or iPad is a straightforward process.
Unblocking a sender will remove them from the blocked list and ensure that their emails are delivered to your inbox. If you ever wish to block them again in the future, you can go through the steps to block them as outlined earlier.
Managing your blocked senders list on your iPhone or iPad gives you control over your iCloud Mail inbox and allows you to tailor your email experience to your preferences. It’s a useful feature for maintaining a clean and organized mailbox, ensuring that you only receive emails from senders you want to hear from.
Unblock a Sender on iCloud.com
If you have previously blocked a sender in your iCloud Mail on iCloud.com but now want to start receiving emails from them again, you can easily unblock them. Here’s how you can unblock a sender on iCloud.com:
- Go to iCloud.com and sign in to your iCloud Mail account using your Apple ID and password.
- In your iCloud Mail inbox, click on the “gear” icon in the top-right corner and select “Preferences” from the dropdown menu.
- In the Preferences window, click on the “Rules” tab.
- In the left sidebar, locate and select the rule that includes the sender you want to unblock.
- Click on the “-” (minus) button at the bottom of the sidebar to delete the rule.
- Click on “Done” to save the changes. The sender will now be unblocked, and you will start receiving their emails in your inbox again.
By following these steps, you can easily unblock a previously blocked sender on iCloud.com and allow their emails to appear in your iCloud Mail inbox again. Unblocking a sender on iCloud.com gives you the flexibility to reestablish communication with someone or receive emails that you may have accidentally blocked.
It’s important to note that unblocking a sender removes them from the blocked list, and their emails will be delivered to your inbox. If you change your mind in the future and want to block the sender again, you can always go through the steps to block them as outlined earlier.
Unblocking a sender on iCloud.com allows you to have full control over your iCloud Mail inbox and ensures that you only receive messages from senders you want to hear from. It’s a useful feature for managing and organizing your email flow according to your preferences.
Managing Blocked Senders in iCloud Mail
In iCloud Mail, you have the ability to block unwanted senders to prevent their emails from cluttering your inbox. Additionally, you can also manage and customize your blocked senders list to ensure that you have control over who can reach your mailbox. Here’s how you can manage blocked senders in iCloud Mail:
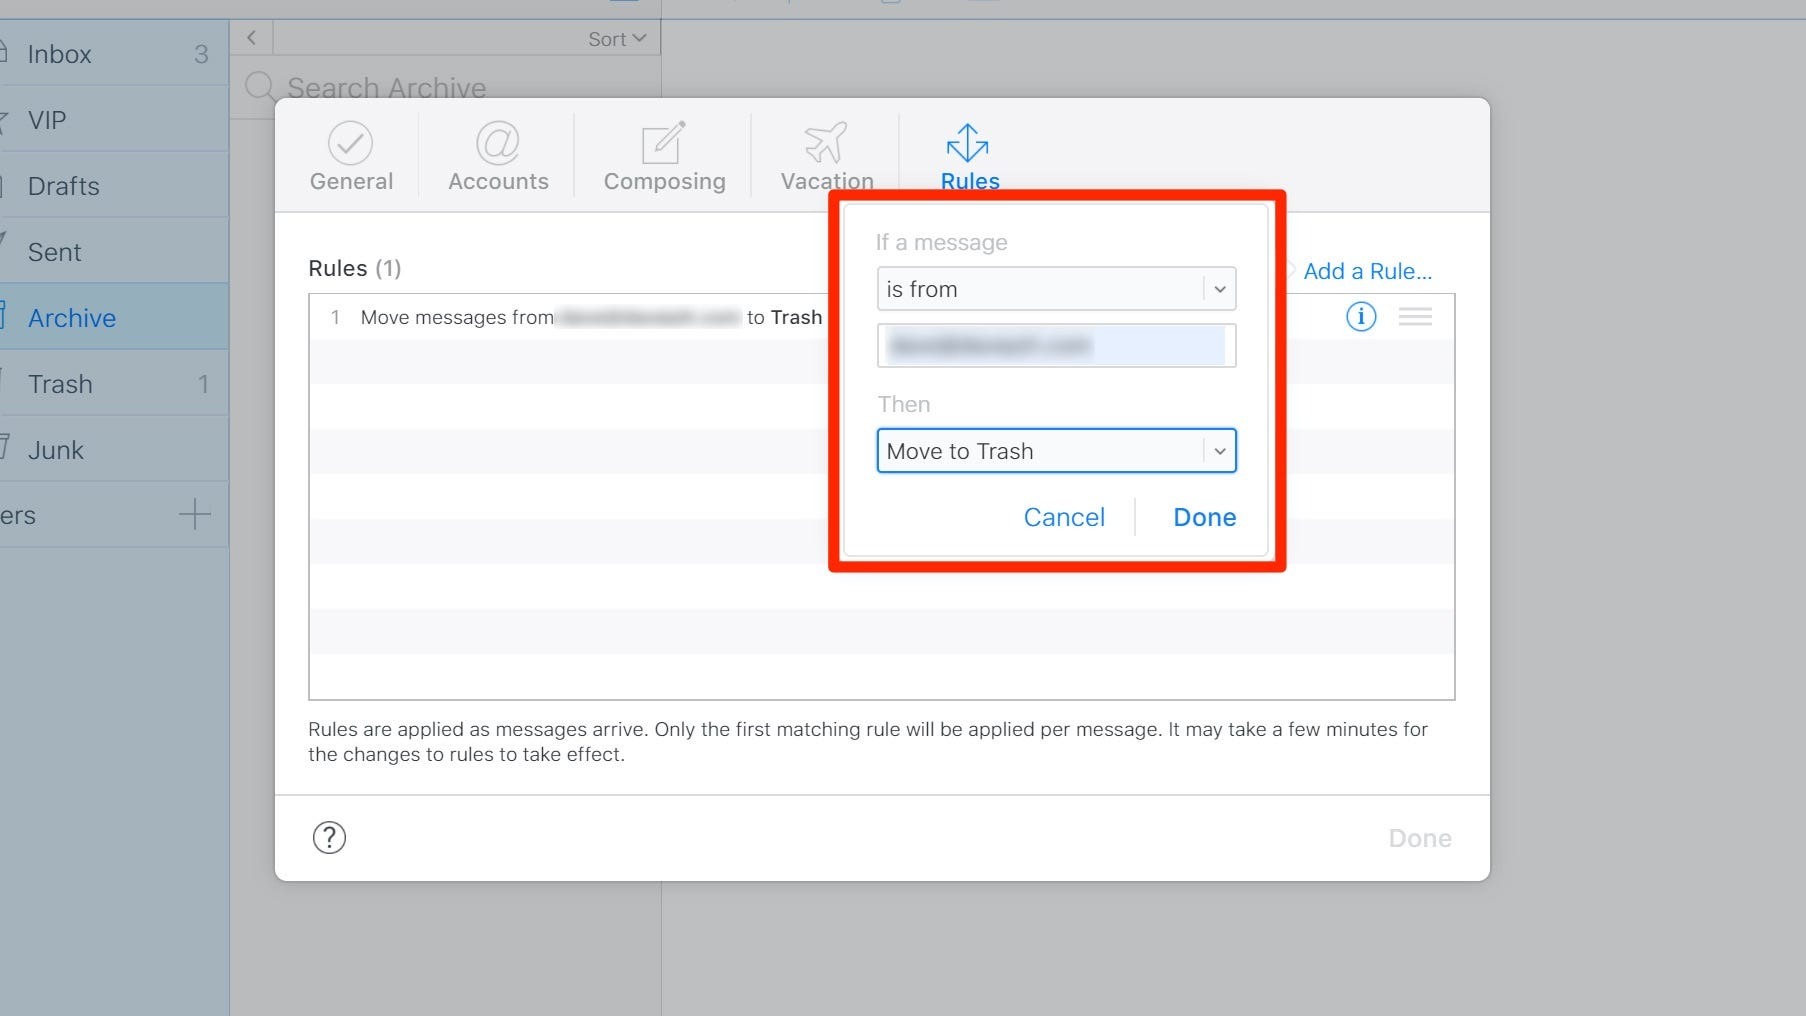
View and Edit Blocked Senders List on Mac:
- Open iCloud Mail on your Mac.
- Click on the “Mail” menu in the top menu bar and select “Preferences”.
- In the Preferences window, click on the “Rules” tab.
- In the left sidebar, you will see a list of rules.
- Look for the rule that includes the sender you want to unblock or edit.
- To unblock a sender, click on the “-” (minus) button next to the rule.
- To edit a rule, select it and make the necessary changes.
- Click on “OK” to save your changes.
View and Edit Blocked Senders List on iPhone or iPad:
- Launch the Settings app on your iPhone or iPad.
- Scroll down and tap on “Mail”.
- Under the “Threading” section, tap on “Blocked”.
- You will see a list of blocked senders.
- To unblock a sender, tap on “Edit” in the top-right corner, tap on the red “-” (minus) icon next to the sender, and tap on “Unblock” to confirm.
- To add a sender to the blocked list, tap on “Add New…” and enter the email address or name of the sender you want to block.
View and Edit Blocked Senders List on iCloud.com:
- Sign in to iCloud.com and access your iCloud Mail.
- Click on the “gear” icon in the top-right corner and select “Preferences” from the dropdown menu.
- In the Preferences window, click on the “Rules” tab.
- In the left sidebar, you will see a list of rules.
- Look for the rule that includes the sender you want to unblock or edit.
- To unblock a sender, click on the “-” (minus) button next to the rule. To edit a rule, select it and make the necessary changes.
- Click on “Done” to save your changes.
By managing your blocked senders list in iCloud Mail, you can customize your inbox and ensure that unwanted or spam emails are kept at bay. Whether you’re accessing iCloud Mail on your Mac, iPhone, iPad, or through the iCloud website, having the ability to view, edit, and control your blocked senders list adds an extra layer of protection and helps you maintain a clean and organized email experience.
View and Edit Blocked Senders List on Mac
When using iCloud Mail on your Mac, you have the ability to view and edit your blocked senders list. This allows you to manage and customize the list according to your preferences. Here’s how you can view and edit the blocked senders list on Mac:
- Open iCloud Mail on your Mac by clicking on the Mail icon in the dock or opening the Mail app from the Applications folder.
- Click on the “Mail” menu in the top menu bar and select “Preferences” from the dropdown menu.
- In the Preferences window, click on the “Rules” tab.
- In the left sidebar, you will see a list of rules.
- Each rule represents a blocked sender or a set of blocked conditions.
- To view the details of a rule, click on it, and you will see the sender or conditions specified in that rule.
- To unblock a sender, simply click on the “-” (minus) button next to the rule that includes the sender you want to unblock.
- If you want to edit a rule, select the rule and make the necessary changes to the sender or conditions.
- Click on “OK” to save your changes to the blocked senders list.
By viewing and editing the blocked senders list on your Mac, you can have more control over who can reach your iCloud Mail inbox. This is especially useful for filtering out unwanted emails or preventing spam from cluttering your mailbox.
Keep in mind that managing the blocked senders list on your Mac can help you maintain a clean and organized email experience. It allows you to tailor your inbox to your preferences and ensures that you only receive messages from senders you want to hear from.
Take advantage of the option to view and edit the blocked senders list on your Mac to enhance your email productivity and enjoy a more personalized iCloud Mail experience.
View and Edit Blocked Senders List on iPhone or iPad
With iCloud Mail on your iPhone or iPad, you have the ability to view and edit your blocked senders list. This feature allows you to manage and customize the list, ensuring that you have control over who can reach your inbox. Here’s how you can view and edit the blocked senders list on iPhone or iPad:
- Launch the Settings app on your iPhone or iPad.
- Scroll down and tap on “Mail”.
- Under the “Threading” section, tap on “Blocked”.
- You will see a list of blocked senders.
- To view the details of a blocked sender, simply tap on their name or email address.
- To unblock a sender, tap on “Edit” in the top-right corner.
- Tap on the red “-” (minus) icon next to the sender you want to unblock.
- Confirm your decision by tapping on “Unblock”.
- To add a new sender to the blocked list, tap on “Add New…” and enter the email address or name of the sender you want to block.
By viewing and editing the blocked senders list on your iPhone or iPad, you can effectively manage unwanted or spam emails. This feature allows you to tailor your mailbox to your preferences and ensures that you only receive messages from senders you want to hear from.
Keep in mind that managing the blocked senders list on your iPhone or iPad provides you with more control over your email experience. It helps you maintain a clutter-free inbox and customize your settings according to your needs.
Utilize the option to view and edit the blocked senders list on your iPhone or iPad to enhance your email productivity and enjoy a more personalized iCloud Mail experience.
View and Edit Blocked Senders List on iCloud.com
When using iCloud Mail on iCloud.com, you have the ability to view and edit your blocked senders list. This gives you control over who can reach your mailbox and allows you to customize your email experience. Here’s how you can view and edit the blocked senders list on iCloud.com:
- Sign in to iCloud.com and access your iCloud Mail.
- Click on the “gear” icon in the top-right corner of the screen. This will open a dropdown menu.
- Select “Preferences” from the dropdown menu.
- In the Preferences window, click on the “Rules” tab.
- In the left sidebar, you will see a list of rules.
- Each rule represents a blocked sender or a set of blocked conditions.
- To view the details of a rule, click on it, and you will see the sender or conditions specified in that rule.
- To unblock a sender, simply click on the “-” (minus) button next to the rule that includes the sender you want to unblock.
- If you want to edit a rule, select the rule and make the necessary changes to the sender or conditions.
- Click on “Done” to save your changes to the blocked senders list.
By viewing and editing the blocked senders list on iCloud.com, you have the power to manage your email flow and ensure that your mailbox is free from unwanted or spam emails. It enables you to personalize your inbox according to your preferences and only receive messages from senders you want to hear from.
Take advantage of the option to view and edit the blocked senders list on iCloud.com to enhance your email productivity and enjoy a more customized and organized iCloud Mail experience.