
Step 1: Set up your Google Nest Doorbell
Setting up your Google Nest Doorbell is the first step towards integrating it with the Google Home app. Follow these simple instructions to ensure a smooth installation process:
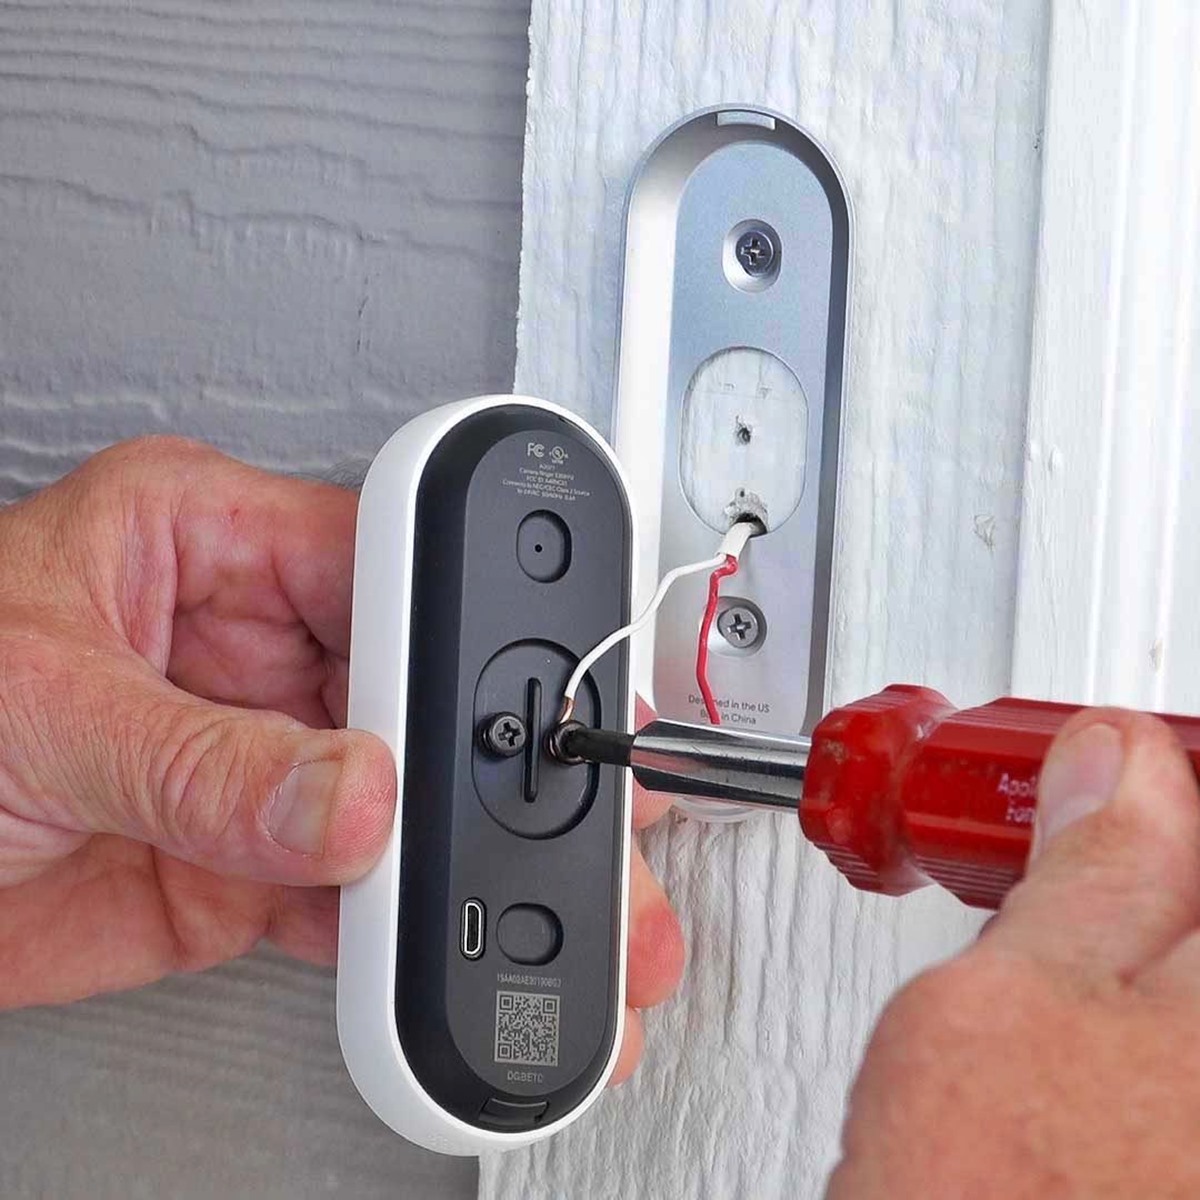
- Prepare the necessary tools: Before you begin, make sure you have the following tools: a screwdriver, a drill, and a level. These will help you securely mount your doorbell.
- Locate the ideal installation spot: Find an appropriate location for your doorbell. It should have a clear view of the area you want to monitor, and it should be within a reasonable range of your Wi-Fi network.
- Mount the doorbell: Use the level to ensure that the doorbell is mounted straight. Make sure to firmly attach it to the wall or doorframe using the screws provided.
- Connect the doorbell to your Wi-Fi network: Follow the manufacturer’s instructions to connect your doorbell to your home’s Wi-Fi network. This will enable seamless integration with the Google Home app.
- Test the doorbell: Once connected, test the doorbell to ensure it is working properly. Ring the doorbell and check if you receive a notification on your smartphone or if it triggers an alert sound.
- Adjust the settings: Use the manufacturer’s app to adjust any specific settings for your doorbell, such as motion detection sensitivity or notification preferences.
By completing these steps, you have successfully set up your Google Nest Doorbell and made it ready for integration with the Google Home app. Now, let’s move on to the next step and connect your doorbell to the app.
Step 2: Connect your Google Nest Doorbell to the Google Home app
Once you have set up your Google Nest Doorbell, the next step is to connect it to the Google Home app. This will allow you to access and control your doorbell’s features directly from the app on your smartphone or tablet. Follow these steps to seamlessly integrate your doorbell:
- Open the Google Home app: Launch the Google Home app on your smartphone or tablet. If you don’t have the app already, you can download it from the App Store or Google Play Store.
- Tap on the ‘Add’ button: Look for the ‘+’ icon at the top-left corner or bottom-right corner of the app’s home screen and tap on it.
- Select ‘Set up device’: From the list of available options, choose ‘Set up device’ to begin the setup process.
- Choose ‘Have something already set up?’: In the setup options, select ‘Have something already set up?’ instead of ‘Set up new devices’.
- Find and select your doorbell: Scroll through the list of compatible devices and select ‘Google Nest Doorbell’ when you see it. Follow the on-screen instructions to proceed.
- Enter your Google account credentials: Sign in with your Google account by entering your email address and password when prompted.
- Follow the on-screen instructions: The app will guide you through the process of connecting your doorbell to the Google Home app. Make sure to follow the instructions carefully to complete the setup.
Once the connection is established, you will be able to access and control your Google Nest Doorbell from the Google Home app. This includes features such as viewing the live stream, adjusting settings, and receiving notifications. Take some time to explore the app and familiarize yourself with the different options available for your doorbell.
With your doorbell successfully connected to the Google Home app, let’s move on to the next step and learn how to add your doorbell to Google Home.
Step 3: Add your Google Nest Doorbell to Google Home
After connecting your Google Nest Doorbell to the Google Home app, you are now ready to add it to your Google Home system. This will allow you to control your doorbell using voice commands and access its features through other Google Home devices. Follow these steps to seamlessly add your doorbell:
- Open the Google Home app: Launch the Google Home app on your smartphone or tablet.
- Tap on the ‘+’ button: Look for the ‘+’ icon at the top-left corner or bottom-right corner of the app’s home screen and tap on it.
- Select ‘Set up device’: From the list of available options, choose ‘Set up device’ to begin the setup process.
- Choose ‘Set up new devices’: In the setup options, select ‘Set up new devices’ instead of ‘Have something already set up?’.
- Follow the on-screen instructions: The app will search for available devices. When it finds your Google Nest Doorbell, select it from the list and follow the on-screen instructions to complete the setup.
- Create a location for your doorbell: Assign a location name to your doorbell, such as ‘Front Door’ or ‘Backyard’ to help identify its placement within your home.
- Choose a default room: Select a default room for your doorbell to help organize your Google Home devices. For example, you can assign it to the ‘Living Room’ or ‘Entryway’.
- Review and confirm: Double-check the details and settings, then tap on ‘Confirm’ to add your Google Nest Doorbell to the Google Home system.
Once successfully added, you can now control your doorbell using voice commands with any Google Home device that supports it. Additionally, you can access and manage your doorbell’s settings through the Google Home app or using the Google Assistant on your smartphone, smart speaker, or smart display.
Now that your Google Nest Doorbell is added to Google Home, it’s time to move on to the next step and customize your doorbell’s settings in the app.
Step 4: Customize your Google Nest Doorbell settings in Google Home
Now that you have added your Google Nest Doorbell to the Google Home app, it’s time to customize its settings according to your preferences. Personalizing your doorbell’s settings will ensure that it caters to your specific needs and provides the desired level of functionality. Follow these steps to customize your Google Nest Doorbell settings:
- Open the Google Home app: Launch the Google Home app on your smartphone or tablet.
- Tap on the doorbell device: Look for your Google Nest Doorbell device listed in the app’s home screen or the ‘Devices’ tab and tap on it.
- Explore the settings: Within the doorbell device screen, you will find various settings options. Tap on each setting to explore and customize it:
- Notification preferences: Choose how you want to receive notifications for events such as someone ringing the doorbell, motion detection, or package delivery. You can enable/disable sounds, customize the notification tone, or set up alerts for specific events.
- Motion detection settings: Adjust the sensitivity and detection zones for motion events. This allows you to focus on specific areas and minimize false alerts.
- Video quality: Customize the video quality based on your internet bandwidth and personal preference. Higher quality settings may provide clearer images but require a stable network connection.
- Activity history: Review the activity history of your doorbell, including recorded events and snapshots. This can help you keep track of who has visited your doorstep and when.
- Save your settings: Once you have customized the desired settings, make sure to save your changes by tapping on the ‘Save’ or ‘Apply’ button.
- Explore advanced settings (optional): If you want to further fine-tune your Google Nest Doorbell’s settings, you can explore the advanced settings options within the app. These settings may include features like facial recognition, activity zones, and more.
By customizing your Google Nest Doorbell settings, you can enhance its functionality and tailor it to meet your specific needs. Take the time to explore and adjust the settings to optimize your doorbell’s performance and ensure that it provides you with the best user experience.
Now that you have personalized your Google Nest Doorbell, let’s move on to the next step and learn how to enable voice commands for your doorbell.
Step 5: Enable voice commands for your Google Nest Doorbell
One of the great features of integrating your Google Nest Doorbell with the Google Home app is the ability to control it using voice commands. Enabling voice commands allows you to conveniently interact with your doorbell and access its features through any Google Home devices with built-in Google Assistant support. Follow these steps to enable voice commands for your Google Nest Doorbell:
- Open the Google Home app: Launch the Google Home app on your smartphone or tablet.
- Navigate to the doorbell device: Locate and tap on your Google Nest Doorbell device either on the app’s home screen or within the ‘Devices’ tab.
- Tap on the settings gear icon: Look for the settings gear icon typically located in the upper right corner of the doorbell device screen and tap on it.
- Select ‘More settings’: From the menu that appears, select ‘More settings’ to access additional options and configurations for your doorbell.
- Enable voice commands: Look for the ‘Enable Google Assistant’ or ‘Enable voice commands’ option within the settings. Toggle the switch to turn on voice commands for your Google Nest Doorbell.
- Follow the on-screen instructions: The app will guide you through the process of setting up voice commands for your doorbell. This may involve linking your Google account, training the Assistant to recognize your voice, or granting necessary permissions.
- Test the voice commands: Once voice commands are enabled, try using the designated wake phrase (usually ‘Hey Google’ or ‘OK Google’) followed by specific instructions related to your doorbell. For example, you can say, ‘Hey Google, show me my front door’ to view the live feed on a Google Home Hub or smart display.
Once you have successfully enabled voice commands, you can conveniently control your Google Nest Doorbell by simply using your voice. This makes it easy to check on your doorstep, view the live stream, and perform various other actions without needing to access the Google Home app manually.
Take some time to experiment with different voice commands for your doorbell and explore the possibilities of hands-free control through your Google Home devices. Enjoy the convenience and accessibility that voice commands provide!
With voice commands set up for your Google Nest Doorbell, let’s move on to the final step and explore some troubleshooting tips to address any issues that may arise.
Step 6: Troubleshooting tips
While setting up and using your Google Nest Doorbell, you may encounter some common issues or challenges. Don’t worry; we’ve got you covered with these troubleshooting tips to help resolve any potential problems:
- Check your Wi-Fi connection: Ensure that your doorbell is properly connected to your Wi-Fi network and that you have a stable internet connection. Weak or intermittent Wi-Fi signals can affect the performance of your doorbell.
- Restart your devices: Sometimes, a simple restart can resolve connectivity issues. Restart your Google Nest Doorbell, Google Home app, and any other relevant devices to refresh the connection.
- Review device placement: Check the position of your doorbell and make sure it has a clear line of sight to your Wi-Fi router. Avoid any obstructions or interference that may disrupt the wireless signal.
- Update firmware and apps: Ensure that your Google Nest Doorbell, Google Home app, and any other associated firmware or apps are up to date. Keeping them updated can fix bugs and improve overall performance.
- Adjust motion detection settings: If you’re receiving too many false motion alerts or missing important events, consider adjusting the motion detection sensitivity and detection zones in the app to better match your preferences.
- Check power supply: If your doorbell is not functioning properly, check if it has a stable power supply. Ensure that the wiring is securely connected and that the voltage meets the required specifications.
- Reset the doorbell: As a last resort, you can try resetting your Google Nest Doorbell to its factory settings. Refer to the manufacturer’s instructions on how to perform a reset and follow the steps carefully.
If these troubleshooting tips do not resolve the issue, you can reach out to the Google Nest support team or consult the manufacturer’s documentation for further assistance. They can provide specific guidance based on the nature of the problem you are facing.
Remember, troubleshooting is a normal part of any technological setup, and with a little patience and persistence, you’ll soon have your Google Nest Doorbell working seamlessly with your Google Home system.