
What are Custom Patterns?
Custom patterns are a versatile and powerful feature in Adobe Photoshop that allow you to create and apply repetitive designs, shapes, or textures to your projects. They can be used to add unique backgrounds, fill in shapes, or create intricate designs with ease. With custom patterns, you can unleash your creativity and give your work a distinct look and feel.
A pattern is essentially a seamless, tileable image that can be repeated infinitely to cover an area of any size. Photoshop provides various built-in patterns, but creating your own custom patterns gives you the freedom to tailor them specifically to your needs and style. Whether you want to replicate a specific texture, incorporate a branded design element, or simply explore new creative possibilities, custom patterns are the way to go.
The beauty of custom patterns lies in their ability to be applied across different projects and resized without losing quality. From small web graphics to large-scale print designs, they are adaptable and easily customizable. With just a few clicks, you can transform the appearance of your designs, adding depth, visual interest, and a cohesive look to your artwork.
Patterns can be created using a variety of elements, including shapes, colors, gradients, or even images. By combining these elements and arranging them in a specific pattern, you can create unique and intricate designs that would be difficult or time-consuming to create manually. Custom patterns are not only a time-saving tool, but they also allow you to achieve complex looks with precision and consistency.
Whether you are a graphic designer, illustrator, or photographer, custom patterns are a valuable asset in your creative toolbox. They provide endless possibilities to enhance your work and add that extra touch of professionalism. Let’s explore how to create, save, and use custom patterns in Adobe Photoshop.
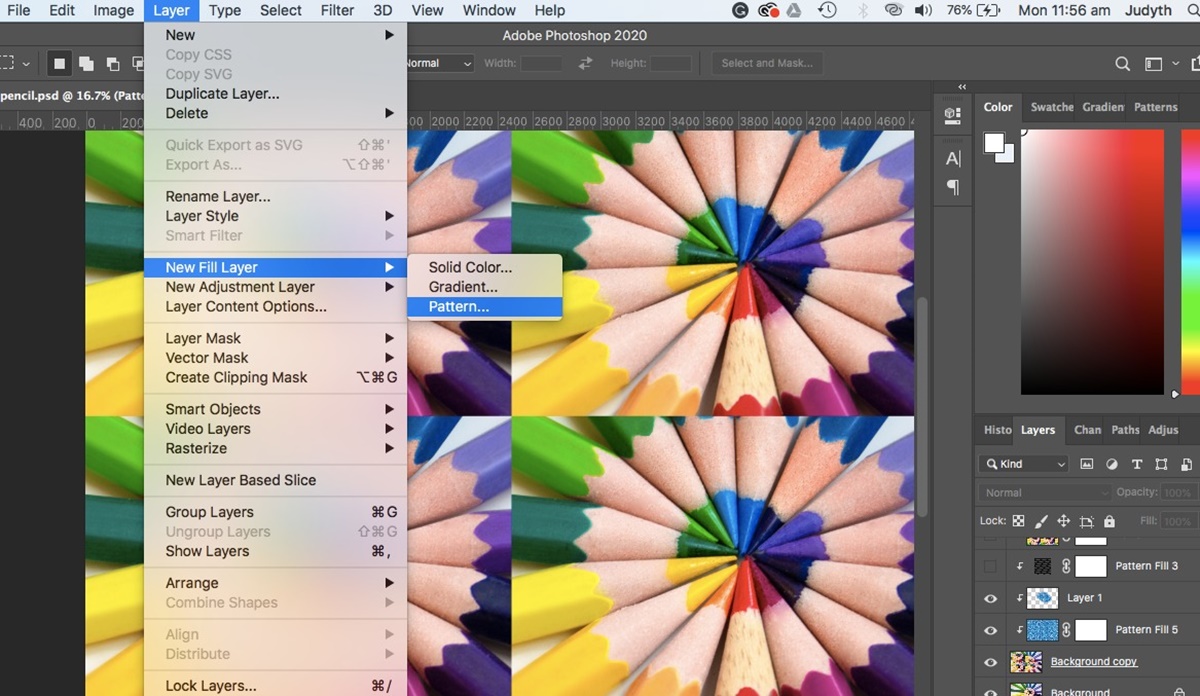
How to Create a Custom Pattern
Creating your own custom pattern in Photoshop is a straightforward process that allows you to unleash your creativity and personalize your designs. There are two main methods to create a custom pattern: using the Paint Bucket tool or the Define Pattern dialogue. Let’s explore both methods in detail.
Using the Paint Bucket Tool
One way to create a custom pattern is by using the Paint Bucket tool. In Photoshop, select the area or shape that you want to turn into a pattern. Ensure that the selection seamlessly tiles when repeated. Go to the Edit menu and choose Define Pattern. A dialogue box will appear prompting you to name your pattern. Give it a unique and descriptive name, then click OK. Your custom pattern is now saved and ready to use.
Keep in mind that using the Paint Bucket tool to create custom patterns works best for simple and repetitive designs. If your pattern is more complex or requires precise alignment, consider using the Define Pattern dialogue method.
Using the Define Pattern Dialogue
The Define Pattern dialogue method provides greater control and customization options for creating your custom pattern. Start by designing your pattern on a separate document or layer. Once you are satisfied with your design, select the entire canvas by pressing Ctrl+A (Windows) or Command+A (Mac). Next, go to the Edit menu, choose Define Pattern, and give your pattern a name in the dialogue box. Click OK to save your custom pattern.
By using this method, you can easily create custom patterns with intricate details, gradients, images, or more complex designs. You have the flexibility to experiment and refine your pattern until it matches your vision perfectly.
Now that you know how to create a custom pattern using either the Paint Bucket tool or the Define Pattern dialogue, let’s move on to saving and organizing your patterns for future use.
Using the Paint Bucket Tool
The Paint Bucket tool in Photoshop is a handy feature that allows you to easily fill selected areas with color or patterns. When it comes to creating custom patterns, the Paint Bucket tool plays a crucial role in applying your pattern to your design elements. Let’s explore how to use the Paint Bucket tool to apply a custom pattern in Photoshop.
First, open the image or design file in Photoshop where you want to apply the custom pattern. Ensure that you have the custom pattern you want to use already created and available in your Photoshop patterns library. If you haven’t created a custom pattern yet, refer to the previous section on how to create one.
Next, select the layer or area on which you want to apply the pattern. You can use the Marquee tool or any other selection tool to make your desired selection. Once the area is selected, select the Paint Bucket tool from the Photoshop toolbar or press the shortcut key “G”. Alternatively, you can access the Paint Bucket tool by pressing Shift + G repeatedly until it appears.
With the Paint Bucket tool selected, look to the options bar at the top of the Photoshop workspace. In the options bar, you will find a dropdown menu labeled “Fill.” Click on the dropdown menu and select “Pattern” from the list. This will bring up a thumbnail display of available patterns.
To apply your custom pattern, click on the pattern thumbnail and select the desired pattern from the patterns library. If your custom pattern is not visible in the library, click on the gear icon and choose “Import Patterns.” Locate your custom pattern file on your computer and click “OK” to import it into the patterns library. Once you select the custom pattern, it will be loaded onto the Paint Bucket tool.
Finally, simply click within the selected area on your canvas to fill it with the custom pattern. The Paint Bucket tool will automatically fill the selected area with the pattern you have chosen. If you want to adjust the fill opacity or blend mode, you can do so in the options bar before applying the pattern. Experiment with different settings to achieve the desired effect.
Using the Paint Bucket tool to apply custom patterns is a quick and effective way to add texture, depth, and interest to your designs. With just a few clicks, you can transform your artwork and make it visually appealing. Now that you know how to use the Paint Bucket tool, let’s move on to the next method of creating custom patterns in Photoshop.
Using the Define Pattern Dialogue
Another method for creating custom patterns in Photoshop is by using the Define Pattern dialogue. This method provides more control and customization options, making it ideal for patterns with intricate details or complex designs. Let’s explore how to use the Define Pattern dialogue to create custom patterns in Photoshop.
First, open the image or design file in Photoshop that you want to use for creating the custom pattern. Ensure that the design element or pattern you want to turn into a custom pattern is isolated on its own layer. This will allow you to easily select and define it as a pattern without including any unwanted elements.
Next, select the layer or area that contains the design element you want to turn into a pattern. You can use the Marquee tool or any other selection tool to make your desired selection. Make sure that the selection encompasses the entire design element you want to turn into a pattern.
Once the selection is made, navigate to the Edit menu at the top of the Photoshop workspace. From the dropdown menu, select “Define Pattern.” A dialogue box will appear, prompting you to name your custom pattern. Give your pattern a unique and descriptive name to easily identify it in your pattern library.
After entering the pattern name, click the “OK” button to save your custom pattern. Photoshop will then store the pattern in your patterns library, making it accessible for future use. You can access your custom patterns by clicking on the patterns dropdown menu in the options bar when using the Paint Bucket tool or any other tool that allows pattern selection.
The Define Pattern dialogue method allows you to create custom patterns with intricate details, gradients, or more complex designs. You have the flexibility to experiment and refine your pattern until it matches your vision perfectly. This method is particularly useful when dealing with patterns that require precise alignment or when you want to create patterns from multiple design elements combined together.
With the Define Pattern dialogue, you have the freedom to create intricate patterns and unleash your creativity. Whether you are designing backgrounds, adding textures, or creating unique patterns, this method offers a versatile and powerful way to customize your patterns in Photoshop.
Now that you know how to use the Define Pattern dialogue to create custom patterns, you can move on to the next step of saving your patterns for future use.
How to Save Custom Patterns
Once you have created your custom patterns in Adobe Photoshop, it is important to save them for easy access and future use. Saving your custom patterns allows you to maintain a library of your own unique designs and patterns that can be applied to various projects. Let’s explore how to save custom patterns in Photoshop.
To save a custom pattern, start by opening the Pattern Fill dialog. You can do this by selecting the layer or area to which you have applied the pattern or by clicking on the Fill layer button in the Layers panel and selecting the pattern option. This will bring up the Pattern Fill dialog, where you can adjust various settings related to your pattern.
In the Pattern Fill dialog, you will see a thumbnail display of the currently selected pattern. To save this pattern, click on the gear icon located in the upper-right corner of the thumbnail display. From the dropdown menu, select “Save Patterns.” This will open a save dialog box where you can choose the location and name for your pattern file.
By default, Photoshop will save your custom patterns in the “Presets/Patterns” folder within the Photoshop installation directory. However, you can choose any location on your computer to save the pattern file. It is recommended to create a dedicated folder for your custom patterns to keep them organized.
Once you have chosen the location and name for your pattern file, click the “Save” button to save your custom pattern. This will create a pattern file with the .pat extension, which can be loaded and applied in future Photoshop projects.
It is worth noting that you can save multiple custom patterns in the same pattern file. This is particularly useful when you have created a set of related patterns that you want to keep together. Simply repeat the process of saving patterns within the same pattern file, and all the patterns will be available when the file is loaded in Photoshop.
By saving your custom patterns, you ensure that you can easily access and apply them to your future projects without having to recreate them every time. This not only saves time but also allows for consistency and branding across different designs.
Now that you know how to save your custom patterns in Photoshop, you can create sets of patterns and organize them for better efficiency and workflow. Let’s explore how to create a set of custom patterns in the next section.
Creating a Set of Custom Patterns
Creating a set of custom patterns in Adobe Photoshop allows you to organize and group related patterns for easier access and management. By grouping patterns together, you can streamline your workflow and quickly apply patterns that complement each other. Let’s explore how to create a set of custom patterns in Photoshop.
To start creating a pattern set, open the Pattern Fill dialog in Photoshop. You can do this by selecting the desired layer or area to which you want to apply the pattern and accessing the Fill options in the Layers panel or by selecting the pattern option from the Fill layer button in the Layers panel.
In the Pattern Fill dialog, scroll through the pattern thumbnails until you find a pattern that you want to include in your pattern set. Click on the pattern thumbnail to select it. To add more patterns to your set, hold down the Shift key and click on additional pattern thumbnails. This will select multiple patterns simultaneously.
After selecting the patterns, click on the gear icon located in the upper-right corner of the thumbnail display. From the dropdown menu, select “Save Patterns.” In the save dialog box, specify the location and name for your pattern set file. It’s advisable to create a dedicated folder to store your pattern sets for better organization.
By default, Photoshop saves pattern sets with the .pat extension. Once saved, you can load and apply the entire pattern set in future Photoshop projects. This allows you to have a collection of patterns readily available to complement your designs without the need to manually select and load individual patterns each time.
When creating pattern sets, consider organizing them based on themes, styles, or specific projects. For example, you could create a set of floral patterns, a set of geometric patterns, or a set of patterns specifically for web design projects. This way, you can easily locate and apply the appropriate patterns depending on the project requirements.
By creating sets of custom patterns, you can enhance your workflow, save time, and ensure consistency in your designs. Whether you’re working on a single project or managing multiple projects simultaneously, pattern sets provide a convenient way to access and apply your custom patterns.
Now that you know how to create pattern sets, let’s explore how to organize and manage your custom pattern library effectively in the next section.
Organizing and Managing Custom Pattern Sets
As your collection of custom patterns grows, it becomes essential to establish an organized system to manage and access them efficiently in Adobe Photoshop. By organizing and managing your custom pattern sets, you can streamline your workflow, save time, and maintain a well-curated library of patterns. Let’s explore some tips on how to organize and manage your custom pattern sets effectively.
One approach to organizing your custom pattern sets is to create folders or directories based on different categories or themes. For example, you could have folders for floral patterns, geometric patterns, texture-based patterns, and so on. Within each folder, you can further subdivide the patterns based on specific styles or variations. This hierarchical organization allows for easy navigation and quick retrieval of the desired pattern sets.
Another strategy is to use descriptive names when saving your pattern set files. This helps in quickly identifying the content of each pattern set. Consider including relevant keywords or tags in the file name that correspond to the patterns included in the set. For example, if the pattern set consists of nature-inspired patterns, you could include keywords such as “floral,” “leaf,” or “landscape” in the file name.
In addition to naming the pattern set files, you can also assign tags or metadata within Photoshop to further categorize and organize your custom patterns. By assigning tags, you can label patterns based on specific attributes or styles. This allows for easy filtering and searching within the patterns panel when you need to find a specific pattern or set.
Consider creating a master library or index file that lists all the custom pattern sets you have. This index file can include brief descriptions, previews, or thumbnails of each pattern set. Having a visual overview of your pattern sets can help in quickly assessing and selecting the right set for a particular project.
Regularly reviewing and updating your pattern library is crucial for effective management. Periodically evaluate your pattern sets and eliminate any duplicates, outdated patterns, or patterns that no longer align with your design style. This ensures that your library remains focused, relevant, and easy to navigate.
Finally, consider backing up your custom pattern sets to prevent any potential loss of your valuable work. Maintain copies of your pattern files on external hard drives, cloud storage, or other reliable backup solutions. This precautionary measure ensures that your pattern sets are protected and can be easily restored if needed.
By implementing these strategies and maintaining an organized approach, you can efficiently manage and utilize your custom pattern sets, enabling a smooth and productive design workflow in Photoshop.
Now that you know how to organize and manage your custom pattern sets, let’s proceed to the next section, which covers loading and applying custom patterns in Photoshop.
Loading and Applying Custom Patterns in Photoshop
Once you have created and organized your custom pattern sets in Adobe Photoshop, it’s time to learn how to load and apply these patterns to your designs. By doing so, you can leverage the power of your custom patterns and enhance your creative projects. Let’s explore how to load and apply custom patterns in Photoshop.
To begin, open the Photoshop project where you want to apply your custom patterns. Ensure that the layer or area where you want to apply the pattern is selected or create a new layer for the pattern. Then, select the Paint Bucket tool from the Photoshop toolbar or press the shortcut key “G” to access the tool.
With the Paint Bucket tool selected, look to the options bar at the top of the Photoshop workspace. In the options bar, you will find a dropdown menu labeled “Fill.” Click on the dropdown menu and select “Pattern” from the list. This will bring up a thumbnail display of available patterns.
To load your custom pattern set, click on the gear icon located in the upper-right corner of the thumbnail display. From the dropdown menu, choose “Load Patterns.” A dialog box will appear prompting you to locate and select the pattern set file on your computer. Once you have selected the file, click “Load” to import the custom pattern set into Photoshop.
After loading your custom pattern set, the patterns will be added to the existing patterns library in Photoshop. You can now select the desired pattern from the library by clicking on its thumbnail in the Pattern Fill dialog.
To apply the pattern, simply click within the selected area on your canvas using the Paint Bucket tool. Photoshop will automatically fill the selected area with the chosen pattern. If you want to adjust the scale or orientation of the pattern, you can do so by modifying the tool options or using the Transform controls after applying the pattern.
Remember that you can also apply patterns to specific selections, shapes, or text within your project by creating a separate layer and using the Paint Bucket tool or Layer Styles. This allows for more flexibility and precision in applying patterns to different elements of your design.
By loading and applying your custom patterns in Photoshop, you can add depth, texture, and visual interest to your designs with just a few clicks. Experiment with different patterns and combinations to achieve the desired effect and make your designs stand out.
Now that you know how to load and apply custom patterns, let’s move on to some tips and tricks for using custom patterns effectively in Photoshop.
Tips and Tricks for Using Custom Patterns
Using custom patterns in Adobe Photoshop opens up a world of creative possibilities. To make the most out of your custom patterns, here are some tips and tricks to enhance your designs and streamline your workflow.
1. Experiment with Blend Modes:
Blend modes can significantly alter the appearance and impact of a pattern. Try experimenting with different blend modes such as Multiply, Overlay, or Screen to achieve unique blending effects and create visually striking designs.
2. Adjust Scale and Offset:
Custom patterns can be scaled and offset to create variations or align them precisely within your design. Use the Transform controls or pattern overlay settings to resize, rotate, or reposition patterns until they fit perfectly and create the desired effect.
3. Combine Patterns:
Don’t be afraid to combine different custom patterns to create more complex and visually interesting designs. Experiment with layering or masking patterns to achieve unique and dynamic effects. Mix patterns with varying scales and opacity to add depth and dimension to your artwork.
4. Create Masked Patterns:
Apply custom patterns selectively using layer masks. By masking patterns, you can control where they appear in your design, allowing for greater flexibility and creative control. Create intricate or intricate effects by revealing specific parts of a pattern through a layer mask.
5. Use Adjustment Layers:
Apply adjustment layers to custom patterns to modify their color, tone, or saturation. This allows you to easily match patterns to your overall design scheme or create unique variations without altering the original pattern files.
6. Save Pattern Variations:
If you create different variations of a custom pattern while working on a project, consider saving them as separate pattern files. This way, you can preserve these variations for future use and quickly apply them to different projects without having to recreate them.
7. Consider Opacity and Fill Settings:
Experiment with the opacity and fill settings of pattern layers to achieve different levels of transparency and blending. This can help you create subtle background textures or overlay patterns without overwhelming the overall design.
8. Create Pattern Brushes:
Convert your custom patterns into brushes to apply them more dynamically and with better control. By creating pattern brushes, you can paint with patterns using different brush dynamics and settings, giving you endless possibilities for your designs.
9. Utilize Layer Styles:
Apply layer styles to your patterns to enhance their appearance and add effects such as drop shadows, bevels, or gradients. Layer styles can take your custom patterns to the next level and create eye-catching designs with a single click.
10. Regularly Update and Expand Your Library:
Keep your custom pattern library up to date by regularly adding new patterns and eliminating outdated ones. Continuously search for inspiration, explore new design trends, and create patterns that reflect your evolving style and the needs of your projects.
By incorporating these tips and tricks into your workflow, you can maximize the potential of your custom patterns and take your designs to new heights in Photoshop. Let your creativity flourish and create stunning visual experiences with the power of custom patterns.