
What are Chrome Extensions?
Chrome Extensions are small software programs that can be installed on the Google Chrome browser to add additional functionality and enhance the browsing experience. These extensions are housed in the Chrome Web Store, where users can find a wide variety of options to customize and personalize their browsing experience.
Chrome Extensions offer a range of features and capabilities, including adding new tools, modifying the appearance of websites, improving productivity, blocking ads, translating content, and much more. With the power of Chrome Extensions, users can tailor their browsing experience to their specific needs and preferences.
Extensions integrate seamlessly into the Chrome browser, providing users with quick and easy access to their favorite tools and features. They typically appear as icons in the browser’s toolbar, allowing users to conveniently access them with just a click.
The Chrome Web Store is home to thousands of Chrome Extensions developed by both Google and third-party developers. It offers a diverse range of options that cater to various interests, including productivity, shopping, social media, news, entertainment, and more.
Chrome Extensions are designed to be lightweight and efficient, ensuring they don’t impact browser performance or slow down browsing speed. They are built using web technologies such as HTML, CSS, and JavaScript, making them easy to develop and deploy.
Whether you’re a student, professional, or casual internet user, there’s likely a Chrome Extension that can enhance your browsing experience and make your life easier. From grammar checkers to password managers to note-taking tools, the possibilities are endless.
In the following sections, we’ll delve into how to access the Chrome Web Store, search for extensions, choose the right ones, install and manage them, and offer some best practices and troubleshooting tips to ensure a smooth experience with Chrome Extensions.
How to Access the Chrome Web Store
The Chrome Web Store is the official marketplace for Chrome Extensions. To access it, follow these simple steps:
- Open the Google Chrome browser on your computer.
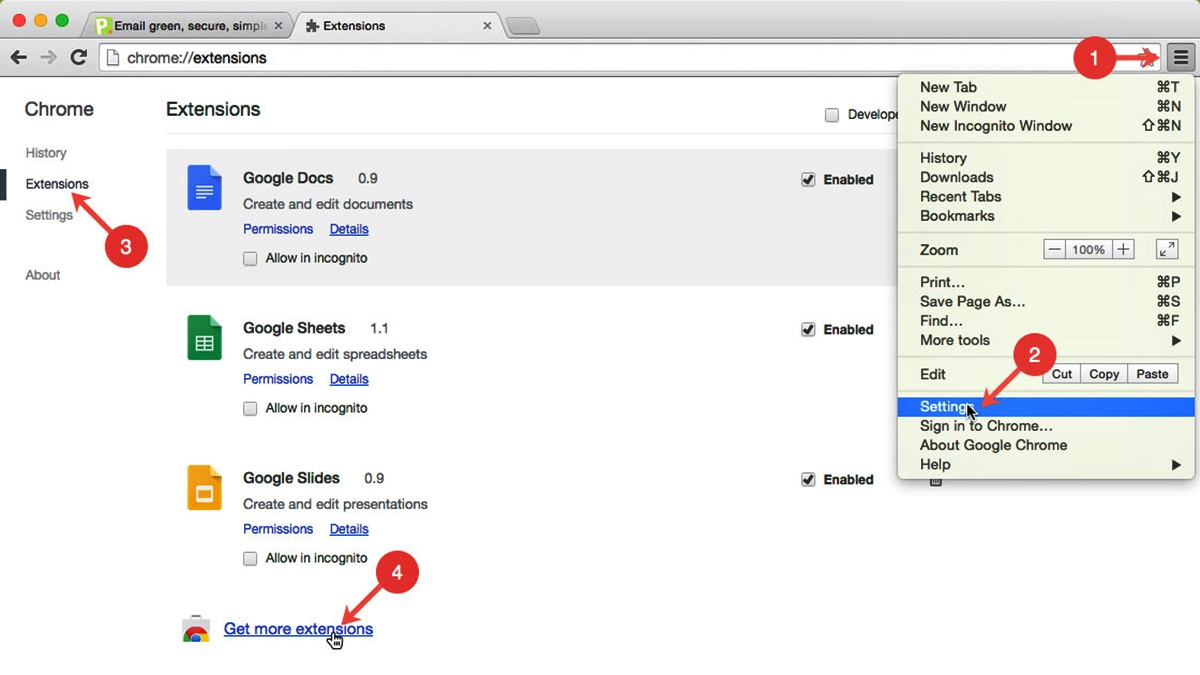
- Click on the three-dot menu icon located at the top-right corner of the browser window.
- In the drop-down menu, hover over the “More Tools” option and select “Extensions.”
- The Extensions page will open in a new tab. Alternatively, you can directly access it by typing “chrome://extensions” in the address bar.
- On the Extensions page, look for the “Open Chrome Web Store” button and click on it.
- You will be redirected to the Chrome Web Store, where you can explore the wide range of extensions available.
Once you’ve accessed the Chrome Web Store, you can browse through various categories, search for specific extensions, and read user reviews and ratings to make an informed decision.
Furthermore, you can access the Chrome Web Store directly by visiting the URL “chrome.google.com/webstore” in any browser. This allows you to explore and discover new extensions even if you are not currently using the Chrome browser.
It’s worth noting that the Chrome Web Store can also be accessed from the Chrome mobile browser on Android devices. Simply open the Chrome app, tap on the three-dot menu icon, and select “Extensions” to access the Chrome Web Store.
Accessing the Chrome Web Store is the gateway to unlocking a wide range of innovative and useful Chrome Extensions. So, take a moment to explore and discover the extensions that can enhance your browsing experience based on your needs and interests.
Searching for Chrome Extensions
Searching for Chrome Extensions in the Chrome Web Store is a straightforward process. Follow these steps to find the perfect extension for your needs:
- Open the Chrome Web Store by following the steps outlined in the previous section.
- At the top of the Chrome Web Store page, you’ll see a search bar. Simply enter keywords related to the functionality you’re looking for in an extension. For example, if you’re looking for ad-blocking extensions, you can enter “ad blocker.”
- As you type, the Chrome Web Store will start suggesting relevant extensions based on your keywords.
- Press Enter or click on the magnifying glass icon next to the search bar to see the search results.
- You’ll be presented with a list of extensions that match your search criteria. You can scroll through the list to explore various options.
- Use the filters available on the left-hand side to refine your search further. You can filter by category, features, user ratings, and more to narrow down your options.
When searching for extensions, it’s important to read the descriptions, user reviews, and ratings to get a better understanding of the extension’s functionality and reliability. This will help you make an informed decision and choose a trusted extension.
Additionally, you can also visit the “Top Charts” section in the Chrome Web Store to discover popular extensions, or explore curated collections created by Google and other users.
Remember, the Chrome Web Store offers a vast selection of extensions, so take your time to explore different options and find the ones that best suit your needs and preferences.
Choosing the Right Chrome Extension
With thousands of Chrome Extensions available in the Chrome Web Store, it’s essential to choose the right one that meets your specific needs. Here are some factors to consider when selecting a Chrome Extension:
- Functionality: Determine the specific functionality you’re looking for in an extension. Whether it’s improving productivity, blocking ads, managing passwords, or enhancing social media, make sure the extension offers the features you need.
- User Reviews and Ratings: Read user reviews and ratings to get insights into the quality and reliability of an extension. Look for extensions with high ratings and positive feedback, as they are more likely to provide a seamless experience.
- Developer Credibility: Consider the reputation and credibility of the extension’s developer. Extensions developed by trusted sources or well-known companies are generally safer and more reliable.
- Update Frequency: Check if the extension has regular updates. Regular updates indicate that the developer is actively maintaining and improving the extension, ensuring compatibility with the latest browser versions and security updates.
- Permissions: Pay attention to the permissions requested by the extension. Only grant necessary permissions that align with the extension’s functionality. Be cautious of extensions that request excessive or unnecessary permissions.
- Compatibility: Ensure that the extension is compatible with your version of Chrome and any other related software or plugins you may have installed.
- Support and Documentation: Check if the extension has documentation, support forums, or a dedicated website that provides assistance and troubleshooting in case you encounter any issues.
It’s also worth noting that Chrome Extensions can be easily disabled or removed if you find that they are not meeting your expectations or causing any issues. So don’t hesitate to experiment with different extensions until you find the perfect fit for your browsing needs.
By carefully considering these factors, you can choose a reliable, feature-rich, and compatible Chrome Extension that enhances your browsing experience and boosts your productivity.
Installing Chrome Extensions
Installing Chrome Extensions from the Chrome Web Store is a simple process. Here’s how you can do it:
- Once you’ve found the extension you want to install, click on its icon or name to open its details page.
- On the details page, you’ll find information about the extension, such as its description, screenshots, user reviews, and ratings.
- If you’ve decided to proceed with installing the extension, click on the “Add to Chrome” button on the top-right corner of the page.
- A pop-up window will appear, asking for confirmation to add the extension. Review the permissions requested by the extension, and if you’re comfortable with them, click on the “Add extension” button.
- The extension will begin downloading and installing. Once the installation is complete, you’ll see a notification confirming that the extension has been added to Chrome.
- The extension’s icon will appear in the browser’s toolbar or the puzzle piece icon in the toolbar, indicating that it’s installed and ready to use.
Some extensions may require additional configuration or setup after installation. The details page of the extension or its accompanying documentation will provide instructions on how to fully utilize its features.
If you’re signed in to your Google account, the extension will be synced across multiple devices where you’re signed in with the same account. This enables you to enjoy a consistent experience regardless of the device you use.
It’s important to note that Chrome Extensions can sometimes conflict with each other or other browser functionality. If you experience any issues after installing an extension, try disabling or removing it to see if the problem resolves.
By following these steps, you can easily install Chrome Extensions to enhance and customize your browsing experience according to your preferences and needs.
Managing Chrome Extensions
Once you’ve installed Chrome Extensions, you can manage them to control their behavior and ensure a smooth browsing experience. Here are some key aspects of managing Chrome Extensions:
- Accessing the Extensions Page: To manage your extensions, open the Chrome browser and click on the three-dot menu icon at the top-right corner. From the dropdown menu, hover over “More Tools” and select “Extensions.” This will take you to the Extensions page, where you can manage all your installed extensions.
- Enabling and Disabling Extensions: On the Extensions page, you’ll see a list of your installed extensions. To enable or disable an extension, toggle the switch located next to its name. Disabling an extension temporarily turns it off without uninstalling it, while enabling it restores its functionality.
- Configuring Extension Options: Some extensions offer configuration options, allowing you to fine-tune their behavior. To access the options for a particular extension, click on the “Details” button below its name on the Extensions page. This will expand the extension’s details, where you can access its settings or preferences.
- Reordering Extension Icons: If you have multiple extensions that display icons in the browser’s toolbar, you can rearrange their order. Simply click on an extension’s icon and drag it to a different position. This way, you can prioritize the visibility and accessibility of your most frequently used extensions.
- Removing Extensions: If you no longer need an extension, or if it’s causing conflicts or issues, you can remove it from Chrome. To do this, locate the extension on the Extensions page and click on the “Remove” button next to its name. Confirm the removal when prompted, and the extension will be uninstalled from your browser.
- Updating Extensions: It’s important to keep your extensions up to date to ensure they work optimally and remain secure. Chrome automatically checks for extension updates in the background and installs them when available. However, you can manually update an extension by enabling the “Developer mode” on the Extensions page and clicking the “Update” button if an update is available for that specific extension.
Regularly reviewing and managing your installed extensions can help you maintain a clutter-free, optimized browsing experience. It allows you to customize your extensions according to your needs, remove unnecessary or problematic ones, and keep them updated for improved performance and security.
Updating Chrome Extensions
Updating Chrome Extensions is crucial to ensure they stay up to date with the latest features, bug fixes, and security enhancements. Chrome provides a seamless process for updating extensions. Here’s how you can do it:
- Open the Chrome browser on your computer and click on the three-dot menu icon at the top-right corner.
- From the dropdown menu, hover over “More Tools” and select “Extensions.”
- The Extensions page will open, displaying a list of your installed extensions.
- If an update is available for an extension, you’ll see an “Update” button below the extension’s name. Click on this button to initiate the update process.
- The update will begin downloading and installing automatically. You may notice a progress bar indicating the update status.
- Once the update is complete, you’ll see a confirmation message. The extension is now up to date with the latest version.
Chrome automatically checks for updates to extensions in the background and installs them when available. However, if you want to manually check for updates, you can enable the “Developer mode” on the Extensions page. This will provide you with more options, including the ability to update individual extensions manually.
Regularly updating your extensions is essential for various reasons:
- Security: Updates often include security patches that protect you from vulnerabilities and potential threats.
- Performance: Updates can improve the functionality and performance of extensions, ensuring they run smoothly and efficiently.
- New Features: Updates sometimes introduce new features or enhancements, giving you access to additional functionality and improved user experience.
- Bug Fixes: Updates address any reported bugs or issues, providing a more stable and reliable experience.
By keeping your extensions up to date, you can maximize their potential, enhance your browsing experience, and ensure a secure and efficient environment while using Chrome.
Removing Chrome Extensions
Removing Chrome Extensions is a simple process that allows you to declutter your browser and remove extensions that are no longer needed or causing issues. Follow these steps to remove an extension from your Chrome browser:
- Open the Chrome browser on your computer and click on the three-dot menu icon at the top-right corner.
- From the dropdown menu, hover over “More Tools” and select “Extensions.”
- The Extensions page will open, displaying a list of all your installed extensions.
- Locate the extension you want to remove from the list.
- Click on the “Remove” button below the extension’s name.
- A confirmation pop-up window will appear, asking you to confirm the removal. Review the message to ensure you’re removing the correct extension.
- If you’re certain you want to remove the extension, click on the “Remove” button in the pop-up window.
- The extension will be uninstalled from your Chrome browser, and its icon and functionality will no longer be available.
Removing an extension does not delete any data associated with it, such as settings or preferences. If you reinstall the extension in the future, your data will typically be restored.
Removing unnecessary or unused extensions can help improve the performance and speed of your browser. It also reduces clutter and simplifies your browsing experience.
It’s important to note that some extensions may require additional steps to remove, especially if they have integrated deeply into the browser. In such cases, the extension’s details page may provide instructions for proper removal.
If you’re experiencing issues with an extension or suspect it may be causing conflicts with other extensions or the browser itself, removing it can help troubleshoot and resolve the problem.
By periodically reviewing and removing extensions that are no longer useful or causing issues, you can maintain a clean and efficient browsing environment in Chrome.
Best Practices for Chrome Extensions
When utilizing Chrome Extensions, it’s important to follow best practices to ensure a secure, reliable, and enjoyable browsing experience. Here are some key practices to keep in mind:
- Choose Trusted Extensions: Stick to extensions developed by reputable sources. Check user reviews, ratings, and developer information to gauge the credibility and reliability of an extension.
- Regularly Update Extensions: Keep your extensions up to date to benefit from the latest features, bug fixes, and security patches. Enable automatic updates or manually check for updates frequently.
- Prune Unused Extensions: Remove extensions that are no longer useful or necessary. This helps reduce clutter, improve browser performance, and minimize potential security risks.
- Use a Selective Approach: Install only the extensions that are truly beneficial and align with your needs. Avoid installing too many extensions, as it can lead to decreased browsing speeds and potential conflicts.
- Review Permissions: When installing an extension, carefully review the permissions it requests. Be cautious of extensions that request excessive or unnecessary permissions that may compromise your privacy or security.
- Stay Security-Conscious: Be vigilant about the security risks associated with extensions. Choose extensions from trusted sources, avoid granting extensive permissions, and regularly review the access levels of your installed extensions.
- Backup Extension Data: Some extensions store data and settings specific to your preferences. Maintain backups of essential data related to extensions to prevent loss in case of unexpected issues or uninstallations.
- Regularly Review Extension Usage: Periodically evaluate the usefulness and effectiveness of your installed extensions. Remove any extensions that are no longer serving their intended purpose to maintain a streamlined browsing experience.
- Read User Reviews and Ratings: Consider the experiences of other users by reading reviews and ratings for extensions. This can provide insights into the extension’s functionality, potential issues, and user satisfaction.
- Report Suspicious Extensions: If you come across an extension that appears suspicious, violates policies, or raises concerns, report it to the Chrome Web Store. This helps maintain a safe and reliable extension ecosystem for all users.
By following these best practices, you can optimize your Chrome browsing experience, enhance productivity, and mitigate potential security risks associated with extensions. Remember to exercise caution, be selective in your choices, and keep your extensions updated for a seamless and secure browsing experience.
Troubleshooting Chrome Extensions
While Chrome Extensions are designed to enhance your browsing experience, issues may occasionally arise. Here are some troubleshooting tips to help resolve common problems with Chrome Extensions:
- Restart Your Browser: Sometimes, a simple restart of the Chrome browser can resolve minor issues with extensions. Close all Chrome windows and relaunch the browser to see if the problem persists.
- Disable Conflicting Extensions: Conflicts can occur when multiple extensions try to modify the same functionality. Temporarily disable other extensions one by one to identify if a conflict exists. This can help isolate the problematic extension causing the issue.
- Clear Extension Cache: Clearing the cache of an extension can sometimes resolve issues related to stored data or temporary files. To do this, go to the Extensions page, locate the extension, and click on the “Details” button. From there, find the “Clear cache” option, and try clearing the cache to see if it resolves the problem.
- Update Chrome: Ensure that your Chrome browser is up to date. Outdated browser versions can sometimes be incompatible with certain extensions. Go to the Chrome menu, select “Help,” and click on “About Google Chrome” to check for updates.
- Reinstall the Extension: If an extension is not functioning properly, try uninstalling it and then reinstalling it from the Chrome Web Store. This can help resolve any installation or compatibility issues that may be causing the problem.
- Check for Extension Updates: Confirm that you’re using the latest version of the extension. Open the Extensions page, enable “Developer mode,” and click on the “Update” button next to the extension that requires an update.
- Reset Browser Settings: Resetting your browser settings can sometimes resolve more persistent issues. Go to the Chrome menu, select “Settings,” scroll down to “Advanced,” click on “Reset settings,” and follow the prompts to reset Chrome to its default settings.
- Seek Support: If you’ve exhausted all troubleshooting options and the problem persists, consider reaching out to the extension’s developer for support. They may have specific troubleshooting steps or updates to address the issue.
If all else fails, you can disable or uninstall the problematic extension and explore alternative extensions with similar functionality. Remember to review user feedback and ratings to avoid potential issues with new extensions.
By applying these troubleshooting techniques and seeking assistance when needed, you can overcome common challenges with Chrome Extensions and enjoy a seamless browsing experience.