
Step 1: Open the Settings app
To begin the process of adding another email account to your iPhone, you will need to locate and open the Settings app. This app contains all the settings and preferences for your device, allowing you to customize various aspects of your iPhone’s functionality.
Locating the Settings app is quite simple. First, unlock your iPhone and navigate to your home screen. Look for the app icon that resembles a gear, usually found on one of your home screen pages or in the dock at the bottom of the screen.
Once you have located the Settings app, tap on it to launch the app. This will open up the main settings menu, where you can access and modify a range of options for your iPhone.
The Settings menu is organized into different sections, with each section containing settings related to a specific category. You will find options for things like Wi-Fi, Bluetooth, Notifications, and more. For our purposes, we will be focusing on the “Mail” section, where you can manage your email accounts and settings.
To proceed to the Mail section, scroll down the Settings menu until you find the “Mail” option. You may need to scroll past other sections such as “Control Center,” “Display & Brightness,” and “Sounds & Haptics” to find it.
Once you have located the “Mail” section, tap on it to access the mail settings. This section allows you to manage your email accounts, including adding, deleting, and modifying accounts, as well as adjusting various email-related settings.
With the “Mail” section now open, you are ready to move on to the next step in adding another email account to your iPhone. Keep following the steps to seamlessly integrate your additional email account into your device and enjoy easy access to all your emails in one place.
Step 2: Scroll down and tap on “Mail”
Once you have successfully opened the Settings app on your iPhone, you will need to scroll down the list of options until you find the “Mail” option. This step is essential as it allows you to access the email settings and manage your email accounts effectively.
To scroll down the list, simply swipe your finger upwards on the screen. As you scroll, you will see various options and sections, including “General,” “Display & Brightness,” “Sounds & Haptics,” and more. Continue scrolling until you reach the “Mail” option.
When you locate the “Mail” option, tap on it to access the mail settings. This action will take you to a new screen where you can manage your email accounts and adjust various email-related preferences.
By tapping on the “Mail” option, you open up a multitude of possibilities for managing and customizing your email experience on your iPhone. From this screen, you can add new email accounts, delete existing accounts, adjust account settings, and configure other email-related preferences.
It’s important to note that the “Mail” option is specifically designed for managing email accounts configured on your iPhone. If you are using third-party email apps, such as Gmail or Outlook, these apps might have their separate settings and configuration options.
Now that you have successfully accessed the “Mail” settings, you are one step closer to adding another email account to your iPhone. The following steps will guide you through the process of adding your new email account, allowing you to stay connected and organized with all your emails conveniently accessible from your iPhone.
Step 3: Tap on “Accounts”
After tapping on the “Mail” option in the Settings app, you will be taken to a new screen that displays various settings related to your email accounts. To proceed with adding another email account to your iPhone, you need to tap on the “Accounts” option.
When you tap on “Accounts,” you will see a list of the email accounts that are currently configured on your iPhone. This includes both the primary account that you set up when you first started using the device and any additional accounts you may have added in the past.
By selecting the “Accounts” option, you gain access to the settings and options specific to each email account. This allows you to manage the individual settings and preferences for each account, such as adjusting the sync frequency, choosing the default email address, or updating the password.
Within the “Accounts” section, you can also add new email accounts to your iPhone. The option to add a new account will be available once you tap on “Accounts,” typically located at the top of the screen.
If you are using multiple email accounts for personal and professional purposes, the ability to manage them separately can be incredibly helpful. By organizing your accounts through the “Accounts” section, you can easily toggle between them and access the relevant emails and settings based on your needs.
Now that you have tapped on “Accounts,” you are ready to move forward and add another email account to your iPhone. The subsequent steps will guide you through the process of setting up your new email account and integrating it seamlessly with your device.
Step 4: Tap on “Add Account”
Once you have selected the “Accounts” option in the Mail settings, it’s time to add a new email account to your iPhone. To do this, simply tap on the “Add Account” option, which is typically located at the bottom of the screen.
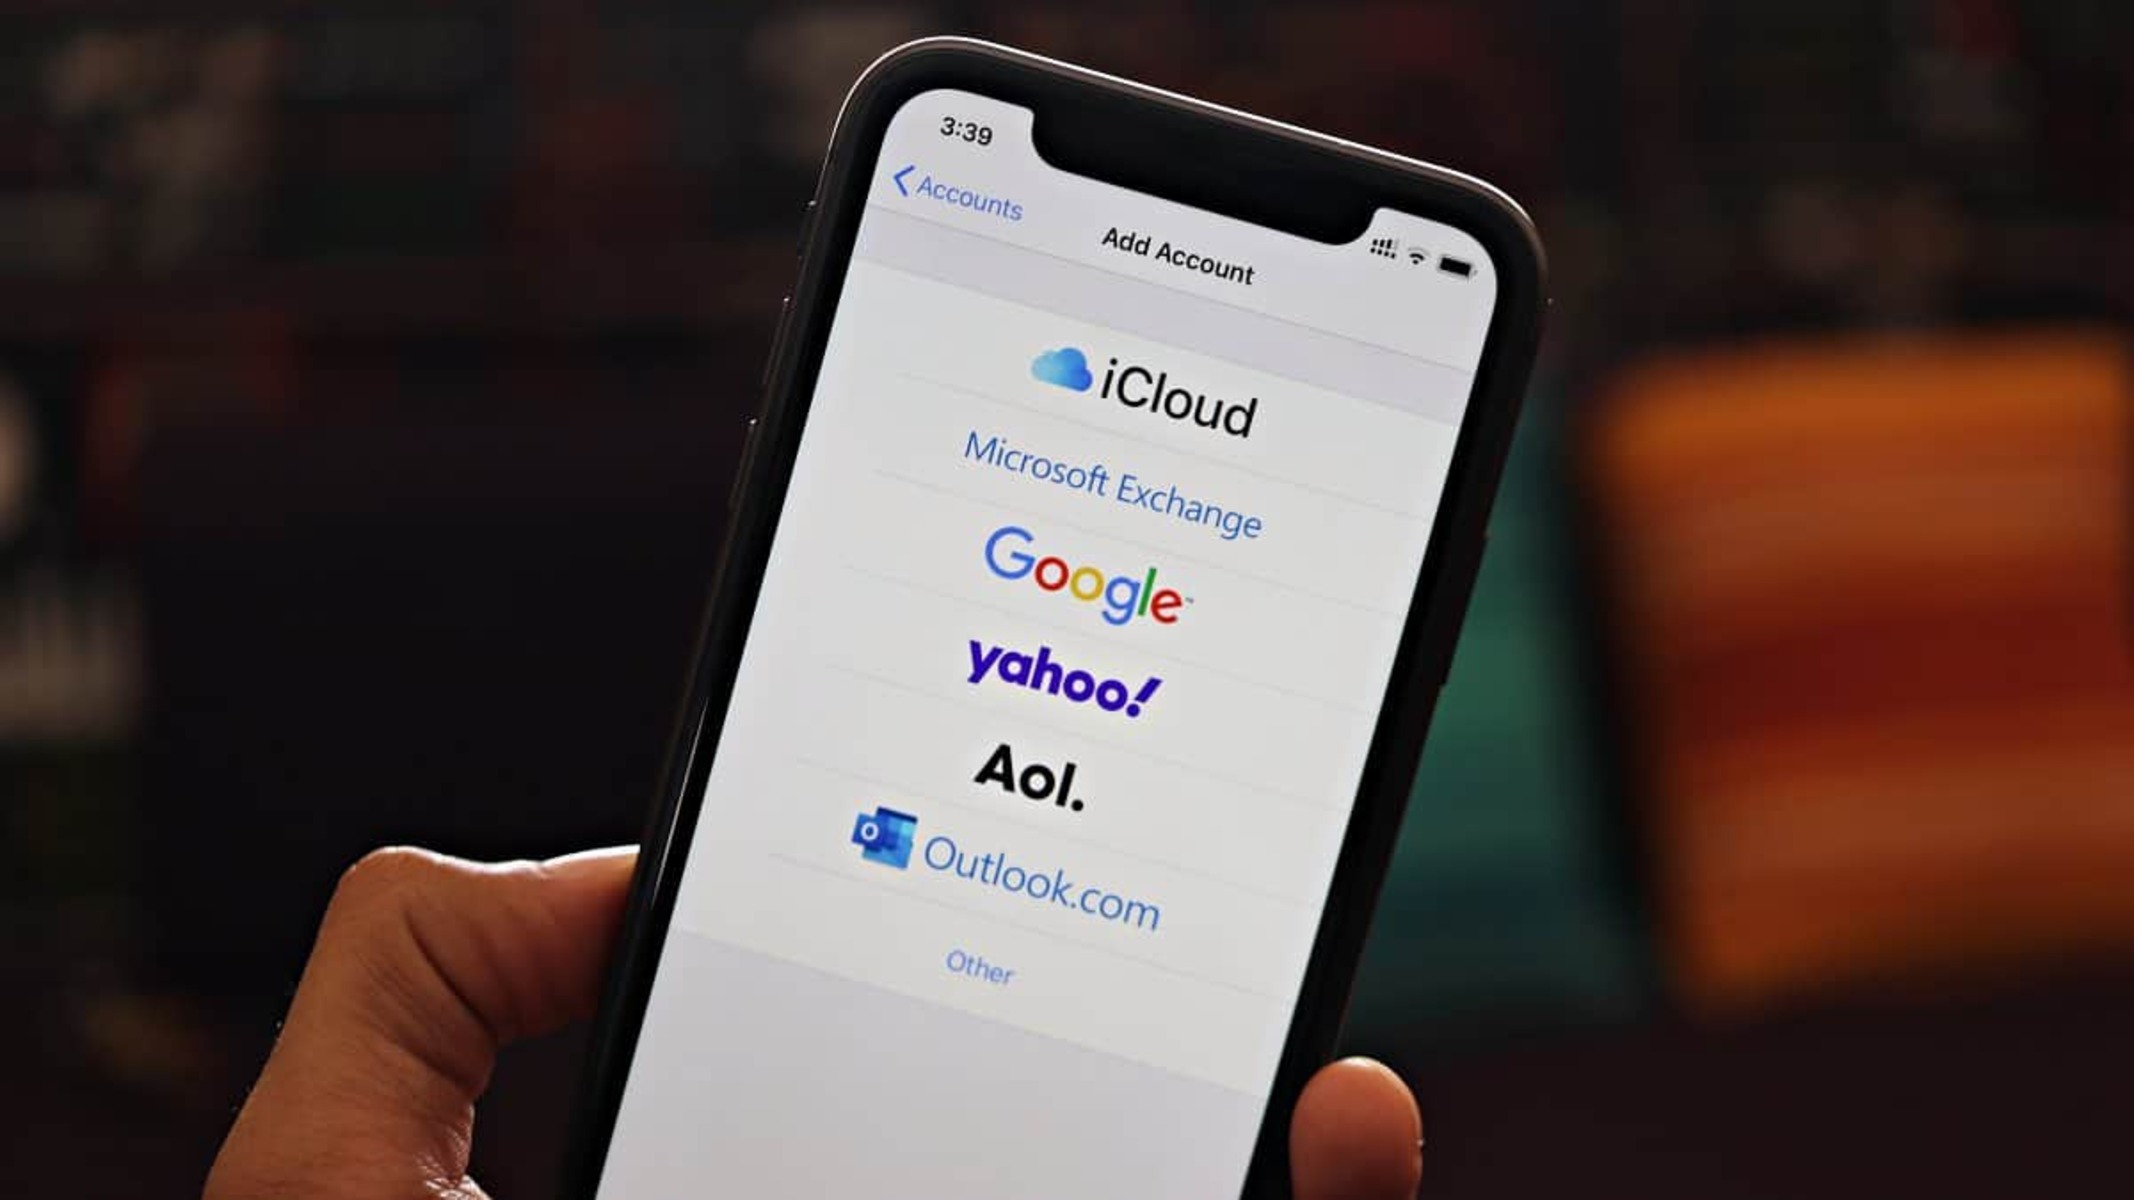
By tapping on “Add Account,” you open up a range of options for adding different types of email accounts to your iPhone. Depending on your needs, you can add accounts from popular providers like Gmail, Yahoo, Outlook, or select the “Other” option to manually configure an email account that isn’t listed.
When you tap on “Add Account,” you will be presented with a list of email providers to choose from. These providers have preconfigured settings that make it easy to set up your account without needing to enter all the information manually.
If you use a widely used email provider like Gmail, Yahoo, or Outlook, you can simply tap on the corresponding option and follow the prompts to sign in with your email address and password. This will automatically configure the account settings, including incoming and outgoing server settings.
If you choose the “Other” option, you will need to manually enter the account details, including the email address, password, server settings, and port numbers. You may need to consult your email provider’s documentation or support resources to obtain these details.
Once you have selected the appropriate email provider or chosen the “Other” option and entered the necessary information, tap on “Next,” and your iPhone will attempt to verify and configure the account settings.
If the verification process is successful, you will be taken to a screen where you can customize the account settings, such as enabling or disabling specific features like Mail, Contacts, Calendars, and Notes.
Now that you have tapped on “Add Account” and entered the required information, you are ready to proceed to the next steps to complete the setup and integration of your new email account with your iPhone.
Step 5: Choose the Email Provider
After tapping on “Add Account” in the Mail settings, you will be presented with a selection of different email providers to choose from. This step is crucial as it allows you to select the right option depending on the email service you use.
By choosing the email provider, you will be able to seamlessly integrate your email account into the iPhone’s Mail app, making it easier to access and manage your emails from your device.
If you are using a widely used email provider like Gmail, Yahoo, or Outlook, you will typically see these options listed on the screen. You can simply tap on the respective provider’s name to proceed with the setup. These providers have preconfigured settings that will automatically configure your account settings, making the setup process quick and hassle-free.
For example, if you use Gmail, tap on the “Google” option, and you will be prompted to sign in with your Gmail email address and password. This authentication step ensures that your account is securely set up on your iPhone, and it also allows the device to sync your email messages, contacts, and calendars.
On the other hand, if you use an email provider that is not listed, such as a custom domain or lesser-known provider, you can choose the “Other” option. This will enable you to manually configure your account by entering the necessary server settings and credentials.
If you select the “Other” option, you will need to provide additional details such as the incoming and outgoing mail server addresses, port numbers, and encryption type. These details can usually be obtained from your email provider’s support documentation or by contacting their customer support.
By choosing the appropriate email provider or selecting the “Other” option, you ensure that your iPhone correctly sets up the account with the necessary server settings and protocols. This enables smooth communication between your device and the email provider’s servers, ensuring that you can send, receive, and manage your emails effortlessly.
Now that you have chosen the email provider, a crucial step in setting up your email account, you are ready to proceed with entering your email address and password in the subsequent steps.
Step 6: Enter Your Email Address and Password
Once you have selected the email provider, it’s time to enter your email address and password to connect your account with your iPhone’s Mail app. This step is crucial as it verifies your identity and allows your device to access and sync your email messages, contacts, and other data.
When prompted, enter your email address in the designated field. Make sure to double-check for any typos or errors before proceeding. The accuracy of the email address is essential to ensure a successful setup of your email account on your iPhone.
After entering your email address, move on to the password field. Here, you will need to input the password associated with your email account. Take care to enter the password accurately, as any mistakes can prevent your device from accessing your emails.
If you are concerned about the security of your password, you can enable the “Show Password” option to verify that it has been entered correctly. Once you are satisfied, disable the option to protect your password from being visible to others.
If you have enabled two-factor authentication for your email account, you may receive a prompt to enter a verification code. This additional layer of security helps protect your account from unauthorized access. Retrieve the code from your trusted device or authentication app and enter it when prompted.
After entering your email address and password correctly, tap on the “Next” button to proceed. Your iPhone will attempt to verify the account settings and establish a connection with the email provider’s servers.
If your email account details are valid and the verification process is successful, you will be granted access to additional customization options for your account, such as enabling or disabling synchronization of mail, contacts, calendars, and notes.
Now that you have entered your email address and password, you are one step closer to completing the setup process of your new email account on your iPhone. The subsequent steps will guide you through customizing your account settings and choosing which items to sync with your device.
Step 7: Tap on “Next”
After entering your email address and password, the next step in adding another email account to your iPhone is to tap on the “Next” button. This action initiates the verification process and allows your device to establish a connection with the email provider’s servers.
By tapping on “Next,” your iPhone will automatically attempt to connect to the email server and verify the account details you have entered. This step ensures that the email account is valid and that all necessary settings are in place to send and receive emails.
During the verification process, your device will also retrieve information about your email account, such as the server settings, authentication protocols, and other relevant details. This information is essential for your device to effectively communicate with the email provider’s servers and retrieve your emails securely.
If the verification process is successful, you will be granted access to additional customization options for your account. These options might include enabling or disabling the synchronization of mail, contacts, calendars, and notes. Review these settings and select the options that best align with your preferences and needs.
It is worth noting that the duration of the verification process may vary depending on factors such as your internet connection speed and the email provider’s server response time. It is not uncommon for the process to take a few seconds or longer, especially if you have a large amount of email data associated with your account.
If, for any reason, the verification process fails, you may receive an error message indicating the issue. Common causes for failure include incorrect email address or password, unstable internet connection, or server-related problems. In such cases, double-check your account details for accuracy and ensure a stable internet connection before attempting the process again.
Once the verification process is complete, you are now closer to enjoying the convenience of accessing and managing your emails from your iPhone’s Mail app. The following steps will guide you through customizing your account settings and choosing which items to sync with your device.
Step 8: Customize Your Account Settings (Optional)
After tapping on “Next” and successfully verifying your email account, you have the option to customize your account settings on your iPhone. These settings allow you to personalize your email experience and tailor it to your specific needs and preferences.
Customizing your account settings is an optional step, but it can significantly enhance your productivity and efficiency when using the Mail app on your iPhone.
Some of the account settings that you can customize include:
- Mail Folders to Push: Choose which mail folders you want to receive push notifications for. This allows you to prioritize and stay promptly updated on important emails.
- Preview Pane: Determine whether you want a preview of your emails to be displayed in the main Mail view or prefer to have them hidden until you select them.
- Signature: Create a personalized signature that will be appended to your outgoing emails. This can include your name, contact information, or a brief message.
- Flag Style: Select a style for flagging important emails. This helps you visually differentiate them from other emails and reminds you of their significance.
- Default Account: If you have multiple email accounts configured on your iPhone, you can set a default account for sending new emails. This ensures that your emails are sent from the desired account by default.
To customize your account settings, open the Settings app and navigate to the “Mail” section. Tap on your email account, and you will be presented with a range of customization options specific to that account.
Take your time to explore these settings and adjust them according to your preferences. You can always revisit these settings later to make any necessary changes.
Remember that the available customization options may vary depending on the email provider you use. Some email providers offer more extensive customization options, while others have more limited choices.
Now that you have the opportunity to customize your account settings, take advantage of this option to create an email experience that suits your unique style and workflow. The following steps will guide you in selecting which items to sync with your iPhone’s Mail app.
Step 9: Choose Which Items to Sync with Your iPhone (Optional)
Once you have customized your account settings, you have the option to choose which items you want to sync with your iPhone’s Mail app. This step allows you to selectively sync specific elements of your email account, ensuring you have access to the information you need while optimizing storage space on your device.
By choosing which items to sync, you can control what gets downloaded and stored on your iPhone, keeping it organized and reducing the clutter in your mailbox. The available options for synchronization may vary depending on your email provider and account settings.
Typically, the items you can choose to sync include:
- Mail: Decide whether to sync all your email messages or set a limit based on a specific period, such as the last 7 days or the last month.
- Contacts: Choose whether to sync your contacts stored in your email account with the Contacts app on your iPhone. This enables you to access and manage your contacts seamlessly.
- Calendars: Select if you want to sync the calendars associated with your email account with the Calendar app on your iPhone. This enables you to view, create, and edit events and appointments on your device.
- Notes: Determine whether to sync any notes stored in your email account with the Notes app on your iPhone. This allows you to access and edit your notes conveniently.
To choose which items to sync, navigate to the “Mail” section in the Settings app and tap on your email account. Look for the synchronization options specific to each type of item and adjust them according to your preferences.
Keep in mind that enabling synchronization for certain items, such as mail or calendars, may consume more storage space on your device. If storage is a concern, consider syncing only the essential items that you frequently access.
Additionally, if you use multiple email accounts on your iPhone, you can customize the synchronization settings individually for each account. This gives you the flexibility to tailor the synchronization process based on your usage patterns and priorities.
Take some time to review and configure the synchronization settings that best align with your needs. By doing so, you ensure that your iPhone’s Mail app contains the most up-to-date information relevant to you.
Now that you have the option to choose which items to sync with your iPhone, proceed to the final step to save your settings and complete the process of adding another email account to your device.
Step 10: Tap on “Save”
After customizing your account settings and choosing which items to sync with your iPhone, the final step in adding another email account is to tap on the “Save” button. This action ensures that all your changes and configurations are saved, and your new email account is ready to use on your device.
By tapping on “Save,” your iPhone will update the settings and establish the necessary connections with your email provider’s servers. This allows your device to start receiving and sending emails through the newly added account.
It is essential to tap on “Save” to confirm your changes and ensure that your settings are applied correctly. If you navigate away from the settings screen without saving, any modifications you made will not take effect, and your new account may not function as intended.
After tapping on “Save,” you will be redirected back to the main Mail settings screen, where you can view a list of all your configured email accounts. Here, you can inspect and manage each account individually, including adding more accounts, modifying settings, or deleting accounts if needed.
Once your email account is successfully saved, it will be fully integrated with the Mail app on your iPhone. You can now start accessing your emails, composing new messages, and managing your inbox right from your device.
Keep in mind that it may take some time for your iPhone to sync all the emails, especially if you have a large number of messages in your inbox. Be patient and allow your device some time to fetch and download all the necessary data.
Congratulations! You have successfully added another email account to your iPhone. Enjoy the convenience of having all your emails in one place and stay organized on the go.
Remember, you can always revisit the Mail settings to make further adjustments or add more email accounts as needed. Take advantage of the robust features and customization options available to optimize your email experience on your iPhone.