
Overview
Syncing your contacts from your iPhone to your Mac can be a useful way to ensure that your contacts are always up to date across all your devices. Whether you recently switched from an old iPhone to a new one, or you simply want to have a backup of your contacts on your Mac, there are several methods available to help you sync your contacts hassle-free.
In this article, we will explore seven methods to sync your contacts from your iPhone to your Mac. These methods include using iCloud, iTunes, AirDrop, Google Contacts Sync, third-party apps, email sync, and Bluetooth sync. Each method has its own benefits and considerations, so you can choose the one that best suits your needs.
Synchronization allows you to transfer and update contacts easily and efficiently, eliminating the need for manually inputting or updating contacts on multiple devices. By syncing your contacts, you can access important contact information, such as phone numbers and email addresses, seamlessly on your iPhone and Mac, ensuring a smooth communication experience.
Whether you want to transfer all your contacts at once or only select specific ones, the methods discussed in this article will guide you through the process. From using Apple’s built-in services to third-party apps, you’ll find a solution that fits your preferences and requirements.
Remember that it’s essential to have a backup of your contacts, especially if they hold valuable or sensitive information. Syncing your contacts to your Mac adds an extra layer of security by storing them on a separate device. In the event of accidental deletion or loss of your iPhone, you can still access your contacts on your Mac and restore them back to your new device.
Now, let’s delve into the various methods available for syncing contacts from your iPhone to your Mac. Whether you’re tech-savvy or a beginner, there’s an option that will work for you. Read on to discover how you can easily sync your contacts and streamline your communication across devices.
Method 1: iCloud
iCloud is Apple’s cloud-based storage and syncing service that allows you to sync your contacts, along with other data, across your iPhone, Mac, and other Apple devices. By using iCloud, you can ensure that your contacts are always up to date and accessible on all your devices. Here’s how you can sync your contacts from your iPhone to your Mac using iCloud:
- Ensure that both your iPhone and Mac are signed in to the same iCloud account. You can check this by going to “Settings” on your iPhone and “System Preferences” on your Mac.
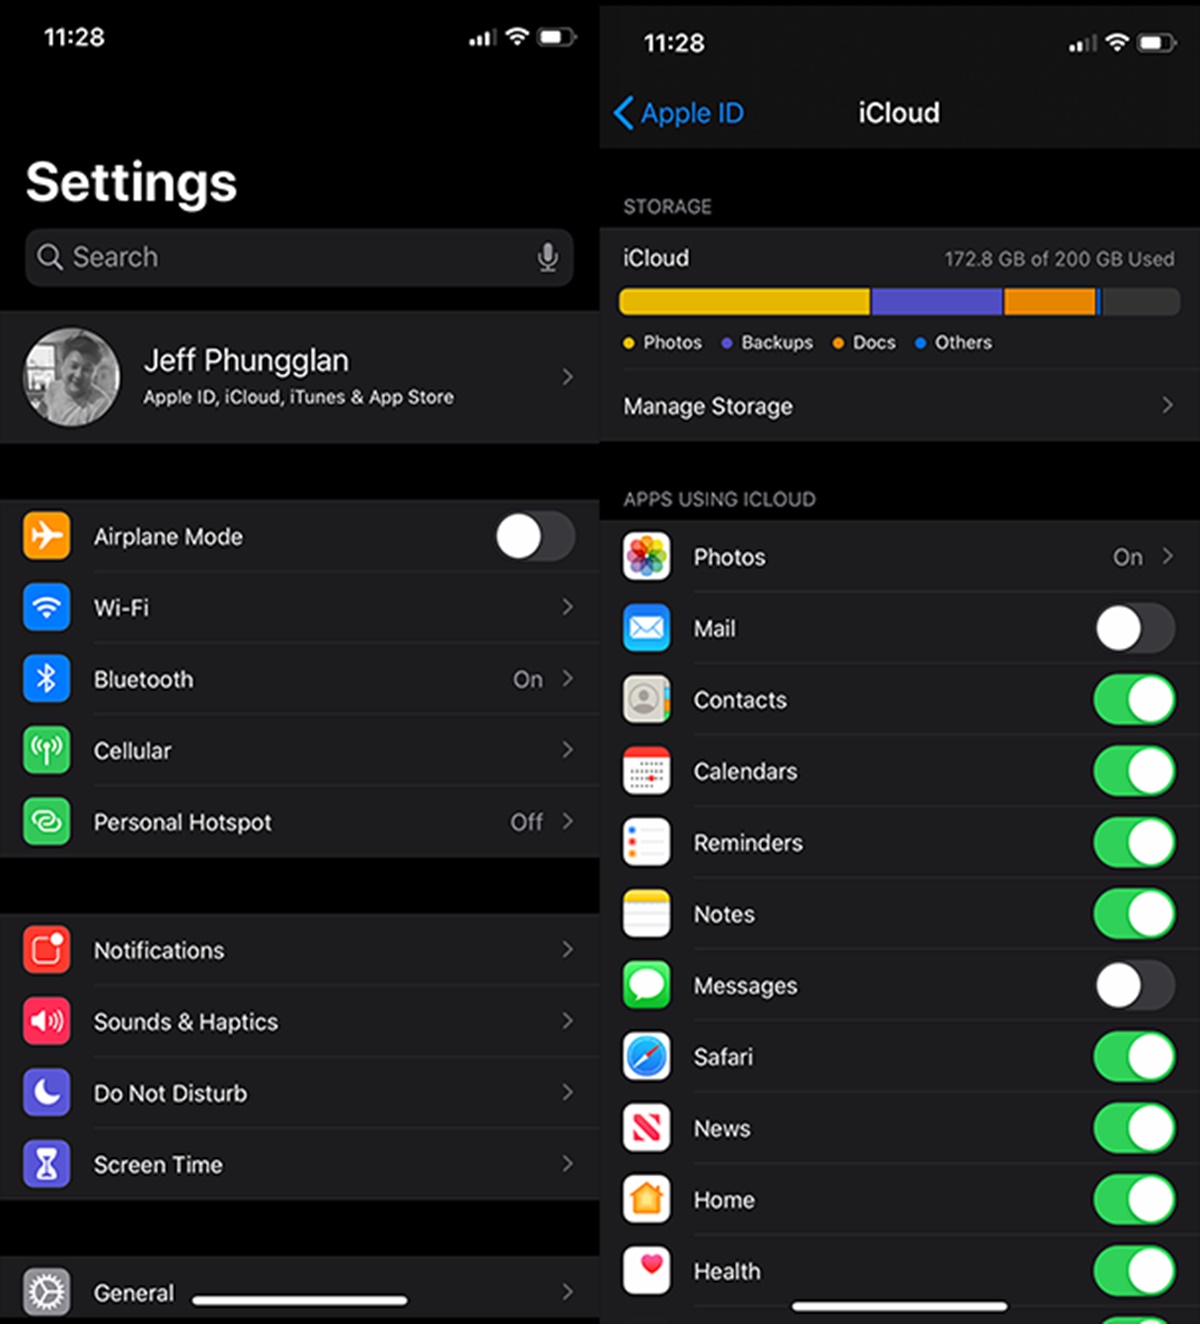
- On your iPhone, go to “Settings” and tap on your Apple ID at the top of the screen.
- Select “iCloud” and toggle on the “Contacts” option to enable contact syncing with iCloud.
- On your Mac, open the “Contacts” app.
- In the menu bar, click on “Contacts” and then select “Preferences.”
- In the “Accounts” tab, ensure that “iCloud” is selected.
- If it’s not already enabled, check the box next to “Enable this account.”
- Click on the “General” tab and check the box next to “Synchronize with iCloud.”
- Your contacts will now sync between your iPhone and Mac using iCloud. Any changes you make to your contacts on one device will be reflected on the other.
iCloud provides a seamless and convenient way to sync your contacts between your iPhone and Mac. By enabling contact syncing with iCloud, you can ensure that your contact information is always up to date and accessible on both devices.
It’s important to note that iCloud offers a limited amount of free storage space, and if you exceed this limit, you may need to purchase additional storage or manage your iCloud storage to continue syncing your contacts. Additionally, make sure your devices are connected to a stable internet connection to ensure smooth and timely syncing between your iPhone and Mac.
Now that you know how to sync your contacts using iCloud, let’s explore another method to transfer your contacts from your iPhone to your Mac – iTunes.
Method 2: iTunes
If you prefer using iTunes to manage your iPhone’s data, you can also sync your contacts from your iPhone to your Mac using this software. Here’s how you can do it:
- Connect your iPhone to your Mac using a USB cable.
- Open iTunes on your Mac. If it doesn’t open automatically, you can launch it from your Applications folder.
- In iTunes, click on the iPhone icon located at the top-left corner of the window.
- Under the “Settings” section in the left sidebar, select “Info.”
- Check the box next to “Sync Contacts.”
- Choose whether you want to sync all contacts or only selected groups. If you select the latter, make sure the desired groups are checked.
- Click on the “Apply” or “Sync” button at the bottom-right corner of the window to initiate the contact sync.
- Wait for the sync process to complete. Once it’s finished, your iPhone contacts will be transferred to the Contacts app on your Mac.
Using iTunes to sync your contacts provides an alternative method that allows you to manage your contacts directly from your Mac. It’s particularly useful if you prefer to have more control over the syncing process or if you don’t want to rely on cloud-based services like iCloud.
While iTunes offers a straightforward way to sync your contacts, it’s worth noting that this method requires a physical connection between your iPhone and Mac. Additionally, any changes you make to your contacts on your iPhone or Mac will not automatically reflect on the other device until you perform another sync.
Now that you know how to sync your contacts using iTunes, let’s explore another method – AirDrop. AirDrop allows you to wirelessly transfer files between your iPhone and Mac, including your contacts.
Method 3: AirDrop
If you prefer a wireless method to transfer your contacts from your iPhone to your Mac, AirDrop is a convenient option. AirDrop allows you to share files, including contacts, between Apple devices using Bluetooth and Wi-Fi. Here’s how you can use AirDrop to sync your contacts:
- Make sure both your iPhone and Mac have AirDrop enabled. On your iPhone, swipe up from the bottom of the screen to open Control Center and enable Wi-Fi and Bluetooth. On your Mac, click on the Finder icon in the Dock, then click on “AirDrop” in the sidebar and ensure it’s set to “Everyone” or “Contacts Only.”
- On your iPhone, open the “Contacts” app.
- Select the contacts you wish to transfer. You can select multiple contacts by tapping on each contact’s name or use the “Select All” option.
- Tap on the “Share” icon.
- In the sharing options, you should see your Mac listed under the AirDrop section. Tap on your Mac’s name to send the contacts.
- On your Mac, you will receive a notification with the option to accept the contact transfer. Click on “Accept” to initiate the transfer.
- The contacts will be saved to the Contacts app on your Mac, and you can access them anytime.
AirDrop provides a wireless and hassle-free method of transferring contacts between your iPhone and Mac. It’s a great option if you want to quickly share individual contacts or a small group of contacts without the need for cables or cloud-based services.
It’s important to note that AirDrop requires both devices to be in close proximity to ensure a successful transfer. Additionally, make sure you have a stable Wi-Fi and Bluetooth connection on both your iPhone and Mac for seamless contact syncing.
Now that you know how to use AirDrop to sync your contacts, let’s explore another method – Google Contacts Sync.
Method 4: Google Contacts Sync
If you use Google services and want to sync your contacts from your iPhone to your Mac, you can use Google Contacts Sync. This method allows you to transfer your contacts to your Google account and then access them on your Mac. Here’s how you can sync your contacts using Google Contacts Sync:
- On your iPhone, open the “Settings” app.
- Scroll down and tap on “Passwords & Accounts.”
- Tap on “Add Account.”
- Select “Google” from the list of account types.
- Enter your Google account credentials and follow the on-screen prompts to sign in.
- Toggle on the “Contacts” option to enable contact syncing with your Google account.
- Wait for a moment as your iPhone transfers the contacts to your Google account.
- On your Mac, open a web browser and go to the Google Contacts website (contacts.google.com).
- Sign in to your Google account using the same credentials you used on your iPhone.
- You should now see all your synced contacts on the Google Contacts website.
- You can access and manage your contacts from the Google Contacts website on your Mac, and any changes you make will be reflected on your iPhone as well.
Syncing your contacts with Google Contacts provides a cross-platform solution, allowing you to access your contacts on both your iPhone and Mac, as well as other devices that are connected to your Google account.
This method also provides the benefit of having your contacts stored securely in the cloud, reducing the risk of data loss. Additionally, by syncing your contacts with Google, you can easily switch to Android devices or other platforms in the future without worrying about losing your contact information.
Now that you know how to sync your contacts using Google Contacts Sync, let’s explore another method – third-party apps.
Method 5: Third-Party Apps
If you prefer using third-party apps to manage your contacts and sync them between your iPhone and Mac, there are several options available in the App Store. These apps often offer additional features and customization options for contact management. Here’s how you can use third-party apps to sync your contacts:
- On your iPhone, open the App Store and search for contact syncing apps. Some popular apps include My Contacts Backup, Sync.ME, and Covve.
- Select the app that best suits your needs and download it to your iPhone.
- Open the app and follow the on-screen instructions to set it up.
- Grant the necessary permissions to the app to access your contacts.
- Depending on the app, you may have different options to sync your contacts, such as via Wi-Fi, cloud-based services, or direct connection.
- Follow the app’s instructions to initiate the contact syncing process.
- Once the contacts have been synced, you can access and manage them using the app on your iPhone.
- On your Mac, open the Mac App Store and search for the same third-party app you used on your iPhone.
- Install the app on your Mac and follow the instructions to set it up.
- Sign in to your account within the app using the same credentials you used on your iPhone.
- The app will automatically sync your contacts between your iPhone and Mac, allowing you to access and manage them on both devices.
Using third-party apps for contact syncing provides flexibility and customization options that may not be available with built-in solutions. These apps often offer features such as contact backups, duplicate contact merging, and advanced contact management tools.
It’s important to research and choose a reputable and trustworthy app from the App Store to ensure the security and privacy of your contacts. Reading user reviews and checking app ratings can provide valuable insights when selecting the right app for your needs.
Now that you know how to sync your contacts using third-party apps, let’s explore another method – email sync.
Method 6: Email Sync
If you prefer a simple and straightforward method to sync your contacts from your iPhone to your Mac, email synchronization is a convenient option. By sending your contacts as an email attachment, you can easily transfer them to your Mac and import them into the Contacts app. Here’s how you can sync your contacts using email:
- On your iPhone, open the “Contacts” app.
- Select the contacts you want to sync. You can choose multiple contacts by tapping on each contact’s name or use the “Select All” option.
- Tap on the “Share” icon.
- In the sharing options, select “Mail” to compose a new email.
- Enter your email address as the recipient, add a subject if desired, and send the email.
- On your Mac, open your email client and access the email you sent from your iPhone.
- Download the contact attachment from the email to your Mac.
- Open the “Contacts” app on your Mac.
- In the menu bar, click on “File” and select “Import.”
- Navigate to the location where you saved the contact attachment, select it, and click on “Import.”
- Your contacts will be imported into the Contacts app on your Mac, allowing you to access and manage them.
Using email synchronization provides a simple and direct method to transfer your contacts from your iPhone to your Mac. It doesn’t require any additional software or cloud services, making it a convenient option for those who prefer to keep things straightforward.
While email synchronization is effective for smaller contact lists, keep in mind that it may not be the most efficient method for large numbers of contacts due to email attachment size limitations. Additionally, note that this method requires an internet connection on both your iPhone and Mac to send and receive the email containing the contact attachment.
Now that you know how to sync your contacts using email, let’s explore another method – Bluetooth sync.
Method 7: Bluetooth Sync
If you prefer to sync your contacts without relying on a network connection or third-party services, Bluetooth sync is a viable option. Bluetooth allows you to establish a direct wireless connection between your iPhone and Mac, enabling you to transfer your contacts easily. Here’s how you can use Bluetooth to sync your contacts:
- On your iPhone, open the “Settings” app.
- Select “Bluetooth” and toggle it on.
- On your Mac, click on the Bluetooth symbol in the menu bar and make sure Bluetooth is turned on.
- On your iPhone, go to the “Contacts” app.
- Select the contacts you want to sync.
- Tap on the “Share” icon.
- In the sharing options, select “Bluetooth.”
- Your iPhone will search for available Bluetooth devices. Tap on your Mac’s name when it appears.
- On your Mac, a notification will appear asking if you want to accept the contact transfer. Click on “Accept” to initiate the syncing process.
- The contacts will be transferred from your iPhone to the Contacts app on your Mac.
Bluetooth sync offers a quick and direct method to transfer contacts between your iPhone and Mac without the need for internet connectivity or cloud services. It provides convenience and privacy by establishing a direct connection between the two devices.
It’s important to note that Bluetooth sync may take longer than other methods, especially when transferring a large number of contacts. Additionally, Bluetooth sync is limited to a certain proximity range, so ensure that your iPhone and Mac are within close distance for a successful transfer.
Now that you know how to use Bluetooth to sync your contacts, you have explored seven different methods to transfer your contacts from your iPhone to your Mac. Choose the method that suits your preferences and needs to ensure that your contacts are always up to date and accessible on both devices.