
Creating a New Administrator Account on Your Mac
If you want to add a new administrator account to your Mac, there are a few simple methods you can follow. Whether you need an additional account for yourself or for someone else, the process is straightforward. Having multiple administrator accounts can be helpful for managing various aspects of your Mac, such as system settings and software installations.
Here are a few methods you can use to create a new administrator account on your Mac:
- Using System Preferences: The easiest way to add a new administrator account is through the System Preferences. Simply click on the Apple menu at the top-left corner of your screen and select “System Preferences.” From there, choose “Users & Groups” and click on the lock icon to make changes. Enter your password, then click on the “+” button to add a new account. Choose “Administrator” as the account type, enter the necessary details, and click on “Create User.”
- Using the Terminal: If you prefer working with the command line, you can create a new administrator account using the Terminal. Open the Terminal application from the Utilities folder in your Applications folder. Then, type the following command: “sudo dscl . -create /Users/[username]” (replace [username] with the desired username for the account). Press Enter. Next, type: “sudo dscl . -create /Users/[username] UserShell /bin/bash” and press Enter. Finally, type: “sudo dscl . -create /Users/[username] UniqueID 501” and press Enter. This will create the new administrator account.
- Assigning Administrator Privileges: If you already have a user account on your Mac and want to grant it administrator privileges, you can do so by going to System Preferences, choosing “Users & Groups,” and selecting the account you want to modify. Click on the lock icon, enter your password, and then click on “Allow user to administer this computer.”
- Enabling the Root User Account: Another option is to enable the root user account on your Mac, which gives it full access and control over the system. However, it is important to note that enabling the root user account should be done with caution, as it can pose security risks if not managed properly. To enable the root user account, go to System Preferences, select “Users & Groups,” and click on the lock icon. Enter your password, then click on “Login Options.” From there, click on “Join” or “Edit” next to “Network Account Server” and then click on “Open Directory Utility.” In the Directory Utility window, click on the lock icon again, enter your password, and choose “Enable Root User” from the Edit menu. Set a password for the root user account and click on “OK.”
By following any of these methods, you can easily create a new administrator account on your Mac, granting it the necessary privileges to manage your system efficiently. Remember to use administrator accounts responsibly and protect your Mac with strong passwords to ensure the security of your data and privacy.
Using System Preferences to Add an Administrator Account
One of the simplest methods to add a new administrator account on your Mac is by using the System Preferences. This user-friendly approach allows you to quickly create a new account with the necessary privileges to manage your system settings and perform administrative tasks.
Follow these steps to add an administrator account using System Preferences:
- Click on the Apple menu located at the top-left corner of your screen and select “System Preferences.”
- In the System Preferences window, click on “Users & Groups.”
- Click on the lock icon located at the bottom left of the window to unlock it. You will need to enter your password to proceed.
- With the lock unlocked, click on the “+” button to add a new user account.
- A new window will appear where you can enter the details for the new account. Fill in the necessary information such as the full name, account name, password, and password hint.
- From the drop-down menu next to “New Account,” select “Administrator” as the account type.
- After confirming the details, click on the “Create User” button to add the new administrator account to your Mac.
Once the account is created, you can customize the settings further if needed. To make changes to the account, click on the account name in the Users & Groups window, then select the desired options. You can modify the account picture, login items, and even manage parental controls if required.
It is important to protect your new administrator account by choosing a strong password. A strong password should include a combination of uppercase and lowercase letters, numbers, and special characters. This will help ensure the security of your account and protect your Mac from unauthorized access.
Adding an administrator account using System Preferences is a straightforward and efficient method. It allows you to easily create a new account with administrative privileges, enabling you to manage various aspects of your Mac effectively. Whether you need an additional account for personal use or for someone else, using System Preferences is an excellent solution.
Adding an Administrator Account from the Terminal
If you prefer working with the command line, you can add a new administrator account on your Mac using the Terminal. This method gives you more flexibility and control over the account creation process.
Follow these steps to add an administrator account from the Terminal:
- Open the Terminal application from the Utilities folder in your Applications folder.
- Type the following command:
sudo dscl . -create /Users/[username](replace [username] with the desired username for the account). Press Enter. - Next, type:
sudo dscl . -create /Users/[username] UserShell /bin/bashand press Enter. This sets the user’s login shell to Bash. - Finally, type:
sudo dscl . -create /Users/[username] UniqueID 501and press Enter. This assigns a unique user ID to the new account.
Once you have entered all the necessary commands, the new administrator account will be created. However, it is important to note that the account will not have a password set by default.
To set a password for the new account, you can use the following command:
sudo dscl . -passwd /Users/[username] [password]
Replace [username] with the desired username for the account and [password] with the password you want to set. Press Enter to set the password.
After setting the password, you can use the created account by logging out and then logging in with the new username and password.
Adding an administrator account from the Terminal gives you more control over the account creation process. It is particularly useful if you are comfortable with using the command line and prefer a more hands-on approach. Just remember to set a strong password for the account to ensure the security of your Mac.
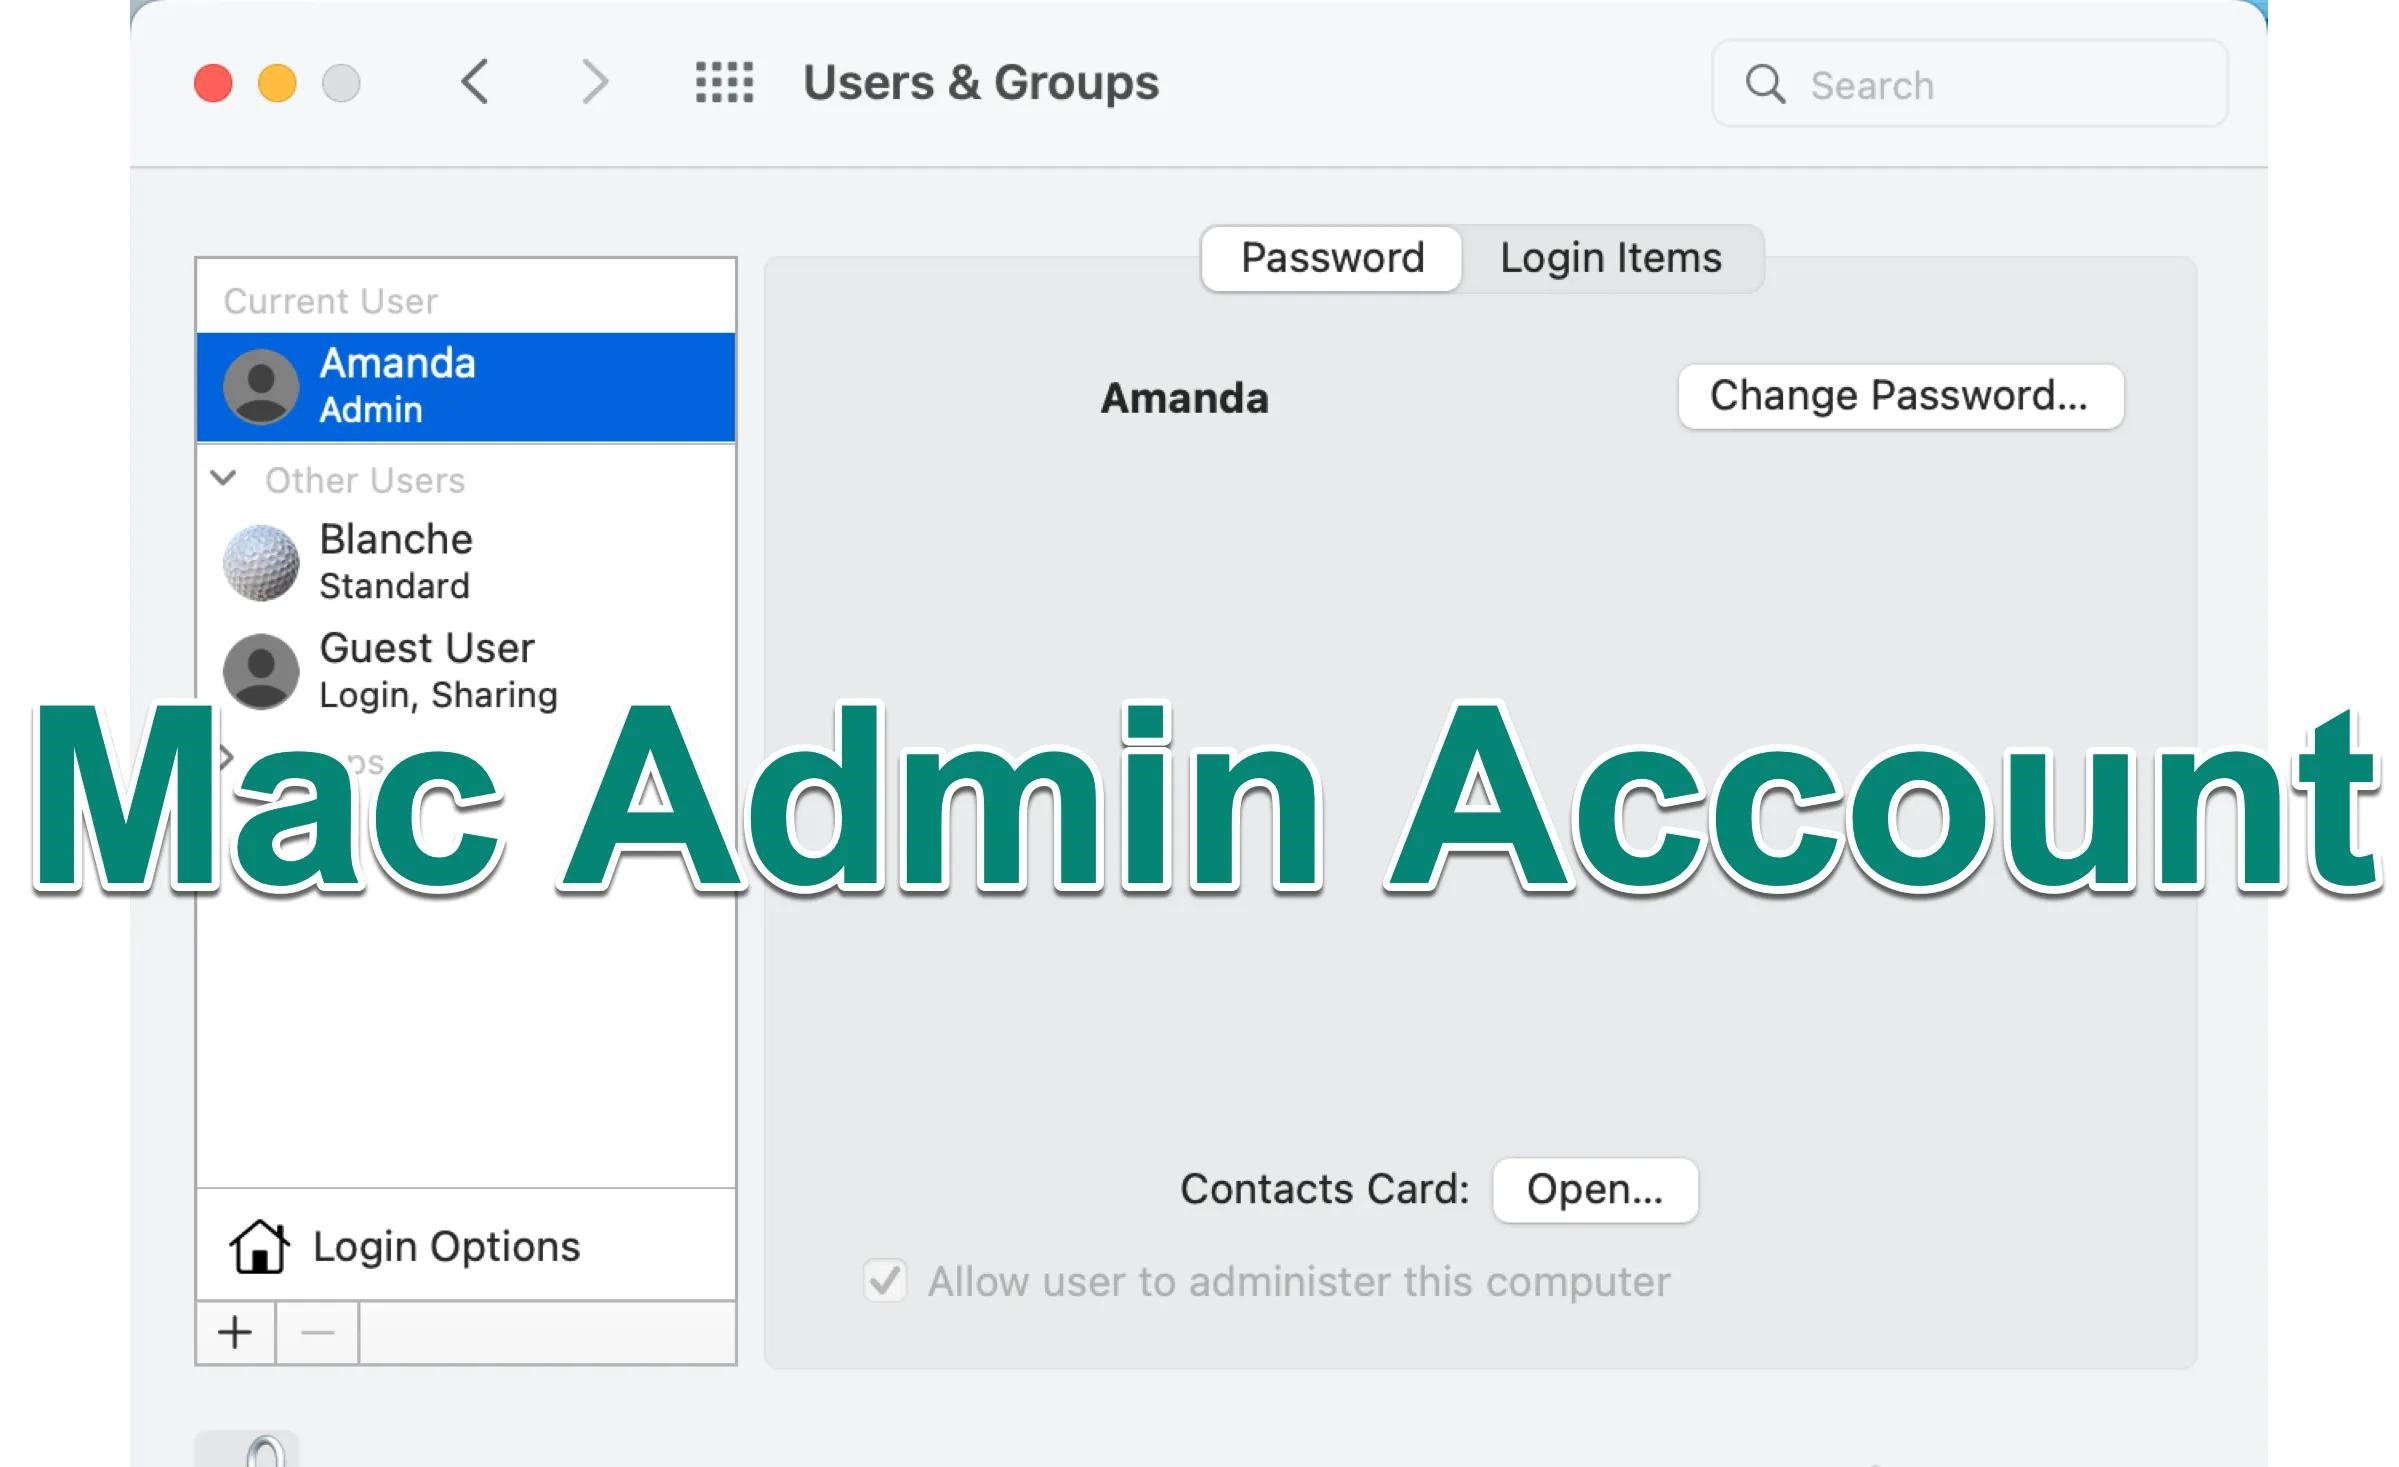
Assigning Administrator Privileges to an Existing User Account
If you already have an existing user account on your Mac and want to give it administrator privileges, you can easily do so through the System Preferences. This method is convenient if you want to grant administrative access to an account that is already set up and has all the necessary personal settings and preferences.
Here are the steps to assign administrator privileges to an existing user account:
- Click on the Apple menu at the top-left corner of your screen and select “System Preferences.”
- In the System Preferences window, click on “Users & Groups.”
- Click on the lock icon at the bottom-left of the window and enter your password to unlock it.
- Select the user account you want to modify from the list on the left-hand side of the window.
- Click on the checkbox next to “Allow user to administer this computer.”
- Once you have enabled the option, the user account will have administrator privileges.
By granting an existing user account administrator privileges, you can now perform administrative tasks and have control over various aspects of your Mac, such as installing software, managing system preferences, and making system-wide changes.
It is important to note that granting administrator privileges to a user account gives them extensive control and access to your Mac. Therefore, it is recommended to assign this privilege only to trusted users who require administrative access. Additionally, make sure to use strong, unique passwords for each account to ensure the security of your system.
Assigning administrator privileges to an existing user account is a simple and efficient way to grant administrative access as needed. It allows you to have more control over your Mac by empowering selected user accounts with the ability to manage system settings and perform administrative tasks.
Enabling the Root User Account on Your Mac
If you need full access and control over your Mac, you can enable the root user account. The root user account is a superuser account that has unrestricted privileges and can modify system files and settings. However, it is important to keep in mind that enabling the root user account should be done cautiously and only when necessary, as it can pose security risks if not managed properly.
To enable the root user account on your Mac, follow these steps:
- Click on the Apple menu at the top-left corner of your screen and select “System Preferences.”
- In the System Preferences window, click on “Users & Groups.”
- Click on the lock icon at the bottom-left of the window and enter your password to unlock it.
- With the lock unlocked, click on “Login Options” or “Join” next to “Network Account Server.”
- Click on the “Open Directory Utility” button. This will open the Directory Utility window.
- In the Directory Utility window, click on the lock icon at the bottom-left and enter your password to make changes.
- From the Edit menu, choose “Enable Root User.” A prompt will appear asking you to set a password for the root user account.
- Set a strong password for the root user account and click on “OK.”
After enabling the root user account, you can log in as the root user. Keep in mind that logging in as the root user should only be done when necessary, as it gives you full access and control over your system. It is recommended to log back into your regular user account when you are done with the specific administrative tasks that require root privileges.
Enabling the root user account can be useful in certain situations where you need absolute control over your Mac. However, exercise caution when using the root user account and ensure that you understand the potential risks and responsibilities associated with it. Regularly updating your Mac’s security features and using strong, unique passwords for all user accounts will help protect your system and maintain its integrity.