
Choose a Screen Saver Image
Selecting an appealing image is the first step in adding a custom screen saver to your Mac. The image you choose will be the focal point of your screen saver and should reflect your personal taste or the sentiment you wish to convey. Here are a few tips to help you select the perfect screen saver image:
- High Quality: Choose an image with a high resolution and sharp details to ensure the best visual experience for your screen saver.
- Relevance: Consider the theme or purpose of your screen saver. Are you looking for a serene landscape, an artistic masterpiece, or perhaps a collection of personal photos? Keep in mind that your screen saver should align with your preferences and provide an enjoyable viewing experience.
- Contrast: A screen saver image with good contrast will make the visual elements stand out and be easily distinguishable. This will enhance the overall impact of your screen saver.
- Diverse Collection: If you plan to rotate multiple images in your screen saver, it’s a good idea to select a variety of pictures. This will prevent monotony and keep your screen saver fresh and interesting.
Once you have chosen the perfect image for your custom screen saver, you’re ready to move on to the next step – converting the image into a screen saver file.
Convert the Image to a Screen Saver File
Now that you have selected the image for your custom screen saver, it’s time to convert it into a screen saver file that your Mac can recognize and use. Follow these steps to convert your image:
- Use a Screen Saver Conversion Tool: There are various third-party screen saver conversion tools available for Mac, such as WallpaperSaver or ScreenSaverTool. These tools allow you to easily convert your chosen image into a compatible screen saver format.
- Open the Conversion Tool: Launch the screen saver conversion tool of your choice and import the image you want to convert.
- Adjust Settings: Some conversion tools offer additional customization options, such as selecting transition effects, adjusting display settings, or adding text overlays. Take advantage of these features to personalize your screen saver even further.
- Save the Converted File: Once you are satisfied with the settings, save the converted screen saver file to your preferred location on your Mac.
It’s important to note that the specific steps may vary depending on the screen saver conversion tool you are using. However, most tools follow a similar process, so consult the documentation or support resources provided by the tool for more detailed instructions.
Now that you have successfully converted your image into a screen saver file, it’s time to proceed to the next step – opening the Terminal.
Open the Terminal
To continue with the process of adding a custom screen saver to your Mac, you will need to open the Terminal application. The Terminal is a powerful tool that allows you to interact with the command line interface on your Mac. Here’s how you can access the Terminal:
- Using Spotlight: Press Command + Space to open Spotlight, type “Terminal,” and hit Enter when the Terminal application appears in the search results.
- From the Utilities Folder: Open the Finder, navigate to the Applications folder, then locate and open the Utilities folder. Inside, you will find the Terminal application.
Once you have successfully opened the Terminal, you will be ready to navigate to the location where you saved your screen saver file. This will allow you to move forward with the installation of your custom screen saver.
If you are unfamiliar with using the Terminal, it is recommended to proceed with caution as executing incorrect commands can have unintended consequences. Take the time to familiarize yourself with basic Terminal commands or seek assistance if needed. Now that you have the Terminal open, you are ready to move on to the next step – navigating to the location of the screen saver file.
Navigate to the Location of the Screen Saver
Now that you have the Terminal open, it’s time to navigate to the location where you saved your custom screen saver file. By moving to the correct directory, you will be able to access and make further modifications to the screen saver. Follow these steps to navigate to the location of the screen saver:
- Type the Command: In the Terminal window, type “cd” (short for “change directory”), followed by the path to the folder where your screen saver file is located. For example, if your screen saver file is saved in the “Documents” folder, the command would be “cd ~/Documents”.
- Press Enter: After entering the command, press Enter on your keyboard. This will execute the command and change your current directory to the specified location.
If you are unsure about the exact path to your screen saver file, you can navigate to the folder manually by using the “cd” command and specifying each folder level until you reach the desired location. Use the “ls” command to list the contents of each directory and verify that you are in the correct folder.
Once you have successfully navigated to the location of your screen saver file, you are ready to move on to the next step – removing the existing screen saver files.
Remove the Existing Screen Saver Files
Before installing your custom screen saver on your Mac, it is necessary to remove any existing screen saver files in the designated folder. By doing so, you ensure that there are no conflicting files that might interfere with the installation process. Here’s how you can remove the existing screen saver files:
- Open the Finder: Launch the Finder application on your Mac.
- Go to the Library Folder: In the Finder, click on the “Go” menu in the menu bar and select “Go to Folder.” Alternatively, you can press the “Shift + Command + G” shortcut. This will open a dialog box.
- Navigate to the Screen Savers Folder: In the dialog box, type “~/Library/Screen Savers” (without quotes) and click on the “Go” button. This will take you to the Screen Savers folder in your user Library.
- Delete the Existing Screen Saver Files: Inside the Screen Savers folder, you will find various files with the extension “.saver”. Select the files you want to remove and move them to the Trash, or right-click on them and select “Move to Trash”.
By deleting the existing screen saver files, you are clearing the way for your custom screen saver to be installed without any conflicts. However, exercise caution while deleting files and ensure that you are only removing the necessary screen saver files.
Now that you have successfully removed the existing screen saver files, you can proceed to the next step – renaming the new screen saver file.
Rename the New Screen Saver File
After removing the existing screen saver files, you are ready to rename the new screen saver file that you previously converted. Renaming the file will help ensure that it is recognized and installed correctly on your Mac. Follow these steps to rename the new screen saver file:
- Locate the New Screen Saver File: Open the Finder and navigate to the location where your new screen saver file is saved.
- Select the File: Click on the new screen saver file to select it. You can also press “Command + A” to select all files in the folder if there are no other files present.
- Right-Click and Choose “Rename”: Right-click on the selected file and choose the “Rename” option from the context menu that appears.
- Enter the New Name: In the renaming field, enter the desired name for your screen saver file. Make sure to choose a descriptive and memorable name.
- Press Enter: After entering the new name, press Enter on your keyboard to apply the changes and rename the file.
By renaming the new screen saver file, you are ensuring that it stands out from other files and can be easily identified during the installation process. It also helps prevent any potential conflicts if there are multiple screen saver files present.
Now that you have successfully renamed the new screen saver file, you are ready to move on to the next step – setting permissions for the screen saver file.
Set Permissions for the Screen Saver File
Setting appropriate permissions for the screen saver file is an important step to ensure that it can be installed and run correctly on your Mac. Permissions control who can access and modify the file. Follow these steps to set permissions for the screen saver file:
- Locate the New Screen Saver File: Open the Finder and navigate to the location where your renamed screen saver file is saved.
- Right-Click on the File: Select the screen saver file and right-click on it to open the context menu.
- Choose “Get Info”: From the context menu, select the “Get Info” option. This will open the Info window for the selected file.
- Expand the “Sharing & Permissions” Section: In the Info window, locate the “Sharing & Permissions” section and click on the triangle icon next to it. This will expand the section, revealing the available permissions settings.
- Set the Permissions: By default, your user account should have “Read & Write” permissions. If not, click on the lock icon and enter your administrator password to enable changes. Then, ensure that your user account has “Read & Write” access. To grant it, click on the “+” symbol and add your account. Set the privilege for the added account to “Read & Write”.
- Apply the Changes: Once you have set the permissions for your user account, click on the lock icon again to prevent further changes and close the Info window.
Setting the appropriate permissions ensures that your user account has the necessary access rights to install and run the screen saver file. It helps prevent any issues related to permissions restrictions during the installation or execution process.
Now that you have successfully set the permissions for the screen saver file, you are ready to proceed to the next step – installing the screen saver on your Mac.
Install the Screen Saver
After completing the previous steps of choosing an image, converting it to a screen saver file, opening the Terminal, navigating to the screen saver location, and setting the necessary permissions, you are now ready to install your custom screen saver on your Mac. Follow these steps to install the screen saver:
- In the Terminal: In the Terminal window, type the following command and press Enter:
open . - Finder Window: The previous command will open a new Finder window, revealing the contents of the current directory.
- Drag and Drop: Locate your renamed screen saver file in the Finder window and drag it into the “Screen Savers” section of the System Preferences.
- System Preferences: Optionally, you can also navigate to the “Screen Savers” section of the System Preferences manually. Open the Apple menu, click on “System Preferences,” and then select “Desktop & Screen Saver.”
- Select the Screen Saver: In the “Screen Savers” section, scroll through the list of available options and find your newly installed screen saver. Click on it to select and preview it.
- Adjust Settings: Depending on the screen saver, you may have additional settings and options available. Customize them according to your preferences.
- Close System Preferences: Once you are satisfied with the settings, close the System Preferences window.
By following these steps, you have successfully installed your custom screen saver on your Mac. It should now be available for selection and use, providing a personalized and visually appealing screen-saving experience.
Now that you have completed the installation process, it’s time to move on to the final step – testing your new screen saver.
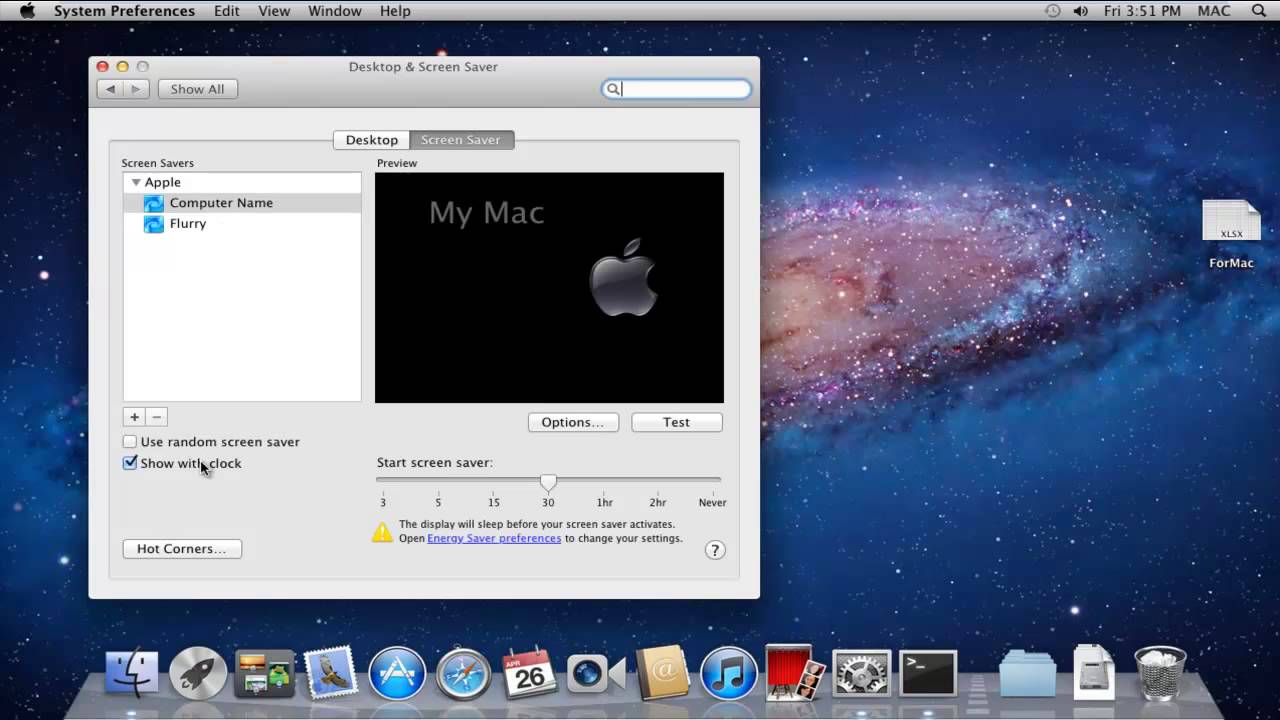
Select the New Screen Saver in Preferences
Now that you have installed your custom screen saver on your Mac, you can select it from the Screen Saver preferences to make it your active screen saver. Follow these steps to select the new screen saver in preferences:
- Open System Preferences: Click on the Apple menu in the top-left corner of your screen and select “System Preferences” from the dropdown menu.
- Go to Desktop & Screen Saver: In the System Preferences window, click on “Desktop & Screen Saver”. This will open the Desktop & Screen Saver preferences pane.
- Navigate to the Screen Saver Settings: In the preferences pane, click on the “Screen Saver” tab located at the top of the window.
- Select the New Screen Saver: Scroll through the list of available screen savers on the left side of the preferences pane. Locate your newly installed screen saver and select it by clicking on its name.
- Customize Settings: Depending on the screen saver, you may have options to customize its settings. If available, you can adjust parameters such as duration, transition effects, or image selection.
- Preview the Screen Saver: To preview the selected screen saver, click on the “Preview” button located on the right side of the preferences pane. This will activate the screen saver on a separate screen to provide a glimpse of how it will appear.
- Apply Changes: If you are satisfied with the screen saver and its settings, close the preferences pane. Your new screen saver is now ready to be displayed when your Mac enters the screen saver mode.
By selecting your newly installed screen saver in the preferences, you have personalized your Mac’s display with a customized screen saver that aligns with your tastes and preferences. Enjoy the visual delight that your new screen saver brings to your Mac.
Now that you have completed the selection process, it’s time to move on to the final step – testing your new screen saver.
Test the New Screen Saver
After installing and selecting your new screen saver in the preferences, it’s important to test it to ensure that it is functioning as expected. By testing the screen saver, you can verify its appearance, transitions, and any additional settings you may have customized. Follow these steps to test your new screen saver:
- Activate the Screen Saver: Allow your Mac to enter the screen saver mode by either waiting for the idle time to kick in or by triggering it manually. You can manually trigger the screen saver by pressing “Shift + Command + Option + Power” on Macs with physical keyboards or by clicking on the “Hot Corners” option in the Screen Saver preferences and moving the cursor to the specified corner.
- Observe the Screen Saver: Once the screen saver is activated, observe its behavior and appearance. Pay attention to any transitions, animations, or visual effects that are part of your selected screen saver.
- Check Customizations: If you have customized any settings for the screen saver, such as image selection, duration, or effects, ensure that these customizations are reflected in the screen saver during the testing phase.
- Exit the Screen Saver: To exit the screen saver, move your mouse, press any key on the keyboard, or click the mouse button. This will bring your Mac back to its normal operating mode.
By testing your new screen saver, you can confirm that it is working as intended and that any customizations you made are in effect. If you encounter any issues or unexpected behavior during the testing phase, you may need to revisit the installation process or review the screen saver settings to address the problem.
Congratulations! You have successfully installed, selected, and tested your new screen saver on your Mac. Enjoy the personalized touch it brings to your computer’s idle display, adding a touch of creativity and visual interest.
Now that you have completed the testing phase, your new screen saver is ready to delight you and others who view your Mac when it enters the screen saver mode.