
Ways to Cancel Subscriptions on Amazon
If you find yourself needing to cancel a subscription on Amazon, you’ll be glad to know that the process is relatively straightforward. Whether you’re looking to cancel a subscription through your Amazon account, the Amazon app, or specific services like Amazon Prime, Kindle, or Amazon Music Unlimited, you have multiple options at your disposal. Here are some of the most common ways to cancel subscriptions on Amazon:
Cancelling Subscriptions through Your Amazon Account
To cancel a subscription through your Amazon account, you can follow these simple steps:
- Go to the “Your Account” page on Amazon.
- Under the “Account & Lists” tab, select “Your Memberships & Subscriptions.”
- Find the subscription you want to cancel and click on the “Manage Subscription” button.
- Follow the instructions provided to complete the cancellation process.
Cancelling Subscriptions through the Amazon App
If you prefer using the Amazon app to manage your subscriptions, here’s how to cancel them:
- Open the Amazon app on your mobile device.
- Tap on the menu icon (three horizontal lines) in the top left corner.
- Select “Your Account” and then “Memberships & Subscriptions.”
- Find the subscription you want to cancel and tap on it.
- Follow the on-screen instructions to cancel the subscription.
Cancelling Subscriptions through the Amazon Website
If you prefer using the Amazon website on your computer, follow these steps to cancel subscriptions:
- Go to the Amazon website and sign in to your account.
- Click on the profile icon in the top right corner and select “Your Account.”
- Under the “Account Settings” section, choose “Memberships & Subscriptions.”
- Find the subscription you want to cancel and click on the “Manage Subscription” button next to it.
- Proceed with the cancellation process as instructed.
Cancelling Subscriptions on the Amazon Fire TV
If you have a subscription through the Amazon Fire TV, here’s how to cancel it:
- From the home screen, navigate to “Settings.”
- Click on “Applications” and then “Manage Installed Applications.”
- Select the app that corresponds to the subscription you want to cancel.
- Choose the option to manage the subscription and follow the steps to cancel it.
Cancelling Subscriptions on Amazon Prime Video
To cancel a subscription specifically on Amazon Prime Video, follow these instructions:
- Go to the Prime Video website and sign in to your Amazon account.
- Click on “Account & Settings” and select “Your Channels.”
- Find the subscription you want to cancel and click “Cancel Channel.”
- Confirm the cancellation by following the prompted steps.
These are just a few examples of how you can cancel subscriptions on Amazon. Remember, the specific steps may vary slightly based on the device or service you are using. By following the appropriate instructions for your situation, you’ll be able to manage and cancel your subscriptions hassle-free.
Cancelling Subscriptions through Your Amazon Account
If you have subscribed to services or memberships through your Amazon account and wish to cancel them, here’s a step-by-step guide:
First, go to the “Your Account” page on Amazon. You can access this page by clicking on the “Account & Lists” tab located at the top right corner of the Amazon homepage.
Once you’re on the “Your Account” page, look for the section titled “Memberships & Subscriptions.” Click on this section to view the list of subscriptions associated with your Amazon account.
Within the “Memberships & Subscriptions” section, you will find the subscription(s) you’re currently subscribed to. Locate the subscription you wish to cancel and click on the “Manage Subscription” button next to it.
A new page will load with information about the selected subscription. Here, you can find details about the subscription, including the renewal date and payment method. Look for the option to cancel the subscription, which is usually located towards the bottom of the page. Click on the cancel button.
Amazon may provide further information or offer alternatives to cancellation at this point. Read the provided information carefully before proceeding. If you still wish to cancel the subscription, follow the instructions provided on the screen.
After confirming the cancellation, Amazon will send you a confirmation email to the email address associated with your account. This email will serve as proof that your subscription has been successfully canceled.
It’s important to note that cancelling a subscription through your Amazon account will only apply to that specific subscription. If you have multiple subscriptions, you will need to repeat the process for each one you wish to cancel.
By following these steps, you can easily cancel subscriptions through your Amazon account. Remember to keep track of any renewal dates to avoid any unwanted charges. Take advantage of the convenience that Amazon provides by managing your subscriptions in one centralized location.
Cancelling Subscriptions through the Amazon App
If you prefer managing your subscriptions through the Amazon app on your mobile device, follow these simple instructions to cancel them:
Start by opening the Amazon app on your device. If you haven’t already signed in, make sure to sign in to your Amazon account.
Once you’re signed in, tap on the menu icon, which usually appears as three horizontal lines in the top left corner of the app.
In the menu, scroll down and look for the “Your Account” section. Tap on it to access your account settings.
Within the account settings, you should find a category called “Memberships & Subscriptions.” Tap on this category to view a list of your current subscriptions.
Locate the subscription you wish to cancel from the list. Tap on it to open the subscription details.
On the subscription details page, you should see an option to manage or cancel the subscription. Tap on this option to proceed with the cancellation.
Amazon may provide additional information or alternative options at this point. Read this information carefully to ensure you understand the consequences of canceling the subscription. If you still wish to proceed, follow the on-screen instructions to confirm the cancellation.
Once the cancellation is confirmed, you will receive a confirmation email from Amazon to the email address associated with your account. Keep this email for your records as proof of the cancellation.
It’s important to note that canceling a subscription through the Amazon app will only apply to that specific subscription. If you have multiple subscriptions, you will need to repeat these steps for each one you wish to cancel.
By using the Amazon app to manage your subscriptions, you can conveniently cancel them from the palm of your hand. This allows you to have greater control over your subscriptions and avoid any unwanted charges. Take advantage of the user-friendly interface of the Amazon app to effectively manage your subscriptions on the go.
Cancelling Subscriptions through the Amazon Website
If you prefer to manage your subscriptions through the Amazon website on your computer, you can easily cancel them by following these steps:
Start by visiting the Amazon website and sign in to your account using your credentials.
Once you’re signed in, click on the profile icon, usually located in the top right corner of the website. From the drop-down menu, select “Your Account” to access your account settings.
Within the account settings, you will find a section titled “Memberships & Subscriptions.” Click on this section to view a list of your current subscriptions.
Look for the subscription you want to cancel from the list. Next to each subscription, you will see a button or link that says “Manage Subscription.” Click on this button for the subscription you wish to cancel.
A new page will open, displaying the details of the subscription you selected. Look for the option to cancel the subscription, usually located towards the bottom of the page. Click on the cancel button.
Amazon may provide additional information or alternative options for your subscription. Carefully read the provided information before proceeding. If you still wish to cancel the subscription, follow the on-screen instructions to confirm the cancellation.
After canceling the subscription, Amazon will send a confirmation email to the email address associated with your account. Keep this email as proof of the cancellation.
It’s important to note that canceling a subscription through the Amazon website will only apply to that specific subscription. If you have multiple subscriptions, you will need to repeat these steps for each one you wish to cancel.
By using the Amazon website to manage your subscriptions, you have a comprehensive view of all your subscriptions in one place. Canceling subscriptions through the website allows you to easily navigate through the cancellation process and provides you with the necessary information at each step. Take advantage of the user-friendly interface of the Amazon website to efficiently manage your subscriptions and stay in control of your subscriptions and finances.
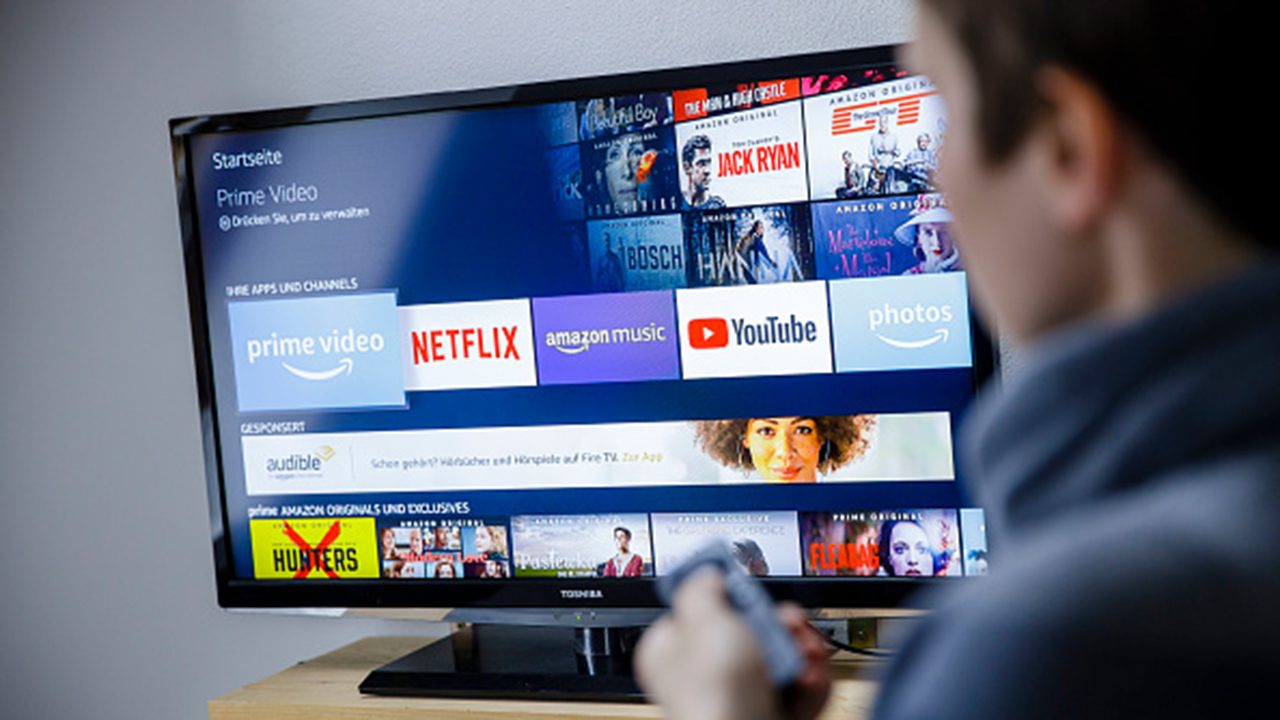
Cancelling Subscriptions on the Amazon Fire TV
If you have subscriptions through the Amazon Fire TV and want to cancel them, follow these steps:
Start by navigating to the home screen of your Amazon Fire TV device.
From the home screen, scroll to the right and select “Settings.” It is usually represented by a gear icon.
Within the settings menu, click on “Applications.”
Next, select “Manage Installed Applications” to view a list of applications installed on your Amazon Fire TV.
Look for the app that corresponds to the subscription you want to cancel. Select it to access the app’s settings.
Within the app’s settings, locate the option to manage your subscription. This option may appear as “Subscription,” “Account,” or something similar. Click on it.
Follow the on-screen prompts to access your subscription details and cancellation options. Amazon Fire TV may require you to log in to your Amazon account or provide additional verification.
Once you reach the subscription management page, you should find an option to cancel the subscription. Click on this option to proceed with the cancellation.
Amazon Fire TV may provide additional information or alternatives to cancellation. Read the provided information carefully before confirming the cancellation.
Confirm the cancellation by following the on-screen instructions. Amazon Fire TV may require you to confirm multiple times to prevent accidental cancellations.
After successfully canceling the subscription, you may receive a confirmation message or email to notify you of the cancellation.
It’s important to note that canceling a subscription on the Amazon Fire TV will only apply to that specific app or service. If you have subscribed to multiple services through the Fire TV, you will need to repeat these steps for each one you wish to cancel.
By following these steps, you can easily cancel subscriptions on the Amazon Fire TV. Keep in mind that the specific steps may vary slightly depending on the app or service you are using. Take advantage of the convenience of managing your subscriptions directly on your Fire TV device and ensure you have control over your subscription expenses.
Cancelling Subscriptions on Amazon Prime Video
If you have subscribed to additional channels or services through Amazon Prime Video and wish to cancel them, here’s what you need to do:
Start by visiting the Prime Video website and sign in to your Amazon account using your credentials.
Once signed in, click on “Account & Settings” located at the top right corner of the Prime Video homepage.
From the drop-down menu, select “Your Channels” to access your subscribed channels and services.
Within the “Your Channels” section, you will see a list of the channels and services you are currently subscribed to.
Find the subscription you want to cancel from the list and click on “Cancel Channel” next to it.
Amazon may prompt you to provide a reason for canceling the channel. Select the appropriate reason or choose “Other” if none of the provided options apply.
Confirm the cancellation by following any additional on-screen instructions. Amazon may ask you to verify your decision or provide further details before canceling.
Once the cancellation is confirmed, you will receive a confirmation email to the email address associated with your account.
It’s important to note that canceling a subscription on Amazon Prime Video will only apply to that specific channel or service. If you have multiple subscriptions through Prime Video, you will need to repeat these steps for each one you wish to cancel.
By canceling subscriptions on Amazon Prime Video, you can manage your channel and service subscriptions more effectively. This allows you to only pay for the content you truly want to access and helps you control your subscription expenses. Take advantage of the flexibility that Amazon Prime Video offers by easily canceling subscriptions whenever you need to.
Cancelling Subscriptions on Audible
If you have an Audible subscription and wish to cancel it, you can do so by following these simple steps:
Begin by visiting the Audible website and sign in to your account using your Audible credentials.
Once signed in, hover over the “Hi, [Your Name]” dropdown located in the top right corner of the Audible homepage. From the dropdown menu, select “Account Details.”
On the Account Details page, locate the “Account Settings” section. Under this section, you will find the “Cancel Membership” option. Click on it.
Audible may present you with alternative options, such as placing your membership on hold instead of canceling. If you still wish to proceed with the cancellation, click on the “Continue Cancelation” button.
To ensure the cancellation is valid, Audible may ask you to confirm your decision by selecting a reason for canceling. Choose the appropriate reason or select “Other” if none of the provided options apply.
After confirming the cancellation, Audible will provide information regarding the remaining credits in your account and the date your library will be accessible until. Review this information and click on the “Finish Cancelation” button to complete the process.
You will receive a confirmation email from Audible to the email address associated with your account. Keep this email as proof of the cancellation.
It’s important to note that canceling your Audible subscription will stop recurring billing and prevent future charges. However, you will still have access to your Audible library and previously purchased audiobooks.
By canceling your Audible subscription, you have the flexibility to manage your audiobook preferences and adjust your membership based on your needs. If you decide to rejoin Audible in the future, you can easily reactivate your membership and resume enjoying audiobooks. Take control of your membership by canceling or modifying it as desired.
Cancelling Subscriptions on Kindle
If you have subscribed to any services or magazines on your Kindle device and want to cancel them, you can do so by following these steps:
Start by turning on your Kindle device and accessing the home screen.
Navigate to the “Settings” menu by tapping on the gear icon located in the top right corner of the screen.
Within the settings menu, look for an option called “Subscriptions” or “Manage Subscriptions.” Tap on this option to proceed.
You will be presented with a list of all the subscriptions you have on your Kindle device. Find the subscription you wish to cancel and tap on it to open the subscription details.
Review the details of the subscription, including the renewal date and payment method. Look for an option to cancel the subscription and tap on it to continue.
Amazon may provide further information or alternative options, such as switching to a different plan or adjusting the frequency of delivery. Carefully read the options provided and decide if canceling is the best choice for you.
If you still want to cancel the subscription, confirm your decision by following the on-screen instructions. This may include tapping on a “Cancel” button and providing a reason for cancellation.
After confirming the cancellation, Kindle will no longer charge you for the subscription and it will be removed from your device.
It’s important to note that canceling a subscription on your Kindle device will only apply to that specific device. If you have the same subscription on multiple devices, you will need to repeat these steps on each device to cancel the subscription.
By canceling subscriptions on your Kindle device, you have the ability to manage and control your content subscriptions. This allows you to tailor your reading experience to your preferences and budget. Take advantage of the ease and convenience of canceling subscriptions directly from your Kindle device.
Cancelling Subscriptions on Amazon Prime
If you have an Amazon Prime subscription that you wish to cancel, here’s how you can do it:
Start by visiting the Amazon website and sign in to your account using your credentials.
Once signed in, hover over the “Hello, [Your Name]” dropdown located at the top right corner of the Amazon homepage. From the dropdown menu, select “Your Prime Membership.”
On the Prime Membership page, you will find all the details of your current Amazon Prime subscription. Look for the “End Membership and Benefits” link. Click on it to proceed with the cancellation process.
Amazon may prompt you to review the benefits of your Prime membership one last time. Take a moment to go through the information presented, as it may contain valuable insights about your Prime benefits.
After reviewing the benefits, you will be asked to confirm the cancellation. If you’re certain about canceling your Prime membership, click on the “Cancel Membership” button.
To ensure the cancellation is valid, Amazon may ask you to provide a reason for canceling. Choose the appropriate reason from the options provided or select “Other” if none of the options apply.
After confirming the cancellation, Amazon will send a confirmation email to the email address associated with your account. The email will confirm that your Prime membership has been canceled and will provide any relevant information regarding your membership.
It’s important to note that canceling your Amazon Prime subscription will immediately halt the benefits associated with Prime, such as free two-day shipping, Prime Video, and Prime Music. However, you may still have access to certain features until the end of your current billing cycle.
By canceling your Amazon Prime subscription, you have the flexibility to reassess your needs and adjust your membership accordingly. If you decide to rejoin Amazon Prime in the future, you can easily reactivate your membership and regain access to all the Prime benefits. Take control of your Prime membership by canceling it if it no longer aligns with your preferences or needs.
Cancelling Subscriptions on Amazon Music Unlimited
If you have an Amazon Music Unlimited subscription and want to cancel it, you can do so by following these steps:
Start by visiting the Amazon website and sign in to your account using your credentials.
Once signed in, hover over the “Hello, [Your Name]” dropdown located at the top right corner of the Amazon homepage. From the dropdown menu, select “Account & Lists.”
On the Account & Lists page, locate the “Memberships & Subscriptions” section. Click on “Amazon Music Unlimited” within this section.
You will be taken to the Amazon Music settings page. In the left-hand menu, select “Manage your subscription” to proceed.
On the subscription management page, you will find details about your Amazon Music Unlimited subscription. Look for the option to cancel the subscription and click on it to continue.
Amazon may prompt you to provide a reason for canceling. Choose the appropriate reason from the options provided or select “Other” if none of the options apply.
After confirming the cancellation, Amazon will display a confirmation message to let you know that your subscription has been successfully canceled.
It’s important to note that canceling your Amazon Music Unlimited subscription will immediately halt your access to the service and any saved playlists or downloaded songs associated with your subscription.
By canceling your Amazon Music Unlimited subscription, you have the freedom to reassess your music streaming needs and make changes accordingly. If you wish to subscribe to Amazon Music Unlimited in the future, you can easily reactivate your membership and regain access to the vast library of music available. Take control of your subscription and personalize your music streaming experience on Amazon Music Unlimited.
Cancelling Subscriptions on Amazon Fresh
If you have an Amazon Fresh subscription that you wish to cancel, here’s how you can do it:
Start by visiting the Amazon website and sign in to your account using your credentials.
Once signed in, hover over the “Hello, [Your Name]” dropdown located at the top right corner of the Amazon homepage. From the dropdown menu, select “Account & Lists.”
On the Account & Lists page, locate the “Memberships & Subscriptions” section. Click on “Amazon Fresh” within this section.
You will be taken to the Amazon Fresh settings page. Look for the “Cancel This Subscription” link and click on it to proceed with the cancellation process.
Amazon may prompt you to provide a reason for canceling. Choose the appropriate reason from the options provided or select “Other” if none of the options apply.
After confirming the cancellation, Amazon will display a confirmation message to let you know that your Amazon Fresh subscription has been successfully canceled.
It’s important to note that canceling your Amazon Fresh subscription will immediately halt your access to the service and any benefits associated with it, such as free grocery delivery and exclusive discounts.
By canceling your Amazon Fresh subscription, you have the freedom to reassess your grocery delivery needs and make changes accordingly. If you decide to subscribe to Amazon Fresh in the future, you can easily reactivate your membership and resume enjoying the convenience of grocery delivery to your doorstep. Take control of your subscription and adjust it based on your current preferences and requirements.
Cancelling Subscriptions on Amazon Photos
If you have a subscription to Amazon Photos and wish to cancel it, you can do so by following these steps:
Start by visiting the Amazon website and sign in to your account using your credentials.
Once signed in, hover over the “Hello, [Your Name]” dropdown located at the top right corner of the Amazon homepage. From the dropdown menu, select “Account & Lists.”
On the Account & Lists page, locate the “Memberships & Subscriptions” section. Click on “Amazon Photos” within this section.
You will be taken to the Amazon Photos settings page. Look for the option to manage your subscription and click on it to proceed.
On the subscription management page, you will find details about your Amazon Photos subscription. Look for the option to cancel the subscription and click on it to continue.
Amazon may prompt you to provide a reason for canceling. Choose the appropriate reason from the options provided or select “Other” if none of the options apply.
After confirming the cancellation, Amazon will display a confirmation message to let you know that your Amazon Photos subscription has been successfully canceled.
It’s important to note that canceling your Amazon Photos subscription will result in the loss of any additional storage space and benefits associated with the subscription.
By canceling your Amazon Photos subscription, you have the flexibility to manage your photo storage needs and adjust your subscription accordingly. If you decide to resubscribe to Amazon Photos in the future, you can easily reactivate your membership and continue enjoying the benefits of convenient photo storage and organization. Take control of your subscription and customize it based on your current requirements and preferences.
Cancelling Subscriptions on Amazon (Other Services)
In addition to the previously mentioned subscriptions, Amazon offers a range of other services that you may have subscribed to. Here’s how you can cancel subscriptions for other services on Amazon:
Start by visiting the Amazon website and sign in to your account using your credentials.
Once signed in, hover over the “Hello, [Your Name]” dropdown located at the top right corner of the Amazon homepage. From the dropdown menu, select “Account & Lists.”
On the Account & Lists page, locate the “Memberships & Subscriptions” section. Click on the relevant service within this section to manage your subscription.
Different services may have different subscription management pages. Look for the option to cancel the subscription and click on it to proceed.
Amazon may prompt you to provide a reason for canceling. Choose the appropriate reason from the options provided or select “Other” if none of the options apply.
After confirming the cancellation, Amazon will display a confirmation message to let you know that your subscription for that specific service has been successfully canceled.
It’s important to note that canceling subscriptions for other services on Amazon will halt your access to the service and any associated features or benefits.
By canceling subscriptions for other services on Amazon, you have the freedom to reassess your needs and make changes accordingly. Whether it’s a digital content subscription, a software service, or any other subscription offered by Amazon, take control of your subscriptions and adjust them based on your current preferences and requirements.
If you decide to resubscribe to any of these services in the future, you can easily reactivate your membership and regain access to the features and benefits they provide. Make the most of your Amazon account by managing all your subscriptions effectively and ensuring they align with your needs.