
Why Privacy Settings Matter
Your privacy is important, especially in today’s digital age. With the increasing amount of personal information shared on social media platforms like Facebook, it’s crucial to have control over who can access your profile, posts, and other sensitive data. Setting up and managing your privacy settings on Facebook is essential for protecting your personal information, maintaining the confidentiality of your online activities, and safeguarding your online presence.
One of the primary reasons why privacy settings matter is to protect your personal and professional reputation. With the vast number of users on Facebook, you never know who might come across your profile or posts. By carefully managing your privacy settings, you can ensure that only authorized individuals or friends can view your content, helping you maintain a positive image and preventing any potentially damaging information from being shared publicly.
Moreover, privacy settings allow you to control who can interact with your profile. You can choose to receive friend requests from only people you know or limit the visibility of certain parts of your profile, such as contact information or employment details, to specific groups of friends. This level of control helps you to maintain a more personal and secure online experience.
Another important reason to pay attention to privacy settings is to protect yourself from online threats and scams. By limiting the visibility of your posts and personal information, you reduce the risk of cybercriminals targeting you for identity theft or online harassment. With the right privacy settings in place, you can minimize the chances of becoming a victim of cybercrimes.
Additionally, privacy settings enable you to customize your Facebook experience according to your preferences and comfort level. You can choose to share your posts with a close-knit group of friends or keep them completely private. You can also control the visibility of your profile information, ensuring that only the information you are comfortable sharing is visible to others. This level of customization allows you to use Facebook as a platform for connecting and sharing with others while maintaining your desired privacy boundaries.
Overall, privacy settings on Facebook play a vital role in protecting your personal information, maintaining your online reputation, and enhancing your overall online security. By taking the time to understand and configure your privacy settings, you can enjoy a safer and more controlled experience on the platform, ensuring that you are in control of what you share and with whom. It’s important to keep in mind that privacy settings should be regularly reviewed and updated as needed to adapt to your evolving preferences and changing online landscape.
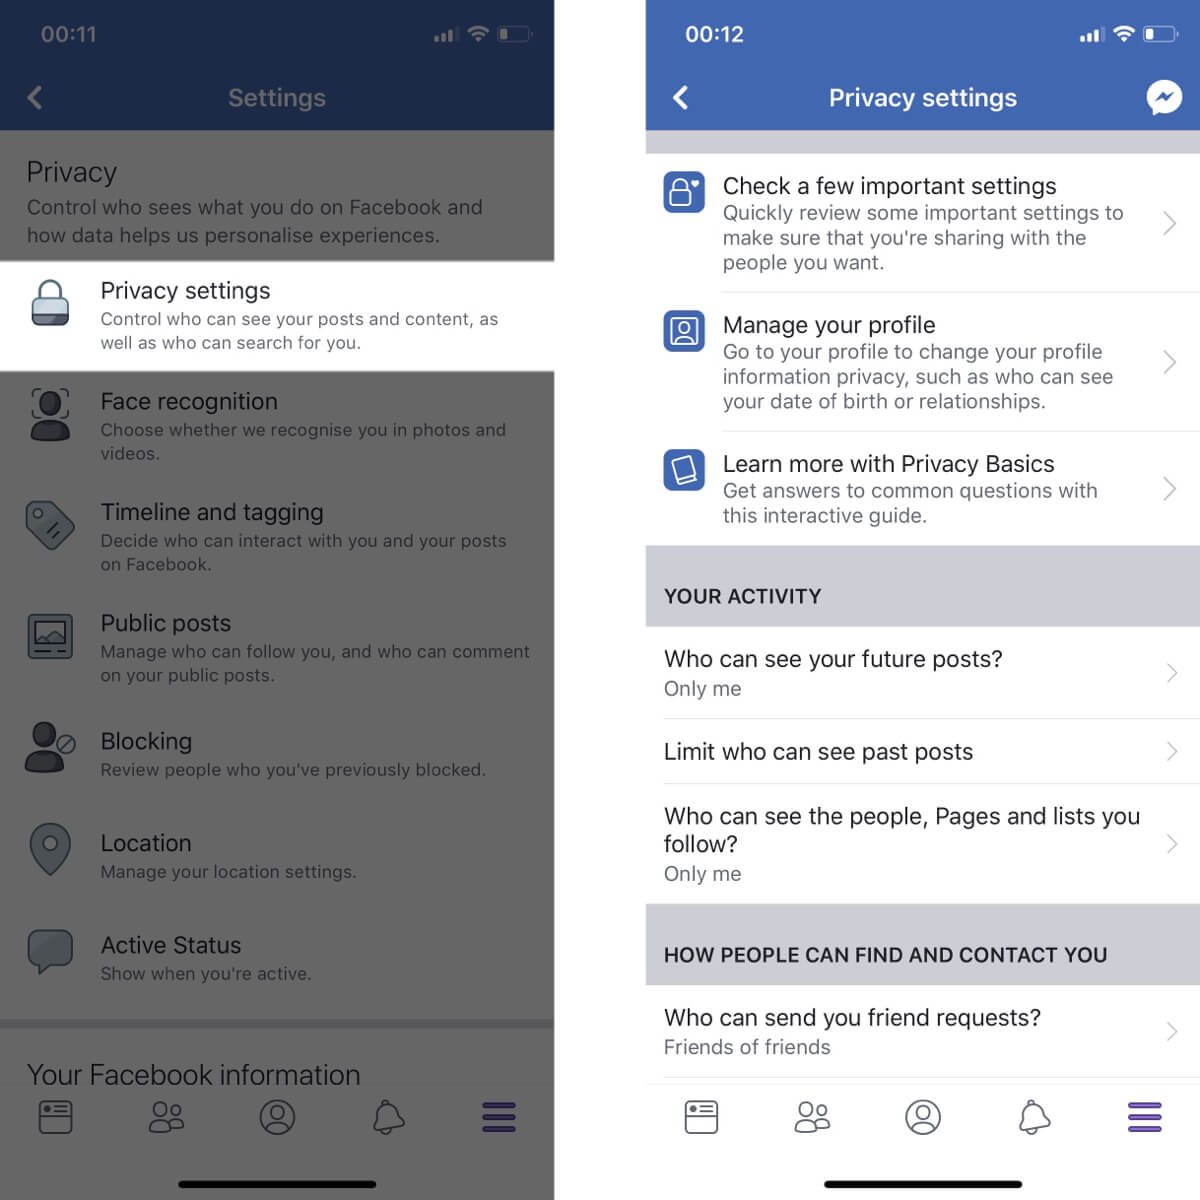
How to Access your Privacy Settings
Accessing your privacy settings on Facebook is a straightforward process. By following these simple steps, you can take control of your privacy and customize the visibility of your profile, posts, and other personal information:
- Open Facebook: Start by logging into your Facebook account using your credentials.
- Go to Settings: Locate the drop-down arrow in the top-right corner of your Facebook homepage. Click on it, and a menu will appear. Select the “Settings & Privacy” option.
- Navigate to Privacy Settings: Within the “Settings & Privacy” menu, click on the “Privacy Shortcuts” option. This will take you to the main privacy settings page.
- Explore Privacy Settings: On the privacy settings page, you will find various sections related to your privacy. These sections include “Your Activity,” “How People Find and Contact You,” “Who Can See Your Stuff,” and more.
- Review Settings: Click on each section to review and adjust the privacy settings according to your preferences. It’s crucial to take the time to understand the implications of each setting before making any changes.
- Customize Privacy: Within each section, you will find options to customize the visibility of your profile, posts, and other related information. For example, you can adjust the audience for your future posts, specify who can see your friend list, and determine who can send you friend requests.
- Save Changes: After making any adjustments to your privacy settings, remember to click on the “Save Changes” button to apply the new settings.
- Regularly Review and Update: It’s important to regularly review and update your privacy settings as needed. Facebook frequently updates its platform and privacy policies, so it’s crucial to stay informed and ensure that your settings align with your desired level of privacy.
By following these steps, you can easily access and customize your privacy settings on Facebook. It’s crucial to take the time to familiarize yourself with the various options available to you and make informed decisions about your online privacy.
Privacy Setting Basics
Understanding the basics of privacy settings on Facebook is essential for maintaining control over your personal information and deciding who can see your posts, profile, and other content. Here are some key concepts and terms to know:
- Public vs. Friends: One of the fundamental choices you will make when setting your privacy is deciding whether your posts and profile information should be visible to the public or just your friends. Choosing “Public” means anyone on or off Facebook can see your content, while choosing “Friends” limits visibility to your approved connections.
- Friends List: Your friends list consists of people you have added or accepted as friends on Facebook. Privacy settings allow you to control who can view your friends list.
- Audience Selector: When posting on Facebook, you can choose the audience for each individual post. The audience selector allows you to specify whether a post is visible to the public, your friends, or even a custom group of people.
- Timeline and Tagging: Timeline review allows you to review and approve posts and tags before they appear on your timeline. You can also control who can tag you in posts and who sees them.
- Blocking: If there are specific individuals you want to prevent from accessing your profile or contacting you, you can utilize the blocking feature. When you block someone, they won’t be able to view your profile or interact with you on Facebook.
It’s important to note that your privacy settings can be adjusted at any time, giving you the flexibility to change them as your preferences or circumstances change. Regularly reviewing and updating your privacy settings ensures that you maintain control over your personal information and online presence.
Beyond the basics, Facebook offers additional privacy features and settings to enhance your overall privacy and security. These features include:
- Two-Factor Authentication: By enabling two-factor authentication, you add an extra layer of security to your Facebook account. This feature requires you to provide a verification code in addition to your password when logging in.
- App and Website Permissions: Privacy settings allow you to manage the permissions granted to apps and websites connected to your Facebook account. You can control what information these external entities can access and what actions they can perform on your behalf.
- Messenger Privacy: Facebook Messenger has its own set of privacy settings. You can control who can message you, who can add you to groups, and who can see your online status.
- Search Engine Visibility: Facebook provides the option to prevent search engines from linking to your profile. If you want to maintain a higher level of privacy, you can disable this feature to minimize your online footprint.
By familiarizing yourself with these privacy setting basics and exploring the additional features Facebook offers, you can have more control over your online privacy and security. Remember to regularly review and update your settings to keep up with changing preferences and privacy concerns.
Who Can See Your Posts
Control over who can see your posts on Facebook is a crucial aspect of your privacy settings. By selecting the appropriate audience for your posts, you can ensure that your content is shared with the right people and maintain the level of privacy you desire. Here’s a breakdown of the different audience options and how to adjust them:
- Public: When you choose the “Public” audience, your posts can be seen by anyone on or off Facebook. This option is best used when you want to share information with a wide audience, such as a public event or a post that is relevant to a larger community.
- Friends: Selecting the “Friends” audience means that only your approved friends on Facebook can see your posts. This option provides a level of privacy and ensures that your content is shared with a more restricted audience.
- Friends Except: With this option, you can choose specific friends or friend lists to exclude from seeing your post. This is useful when you have certain connections you prefer not to show the post to.
- Specific Friends: If you want to limit the visibility of a particular post to only a select group of friends, you can use the “Specific Friends” option. This allows you to choose individuals or friend lists who should be able to see the post.
- Custom: The “Custom” audience option provides the most control over who can see your posts. This allows you to specify exactly who can view your content by selecting individuals, friend lists, or even excluding certain people.
To select your desired audience for a post, follow these steps:
- Create a Post: Start by writing your post or sharing content on Facebook.
- Locate the Audience Selector: Just below the post box, you will find the audience selector, which is represented by a dropdown menu.
- Choose Your Audience: Click on the audience selector and select the desired audience for your post. You can choose from options like Public, Friends, Friends Except, Specific Friends, or Custom.
- Review and Post: Take a moment to review the selected audience before posting your content. Once you are satisfied, click on the “Post” button to share your post with the selected audience.
It’s important to note that your selected audience will remain the default setting for subsequent posts until you change it. This means you don’t have to select the audience for every post if you want to maintain consistency in your privacy settings.
By carefully considering who can see your posts and utilizing the appropriate audience options, you can ensure that your content is visible to the right people while maintaining your desired level of privacy on Facebook.
Who Can See Your Profile Information
Your profile information on Facebook may include details such as your name, profile picture, cover photo, bio, contact information, and more. It’s crucial to manage the visibility of this information to protect your privacy and control who can see specific details about you. Here’s an overview of the different aspects of your profile and how to adjust their visibility:
- Profile Picture: Your profile picture is the image that represents you on Facebook. By default, it is visible to the public, but you can adjust the settings to make it visible to your friends or a custom audience.
- Cover Photo: The cover photo is the large image at the top of your profile. Similar to the profile picture, you can choose to make it visible to either the public, your friends, or a custom audience.
- About Section: The “About” section on your profile includes information such as your work and education history, relationship status, hometown, and more. You can control the visibility of each individual piece of information within this section by adjusting the settings for each category.
- Contact Information: This section allows you to specify how people can contact you. You can choose to make your email address, phone number, and other contact details visible to the public, your friends, or restrict the visibility to a custom audience.
- Posts on Your Timeline: The visibility of posts on your timeline can be controlled through your privacy settings. You can choose to make posts visible to the public, your friends, or customize the visibility for each post individually.
- Friend List: By default, your friend list is visible to your friends. However, you can adjust the settings to make it visible only to you or customize the visibility for specific groups of people.
- Photos and Albums: You have the flexibility to choose who can see the photos and albums you upload or are tagged in. You can adjust the visibility settings to make them visible to the public, your friends, or a custom audience.
To manage the visibility of your profile information, follow these steps:
- Go to Privacy Settings: Visit the “Settings & Privacy” section on Facebook.
- Navigate to “Privacy Shortcuts”: Click on “Privacy Shortcuts” to access the main privacy settings page.
- Adjust Profile Settings: Explore the different sections related to profile visibility, such as “Your Activity,” “How People Find and Contact You,” and “Who Can See Your Stuff.” Adjust the settings for each category according to your preferences.
- Review and Save Changes: After making any adjustments, review the changes and click on the “Save Changes” button to apply the new settings.
By managing the visibility of your profile information, you can ensure that only the desired audience can access specific details about you on Facebook. Regularly reviewing and updating these settings allows you to maintain control over your privacy and choose who sees what on your profile.
Controlling Tagging and Timeline Review
Tagging allows others to mention you in their posts, photos, and comments on Facebook, linking your profile to the content they shared. While tagging can be a fun way to engage with friends, it’s important to have control over how you are tagged and whether or not the tagged content appears on your timeline. Here’s how you can manage tagging and timeline review:
Timeline Review:
- Timeline Review allows you to review and approve posts and tags before they appear on your timeline. When someone tags you in a post or photo, you will receive a notification to review it and make a decision.
- To enable Timeline Review, go to the “Settings & Privacy” section on Facebook and click on “Timeline and Tagging.”
- Under “Review,” click on “Review tags people add to your posts before the tags appear on Facebook?” to enable this feature.
- Now, whenever you are tagged, you can review the post or photo before deciding whether to allow it on your timeline.
Tagging Settings:
- You can control who can tag you and who sees the tagged content on your profile.
- Go to the “Settings & Privacy” section and click on “Timeline and Tagging.”
- Under “Tagging,” you will find options to control tag approvals, who can see tagged posts, and who can see tags from others on your profile.
- By enabling tag approvals, you maintain more control over what is visible on your timeline and whether you want to be associated with specific posts or photos.
- Under “Who can see posts you’re tagged in on your profile?,” you can choose between “Friends,” “Friends of friends,” or “Only me” to limit the visibility of tagged posts.
- Similarly, under “Review tags people add to your own posts before the tags appear on Facebook?,” you can enable tag review for posts you create.
Managing tagging and enabling timeline review provides you with the ability to curate your online presence and control what content is associated with your profile. It allows you to maintain a level of privacy and ensure that only the tags and posts you deem appropriate are visible on your timeline.
Remember, it’s essential to regularly review your tagging and timeline settings to keep up with changes in Facebook’s privacy policies and to align with your evolving preferences for online engagement.
Managing Friend Requests and Blocking Users
Managing friend requests and blocking users on Facebook is crucial for maintaining a safe and comfortable online experience. By controlling who can connect with you and taking steps to handle unwanted interactions, you can protect your privacy and create a positive social media environment. Here’s how you can effectively manage friend requests and block users:
Managing Friend Requests:
- Review Requests: When you receive a friend request from someone on Facebook, take the time to review their profile and determine whether you want to accept or decline the request.
- Consider Mutual Connections: Take note of any mutual friends or acquaintances you may have with the person sending the request. This can help you assess their credibility and decide if you feel comfortable adding them to your friend list.
- Accept or Decline: If you choose to accept a friend request, the person will be added to your friend list, and you will have access to each other’s posts and updates. If you decide to decline the request, the person won’t be notified, and they won’t be added to your friend list.
- Manage Request Settings: To adjust your friend request settings, go to the “Settings & Privacy” section on Facebook and click on “Privacy Shortcuts.” Then, select “Privacy Checkup” and navigate to the section related to managing friend requests.
- Customize Friend Request Audience: Within these settings, you can choose who is allowed to send you friend requests. You can set it to “Everyone,” “Friends of friends,” or limit it to “Friends” only.
Blocking Users:
- Blocking someone on Facebook is an effective way to prevent them from accessing your profile, sending you friend requests, or interacting with you.
- To block a user, go to their profile and click on the three dots menu (located on the cover photo or near the “Message” button).
- Select the “Block” option from the menu. Facebook will then confirm the action and provide additional options to block specific actions related to the user.
- When you block someone, they won’t be notified, but they will no longer be able to access your profile, send you messages, or interact with your content.
- Additionally, you can manage your blocking settings by going to the “Settings & Privacy” section, clicking on “Blocking,” and adjusting the options according to your preferences.
By effectively managing friend requests and blocking users as needed, you can create a safer and more controlled Facebook experience. Remember to regularly review your friend requests and settings to ensure that you are only connected with individuals who align with your online social circle and preferences.
Securing Your Account with Two-Factor Authentication
Securing your Facebook account is crucial to protect your personal information from unauthorized access. One essential security feature offered by Facebook is Two-Factor Authentication (2FA). Enabling 2FA adds an extra layer of protection to your account, making it significantly more difficult for anyone to gain unauthorized access. Here’s how you can secure your account with Two-Factor Authentication:
Setting Up Two-Factor Authentication:
- Go to Facebook Security Settings: Start by logging into your Facebook account and accessing the “Settings & Privacy” section.
- Select Security and Login: Within the “Settings & Privacy” menu, choose “Security and Login.”
- Enable Two-Factor Authentication: Look for the Two-Factor Authentication option and click on “Edit.”
- Choose an Authentication Method: Facebook offers various 2FA methods such as text message (SMS), authentication apps, and security keys.
- Follow the Prompts: Depending on the method you choose, follow the on-screen instructions to complete the setup process.
How Two-Factor Authentication Works:
Once you have enabled Two-Factor Authentication, the process of logging into your Facebook account will involve an additional step after entering your password. Different authentication methods may require different steps, but the common principle is that you will need to provide a second verification factor.
- Text Message (SMS): If you chose the text message method, Facebook will send a verification code to your registered mobile phone number whenever you log in with your password. Enter this code to complete the login process.
- Authentication Apps: If you opted for an authentication app, such as Google Authenticator or Authy, you will need to open the app and enter the verification code generated on your device.
- Security Keys: If you use a security key, insert the key into an available USB port on your device or tap the key if it is a wireless option, to prove your identity and authenticate the login process.
Enabling Two-Factor Authentication adds an extra layer of security by requiring a second verification factor. Even if someone obtains your password, they will still need the additional authentication code or physical security key to access your account.
Regularly reviewing and updating your Two-Factor Authentication settings ensures that your Facebook account remains secured and helps prevent unauthorized access. It’s important to choose a method that works best for you and to keep your authentication factors safe and accessible.
By implementing Two-Factor Authentication, you can significantly enhance the security of your Facebook account and protect your personal information from unauthorized individuals or malicious activities.
Understanding App and Website Permissions
When using Facebook, you may encounter various apps and websites that integrate with the platform. These third-party entities may request access to your Facebook account in order to provide specific features or services. Understanding and managing app and website permissions is vital for maintaining control over your personal information and ensuring the privacy and security of your Facebook account. Here’s what you need to know:
Granting Permissions:
- When you install or connect to a third-party app or website through Facebook, it may request access to certain information or actions associated with your account.
- Permissions can range from basic details like your name and profile picture to more sensitive information like your email address, friend list, or even the ability to post on your behalf.
- Facebook provides a clear list of the permissions requested by each app or website before you authorize their access to your account.
- Take the time to review these permissions and consider the necessity of granting access to your personal information. Only authorize permissions that you feel comfortable with and genuinely need for the app or website to function.
- Be cautious with apps or websites that request excessive permissions or seem suspicious. It’s essential to trust the source and reputation of the app or website before granting access to your Facebook account.
Managing Permissions:
- You have the ability to manage and control the permissions granted to apps and websites linked to your Facebook account.
- To review and manage permissions, go to the “Settings & Privacy” section on Facebook and select “Settings.”
- In the “Settings” menu, navigate to the “Apps and Websites” section. Here, you will find a list of all the apps and websites connected to your account.
- Click on an app or website to view and adjust its permissions. You can remove access altogether or modify specific permissions according to your preferences.
- Regularly review and clean up your list of connected apps and websites to ensure that you only have authorized and trusted entities accessing your Facebook account.
By understanding app and website permissions and actively managing them, you can maintain control over your personal information and minimize potential privacy risks associated with third-party integrations. It’s important to regularly review and update your permissions to align with your changing preferences and to stay informed about the apps and websites that have access to your Facebook account.
Managing Privacy on Messenger
Facebook Messenger is a popular messaging platform that allows you to connect and communicate with friends and family members. While using Messenger, it’s essential to be mindful of your privacy settings to ensure that your conversations and personal information are protected. Here’s how you can manage your privacy on Messenger:
Chat Privacy:
- Control Message Requests: Messenger allows you to receive message requests from people who aren’t on your friends list. By default, these requests are filtered into a separate message folder. You can review and accept or ignore these requests at your discretion.
- Manage Message Requests: To access your message requests on Messenger, tap on the “People” icon, then select “Message Requests.” From there, you can review and respond to any pending requests.
- Block Unwanted Contacts: If you receive messages from someone you don’t want to communicate with, you can block them on Messenger. Blocking a user will prevent them from sending messages or contacting you through the platform.
- Report Conversations: If you encounter any inappropriate or abusive behavior on Messenger, you can report the conversation to Facebook. This helps improve the safety and security of the platform for all users.
Active Status and Read Receipts:
- Control Active Status: Messenger displays your active status to your contacts, indicating when you are online and available to chat. You can adjust this setting by tapping on your profile picture in Messenger and selecting the “Active Status” option.
- Disable Read Receipts: Messenger shows read receipts, indicating when your messages have been seen by the recipient. If you prefer not to have your read receipts enabled, you can turn them off in Messenger’s settings.
Privacy in Group Chats:
- Be Mindful of Group Privacy: When joining or creating group chats on Messenger, be aware of the privacy settings. Choose whether the group is public, private, or restricted to invited members only.
- Manage Group Participants: As the creator or admin of a group chat, you have control over who can join, invite others, and remove members. Regularly review and manage the participants to ensure the privacy and security of the group.
Customize Message Requests:
- Choose Message Filtering: Messenger provides options to filter message requests based on various categories, such as friends, friends of friends, or people you may know. You can choose the level of filtering that suits your preferences.
- Customize Message Requests Filtering: To customize message request filtering, tap on your profile picture in Messenger, go to “Privacy,” then select “Message Filtering.” From there, you can adjust the level of filtering for message requests.
By managing your privacy settings on Messenger, you can ensure a safer and more secure messaging experience. Regularly review and update your settings to align with your preferences and maintain control over your conversations and personal information.
Keeping Your Public Profile Private
Your public profile on Facebook is visible to anyone who comes across it, even if they are not your friends. Therefore, it’s important to take steps to keep your public profile private and limit the information that is accessible to the general public. Here’s how you can maintain privacy on your public profile:
Review Your Public Profile:
- Start by reviewing your public profile as if you were a stranger visiting it for the first time. Look for any information that you wouldn’t want to share with the public.
- Pay attention to your profile picture, cover photo, bio, and other visible details on your profile. Ensure that they are appropriate and aligned with your intended level of visibility.
Adjust Privacy Settings:
- Go to the “Settings & Privacy” section on Facebook and select “Privacy Shortcuts.”
- Click on “See More Privacy Settings” to access additional privacy options.
- Navigate to the “Your Activity” section and select “Who can see your future posts?” Here, you can choose the visibility of your posts to be either public, friends, or a customized list or group.
- Consider setting the default visibility of your future posts to “Friends” or a customized audience to ensure that only approved individuals can see your posts.
- Furthermore, review the sections related to profile visibility and adjust who can see your profile picture, cover photo, friends list, and other details.
Manage Previous Posts:
- You can also control the visibility of your past posts on Facebook.
- Go to the “Settings & Privacy” section, select “Privacy Shortcuts,” and then choose “See More Privacy Settings.”
- Under “Your Activity,” select “Limit Past Posts” and follow the instructions to limit the visibility of your previous posts to a narrower audience.
Review Tagging Settings:
- Tags from others can potentially be visible on your public profile. To manage this:
- Go to the “Settings & Privacy” section, select “Privacy Shortcuts,” and then choose “See More Privacy Settings.”
- Under “How People Find and Contact You,” select “Timeline and Tagging” to access tagging settings.
- Review the options related to reviewing tags before they appear on your timeline and who can see posts you’re tagged in on your profile.
Regularly reviewing and adjusting your privacy settings is essential to keep your public profile private and protect your personal information on Facebook. Be mindful of the information you share and consider the level of visibility you desire for your public profile.
Privacy Settings for Groups
Groups on Facebook provide a platform for users with shared interests to come together and engage in discussions. Managing the privacy settings for groups is important to ensure that the group remains a safe and comfortable space for its members. Here are some privacy settings to consider when it comes to Facebook groups:
Choosing the Right Group Privacy:
- When creating a group, you have the option to choose its privacy level. You can make a group public, closed, or secret.
- A public group is visible to anyone on Facebook, and anyone can join without needing approval. Public groups are suitable for open discussions and broader audiences.
- For a closed group, the group’s content is visible to anyone, but individuals must request to join and await approval from a group admin. Closed groups are useful for a more private community or niche interests.
- In a secret group, the group and its content are hidden from everyone except its members. Secret groups provide the highest level of privacy and are ideal for confidential or sensitive discussions.
- Choose the privacy setting that aligns with the purpose and intentions of your group.
Managing Group Membership:
- As a group admin or moderator, you have control over who can join and participate in the group.
- Regularly review group membership requests and ensure that only appropriate individuals are approved.
- If you want stricter control over membership, consider using membership questions. With this feature, individuals must answer specific questions before being accepted into the group. This helps ensure that members have relevant interests or intentions.
- Monitor the group’s member list and remove any individuals who violate group guidelines or engage in inappropriate behavior.
Establishing Clear Group Guidelines:
- Set clear and concise rules and guidelines for the group’s behavior and content.
- Ensure that these guidelines are visible to all group members and that everyone understands the expected code of conduct.
- Regularly remind group members of the guidelines and address any violations promptly.
- By establishing clear guidelines, you create a safe and respectful environment for all members.
Sensitive and Confidential Discussions:
- If your group involves sensitive or confidential discussions, such as support groups or professional communities, ensure that the privacy setting is appropriate (e.g., closed or secret group).
- Emphasize to group members the importance of maintaining privacy and confidentiality within the group.
- Encourage members to report any breaches of privacy or unauthorized sharing of content.
By carefully managing the privacy settings and membership of your Facebook group, you can create a positive and secure space for members to connect and engage. Regularly review and update the group’s privacy settings and guidelines to align with the group’s purpose and the needs of its members.
Customizing Privacy for Events
Facebook Events are a great way to organize and invite people to gatherings, parties, and other occasions. Customizing the privacy settings for your Facebook Events allows you to control the visibility, accessibility, and overall privacy of the event. Here’s how to customize the privacy settings for your events:
Creating an Event with Custom Privacy:
- When creating an event, click on the “Create” button in the Events section of Facebook.
- Enter the event details, including the name, date, location, and description.
- Under the “Privacy” section, choose the desired privacy setting for the event.
- Options include: Public, Friends, Friends of Friends, or Invite Only.
- Public events are visible to anyone on Facebook and can be found in search results. Anyone can RSVP and invite others to the event.
- Friends events are visible to your Facebook friends, and they can RSVP and invite their friends. Non-friends can only see limited event details.
- Friends of Friends events are visible to your friends and their friends, and they can also invite their friends. Non-friends can only see limited event details.
- Invite Only events are only visible to those you specifically invite. Non-invitees won’t even know that the event exists.
Modifying Privacy for Existing Events:
- If you have already created an event and want to change its privacy settings:
- Go to the event page and click on the three dots in the top-right corner.
- Select “Edit Event” to access the event settings.
- Scroll down to the “Privacy” section and select the new privacy option.
- Save the changes to update the event’s privacy settings.
Additional Privacy Considerations for Events:
- Even with custom privacy settings, it’s important to be mindful of the content and details you share in the event description and discussions.
- Avoid sharing sensitive information such as home addresses, personal contact details, or confidential event details in the event description, especially for public or friends-of-friends events.
- Monitor the guest list and remove any individuals who may pose a risk or are not genuinely interested in attending the event.
- Encourage attendees to follow the event guidelines and report any inappropriate behavior or violations of privacy.
By customizing the privacy settings for your Facebook Events, you can ensure the appropriate visibility and accessibility for your gatherings while maintaining the desired level of privacy. Regularly review and update the privacy settings for each event to ensure they align with the nature and purpose of the event, as well as the comfort and safety of the attendees.
Blocking and Managing App Invites
App invites can sometimes be overwhelming, with numerous requests flooding your Facebook notifications. Thankfully, Facebook provides tools to manage and control the app invites you receive. By blocking and managing app invites, you can reduce unwanted notifications and maintain a more streamlined experience. Here’s how:
Blocking App Invites:
- If you receive app invites from a specific app or game that you no longer wish to see, you can block invites from that particular app.
- To block app invites, find an invite from the app in your notifications or go to the app’s page.
- Click on the dropdown arrow in the top-right corner of the invite and select the “Block [App Name]” option.
- This will prevent any further app invites from that specific app.
Managing App Invites:
- If you want to manage your overall app invite settings, follow these steps:
- Go to the “Settings & Privacy” section on Facebook and select “Settings.”
- In the “Settings” menu, click on “Notifications” to access your notification settings.
- Scroll down to the “App Notifications” section and click on “Edit” to manage your app invite settings.
- You can choose to turn off app invites altogether or select specific apps to turn on or off their invites.
- By managing your app invite settings, you can control which apps can send you invites and reduce unwanted notifications.
Reviewing App Permissions:
- If you want to review the apps that have permission to send you invites and access your information, follow these steps:
- Go to the “Settings & Privacy” section on Facebook and select “Settings.”
- In the “Settings” menu, click on “Apps and Websites” to access your connected apps and websites.
- Here, you can review the apps and games that are connected to your Facebook account.
- If you no longer use or trust a particular app, you can remove its access by clicking on the “X” button next to the app’s name.
- Regularly review and manage your connected apps to ensure that you only authorize trusted entities and minimize the chances of unwanted app invites.
By blocking and managing app invites, you can reduce notification overload and maintain control over the app invitations you receive on Facebook. Take the time to customize your settings and review your connected apps to create a more tailored and enjoyable Facebook experience.
Controlling Ad Preferences and Personalized Ads
Facebook collects valuable data to provide personalized advertisements based on users’ interests and online activities. While targeted ads can offer relevant content, some users prefer to have more control over the ads they see. Facebook allows users to manage their ad preferences and customize their ad experience. Here’s how to control ad preferences and personalize your ad settings:
Managing Ad Preferences:
- Access your ad preferences by going to the “Settings & Privacy” section on Facebook and selecting “Settings.”
- In the “Settings” menu, click on “Ads” to access your ad preferences.
- Under “Ad Preferences,” you will find options to control your ad settings.
- Review Your Interests: Click on “Your Interests” to view and manage the interests Facebook has associated with your profile. You can remove or add interests to make your ad preferences more accurate.
- Modify Your Ad Settings: In the “Ad Settings” section, you can adjust preferences like allowing ads based on data from partners, disabling ads that are shown based on your activity off Facebook, and controlling whether ads can target you on platforms other than Facebook.
- Hide Specific Ads: If you come across an ad that you find irrelevant or bothersome, you can click on the three dots in the top-right corner of the ad and select “Hide ad.” This action helps Facebook better understand your preferences and reduces the likelihood of similar ads appearing in the future.
- Manage Advertisers: In the “Where You’re Logged In” section, you can control which advertisers can show you ads based on your interactions with their websites and apps.
About Personalized Ads:
- Facebook generates personalized ads based on the information it collects about you, such as your interests, demographics, and online behavior.
- Personalized ads are designed to be more relevant to your preferences and provide a more targeted advertising experience.
- By controlling your ad preferences, you can influence the types of ads you see and make the ad experience on Facebook more tailored to your interests.
Ad Transparency and Reporting:
- If you want to know why a specific ad is being shown to you, you can click on the “Why am I seeing this?” option on the ad itself. Facebook will provide information about why that particular ad is being targeted to you.
- Facebook also offers options to report ads that you find offensive, misleading, or inappropriate. By reporting problematic ads, you help maintain a safer and more reliable ad environment for all users.
By taking advantage of the ad preferences and personalization settings on Facebook, you can have more control over the ads you see. Regularly reviewing and managing your ad preferences ensures that the ads you encounter are more relevant and aligned with your interests.
Securing Your Profile from Search Engines
Facebook provides privacy features that allow you to control the visibility of your profile on search engines. By securing your profile from search engines, you can limit the information accessible to people who may be searching for you online. Here’s how you can safeguard your profile:
Accessing Search Engine Privacy Settings:
- Go to the “Settings & Privacy” section on Facebook and select “Settings.”
- In the “Settings” menu, click on “Privacy.”
- Scroll down to the “How People Find and Contact You” section and find the “Who can look you up using the email address/phone number you provided?” setting.
- Click on “Edit” to adjust the visibility.
- Choose between “Everyone,” “Friends of Friends,” or “Friends” to determine who can find your profile using your email address or phone number through search engines.
Unlisting Your Profile from Search Engines:
- Facebook allows you to unlist your profile from search engines entirely by disabling the option to find your profile using your email address or phone number.
- To unlist your profile, go to the “Settings & Privacy” section, select “Settings,” then click on “Privacy.”
- Scroll down to the “How People Find and Contact You” section and click on “Edit” next to the “Do you want search engines outside of Facebook to link to your profile?” option.
- Uncheck the box to prevent search engines from linking to your profile.
Considering Other Profile Details:
- While securing your profile from search engines limits the visibility of your email address or phone number, it’s important to evaluate other profile details that might be publicly accessible.
- Review your privacy settings for posts, photos, and other personal information to ensure they’re appropriately restricted to the desired audience.
- Regularly review your profile’s “About” section and other visible details to ensure that only information you’re comfortable sharing is visible to others.
By adjusting the search engine privacy settings and carefully managing your profile information, you can create a safer and more private online presence on Facebook. Keep in mind that search engines may still have indexed information from before these settings were applied, so regularly review your privacy settings to maintain control over your profile’s visibility.
Privacy and Safety Tools for Parents and Young Users
Facebook recognizes the importance of online safety and privacy, especially for young users. To provide a secure environment, the platform offers several privacy and safety tools for parents and young users. Here are some of the key features and settings you can utilize:
Privacy Settings for Minors:
- Facebook allows users under the age of 18 to customize their privacy settings to ensure a safer online experience.
- By default, Facebook applies stricter privacy settings to minors’ accounts, limiting the visibility of their posts and limiting who can contact them.
- Parents and guardians can review and adjust these privacy settings to further enhance security.
Parental Controls:
- Parents have the option to link their Facebook account with their child’s account through the “Parental Control” feature.
- This feature allows parents to manage and control their child’s account, including password reset, friend requests, and access to certain features.
- Parents can also restrict who can see their child’s posts and who can send them friend requests.
Safe and Trusted Interactions:
- Facebook offers various tools to protect young users from unwanted interactions and potential risks.
- The “Messenger Kids” feature provides a safer environment for kids to chat and connect with approved contacts.
- Young users can report and block individuals who engage in inappropriate behavior or violate Facebook’s Community Standards.
- Facebook has implemented advanced technology, including artificial intelligence and machine learning, to identify and remove harmful content targeting young users.
Education and Resources:
- Facebook provides educational resources and guides for parents and guardians to navigate digital safety for their children.
- The “Parents Portal” offers tips, advice, and resources to help parents better understand the platform and equip their children with online safety knowledge.
- Facebook collaborates with external organizations and experts to develop programs and initiatives focused on online safety and digital literacy.
It’s important for parents and guardians to actively engage and educate themselves about the privacy and safety tools available on Facebook. Maintaining open lines of communication with children and encouraging responsible online behavior are key to fostering a secure and positive online experience for young users.
Best Practices for Online Privacy and Security on Facebook
Protecting your online privacy and security on Facebook is vital to ensure a safe and enjoyable experience. By following best practices, you can enhance your privacy settings, safeguard your personal information, and minimize the risk of security breaches. Here are some important practices to consider:
Regularly Review Privacy Settings:
- Take the time to review and update your privacy settings on a regular basis.
- Ensure your posts, profile information, and other personal details are visible only to the desired audience.
- Review the visibility of your photos, friends list, and other sensitive information.
Manage Connected Apps and Third-Party Permissions:
- Regularly review the apps and websites connected to your Facebook account.
- Remove access for apps that you no longer use or trust.
- Be cautious about granting unnecessary permissions to apps and carefully review the information they can access.
Use Strong and Unique Passwords:
- Choose strong, long, and unique passwords for your Facebook account.
- Avoid using the same password for multiple online accounts.
- Consider using a password manager to generate and store complex passwords securely.
Enable Two-Factor Authentication:
- Turn on Two-Factor Authentication to add an extra layer of security to your Facebook account.
- This feature requires you to provide a verification code in addition to your password when logging in.
- Choose from options like text message (SMS), authentication apps, or security keys as your preferred authentication method.
Be Mindful of Phishing and Scams:
- Be cautious of suspicious messages, emails, or links that request your personal information.
- Avoid clicking on suspicious links, and be skeptical of unexpected messages, even if they appear to be from friends.
- Report any phishing attempts or scams to Facebook.
Think Before You Share:
- Consider the potential impact of your posts and carefully choose what you share.
- Avoid sharing sensitive or personal information that could compromise your privacy or security.
- Think about who may have access to your posts and adjust the audience settings accordingly.
Stay Informed about Privacy Updates:
- Stay up to date with Facebook’s privacy policies and features.
- Regularly check for updates and understand the implications of changes.
- Take advantage of educational resources and guides provided by Facebook to enhance your knowledge of online privacy and security.
By following these best practices, you can maintain a higher level of online privacy and security on Facebook. Remember, online privacy is an ongoing process, and it’s important to stay vigilant and proactive in safeguarding your personal information.