
Reasons to Erase Your iPad Remotely
When it comes to taking care of your personal information and keeping your devices secure, it’s essential to have a plan in place. One such plan is the ability to erase your iPad remotely. While it may seem like an extreme measure, there are several important reasons why you should consider this option. Let’s explore a few of them:
- Lost or Stolen Device: One of the most common reasons people choose to erase their iPads remotely is when their device is lost or stolen. By initiating a remote erase, you can protect your sensitive information from falling into the wrong hands. This ensures that your personal data, such as contacts, photos, and passwords, remain secure.
- Prevent Unauthorized Access: In situations where you suspect someone else might have gained access to your iPad without your permission, remotely erasing it can provide peace of mind. By doing so, you can ensure that any confidential data or sensitive documents stored on your device are immediately removed, preventing unauthorized individuals from accessing them.
- Selling or Donating Your iPad: If you are planning to sell, donate, or pass on your iPad to someone else, it’s crucial to remove all of your personal information before doing so. Erasing your iPad remotely guarantees that your data is wiped clean and minimizes the risk of any potential misuse of your information.
- Protecting Your Privacy: Our iPads contain a plethora of personal information, such as emails, messages, bank account details, and more. By erasing your device remotely, you can safeguard your privacy and prevent any unauthorized access to sensitive information that could be potentially detrimental to your personal or professional life.
- Preventing Identity Theft: Identity theft is a significant concern in today’s digital age. Erasing your iPad remotely adds an extra layer of security, reducing the risk of your personal information being used maliciously by identity thieves. Taking this precautionary step can help you avoid potential financial loss or damage to your reputation.
With these compelling reasons in mind, it’s clear that the option to erase your iPad remotely is a crucial security feature to protect your personal information. By implementing this proactive measure, you can ensure the confidentiality of your data and maintain peace of mind in an increasingly interconnected world.
How to Set up Find My iPad
Find My iPad is a powerful feature provided by Apple that allows you to locate your device if it goes missing and even erase its data remotely. To take advantage of this essential security tool, follow these simple steps to set up Find My iPad:
- Ensure iCloud is Enabled: The first step is to ensure that you have an iCloud account and have it enabled on your iPad. To do this, go to “Settings”, tap on your name at the top of the screen, and then select “iCloud”. Here, you can sign in to your iCloud account or create one if you don’t have one already.
- Enable Find My iPad: Once you have iCloud set up on your device, navigate to the “Settings” app, select your name, and tap on “Find My” under the iCloud settings. Toggle on the “Find My iPad” option.
- Enable Send Last Location: For an extra layer of security, it’s recommended to enable the “Send Last Location” feature. This will automatically send the last known location of your iPad to Apple when the battery is critically low, allowing you to track it even if the battery dies shortly after.
- Location Services: To utilize Find My iPad effectively, ensure that Location Services are enabled. Go to “Settings”, select “Privacy”, and tap on “Location Services”. Toggle on the location services for the Find My app.
- Enable Offline Finding: With the latest updates to iOS, Apple has introduced “Offline Finding” which allows the device to be located even when it is not connected to the internet. To enable this feature, go to “Settings”, tap on your name, select “Find My”, and toggle on “Enable Offline Finding”.
Once you have completed these steps, you have successfully set up Find My iPad on your device. Now, you will be able to use the feature to locate your device, send messages to it, play a sound, and even erase its data remotely.
Setting up Find My iPad is an essential proactive measure to protect your device and personal data. By following these steps, you can have peace of mind knowing that you have a powerful tool at your disposal to assist in locating your iPad and ensuring the security of your valuable information.
Using Find My iPad to Locate Your Device
Ever misplaced your iPad and wished you had a way to track it down? With the Find My iPad feature, you can easily locate your device using another Apple device or a web browser. Here’s how you can use Find My iPad to locate your device:
- Using Another Apple Device: If you have another Apple device, such as an iPhone or Mac, with the Find My app installed, you can easily locate your iPad. Open the Find My app and select the “Devices” tab. You’ll see a list of your devices, including your iPad. Tap on the iPad to view its location on a map.
- Using a Web Browser: Don’t have access to another Apple device? No problem. You can also use a web browser on any device to locate your iPad. Go to the iCloud website and sign in with your Apple ID. Click on “Find iPhone” and select your iPad from the list of devices. Its location will be displayed on the map.
- Viewing Location Details: Once you’ve located your iPad using either method, you can view additional location details. This includes the date and time of the last known location, as well as the battery percentage remaining. This information can be helpful in determining how recent the location is and whether the device is powered on.
- Zooming In and Out: When viewing the location on the map, you can zoom in and out for a more detailed or broader view. This can be useful if you’re trying to pinpoint the exact location or if you need to see the surrounding area to better understand the device’s whereabouts.
- Tracking Movement: In some cases, you may notice that your iPad’s location is constantly changing. This could indicate that someone is moving with your device. By keeping an eye on the location and its movements, you can provide accurate information to the authorities if necessary.
The Find My iPad feature is a lifesaver when it comes to locating your lost or misplaced device. Whether you’re using another Apple device or a web browser, you can track down your iPad’s location with ease. Remember to act quickly, as the accuracy of the location can decrease over time or if the device’s battery drains. Keep in mind that Find My iPad requires the device to be connected to the internet to provide the most accurate location information.
Now that you know how to use Find My iPad to locate your device, you can rest assured knowing that you have a reliable tool to help you find your iPad in no time.
Using Find My iPad to Send a Message to Your Device
Have you ever misplaced your iPad and wished you could communicate with whoever found it? With the Find My iPad feature, you have the ability to send a message to your device, providing instructions or contact information. Here’s how you can use Find My iPad to send a message:
- Using Another Apple Device: If you have another Apple device with the Find My app installed, you can easily send a message to your iPad. Open the Find My app and select the “Devices” tab. Tap on your iPad to access its details, and then select “Play Sound”. This will prompt a pop-up window where you can enter a custom message that will be displayed on your iPad’s screen.
- Using a Web Browser: Don’t have access to another Apple device? No problem. You can also send a message to your iPad using a web browser on any device. Visit the iCloud website and sign in with your Apple ID. Click on “Find iPhone” and select your iPad. From there, you can click on the “Play Sound” option, and a window will appear where you can enter a custom message to be displayed on your iPad’s screen.
- Creating a Custom Message: When sending a message, you can customize it to your liking. This can include instructions on how to return your iPad, your contact information, or a request for someone to reach out to you. Remember to keep the message concise and clear, as it may be displayed on a locked screen, giving the finder limited visibility.
- Triggering the Message Alert: After sending the message, your iPad will receive an alert notification with the message you entered. This notification will appear regardless of whether your device is locked or unlocked. The finder will be able to read the message and, hopefully, respond accordingly.
- Update or Cancel the Message: If you need to update the message or cancel it altogether, you can do so through the Find My app or the iCloud website. This flexibility allows you to modify your instructions or contact information as needed, ensuring that you can provide the most relevant information to assist in the safe return of your iPad.
Sending a message using Find My iPad is a valuable feature that can help facilitate communication with whoever finds your misplaced device. Whether you’re using another Apple device or a web browser, sending a customized message can provide clear instructions and contact information, increasing the chances of a swift return. Remember to act quickly and include pertinent details to ensure effective communication.
Now that you know how to use Find My iPad to send a message, you can take advantage of this feature to increase the likelihood of retrieving your device and maintaining peace of mind.
Using Find My iPad to Play a Sound on Your Device
Have you ever struggled to find your iPad in your own home? With the Find My iPad feature, you can use a helpful function called “Play Sound” to make your device emit a sound, helping you locate it quickly. Here’s how you can use Find My iPad to play a sound on your device:
- Using Another Apple Device: If you have another Apple device with the Find My app installed, you can easily play a sound on your iPad. Open the Find My app and select the “Devices” tab. Tap on your iPad, and then select the “Play Sound” option. Your iPad will emit a distinct sound, making it easier to locate.
- Using a Web Browser: Don’t have access to another Apple device? No problem. You can also play a sound on your iPad using a web browser on any device. Visit the iCloud website and sign in with your Apple ID. Click on “Find iPhone” and select your iPad. From there, click on the “Play Sound” option, and your iPad will start to emit the sound.
- Distinctive Sound: The sound played on your device is designed to be distinct and easily recognizable. This makes it easier for you to locate your iPad, even if it is buried under cushions or hiding in a bag. The sound will continue to play until you manually stop it.
- Volume Controls: If the sound played on your iPad is too soft or too loud, you can adjust the volume using the physical volume buttons on your device. This can help you fine-tune the sound level to your preference and aid in locating your iPad more effectively.
- Locating Multiple Devices: If you have multiple devices linked to your Apple ID, it’s essential to correctly select the device you want to play the sound on. Double-check the device name and ensure that you’re targeting the correct iPad to avoid inadvertently playing a sound on another device.
Playing a sound on your iPad using Find My iPad is a handy feature when you’ve misplaced your device within your own home or office. Whether you’re using another Apple device or a web browser, playing a distinctive sound can help you locate your iPad quickly and easily. Remember to adjust the volume controls to ensure the sound is audible in your surroundings.
Now that you know how to use Find My iPad to play a sound on your device, you can rely on this feature to help you find your misplaced iPad and save time searching for it.
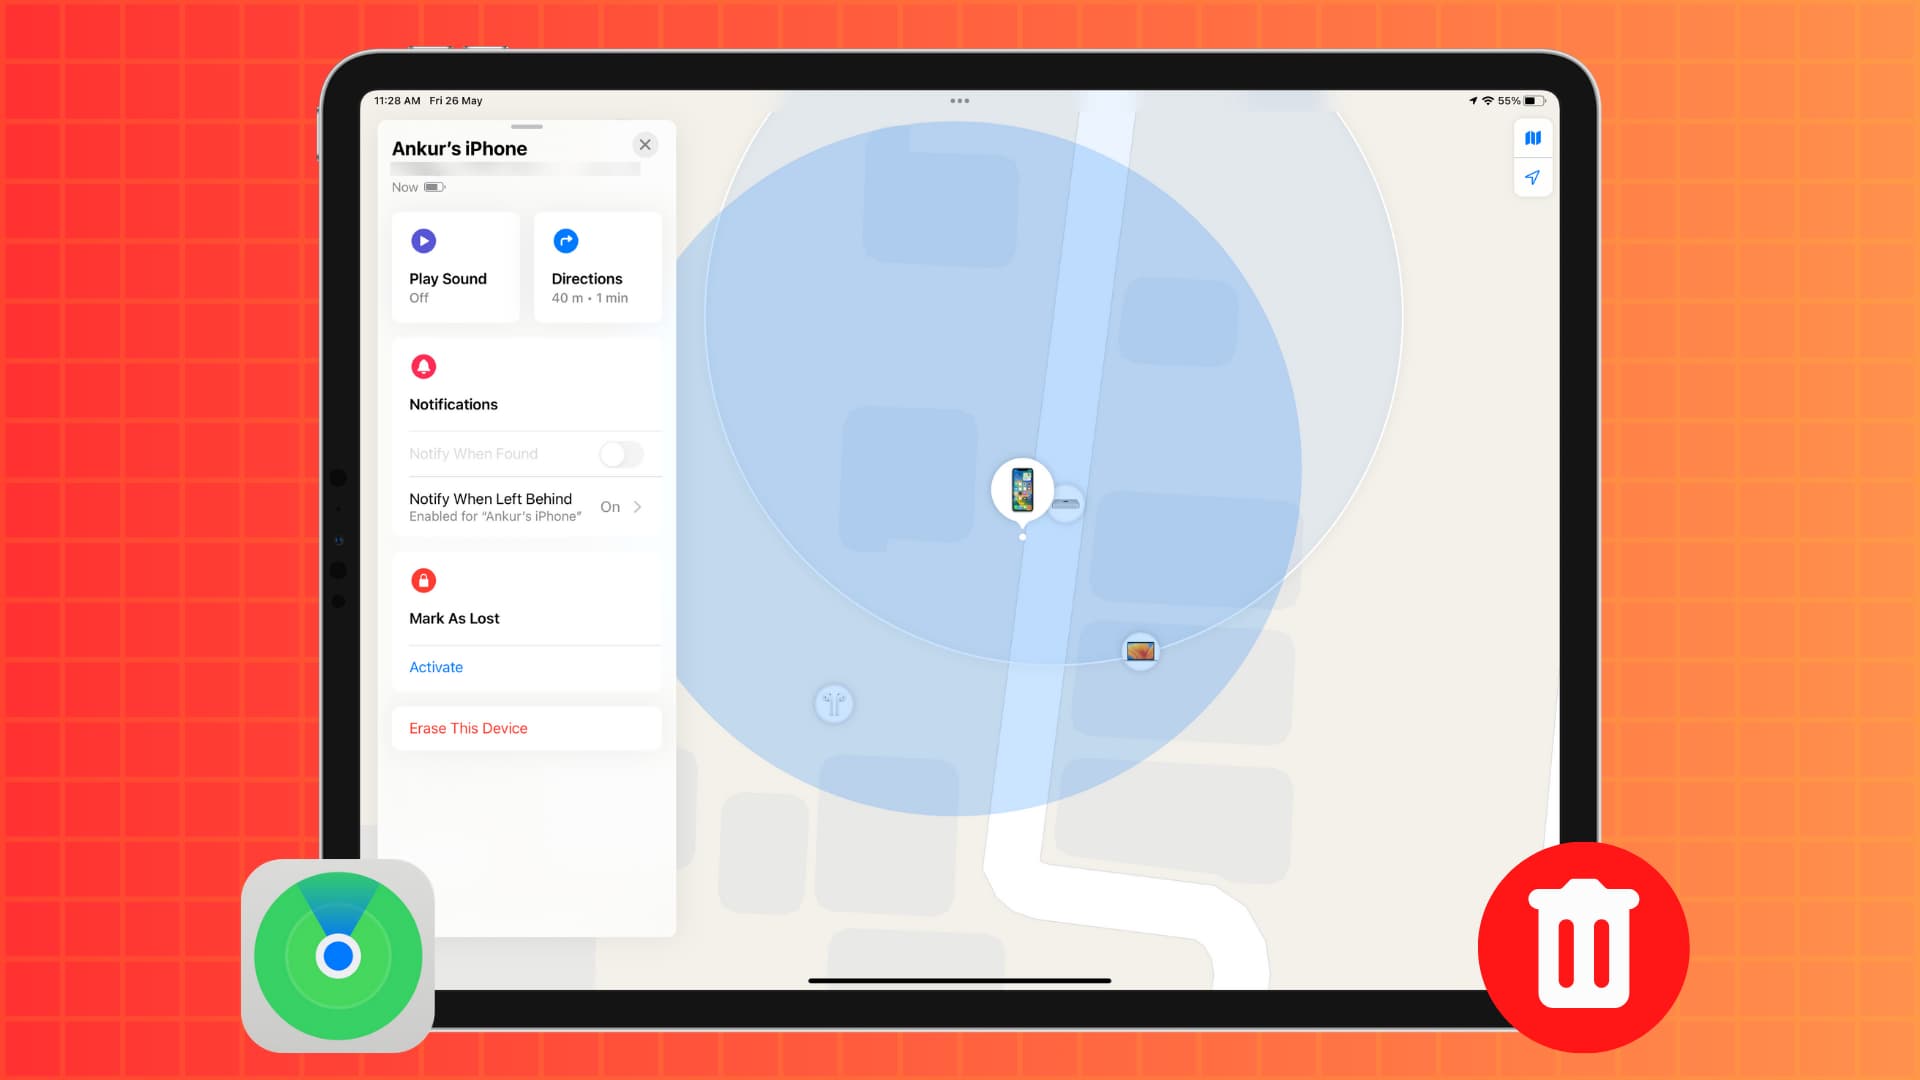
Erasing Your iPad Remotely
While no one wants to think about their iPad being lost or stolen, it’s important to be prepared for such situations and take the necessary steps to protect your personal data. One of the most effective ways to ensure the security of your information is by erasing your iPad remotely. Here’s how you can do it:
- Using Another Apple Device: If you have another Apple device with the Find My app installed, you can easily erase your iPad remotely. Open the Find My app and select the “Devices” tab. Find your iPad in the list of devices and tap on it. From there, select the “Erase This Device” option. Confirm the action, and your iPad will begin the erasing process.
- Using a Web Browser: If you don’t have access to another Apple device, you can still erase your iPad remotely using a web browser. Go to the iCloud website and sign in with your Apple ID. Click on “Find iPhone” and select your iPad. From there, click on the “Erase iPad” option, and confirm the action. The erasing process will commence.
- Activation Lock: When you initiate the remote erase, a feature called Activation Lock will automatically enable on your iPad. This feature ensures that your device remains locked and inaccessible to anyone, even if it’s erased. Activation Lock prevents unauthorized users from activating or using your iPad without your Apple ID and password.
- Backup Before Erasing: It’s essential to note that erasing your iPad remotely will remove all data on your device permanently. Therefore, it’s crucial to have a recent backup of your iPad’s data to ensure you don’t lose any important information. You can create a backup through iCloud or by connecting your iPad to a computer with iTunes.
- Remote Erase Confirmation: After initiating the remote erase, you will receive a confirmation email sent to your Apple ID email address. This email serves as a notification that the erase request has been received and is being processed. It’s a good idea to keep this email for your records.
By erasing your iPad remotely, you can protect your personal information from falling into the wrong hands. This feature provides peace of mind, knowing that even if your device is lost or stolen, all sensitive data will be permanently erased, preventing unauthorized access.
Now that you know how to erase your iPad remotely using either another Apple device or a web browser, you can act quickly to secure your personal data in the event of a loss or theft. Remember to create regular backups to safeguard your important information.
How to Use Erase iPad
If you find yourself in a situation where you need to erase your iPad due to loss or theft, it’s crucial to know how to properly use the “Erase iPad” feature. This feature allows you to remotely wipe all data on your device for security purposes. Here’s how to use Erase iPad:
- Access Find My iPad: To begin the process, you need to access the Find My iPad feature. This can be done through the Find My app on another Apple device or by signing in to the iCloud website on any web browser.
- Select Your iPad: Once you have accessed Find My iPad, select your iPad from the list of devices. This will bring up the device’s details and options.
- Choose “Erase iPad”: Look for the “Erase iPad” option and click on it. You will be prompted to confirm the action, as erasing your iPad will permanently delete all data on the device.
- Enter Your Apple ID Password: As an added layer of security, you will be required to enter your Apple ID password to verify that you have authorization to erase the device. This ensures that random individuals cannot maliciously erase your iPad.
- Confirm the Erase: After entering your Apple ID password, confirm the erase action. You will receive a confirmation email stating that the erase request has been initiated.
- Wait for the Erase Process: Once the erase request is confirmed, your iPad will start the erasing process. This may take some time, depending on the amount of data on your device. It’s important to note that your iPad must be connected to the internet for the erase process to commence.
- Activation Lock Activation: During the erase process, Activation Lock will be enabled. This means that even after erasing your iPad, the device will remain locked and unusable without your Apple ID and password.
Using the Erase iPad feature is a crucial step in securing your personal data and preventing unauthorized access. It’s important to understand that once you initiate the erase process, there is no way to reverse it, so ensure you have a backup of your data if possible.
Knowing how to use Erase iPad gives you the peace of mind that your personal information is protected, even in the event that your iPad is lost or stolen. Always keep your Apple ID and password secure, as they are essential for authorizing such actions on your device.
What Happens When You Erase Your iPad Remotely
When you choose to erase your iPad remotely, it’s important to understand what exactly happens to your device and the implications of this action. Here’s what happens when you initiate the erase process on your iPad:
- All Data is Permanently Deleted: The most significant outcome of erasing your iPad remotely is that all data on the device will be permanently deleted. This includes personal files, photos, videos, contacts, messages, and any other information stored on your iPad. It’s important to have a recent backup of your data to ensure you can restore it to a new device if needed.
- Activation Lock is Enabled: As soon as you initiate the erase process, Activation Lock is automatically activated on your iPad. This means that even after the erase, your device will remain locked and inaccessible without your Apple ID and password. This security measure helps prevent unauthorized individuals from using or selling your iPad.
- Device Settings are Reset: In addition to data deletion, erasing your iPad remotely also resets all device settings to their factory defaults. This means that any customized settings, preferences, or configurations you had on your device will be lost. You will need to reconfigure your iPad once you set it up again.
- Lost Mode is Disabled: If you had previously activated Lost Mode on your iPad, initiating the remote erase will disable this feature. Lost Mode allows you to track the location of your device and display a custom message on its screen. Once the erase process starts, Lost Mode is automatically deactivated.
- Erasure Cannot be Undone: Once you confirm the erase process, it cannot be undone. There is no way to recover the data or revert the action. It is crucial to be certain that erasing your iPad is the desired course of action, as all data and settings will be permanently erased.
Understanding what happens when you erase your iPad remotely is vital in making an informed decision about device security and data protection. It’s recommended to exhaust all other options, such as locating your device or attempting device locking, before proceeding with the erase process to ensure you have explored all possibilities.
Always remember to create backups of your important data regularly to avoid permanent loss and to keep your Apple ID and password secure to prevent unauthorized access to your devices.
Things to Consider Before Erasing Your iPad Remotely
Before you proceed with the remote erasure of your iPad, there are a few important factors to consider. Taking these into account will help you make an informed decision and ensure that erasing your device is the best course of action. Here are some things to consider:
- Backup Your Data: Prior to initiating the remote erasure, it’s crucial to have a recent backup of your data. Erasing your iPad will permanently delete all data on the device, so having a backup ensures you can restore your important files, photos, and information to a new device if needed.
- Consider the Location: If you believe your iPad is lost rather than stolen, it may be worth trying to locate it first. Utilize the Find My iPad feature to track its location, play a sound, or send a message to the device. If you’re able to locate it, you can retrieve it and avoid the need for a remote erasure.
- Balance Security and Convenience: Remote erasing your iPad is an effective way to protect your personal information. However, it’s essential to weigh the level of security against the inconvenience of losing all data and settings on your device. Consider whether there are any alternative measures you can take to secure your data or protect your iPad without resorting to erasure.
- Evaluate the Sensitivity of Your Data: Assess the sensitivity of the data on your iPad. If you have highly confidential or sensitive information stored on your device, remote erasure may be the best option to minimize the risk of it falling into the wrong hands. However, if the data is less sensitive, you may want to explore other options or try to locate the device before taking such a drastic action.
- Keep Your Apple ID Secure: Remote erasing can only be done with your Apple ID credentials. Ensure that your Apple ID and password are kept secure to prevent unauthorized access to your device and the ability for others to initiate a remote erasure. Use strong, unique passwords and enable two-factor authentication for added security.
By considering these factors, you can make a more informed decision regarding the remote erasure of your iPad. It’s always best to exhaust alternative options and explore all possibilities before erasing your device to minimize data loss and inconvenience.
Remember to prioritize the security of your data, maintain regular backups, and keep your Apple ID secure. These practices will help protect your personal information and ensure that you are prepared to handle any unexpected situations involving your iPad.
Frequently Asked Questions about Erasing iPad Remotely
Erasing your iPad remotely is a powerful feature that can help protect your personal data. However, you may have some questions about this process and its implications. Here are some frequently asked questions about erasing your iPad remotely:
- Can I track my iPad after erasing it remotely?
No, once you initiate the remote erase, all data on your iPad, including the tracking capabilities, will be permanently removed. However, Activation Lock will remain active, preventing unauthorized use of your device. You can still track the new device associated with your Apple ID. - What happens if I find my iPad after erasing it remotely?
If you find your iPad after erasing it remotely, you will need to set it up as a new device. Without a recent backup, you will not be able to restore your previous settings or data. Take this into consideration before proceeding with the remote erase. - Can someone bypass Activation Lock after erasing my iPad remotely?
Activation Lock is designed to be a strong security measure and is difficult to bypass. Without your Apple ID and password, it is extremely challenging for anyone to gain access to your device. Activation Lock adds an extra layer of protection to prevent unauthorized use or resale of your iPad. - Can I still erase my iPad remotely if it’s offline?
No, in order to initiate the remote erase, your iPad needs to be connected to the internet. If your iPad is offline, the erase process will start as soon as it reconnects to the internet. This is why it’s important to act quickly if you suspect your device is lost or stolen. - Will erasing my iPad remotely affect the information on my iCloud account?
No, erasing your iPad remotely only affects the data on the device itself. Your information stored in iCloud, such as contacts, calendars, and photos, will not be affected by the remote erasure. This information remains securely stored in your iCloud account and can be accessed from other Apple devices or the iCloud website.
It’s important to be well-informed about the process of erasing your iPad remotely. Understanding the implications and limitations can help you make the best decision for securing your personal data and device.
If you have any further questions or concerns about erasing your iPad remotely, it’s recommended to consult Apple’s official documentation or reach out to Apple Support for assistance tailored to your specific situation.