
Does the iPad Have a SIM Card?
When it comes to connectivity options, iPads have come a long way since their inception. Apple offers various iPad models with different connectivity capabilities, including cellular connectivity. One of the key components that enable cellular connectivity in iPads is the SIM card.
A SIM card, which stands for Subscriber Identity Module, is a small, removable card that allows your iPad to connect to a cellular network. It contains important information, such as your mobile network provider details and unique identification data.
Now, you might be wondering if every iPad has a SIM card. The answer to that question depends on the specific iPad model you have.
Generally, all iPad models do come with a SIM card slot, providing you with the flexibility to choose between a cellular data plan or using Wi-Fi only. However, it’s important to note that not all iPads have a physical SIM card slot.
Apple introduced eSIM technology in some of its recent iPad models. Instead of a physical SIM card, an eSIM is embedded directly into the device. This means that there is no physical slot for a SIM card, and you will need to use a digital SIM card for cellular connectivity.
If you’re unsure whether your iPad has a physical SIM card slot or uses eSIM technology, you can easily check by examining the device’s physical features.
By knowing the availability of a SIM card slot or eSIM technology, you can better understand the possibilities for connectivity with your iPad.
Identifying if Your iPad Has a SIM Card Slot
If you’re not sure whether your iPad has a SIM card slot or if it uses eSIM technology, there are a few simple ways to identify it.
The first method is to check the physical appearance of your iPad. Look for a small, rectangular cutout on the side or top edge of the device. This is where the SIM card slot is typically located. If you see this cutout, you can be confident that your iPad has a physical SIM card slot.
Another method is to check the iPad model number. You can find this information on the back of your device or in the Settings app. Go to “Settings” > “General” > “About” and locate the “Model” or “Model Number” section. Search for your iPad model number online or on Apple’s official website to determine whether it supports a physical SIM card slot.
If your iPad uses eSIM technology, you won’t find a physical SIM card slot. Instead, you can verify this by going to the “Cellular Data” or “Mobile Data” section in the Settings app. If you see an option to “Add a Plan” or “Set Up Cellular Data,” it indicates that your iPad supports eSIM technology.
By using these methods, you can easily determine whether your iPad has a SIM card slot or uses eSIM technology, enabling you to proceed accordingly with your connectivity options.
How to Find Your iPad’s SIM Card Slot
If you have confirmed that your iPad has a physical SIM card slot, you may be wondering where exactly it is located. Here’s how to find it:
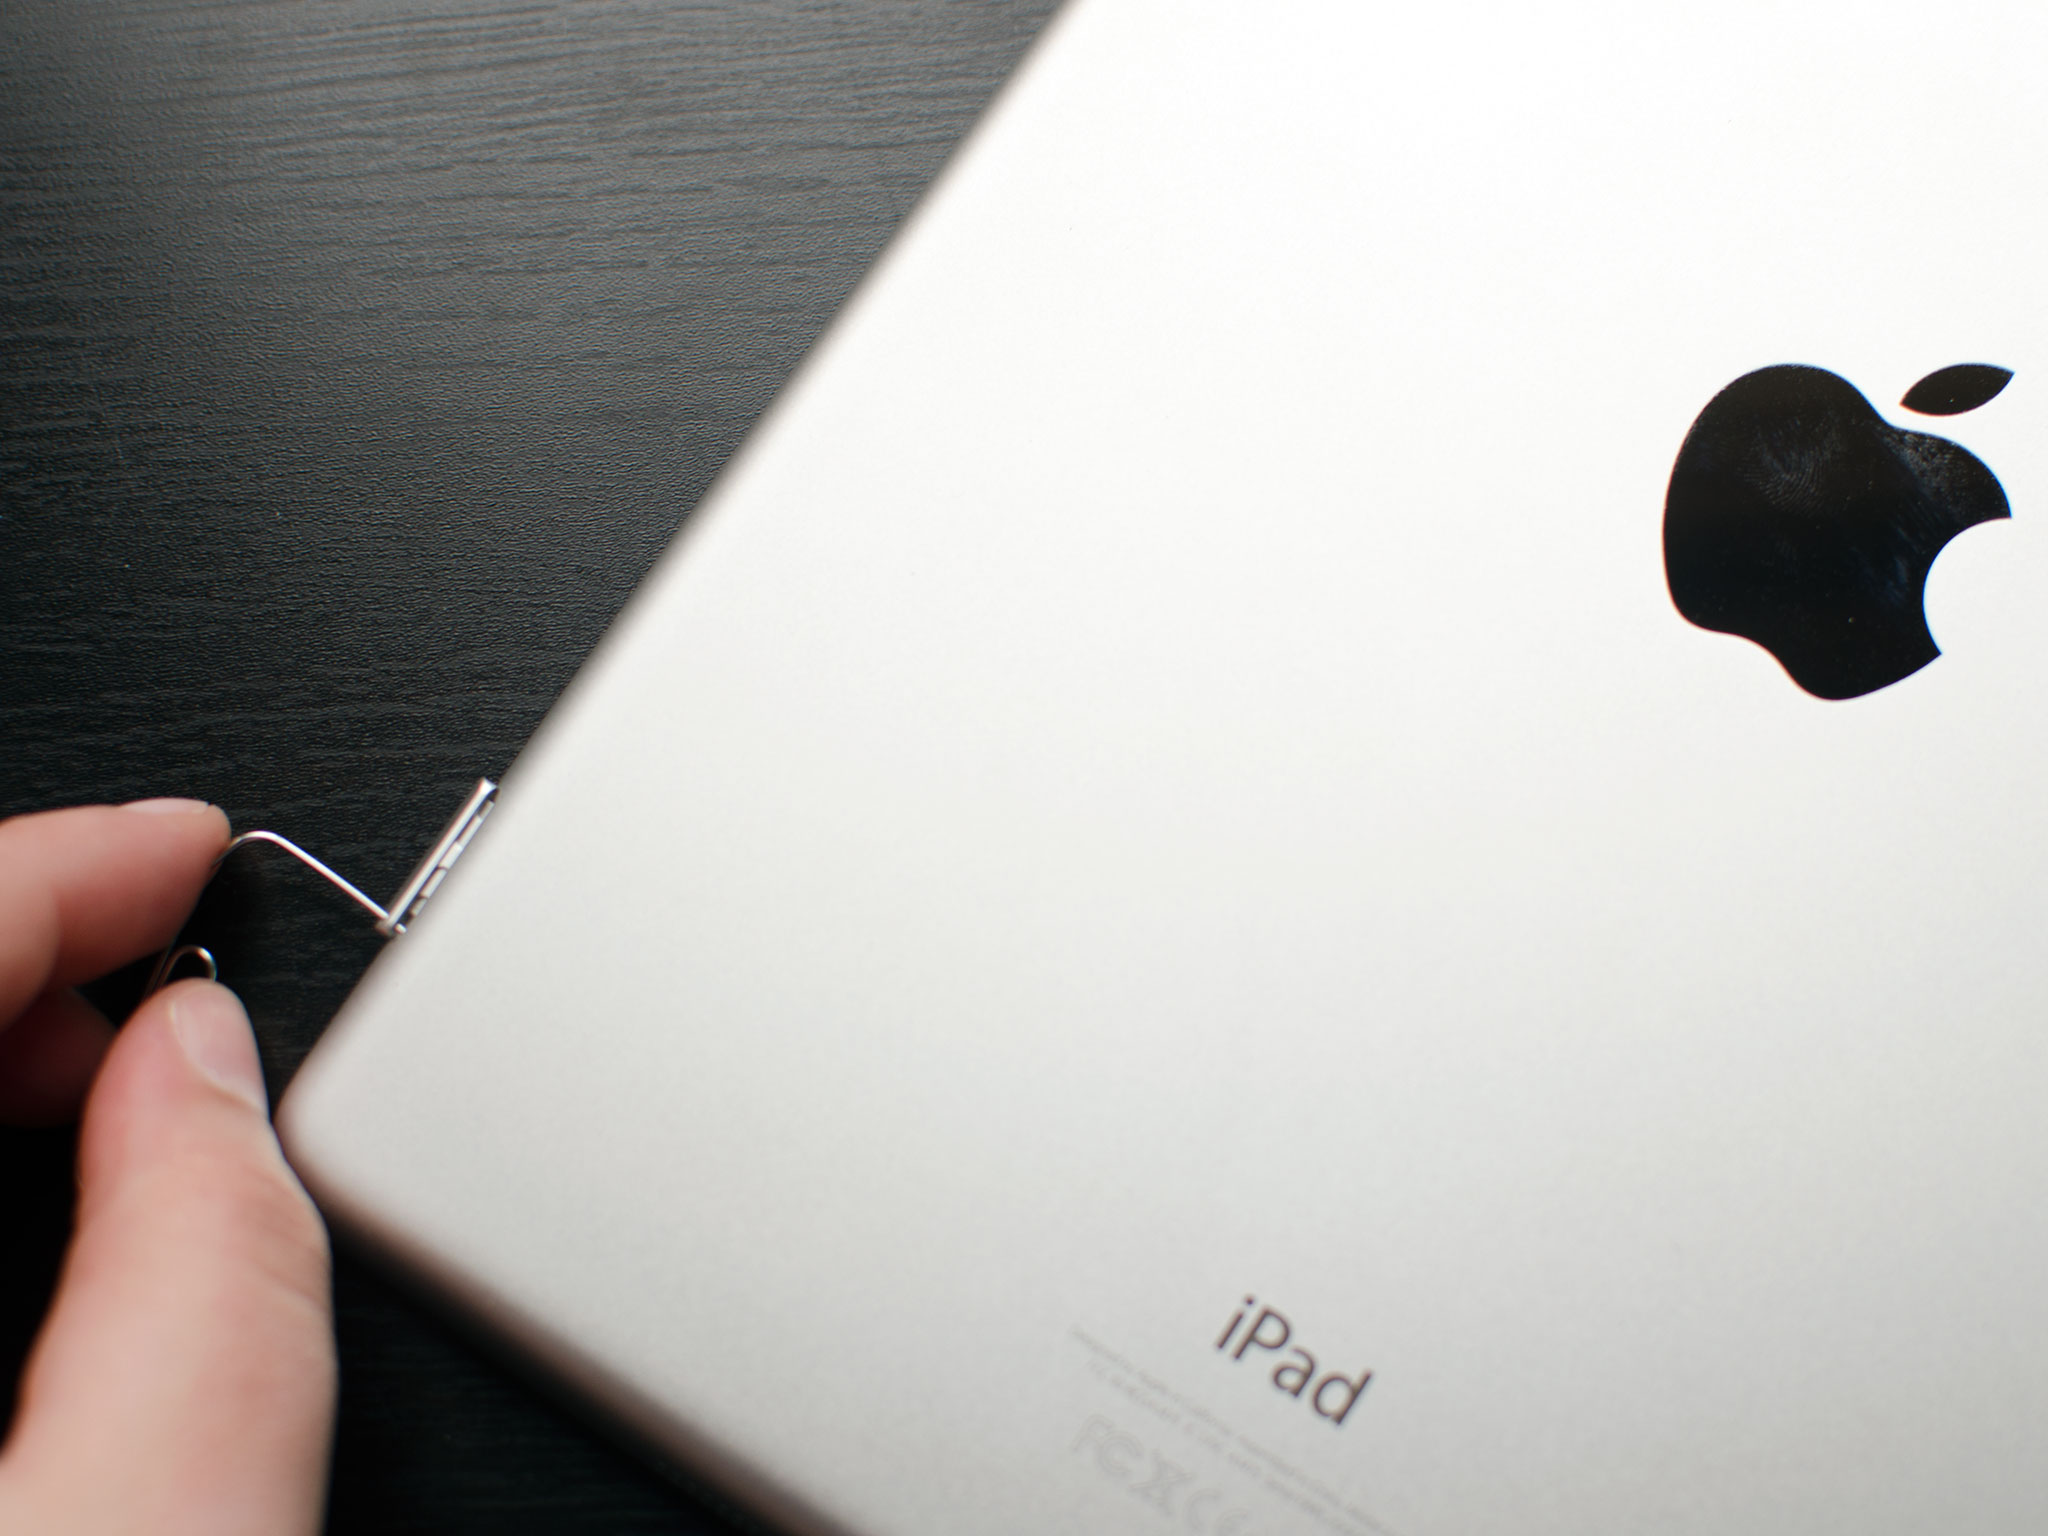
1. Start by examining the sides or top edge of your iPad. Look for a small, rectangular cutout. This cutout is the SIM card tray.
2. Once you have located the SIM card tray, you will need a SIM card removal tool or a small paperclip. These tools are usually included in the iPad’s packaging, but if you don’t have one, a paperclip can work just as well.
3. Insert the SIM card removal tool or straightened paperclip into the small hole next to the SIM card tray. Apply a gentle amount of pressure to push the tool into the hole.
4. The SIM card tray will pop out slightly. Gently pull it out using your fingers, keeping a firm grip on the tray.
5. Place your SIM card into the tray. Ensure that the gold contacts on the SIM card are facing downwards and aligned with the contacts in the tray.
6. Carefully insert the tray back into the iPad, aligning it with the slot. Gently push it back in until it is firmly seated in place.
That’s it! You have successfully found your iPad’s SIM card slot and inserted your SIM card. Now you can enjoy cellular connectivity on your iPad.
Note that the specific process may vary slightly depending on your iPad model. If you’re unsure about any step, you can always refer to the iPad’s user manual or contact Apple support for assistance.
Steps to Remove the SIM Card from Your iPad
If you need to remove the SIM card from your iPad for any reason, follow these simple steps:
1. Start by locating the SIM card tray on your iPad. The tray is usually found on the side or top edge of the device. Look for a small, rectangular cutout.
2. Get a SIM card removal tool or use a straightened paperclip. Insert the tool or paperclip into the small hole next to the SIM card tray. Apply a small amount of pressure to push the tool into the hole.
3. The SIM card tray will pop out slightly. Gently pull it out using your fingers, maintaining a firm grip on the tray.
4. Remove the SIM card from the tray by carefully sliding it out. Be sure to handle the SIM card with care and avoid touching the gold contacts, as fingerprints and dirt can interfere with connectivity.
5. Once the SIM card has been removed, you can choose to insert a new SIM card or leave the tray empty if you no longer require cellular connectivity.
6. Slide the tray back into the iPad, aligning it properly with the slot. Apply gentle pressure until the tray is securely inserted.
That’s it! You have successfully removed the SIM card from your iPad. Always remember to store the SIM card in a safe place if you plan to use it again in the future.
It’s important to note that removing the SIM card will disable cellular connectivity on your iPad. If you wish to use your iPad with cellular data again, you will need to insert a compatible SIM card into the device.
Using the SIM Tray Tool to Remove the SIM Card
If you’re unsure how to remove the SIM card from your iPad, don’t worry! Apple provides a SIM tray tool or an alternative paperclip that can assist you in the process. Follow these steps to use the SIM tray tool:
1. Locate the SIM card tray on your iPad. Look for a small, rectangular cutout on the side or top edge of the device.
2. Take the SIM card removal tool or straightened paperclip and insert it into the small hole next to the SIM card tray. Apply a small amount of pressure to push the tool into the hole.
3. The SIM card tray will pop out slightly. Gently pull it out using your fingers, ensuring you have a firm grip on the tray.
4. Remove the SIM card from the tray by sliding it out. Be cautious not to touch the gold contacts on the SIM card, as dirt and fingerprints can interfere with connectivity.
5. If you need to change or replace the SIM card, insert the new SIM card into the tray. Make sure the gold contacts on the SIM card are facing down and aligned with the contacts in the tray.
6. Carefully insert the tray back into the iPad, aligning it with the slot. Gently push it back in until it is securely seated.
That’s it! You have successfully used the SIM tray tool to remove the SIM card from your iPad. Remember to store the SIM card safely if you plan to use it again in the future.
If you no longer require cellular connectivity, you can choose to leave the SIM card tray empty. Keep in mind that removing the SIM card will disable cellular data on your iPad, so ensure you have an alternate internet connection available.
Alternative Ways to Remove the SIM Card from Your iPad
If you find yourself without a SIM tray tool or a paperclip to remove the SIM card from your iPad, there are alternative methods you can try. Here are a few options:
1. Use a bobby pin or a sewing needle: Straighten out a bobby pin or a sewing needle, making sure it’s long enough to reach the SIM card tray. Insert the straightened end into the small hole next to the tray and apply gentle pressure to eject the tray.
2. Use a toothpick: Take a toothpick and carefully insert it into the small hole next to the SIM card tray. Move the toothpick around to release the tray and gently pull it out with your fingers.
3. Use a thumbtack: Straighten out a standard thumbtack, leaving the pointed end intact. Insert the pointed end into the small hole next to the SIM card tray and gently push until the tray pops out for removal.
4. Use the corner of a folded paper: Fold a small piece of paper into a narrow triangle, then use the sharp corner to push into the hole next to the SIM card tray. The pressure will help to eject the tray, allowing you to remove it with your fingers.
Remember, when using these alternative methods, it’s crucial to be gentle and cautious. Avoid applying excessive force or inserting the object too deeply to prevent any potential damage to your iPad or the SIM card tray.
If you find it challenging or uncomfortable to remove the SIM card on your own, consider seeking assistance from an Apple authorized service provider or visit an Apple Store, where they can help you safely remove the SIM card from your iPad.
What to Do If You Can’t Identify or Remove the SIM Card from Your iPad
If you’re having trouble identifying or removing the SIM card from your iPad, there are a few steps you can take to troubleshoot the issue:
1. Check the iPad model and user manual: Confirm that your iPad model indeed has a SIM card slot or utilizes eSIM technology. Refer to the user manual for specific instructions on locating and removing the SIM card.
2. Clean the area around the SIM card tray: Use a soft cloth or compressed air to remove any dust or debris that may be obstructing the SIM card tray. This can help improve access and ease of removal.
3. Try a different SIM card removal tool: If the provided SIM tray tool or alternative methods mentioned previously are not effective, consider using a different type of SIM card removal tool. Some third-party options may work better for your specific situation.
4. Restart your iPad: Occasionally, a simple restart can resolve minor software glitches that may be affecting the SIM card detection or removal process. Hold down the power button, slide to power off, and then turn your iPad back on after a few seconds.
5. Seek professional assistance: If you’ve exhausted all troubleshooting options and are still unable to identify or remove the SIM card, it’s advisable to seek help from an Apple authorized service provider or visit an Apple Store. They will have the expertise and tools necessary to assist you and ensure the SIM card is safely removed.
Remember, attempting to forcefully remove the SIM card or using excessive pressure can damage your iPad. It’s always best to exercise caution and seek professional assistance when necessary.
By following these steps, you should be able to resolve any issues encountered while identifying or removing the SIM card from your iPad.
Understanding the Purpose of a SIM Card in Your iPad
A SIM card plays a crucial role in enabling cellular connectivity on your iPad. Understanding the purpose of a SIM card can help you make the most out of your device and enjoy seamless connectivity wherever you go.
Here are a few key points to help you grasp the significance of a SIM card in your iPad:
1. Cellular network connectivity: The primary purpose of a SIM card is to connect your iPad to a cellular network. It allows you to access the internet, make calls, send messages, and use various online services, even when you’re away from Wi-Fi networks.
2. Mobile data plans: A SIM card provides access to mobile data plans offered by cellular network providers. This allows you to choose a data plan that suits your needs and preferences. With a SIM card, you can browse the web, stream videos, use social media, and stay connected wherever you are.
3. Network authentication: SIM cards contain unique identification data that authenticates your device on a cellular network. This ensures that your iPad can securely connect to the network and access the services provided by your mobile network provider.
4. Flexibility and portability: Using a SIM card allows you to easily switch between different networks or carriers by simply replacing the SIM card. This flexibility is particularly useful when traveling internationally, as you can use local SIM cards to avoid expensive roaming charges.
5. Enhanced security: SIM cards provide an additional layer of security for your iPad and its connectivity. The unique data stored on the SIM card helps protect your device from unauthorized access and ensures the privacy and integrity of your cellular communications.
By understanding the purpose of a SIM card, you can fully utilize the connectivity options available on your iPad and choose the most suitable data plans for your needs. Whether it’s staying connected on the go, accessing online services, or enjoying the flexibility of network options, a SIM card is an essential component for a seamless iPad experience.