
Materials Needed
To craft a buttstock monopod for enhanced stability, you'll need a few essential tools and materials. Here's a rundown of what you'll require:
-
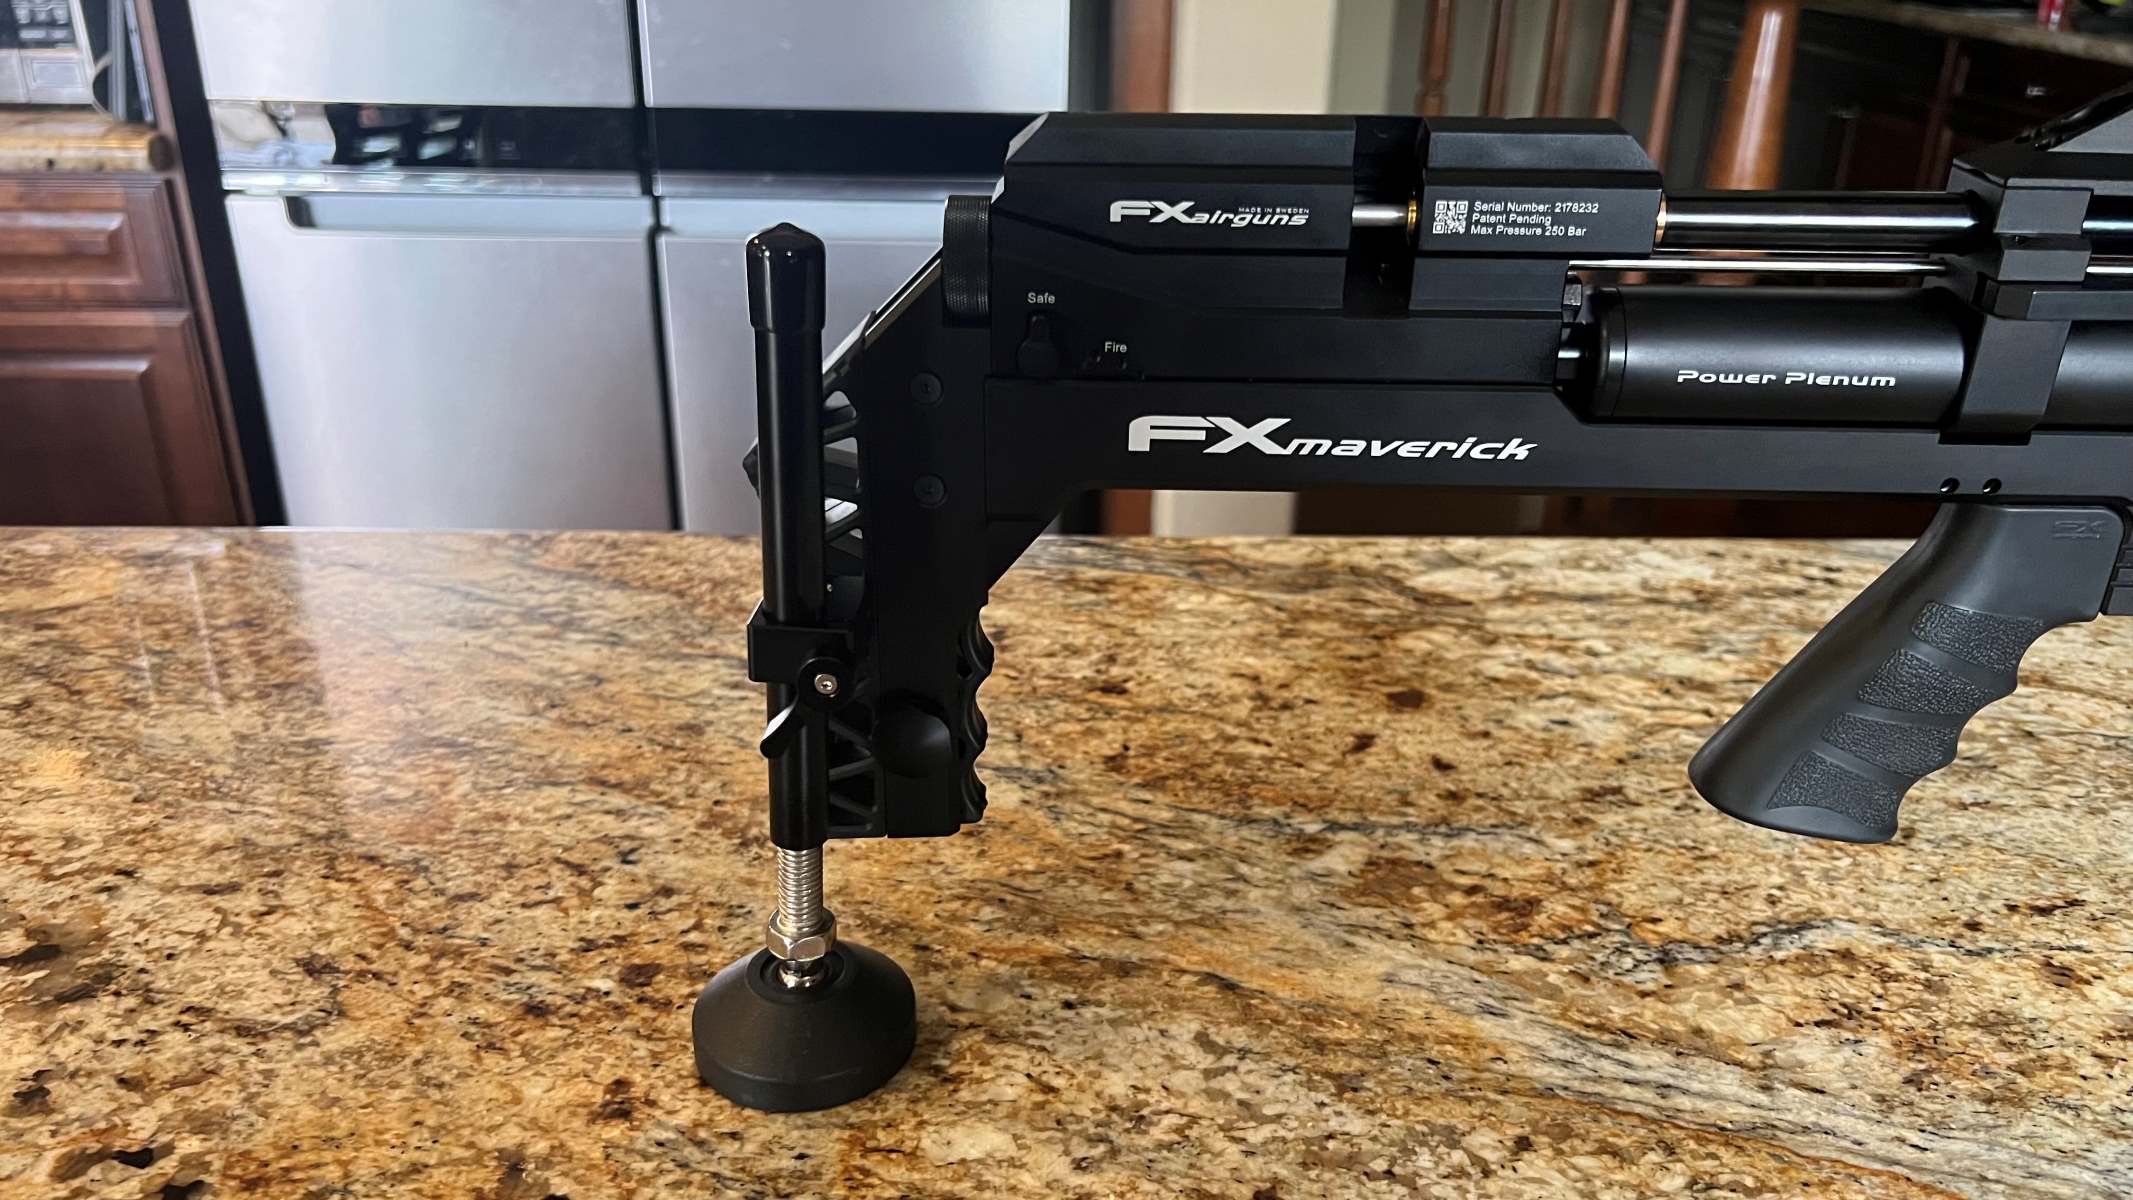
Buttstock Monopod Kit: This kit typically includes a monopod attachment, a mounting base, and the necessary hardware. It's crucial to select a kit that is compatible with your firearm's buttstock to ensure a secure fit.
-
Firearm Buttstock: The monopod will be attached to the buttstock of your firearm, so it's essential to have the specific buttstock that the monopod kit is designed for. This could be a rifle or shotgun buttstock, depending on your firearm.
-
Screwdriver Set: A set of screwdrivers, including both flathead and Phillips head varieties, will be necessary for attaching the monopod to the buttstock securely.
-
Drill and Drill Bits: Depending on the monopod kit, you may need a drill to create pilot holes for the mounting base and screws. Ensure that you have the appropriate drill bits for the specific size of the screws.
-
Measuring Tape: Accurate measurements are crucial for positioning and aligning the monopod correctly. A reliable measuring tape will aid in achieving precision during the installation process.
-
Marker or Pencil: Marking the locations for drilling and screwing is essential to ensure that the monopod is attached in the optimal position for stability. A marker or pencil will allow you to make these markings accurately.
-
Safety Gear: When working with tools and hardware, safety should always be a priority. Safety glasses and gloves are essential to protect your eyes and hands during the installation process.
-
Stable Work Surface: A stable workbench or surface will provide the necessary support for securely attaching the monopod to the buttstock. This will ensure that the installation is performed accurately and safely.
Gathering these materials will set the stage for creating a reliable buttstock monopod that enhances the stability of your firearm, ultimately improving your shooting experience. With these tools in hand, you'll be well-prepared to embark on the process of assembling your buttstock monopod.
Step 1: Gathering the Necessary Tools
Before diving into the process of creating a buttstock monopod for enhanced stability, it’s essential to gather all the necessary tools and materials. This step sets the foundation for a smooth and efficient assembly process. Here’s a detailed guide to acquiring the required tools:
- Buttstock Monopod Kit: Begin by obtaining a high-quality buttstock monopod kit designed for your specific firearm. Ensure that the kit includes all the essential components, such as the monopod attachment, mounting base, and the corresponding hardware. Selecting a compatible kit is crucial for seamless integration with your firearm’s buttstock.
- Firearm Buttstock: Depending on your firearm type, whether it’s a rifle or shotgun, make sure you have the appropriate buttstock that aligns with the specifications of the monopod kit. The compatibility between the buttstock and the monopod is vital for a secure and stable attachment.
- Screwdriver Set: A comprehensive set of screwdrivers, encompassing both flathead and Phillips head varieties, is indispensable for attaching the monopod securely to the buttstock. Having the right tools for the job ensures that the installation process proceeds smoothly.
- Drill and Drill Bits: Depending on the monopod kit’s requirements, a drill and the corresponding drill bits may be necessary to create pilot holes for the mounting base and screws. It’s imperative to have the appropriate drill bits that match the size of the screws for precise and secure installation.
- Measuring Tape: Accurate measurements are fundamental in positioning and aligning the monopod correctly on the buttstock. A reliable measuring tape will facilitate precision during the installation process, ensuring that the monopod is optimally placed for stability.
- Marker or Pencil: Marking the locations for drilling and screwing is a critical step in the installation process. Using a marker or pencil to make these markings accurately will contribute to the precise attachment of the monopod, enhancing its functionality.
- Safety Gear: Prioritize safety by equipping yourself with safety glasses and gloves to protect your eyes and hands during the installation process. Safety gear is essential when working with tools and hardware, ensuring a secure and risk-free assembly process.
- Stable Work Surface: Prepare a stable workbench or surface that will provide the necessary support for securely attaching the monopod to the buttstock. A stable work surface is vital for performing the installation accurately and safely.
Gathering these tools and materials lays the groundwork for the subsequent steps involved in assembling the buttstock monopod. With the necessary equipment at hand, you’re poised to embark on the journey of creating a reliable and stable monopod for your firearm.
Step 2: Preparing the Buttstock
With the essential tools and materials at your disposal, the next crucial step in creating a buttstock monopod for enhanced stability is preparing the buttstock of your firearm. This preparation process sets the stage for the seamless attachment of the monopod, ensuring a secure and stable foundation. Here’s a detailed guide to preparing the buttstock:
1. Assess the Buttstock: Begin by thoroughly examining the buttstock of your firearm to identify the optimal location for attaching the monopod. Consider factors such as balance, weight distribution, and your preferred shooting position to determine the most suitable placement for the monopod.
2. Clean the Attachment Area: It’s essential to ensure that the surface of the buttstock where the monopod will be attached is clean and free from any debris or residue. Use a soft cloth to wipe the attachment area, removing any dirt or oil that may hinder the secure installation of the monopod.
3. Positioning and Marking: Carefully position the mounting base of the monopod on the buttstock, aligning it according to your earlier assessment. Use a marker or pencil to mark the specific points where the pilot holes for the mounting base will be drilled. Precision in marking is crucial for the accurate attachment of the monopod.
4. Pilot Hole Preparation: If the monopod kit requires pilot holes for the mounting base, use the appropriate drill bit to create these holes at the marked locations. Exercise caution and ensure that the pilot holes are drilled to the correct depth, allowing for a secure fit of the mounting base.
5. Attachment Surface Enhancement: Depending on the material of the buttstock, consider using appropriate methods to enhance the attachment surface. For wooden buttstocks, using wood glue or reinforcement may be beneficial, while synthetic buttstocks may require specific adhesion techniques for optimal attachment.
6. Secure the Mounting Base: Once the pilot holes are prepared and the attachment surface is enhanced, proceed to securely attach the mounting base of the monopod to the buttstock using the provided hardware. Ensure that the mounting base is firmly affixed, providing a stable foundation for the monopod.
By meticulously preparing the buttstock, you establish a solid groundwork for the subsequent attachment of the monopod, ensuring stability and reliability in its functionality. This meticulous preparation is instrumental in creating a buttstock monopod that enhances the overall shooting experience with your firearm.
Step 3: Attaching the Monopod
With the buttstock prepared, the next pivotal step in the process of creating a buttstock monopod for enhanced stability is the actual attachment of the monopod to the firearm. This step requires precision and attention to detail to ensure a secure and stable connection. Here’s a comprehensive guide to attaching the monopod:
1. Align the Monopod: Begin by aligning the monopod attachment with the mounting base on the prepared buttstock. Ensure that the monopod is positioned according to your earlier markings and assessment, aiming for optimal balance and stability.
2. Secure the Monopod: Utilize the provided hardware, such as screws or bolts, to firmly secure the monopod to the mounting base. Use a screwdriver to tighten the fasteners, ensuring that the monopod is securely attached to the buttstock. Exercise caution to avoid over-tightening, which may compromise the integrity of the attachment.
3. Check for Stability: Once the monopod is attached, perform a thorough stability check to ensure that it is securely and rigidly affixed to the buttstock. Gently apply pressure and verify that the monopod remains stable without any wobbling or shifting. This step is crucial for confirming the reliability of the attachment.
4. Functional Testing: Test the functionality of the monopod by extending and retracting it as per the manufacturer’s instructions. Verify that the monopod operates smoothly and securely, providing the desired support and stability. This testing phase ensures that the monopod is fully functional and ready for use.
5. Fine-Tuning: Make any necessary adjustments to the monopod’s attachment and positioning to achieve the optimal stability and functionality. This may involve minor repositioning or tightening to fine-tune the monopod’s attachment to the buttstock, ensuring an ideal configuration.
6. Verify Compatibility: Confirm that the attached monopod does not hinder the overall operation and handling of the firearm. Ensure that the monopod’s presence does not impede the firearm’s functionality or ergonomics, allowing for seamless integration during shooting activities.
By meticulously following these steps, you can securely attach the monopod to the buttstock, creating a stable and reliable support system for your firearm. This attachment process is integral to the overall functionality and effectiveness of the buttstock monopod, enhancing your shooting experience.
Step 4: Adjusting for Stability
After attaching the monopod to the buttstock, the next crucial step in the process of creating a buttstock monopod for enhanced stability is to adjust and optimize its configuration for maximum stability. Fine-tuning the monopod ensures that it provides reliable support, contributing to an improved shooting experience. Here’s a detailed guide to adjusting for stability:
1. Height Adjustment: Evaluate the height of the monopod to align with your shooting preferences and body posture. Adjust the monopod’s height to achieve a comfortable and stable shooting position, allowing for enhanced control and accuracy.
2. Leg Extension: If the monopod features extendable legs, adjust them to the desired length based on the terrain and shooting conditions. Longer leg extensions may be suitable for uneven or elevated surfaces, providing enhanced stability and support.
3. Locking Mechanism: Ensure that the monopod’s locking mechanism, if applicable, is engaged securely to prevent inadvertent movement or retraction during firearm use. A reliable locking mechanism is essential for maintaining stability and rigidity in the deployed position.
4. Surface Grip: Assess the surface grip of the monopod’s feet or base. If the monopod is equipped with rubberized or textured feet, verify that they provide sufficient traction on various surfaces, enhancing stability and preventing slippage during use.
5. Tension Adjustment: If the monopod incorporates tension adjustment features, fine-tune the tension to achieve the optimal balance between stability and maneuverability. Adjusting the tension allows for personalized support based on individual shooting styles and preferences.
6. Stability Testing: Conduct thorough stability tests by applying controlled pressure and simulating shooting scenarios to verify the monopod’s stability under real-world conditions. This testing phase ensures that the adjusted configuration effectively enhances stability and support.
7. Compatibility Check: Verify that the adjusted monopod configuration does not interfere with the overall handling and operation of the firearm. Ensure that the adjusted monopod remains compatible with the firearm’s ergonomics and functionality, allowing for seamless integration during shooting activities.
By meticulously adjusting the monopod for stability, you can tailor its configuration to meet your specific shooting requirements, ultimately enhancing the stability and support it provides. This adjustment process is instrumental in optimizing the functionality of the buttstock monopod, contributing to an improved shooting experience.
Step 5: Testing and Fine-Tuning
Upon completing the attachment and adjustment of the buttstock monopod, the final critical step in the process is to conduct comprehensive testing and fine-tuning to ensure optimal performance and stability. Thorough testing and fine-tuning validate the functionality of the monopod and allow for necessary adjustments to achieve peak effectiveness. Here’s a detailed guide to testing and fine-tuning the buttstock monopod:
1. Stability Assessment: Begin by assessing the stability of the monopod in various shooting positions. Test the monopod’s ability to support the firearm under different angles and levels of elevation, ensuring that it maintains stability and rigidity across diverse shooting scenarios.
2. Recoil Management: Test the monopod’s effectiveness in managing recoil during firearm use. Assess how the monopod mitigates the impact of recoil, contributing to improved shot accuracy and follow-up shot readiness.
3. Target Acquisition: Evaluate the monopod’s influence on target acquisition and tracking. Test how the monopod enhances the shooter’s ability to acquire and maintain targets, contributing to enhanced precision and shooting proficiency.
4. Fine-Tuning Adjustments: Based on the testing outcomes, make fine-tuning adjustments to the monopod’s configuration. This may involve refining the height, leg extension, tension, or other settings to optimize stability and support based on real-world performance.
5. Field Testing: Take the firearm equipped with the monopod to the field or shooting range for practical testing. Engage in shooting activities across varying terrains and conditions to assess the monopod’s performance in real-world shooting scenarios.
6. User Feedback: Solicit feedback from shooters who have used the firearm with the monopod attached. Gather insights into the user experience and any potential areas for improvement, allowing for iterative refinements to enhance the monopod’s functionality.
7. Durability Testing: Subject the monopod to durability testing, ensuring that it withstands prolonged use and exhibits resilience under demanding shooting conditions. Assess the monopod’s durability and structural integrity to confirm its long-term reliability.
8. Compatibility Verification: Verify that the monopod remains compatible with the firearm’s ergonomics and operation. Confirm that the monopod’s presence does not hinder the firearm’s functionality, allowing for seamless integration during shooting activities.
By rigorously testing and fine-tuning the buttstock monopod, you can validate its stability, functionality, and durability, ensuring that it enhances the overall shooting experience. This comprehensive testing and fine-tuning process is instrumental in refining the monopod’s performance to meet the highest standards of stability and support.