
Materials Needed
To embark on this DIY monopod project, you'll require a few essential materials. Here's a rundown of what you'll need:
-
Aluminum Pipe: Look for a sturdy and lightweight aluminum pipe, which will serve as the main body of your monopod. The pipe should be long enough to provide adequate height for your photography needs.
-
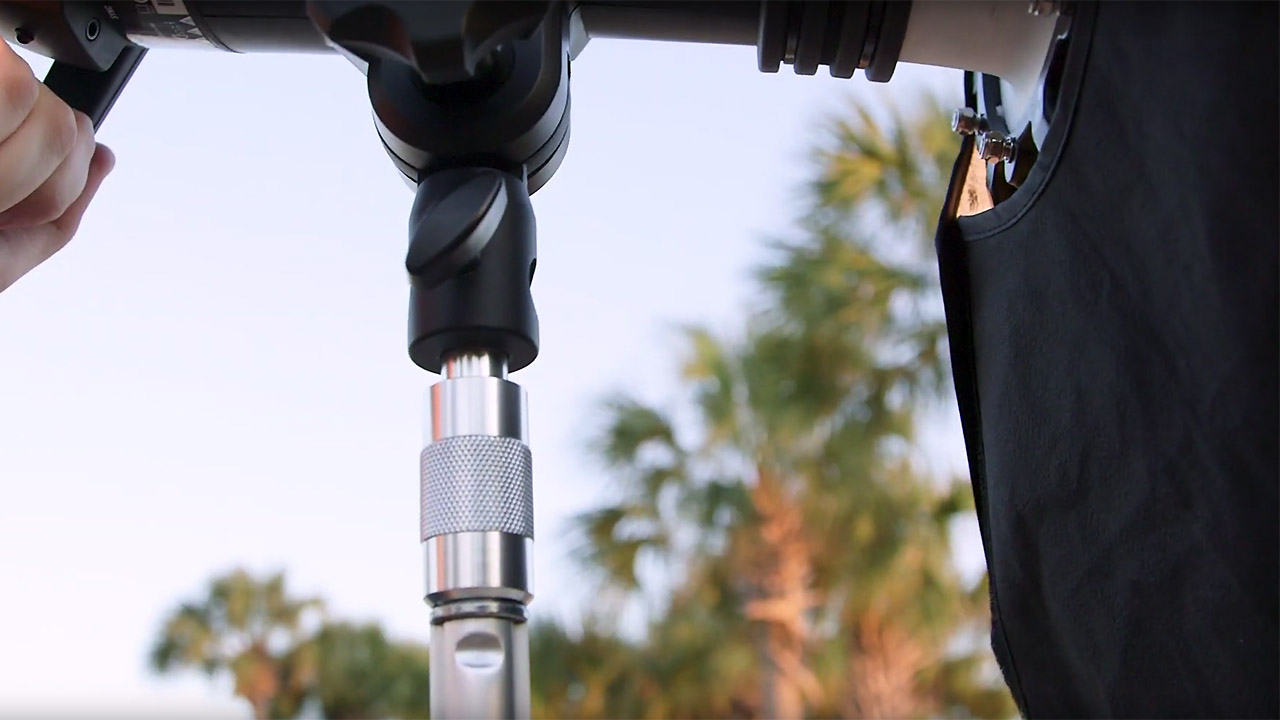
Tripod Head: A tripod head is crucial for mounting your camera securely onto the monopod. Ensure you select a high-quality head that is compatible with your camera model and offers smooth panning and tilting movements.
-
Rubber Grip: A comfortable rubber grip will enhance the handling of your monopod, providing a secure and ergonomic hold during extended shooting sessions.
-
Measuring Tape: Accurate measurements are vital for ensuring the proper length of the monopod and the precise positioning of the tripod head.
-
Hacksaw or Pipe Cutter: A hacksaw or pipe cutter will be indispensable for accurately cutting the aluminum pipe to the desired length.
-
Drill and Bits: You'll need a drill and appropriate drill bits to create the necessary holes for attaching the tripod head and rubber grip securely.
-
Screwdriver and Screws: These tools will be used to fasten the tripod head and rubber grip onto the aluminum pipe.
-
Sandpaper: Smooth any rough edges on the cut pipe to ensure a professional finish and eliminate the risk of injury from sharp edges.
-
Optional: Paint or Finish: If desired, you can apply a coat of paint or a protective finish to the aluminum pipe for added durability and a personalized touch.
Gathering these materials will set the stage for the subsequent steps in creating your custom monopod. With the necessary components in hand, you'll be well-equipped to proceed with the construction process.
Step 1: Gather Your Materials
Before diving into the construction of your DIY monopod, it’s crucial to gather all the necessary materials and tools. This initial step sets the foundation for a smooth and efficient building process. Here’s a detailed guide to help you gather everything you’ll need:
Start by acquiring a sturdy and lightweight aluminum pipe. The pipe should be of sufficient length to provide the desired height for your monopod. Ensure that the aluminum pipe is durable and capable of supporting the weight of your camera and lens without flexing excessively.
Next, select a high-quality tripod head that is compatible with your camera model. The tripod head should offer smooth and precise movements, allowing for seamless panning and tilting while providing a secure mount for your camera. Consider the weight and dimensions of your camera setup when choosing the appropriate tripod head.
For enhanced handling and comfort, obtain a rubber grip that will be attached to the aluminum pipe. The grip should provide a secure and ergonomic hold, reducing hand fatigue during extended photography sessions. Additionally, ensure that it can be securely fastened to the pipe for stability.
Accurate measurements are crucial for this project, so be sure to have a measuring tape on hand. Precise measurements will guide the cutting of the aluminum pipe to the desired length and the positioning of the tripod head and rubber grip for optimal functionality.
Equipping yourself with a hacksaw or pipe cutter is essential for accurately cutting the aluminum pipe to the required length. This tool will enable you to achieve clean and precise cuts, ensuring a professional and polished appearance for your monopod.
A drill and appropriate drill bits will be necessary for creating the essential holes in the aluminum pipe to attach the tripod head and rubber grip securely. Ensure that the drill bits are suitable for the material and thickness of the pipe to achieve precise and secure fittings.
Prepare a screwdriver and the corresponding screws for fastening the tripod head and rubber grip onto the aluminum pipe. Select screws that are appropriate for the materials involved and ensure a secure attachment for reliable performance.
Smooth any rough edges on the cut aluminum pipe using sandpaper. This step is crucial for safety, as it eliminates sharp edges that could pose a risk of injury while also providing a professional finish to your monopod.
Finally, consider whether you’d like to personalize your monopod with a coat of paint or a protective finish. While optional, this step can add durability and a touch of personalization to your DIY creation.
By gathering these materials and tools, you’ll be fully prepared to embark on the subsequent steps of constructing your custom monopod. With careful preparation, you can ensure a seamless and enjoyable building process, leading to the creation of a reliable and personalized photography accessory.
Step 2: Measure and Cut the Pipe
With the necessary materials gathered, the next crucial step in creating your DIY monopod is to measure and cut the aluminum pipe to the desired length. This process requires precision and attention to detail to ensure the optimal height and functionality of your monopod. Follow these steps to measure and cut the pipe accurately:
1. Determine the Desired Length: Begin by deciding the ideal height for your monopod based on your photography needs. Consider factors such as shooting angles and stability requirements. Once you have a clear idea of the desired length, mark the cutting point on the aluminum pipe using a pencil or marker.
2. Measure and Mark: Use a measuring tape to mark the precise cutting point on the aluminum pipe. Double-check the measurements to ensure accuracy, as this step is critical in determining the final height of your monopod. Make clear and visible marks to guide the cutting process.
3. Secure the Pipe: Before cutting, securely clamp the aluminum pipe in place to prevent any movement during the cutting process. This will ensure a clean and accurate cut, minimizing the risk of errors and inconsistencies in the final length of the monopod.
4. Use a Hacksaw or Pipe Cutter: Employ a hacksaw or pipe cutter to carefully cut the aluminum pipe at the marked point. Exercise caution and maintain a steady hand to achieve a clean and precise cut. Take your time during this step to ensure that the cut is straight and even.
5. Smooth the Edges: After cutting the pipe, use sandpaper to smooth any rough edges and remove any burrs created during the cutting process. This step is essential for both safety and aesthetics, as it eliminates sharp edges and provides a professional finish to the cut end of the pipe.
6. Verify the Length: Once the cutting and smoothing process is complete, verify that the length of the aluminum pipe matches your desired specifications. Confirm that the cut end is even and free from imperfections that could affect the stability and appearance of the monopod.
By meticulously following these steps to measure and cut the aluminum pipe, you can ensure that your DIY monopod will meet your specific height requirements and provide a stable and reliable support for your camera. Attention to detail during this phase will contribute to the overall functionality and professional finish of your custom monopod.
Step 3: Attach the Tripod Head
Attaching the tripod head is a pivotal step in the construction of your DIY monopod, as it directly impacts the stability and functionality of the camera mount. Follow these detailed steps to securely attach the tripod head to the aluminum pipe:
1. Select the Mounting Position: Determine the optimal placement for the tripod head on the aluminum pipe, considering factors such as balance, weight distribution, and ease of camera movement. Mark the position with a pencil or marker, ensuring that it aligns with your shooting preferences.
2. Create Pilot Holes: Use a drill and an appropriate drill bit to create pilot holes at the marked position on the aluminum pipe. Pilot holes are essential for guiding the screws and ensuring precise and secure attachment of the tripod head.
3. Secure the Tripod Head: Align the tripod head with the pilot holes and use screws to securely fasten it to the aluminum pipe. Ensure that the attachment is stable and that the tripod head is level and aligned with the axis of the monopod for smooth panning and tilting movements.
4. Test the Movement: After attaching the tripod head, test the range of motion to ensure that it allows for smooth and controlled movements of your camera. Verify that the tripod head provides the necessary stability and support for your specific camera model and shooting style.
5. Verify the Secure Attachment: Double-check the screws to ensure that the tripod head is firmly and securely attached to the aluminum pipe. Confirm that there is no wobbling or instability in the connection, as a secure attachment is crucial for the safe and reliable use of your monopod.
6. Consider Additional Reinforcement: Depending on the weight of your camera setup and your intended usage, you may opt to reinforce the attachment of the tripod head with additional measures, such as epoxy adhesive or supplementary fasteners. This step can provide added peace of mind regarding the stability of the tripod head.
By following these steps to attach the tripod head securely to the aluminum pipe, you can ensure that your DIY monopod will provide a stable and reliable platform for capturing stunning photographs and videos. Attention to detail during this phase will contribute to the overall functionality and performance of your custom monopod.
Step 4: Add the Grip
Adding a comfortable and secure grip to your DIY monopod is essential for enhancing handling and minimizing hand fatigue during extended photography sessions. Follow these detailed steps to attach the rubber grip to the aluminum pipe:
1. Select the Grip Position: Determine the optimal placement for the rubber grip on the aluminum pipe, considering factors such as ergonomics and the natural hand position during use. Mark the position with a pencil or marker, ensuring that it aligns with your preferred grip location.
2. Create Pilot Holes: Use a drill and an appropriate drill bit to create pilot holes at the marked position on the aluminum pipe. Pilot holes are essential for guiding the screws and ensuring precise and secure attachment of the rubber grip.
3. Attach the Grip: Align the rubber grip with the pilot holes and use screws to securely fasten it to the aluminum pipe. Ensure that the grip is positioned securely and aligned with the axis of the monopod, providing a comfortable and stable hold during use.
4. Test the Comfort and Stability: After attaching the rubber grip, test the comfort and stability it provides during handling. Verify that the grip offers a secure and ergonomic hold, reducing hand fatigue and enhancing control while using the monopod.
5. Verify the Secure Attachment: Double-check the screws to ensure that the rubber grip is firmly and securely attached to the aluminum pipe. Confirm that there is no slippage or instability in the connection, as a secure attachment is crucial for the safe and reliable use of your monopod.
6. Consider Customization: Depending on your preferences, you may choose to customize the rubber grip with additional padding or textures to further enhance comfort and handling. This step allows for personalization tailored to your specific shooting needs.
By following these steps to add the rubber grip to your DIY monopod, you can ensure that your photography accessory will provide a comfortable and secure hold, allowing for extended and effortless shooting sessions. Attention to detail during this phase will contribute to the overall usability and ergonomic design of your custom monopod.
Step 5: Test and Adjust
After completing the construction of your DIY monopod, it’s essential to thoroughly test its functionality and make any necessary adjustments to ensure optimal performance. Follow these detailed steps to test and fine-tune your custom monopod:
1. Test Stability and Load Capacity: Mount your camera onto the monopod and test its stability with varying degrees of tilt and panning. Verify that the monopod can support the weight of your camera and lens combination without excessive flexing or instability.
2. Evaluate Height and Comfort: Assess the overall height of the monopod and verify that it meets your specific shooting needs. Additionally, evaluate the comfort of the rubber grip and ensure that it provides a secure and ergonomic hold during use.
3. Test Movement and Flexibility: Experiment with the range of motion provided by the tripod head, ensuring smooth and controlled panning and tilting movements. Verify that the tripod head allows for effortless adjustments while maintaining stability.
4. Verify Secure Attachments: Double-check the attachments of the tripod head and rubber grip to ensure that they are firmly and securely fastened to the aluminum pipe. Confirm that there is no wobbling or slippage in these critical connections.
5. Make Necessary Adjustments: If any issues are identified during testing, such as instability, discomfort, or limitations in movement, make the necessary adjustments. This may involve tightening connections, refining the positioning of components, or addressing any comfort-related concerns.
6. Fine-Tune for Personal Preferences: Consider fine-tuning the monopod to align with your personal shooting style and preferences. This may include customizing the grip, adjusting the height, or implementing additional modifications based on your specific needs.
7. Conduct Real-World Testing: Take the monopod into real-world shooting scenarios to further evaluate its performance. Pay attention to its stability, handling, and overall usability in practical photography settings.
8. Seek Feedback and Iterate: If possible, seek feedback from fellow photographers and enthusiasts to gain insights into potential improvements. Use this feedback to iterate on the design and functionality of your DIY monopod.
By meticulously testing and making necessary adjustments to your DIY monopod, you can ensure that it meets your exacting standards for stability, comfort, and performance. This iterative process allows for the refinement of your custom monopod to align with your unique photography requirements.