
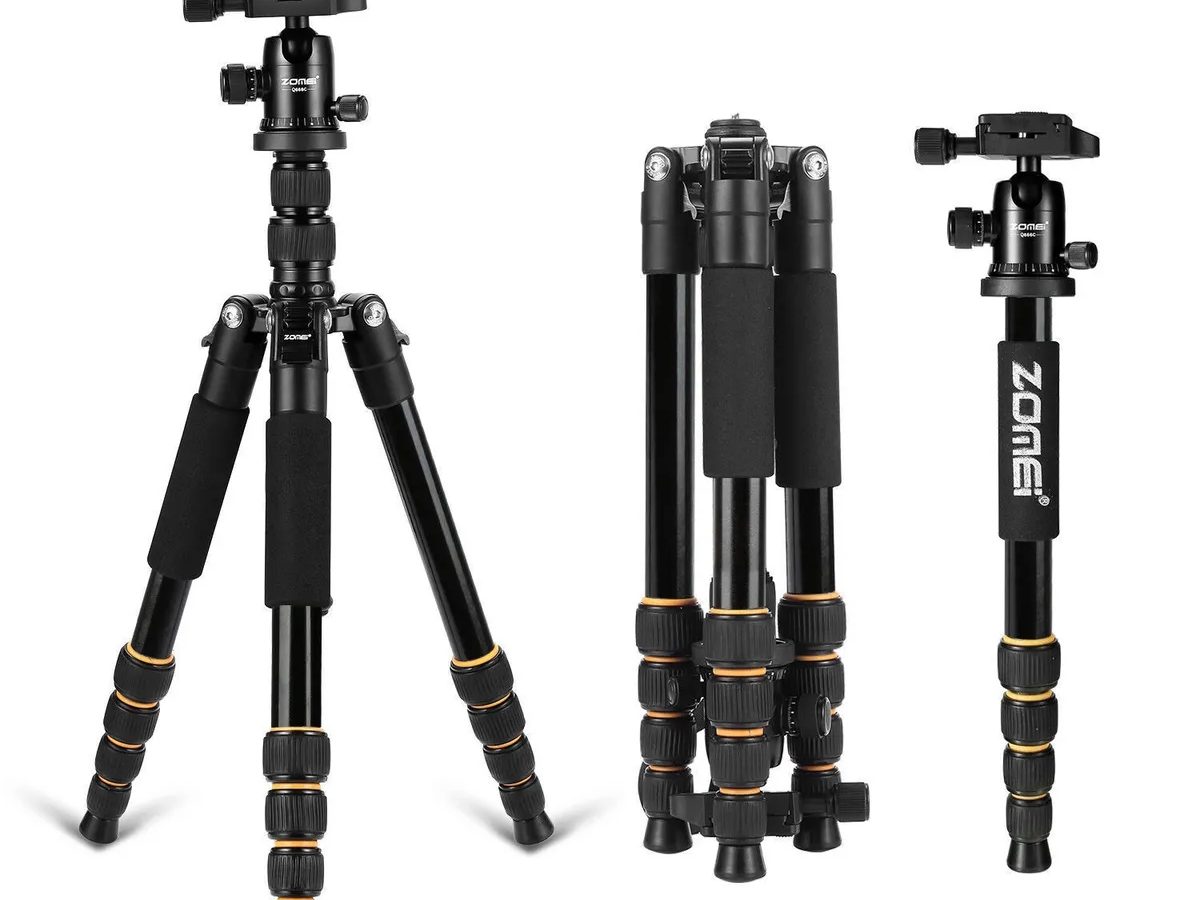
Materials Needed
To convert your Zomei tripod into a monopod, you will need the following materials:
-
Zomei Tripod: The base of your DIY monopod will be your Zomei tripod. Ensure that it is in good working condition and can support the weight of your camera or other equipment.
-
Monopod Head: You will need a monopod head to attach to the tripod legs. This head will allow you to tilt and swivel the camera when using the monopod.
-
Hex Key (Allen Wrench): Depending on the design of your Zomei tripod, you may need a hex key to disassemble and reassemble the tripod.
-
Pliers or Wrench: These tools will be used to remove the legs of the tripod, allowing you to convert it into a monopod.
-
Optional: Threadlocker: If you want to ensure that the screws and connections remain secure, you may consider using threadlocker during the assembly process.
-
Cleaning Cloth: It's always a good idea to have a cleaning cloth on hand to wipe down the tripod and monopod components, especially if they have collected dust or debris.
-
Safety Glasses: When working with tools, particularly when disassembling and reassembling equipment, it's important to prioritize safety. Wearing safety glasses can protect your eyes from any potential debris or small parts that may become dislodged during the process.
-
Workbench or Stable Surface: Having a stable surface to work on will make the disassembly and reassembly process much easier. A workbench or table with ample space will provide a suitable area for the conversion process.
-
Camera or Equipment: Once you have successfully converted your Zomei tripod into a monopod, you will need your camera or other equipment to test the functionality of the monopod.
Gathering these materials will set the stage for a successful transformation of your Zomei tripod into a functional and versatile monopod.
Step 1: Disassembling the Tripod
Before you can begin the process of converting your Zomei tripod into a monopod, you will need to disassemble the tripod to access the individual legs. Follow these steps to disassemble the tripod:
-
Secure the Tripod: Place the Zomei tripod on a stable surface, such as a workbench or table, to prevent it from tipping over during the disassembly process.
-
Identify the Locking Mechanisms: Take note of the locking mechanisms that secure the legs of the tripod. Depending on the model of your Zomei tripod, these mechanisms may be twist locks or lever locks.
-
Unlock the Legs: Carefully unlock the legs of the tripod by releasing the twist locks or lever locks. Extend the legs to their maximum length to provide ample space for the next steps.
-
Inspect the Leg Joints: Examine the joints where the legs meet the main body of the tripod. Look for any screws, bolts, or other fasteners that may need to be removed to detach the legs.
-
Use the Hex Key: If your Zomei tripod utilizes screws to secure the legs, use a hex key (Allen wrench) to loosen and remove these fasteners. Keep track of the removed screws to ensure they can be reattached during the reassembly process.
-
Apply Gentle Pressure: With the fasteners removed, apply gentle pressure to the legs to detach them from the main body of the tripod. Be cautious during this step to avoid causing any damage to the tripod or its components.
By carefully disassembling the tripod, you will gain access to the individual legs, which are essential for transforming the tripod into a monopod. Proceed to the next step to continue the conversion process.
Step 2: Removing the Legs
With the Zomei tripod disassembled, the next step in converting it into a monopod involves removing the individual legs from the main body of the tripod. Follow these steps to effectively remove the legs:
-
Organize the Components: Lay out the tripod legs and any associated screws or fasteners in an organized manner to ensure that you can easily access them during the reassembly process.
-
Inspect the Leg Attachment Points: Take a close look at the attachment points where the legs connect to the main body of the tripod. Identify any additional screws or fasteners that may need to be removed to detach the legs completely.
-
Use Pliers or Wrench: Depending on the design of your Zomei tripod, you may need to use pliers or a wrench to loosen and remove any remaining fasteners that secure the legs to the tripod. Exercise caution to avoid damaging the tripod or its components during this process.
-
Gently Detach the Legs: Once all fasteners have been removed, gently detach the legs from the main body of the tripod. Take care to maintain the integrity of the legs and the tripod to ensure a smooth transition to the monopod configuration.
-
Verify Smooth Removal: Confirm that each leg has been successfully removed from the tripod. Check for any residual debris or obstructions at the attachment points that may impede the conversion process.
By effectively removing the legs from the Zomei tripod, you are one step closer to creating a functional monopod. The next step will involve attaching the monopod head to the tripod to complete the conversion process.
Step 3: Attaching the Monopod Head
Once the legs have been successfully removed from the Zomei tripod, the next crucial step in the DIY monopod conversion process is to attach the monopod head. Follow these steps to seamlessly integrate the monopod head with the tripod:
-
Prepare the Monopod Head: Ensure that the monopod head is compatible with the Zomei tripod and that any necessary adapters or mounting plates are in place. This will facilitate a secure and stable connection between the monopod head and the tripod.
-
Identify Attachment Points: Examine the top portion of the tripod where the legs were previously attached. Identify the specific points where the monopod head will be secured to the tripod, typically utilizing screws or a mounting plate.
-
Align the Monopod Head: Position the monopod head over the designated attachment points on the tripod. Ensure that it is aligned correctly and that any screw holes or mounting interfaces are properly matched.
-
Secure the Monopod Head: Utilize the provided screws or fasteners to secure the monopod head to the tripod. Use a hex key or appropriate tool to tighten the screws, ensuring a firm and stable connection between the monopod head and the tripod.
-
Test the Stability: Once the monopod head is securely attached, test the stability and rigidity of the connection. Apply gentle pressure and verify that the monopod head remains firmly in place without any wobbling or instability.
By successfully attaching the monopod head to the Zomei tripod, you have effectively transformed it into a functional monopod. The next step will involve testing the monopod to ensure its functionality and performance.
Step 4: Testing the Monopod
With the monopod head securely attached to the Zomei tripod, it’s time to test the functionality and stability of the newly converted monopod. Follow these steps to ensure that the monopod meets your requirements:
-
Mount Your Camera or Equipment: Attach your camera or other equipment to the monopod head. Ensure that it is securely fastened and balanced to accurately assess the performance of the monopod.
-
Adjust the Monopod Height: Extend the monopod to your desired height, taking advantage of its adjustable feature. Verify that the monopod remains stable and can support the weight of your equipment without any significant wobbling or tilting.
-
Test Tilt and Swivel Functions: Utilize the monopod head to test the tilt and swivel functions. Ensure that the head provides smooth and controlled movements, allowing you to adjust the camera’s angle and orientation with ease.
-
Assess Stability and Balance: Move the monopod with your equipment attached to different positions and angles. Evaluate the stability and balance of the monopod, confirming that it can maintain a steady and secure position during use.
-
Check for Smooth Panning: If applicable, test the monopod’s ability to pan smoothly from side to side. This functionality is essential for capturing dynamic scenes and maintaining a steady frame during video recording.
By thoroughly testing the monopod, you can ensure that it meets your expectations in terms of stability, functionality, and performance. Once you are satisfied with the monopod’s capabilities, you can proceed to the optional step of reassembling the tripod.
Step 5: Reassembling the Tripod (Optional)
If you wish to restore your Zomei tripod to its original configuration after successfully converting it into a monopod, you can follow these optional steps to reassemble the tripod:
-
Retrieve the Removed Components: Gather all the components that were detached from the tripod during the conversion process, including the legs and any associated screws or fasteners.
-
Clean and Inspect the Components: Before reassembling the tripod, take the opportunity to clean and inspect the individual components. Remove any accumulated dust or debris and ensure that all parts are in good condition.
-
Align the Legs: Position the tripod legs at the designated attachment points on the main body of the tripod. Verify that they are aligned correctly and that any screw holes or fastener interfaces are properly matched.
-
Secure the Legs: Use the appropriate screws or fasteners to secure the legs to the tripod. Ensure that they are tightened securely to maintain the stability and integrity of the tripod’s structure.
-
Test the Stability: Once the tripod is reassembled, test its stability by extending the legs and applying gentle pressure. Verify that the tripod remains firm and steady, indicating a successful reassembly process.
Reassembling the tripod is an optional step that allows you to return the Zomei tripod to its original form, providing versatility for your photography and videography needs. Whether you choose to reassemble the tripod or maintain it as a monopod, this DIY conversion process offers flexibility and customization for your equipment.