
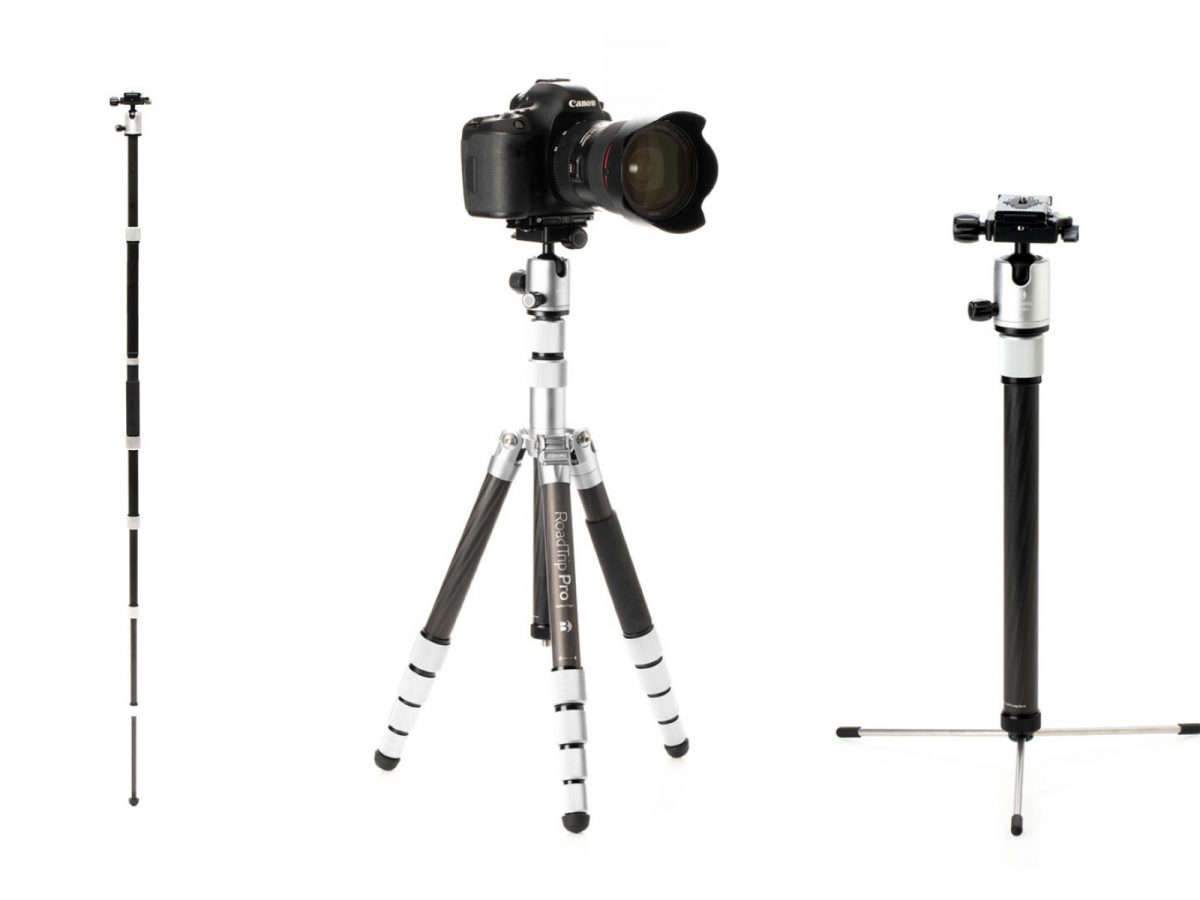
Choosing the Right MeFoto Tripod
When it comes to transforming a MeFoto tripod into a monopod, selecting the right tripod is crucial. MeFoto offers a range of tripods, each designed for specific purposes. Consider the weight and size of your camera equipment, the shooting conditions you anticipate, and your personal preferences when choosing the ideal MeFoto tripod for conversion.
First, evaluate the weight and size of your camera gear. If you frequently work with heavy DSLR cameras and large lenses, opt for a sturdy and robust MeFoto tripod model that can support the weight without compromising stability. Conversely, if you primarily use a lightweight mirrorless camera, a smaller and more portable MeFoto tripod may suffice.
Next, consider the shooting conditions you typically encounter. If you often photograph in rugged outdoor environments or adverse weather conditions, prioritize a MeFoto tripod with durable construction and weather-resistant features. Conversely, if you predominantly shoot in controlled indoor settings, you may prioritize other factors such as compactness and ease of setup.
Additionally, factor in your personal preferences and shooting style. If you prefer quick setup and minimal adjustments, a MeFoto tripod with intuitive leg locks and a user-friendly design may be ideal. Conversely, if you prioritize versatility and adaptability, a MeFoto tripod with adjustable leg angles and multiple mounting options may better suit your needs.
Ultimately, the right MeFoto tripod for the monopod conversion is one that aligns with your specific photographic requirements, offering the necessary support, stability, and functionality while complementing your shooting style. By carefully considering the weight and size of your camera equipment, the shooting conditions you typically encounter, and your personal preferences, you can select the most suitable MeFoto tripod for the transformation into a reliable and versatile monopod.
Disassembling the Tripod
Before embarking on the transformation of your MeFoto tripod into a monopod, it is essential to disassemble the tripod to prepare for the conversion process. The disassembly process involves several key steps that ensure a seamless transition to a monopod configuration.
Begin by positioning the tripod on a stable surface, ensuring that it is securely set up to prevent any accidental movements during disassembly. Next, extend the tripod legs to their maximum height and loosen the leg angle locks to allow for easy manipulation of the legs.
Once the tripod is in the extended position, locate the leg angle lock mechanism on each leg. Depending on the specific model of the MeFoto tripod, the leg angle locks may feature a release button or lever that enables the legs to be adjusted to different angles. Engage the release mechanism to unlock the legs and prepare them for removal.
With the leg angle locks disengaged, carefully remove each leg from the tripod’s center column. Take care to support the center column and tripod head to prevent any imbalance or tipping during leg removal. Gently pull each leg away from the center column, ensuring a smooth and controlled separation.
As you remove each leg, set them aside in a safe and organized manner to prevent misplacement or damage. It is advisable to lay the legs out in the order of removal, facilitating easy reassembly once the monopod conversion is complete.
Once all three legs have been detached from the center column, inspect the tripod to ensure that no components have been inadvertently dislodged or damaged during the disassembly process. Confirm that the center column, tripod head, and remaining components are secure and free from any potential issues before proceeding to the next phase of the conversion.
By meticulously disassembling the MeFoto tripod and preparing the individual components for the monopod transformation, you set the stage for a successful and efficient conversion process. This careful disassembly lays the groundwork for the subsequent steps involved in creating a functional and versatile monopod from your existing MeFoto tripod.
Removing the Tripod Legs
Once the MeFoto tripod is disassembled, the next crucial step in the conversion process involves the removal of the tripod legs. This step is fundamental to creating a monopod from the existing tripod structure and requires precision and attention to detail.
With the tripod legs detached from the center column, carefully examine each leg to identify the attachment points and locking mechanisms. Depending on the specific model of the MeFoto tripod, the attachment method may vary, encompassing twist locks, flip locks, or other securing mechanisms.
Engage the release mechanisms on each leg to unlock them from their folded position. This may involve twisting, flipping, or sliding the locking components to free the legs for removal. Exercise caution and ensure that each leg is fully released before attempting to detach it from the tripod’s center column.
Once the locking mechanisms are disengaged, gently pull each tripod leg away from the center column. Take care to maintain a steady and controlled motion to prevent any jarring or sudden movements that could potentially damage the tripod or its components.
As each leg is removed, set it aside in a secure and organized manner, arranging the legs in the order of removal to facilitate the reassembly process after the monopod conversion is complete. This systematic approach minimizes the risk of misplacement and streamlines the subsequent stages of the transformation.
After all three legs have been successfully detached from the center column, inspect the tripod to ensure that no residual components or obstructions remain that could impede the monopod conversion. Verify that the center column and tripod head are stable and free from any impediments, preparing the structure for the next phase of the transformation.
By methodically removing the tripod legs and preparing them for the monopod conversion, you lay the groundwork for the seamless transition to a versatile and functional monopod. This meticulous approach ensures that the conversion process proceeds smoothly and sets the stage for the successful utilization of the MeFoto monopod in your photographic endeavors.
Attaching the Monopod Adapter
With the MeFoto tripod disassembled and the legs removed, the next pivotal step in the transformation process involves attaching the monopod adapter to the tripod’s center column. The monopod adapter serves as the key component that facilitates the conversion of the tripod into a functional and versatile monopod.
Begin by selecting a high-quality monopod adapter designed to seamlessly integrate with the MeFoto tripod model in use. Ensure that the adapter is compatible with the specific dimensions and specifications of the tripod’s center column, providing a secure and stable foundation for the monopod configuration.
Once the appropriate monopod adapter is selected, position it at the top of the tripod’s center column, aligning it with the threading or mounting interface. Carefully thread or affix the adapter to the center column, ensuring a snug and secure fit that minimizes any potential play or instability once the monopod is assembled.
Utilize any provided tools or fastening mechanisms to secure the monopod adapter firmly to the center column, following the manufacturer’s guidelines and recommendations for optimal attachment. Confirm that the adapter is affixed in a manner that guarantees stability and reliability during use as a monopod.
After attaching the monopod adapter, perform a thorough inspection to verify that it is securely installed and free from any defects or irregularities that could compromise its functionality. Confirm that the adapter is aligned correctly and firmly affixed to the center column, ready to support the subsequent stages of the monopod conversion.
By meticulously attaching the monopod adapter to the MeFoto tripod’s center column, you establish the foundation for the successful transformation of the tripod into a fully functional monopod. This critical step sets the stage for the final assembly of the monopod and ensures that the resulting configuration delivers the stability, support, and versatility required for diverse photographic applications.
Testing the Monopod Conversion
Upon completing the attachment of the monopod adapter to the MeFoto tripod’s center column, it is essential to conduct thorough testing to ensure the successful conversion of the tripod into a monopod. This crucial phase involves evaluating the stability, functionality, and ergonomics of the newly configured monopod to ascertain its suitability for photographic use.
Commence the testing process by extending the center column, now equipped with the monopod adapter, to its full height. Verify that the extension mechanism operates smoothly and that the column remains securely locked in the extended position, providing a stable foundation for the monopod configuration.
Next, assess the stability and rigidity of the monopod by applying gentle pressure and subtle movements to gauge its ability to support the weight of your camera equipment. Verify that the monopod remains steady and exhibits minimal flexing or wobbling, ensuring that it can effectively stabilize your camera during use.
Test the monopod’s maneuverability and ergonomics by adjusting its height and positioning to simulate real-world shooting scenarios. Evaluate the ease of adjustment and the overall comfort of handling the monopod, ensuring that it offers the flexibility and user-friendly characteristics required for diverse photographic applications.
Attach your camera equipment to the monopod and assess its compatibility and balance. Verify that the monopod effectively supports the weight of your gear without compromising stability, and confirm that the camera remains secure and well-positioned on the monopod during testing.
Engage in simulated shooting scenarios to evaluate the monopod’s performance in practical settings. Assess its ability to minimize camera shake and enhance stability during handheld shooting, ensuring that it delivers the desired support and improves the overall quality of your photographic output.
Throughout the testing process, carefully observe the monopod’s behavior and performance, taking note of any potential issues or areas for improvement. Address any concerns related to stability, functionality, or ergonomics to optimize the performance of the newly converted monopod.
By rigorously testing the monopod conversion, you can confidently validate the successful transformation of the MeFoto tripod into a reliable and versatile monopod. This comprehensive evaluation ensures that the monopod meets the necessary criteria for stability, functionality, and user comfort, empowering you to leverage its capabilities for a diverse range of photographic pursuits.
Tips for Using the MeFoto Monopod
As you embark on utilizing the MeFoto monopod in your photographic endeavors, incorporating certain tips and best practices can enhance your overall experience and maximize the benefits offered by this versatile equipment. By integrating these recommendations into your workflow, you can optimize the functionality and performance of the MeFoto monopod, elevating the quality of your photography.
- Optimize Height Adjustment: Utilize the adjustable height feature of the monopod to customize its elevation according to your shooting requirements. Experiment with different heights to find the optimal positioning for capturing diverse subjects and scenes.
- Stabilize Your Stance: When using the monopod, adopt a stable and balanced stance to complement its support. Position your feet shoulder-width apart and distribute your weight evenly to enhance stability and minimize camera shake.
- Utilize a Ball Head or Tilt Head: Enhance the versatility of the monopod by incorporating a compatible ball head or tilt head. These accessories provide additional flexibility for adjusting the camera’s angle and orientation, expanding your creative possibilities.
- Engage in Panning Shots: Leverage the monopod’s maneuverability to capture captivating panning shots. Experiment with controlled movements to convey a sense of motion in your photographs, adding dynamism to static scenes.
- Experiment with Tethering: Explore the option of tethering your camera to the monopod to further enhance stability and minimize vibrations. Tethering can be particularly beneficial when capturing long-exposure images or working in challenging shooting conditions.
- Adapt to Changing Environments: Embrace the portability and quick setup of the monopod to seamlessly transition between different shooting environments. Whether you’re navigating crowded urban settings or exploring expansive natural landscapes, the monopod offers adaptability and convenience.
- Employ the Monopod as a Walking Stick: In outdoor settings, leverage the monopod as a supportive walking stick to navigate uneven terrain and maintain stability. This dual functionality enhances the practicality of the monopod during outdoor excursions.
- Practice Controlled Movements: Refine your technique by practicing controlled movements and smooth adjustments with the monopod. Develop a fluid and deliberate approach to maximize the benefits of using this versatile support tool.
- Customize Grip and Padding: Personalize the monopod’s grip and padding to suit your preferences and shooting style. Comfortable and secure handling contributes to prolonged shooting sessions and enhances overall control.
- Maintain and Inspect Regularly: Routinely inspect and maintain your MeFoto monopod to ensure its optimal performance and longevity. Check for any signs of wear, damage, or loose components, and address any issues promptly to preserve the monopod’s functionality.
By integrating these tips into your utilization of the MeFoto monopod, you can harness its full potential and capitalize on its versatility, stability, and convenience. Embrace the adaptability and support provided by the monopod to elevate your photographic pursuits and capture compelling images with enhanced precision and control.