
What are the MIN and IF functions in Excel?
In Excel, the MIN function calculates the minimum value from a range of cells or a set of specified values. It is commonly used to find the smallest number in a given dataset. The MIN function is a versatile tool that can be used in various scenarios, such as identifying the lowest sales figure, determining the earliest date, or finding the shortest duration.
The IF function, on the other hand, allows you to perform logical tests and returns different results based on the outcome. It checks whether a given condition is true or false, and returns a specified value depending on the result. The IF function is often used for creating conditional formulas or statements in Excel, enabling you to make decisions and perform calculations based on certain criteria.
When used separately, the MIN and IF functions provide valuable functionality in Excel. However, their true power can be unleashed when they are combined in an array formula.
An array formula is a special type of formula in Excel that allows you to perform calculations on multiple values simultaneously. It can manipulate an entire range of values and give you a single result. By combining the MIN and IF functions within an array formula, you can extract specific data based on certain criteria and calculate the minimum value that meets those criteria.
Using this combination, you can create dynamic formulas that adapt to different conditions and provide you with accurate results. It opens up new possibilities for analyzing data and making informed decisions based on customized criteria.
The ability to combine the MIN and IF functions in an array formula is a valuable skill for Excel users, as it allows for more advanced calculations and efficient data analysis. In the following sections, we will explore how to use and apply this combination effectively.
How can the MIN function be used in Excel?
The MIN function in Excel is a powerful tool that allows you to find the smallest value in a given range or a set of specified values. It can be used in various scenarios to analyze data and extract relevant information. Here are some common use cases for the MIN function:
- Finding the minimum value: The most basic use of the MIN function is to calculate the smallest number in a range of cells. For example, if you have a list of sales figures for different products, you can use the MIN function to identify the product with the lowest sales.
- Determining the earliest date: If you have a range of dates, you can use the MIN function to find the earliest or oldest date among them. This can be helpful for analyzing time-based data, such as project deadlines or customer sign-up dates.
- Identifying the shortest duration: The MIN function can also be used to calculate the shortest duration or time period. For instance, if you have a range of task completion times, you can use the MIN function to determine the task that took the least amount of time.
- Conditional calculations: In combination with other functions and logical operators, the MIN function can be used to perform conditional calculations. For example, you can use the MIN function in conjunction with the IF function to find the minimum value that fulfills certain criteria or conditions.
One of the advantages of the MIN function is its ability to handle both numbers and dates in Excel. It automatically ignores any non-numeric values present in the range being evaluated. Additionally, the MIN function can handle arrays and ranges of data, making it flexible and convenient for various data analysis tasks.
To use the MIN function in Excel, you simply need to specify the range of cells or values within the function’s arguments, and it will return the smallest value accordingly. You can use it in combination with other functions, mathematical operators, or logical tests to create more complex formulas and achieve dynamic calculations.
By understanding how to utilize the MIN function effectively, you can streamline your data analysis processes and make more informed decisions based on the smallest values in your datasets.
How can the IF function be used in Excel?
The IF function is a versatile tool in Excel that allows you to perform logical tests and return different results based on the outcome. It is commonly used for creating conditional formulas and statements, enabling you to make decisions and perform calculations based on certain criteria. Here are some ways in which the IF function can be used:
- Conditional formatting: The IF function can be applied in conditional formatting to highlight cells that meet specific conditions. For example, you can use the IF function to format cells that contain values above a certain threshold in one color and those below the threshold in another color.
- Data validation: The IF function can be used in conjunction with data validation to restrict input based on specific criteria. Using the IF function, you can set up data validation rules that allow or prevent certain values from being entered into a cell.
- Calculating grades or scores: If you have a grading system or scoring mechanism, you can use the IF function to assign grades or scores based on the performance of students, employees, or any other metric. For instance, you can create a formula that assigns an “A” grade if the score is above 90, a “B” grade if the score is between 80 and 90, and so on.
- Performing calculations based on conditions: The IF function allows you to perform calculations based on certain conditions. For example, you can use the IF function to calculate the commission for sales representatives based on their sales targets. If they achieve their target, a higher commission rate can be applied, whereas if they fall short, a lower commission rate can be used.
- Creating logical statements: The IF function can be used to create logical statements by combining it with other logical operators such as AND or OR. This allows for more complex conditions and decision-making in Excel.
The IF function in Excel follows a specific syntax: =IF(logical_test, value_if_true, value_if_false). The logical_test is the condition that is evaluated, and the value_if_true is the result returned if the condition is true. The value_if_false is the result returned if the condition is false. By nesting IF functions within each other, you can create more advanced and intricate conditional statements.
The IF function is a powerful tool that enhances the flexibility and functionality of your Excel spreadsheets. It enables you to automate decision-making processes, streamline calculations, and display data based on specific criteria. By learning how to utilize the IF function effectively, you can unlock the full potential of Excel for data analysis and manipulation.
What is an array formula in Excel?
An array formula is a powerful feature in Excel that allows you to perform calculations on multiple values simultaneously. Unlike regular formulas that operate on single cells, array formulas can manipulate entire ranges of data and return a single result. They offer advanced functionality and enable more complex calculations that are not possible with standard Excel formulas.
Array formulas are enclosed in curly braces {} and are entered differently than regular formulas. Instead of pressing the Enter key after typing the formula, you need to input it by pressing Ctrl+Shift+Enter. This indicates to Excel that it is an array formula and triggers the necessary calculations.
One of the key advantages of using array formulas is their ability to handle large amounts of data efficiently. They can process entire ranges of cells in a single operation, which can significantly improve calculation speed and enhance the performance of your Excel worksheets.
Array formulas are particularly useful when dealing with complex calculations that involve multiple criteria or require calculations across multiple rows or columns. They enable you to perform calculations based on multiple conditions and extract specific data from large datasets.
Additionally, array formulas can be used to perform calculations on non-adjacent ranges of cells, allowing for more flexible and dynamic analysis of data. They can be combined with various Excel functions, operators, and logical tests to create custom formulas that cater to specific needs.
However, it’s important to note that array formulas can be more resource-intensive and may impact the performance of your Excel workbook if used excessively or with very large datasets. Therefore, it’s recommended to use array formulas sparingly and only when necessary.
Overall, array formulas are a valuable tool in Excel that empowers you to perform advanced calculations, analyze complex data, and extract specific information from large datasets. By understanding how to use array formulas effectively, you can take your Excel skills to the next level and unlock the full potential of this powerful feature.
How to combine the MIN and IF functions in an array formula
Combining the MIN and IF functions in an array formula in Excel allows you to extract specific data based on certain criteria and calculate the minimum value that meets those criteria. This combination of functions enables you to perform complex calculations and make decisions based on customized conditions. Here’s a step-by-step guide on how to combine the MIN and IF functions in an array formula:
Step 1: Set up the data
Begin by organizing your data in a worksheet. Ensure that you have a range of values or a dataset that you want to evaluate using the MIN and IF functions. The data should contain the values you want to analyze along with the corresponding criteria that will be used to determine the minimum value.
Step 2: Write the array formula
Select the cell where you want the result of the array formula to appear. You will then enter the array formula using the following syntax:
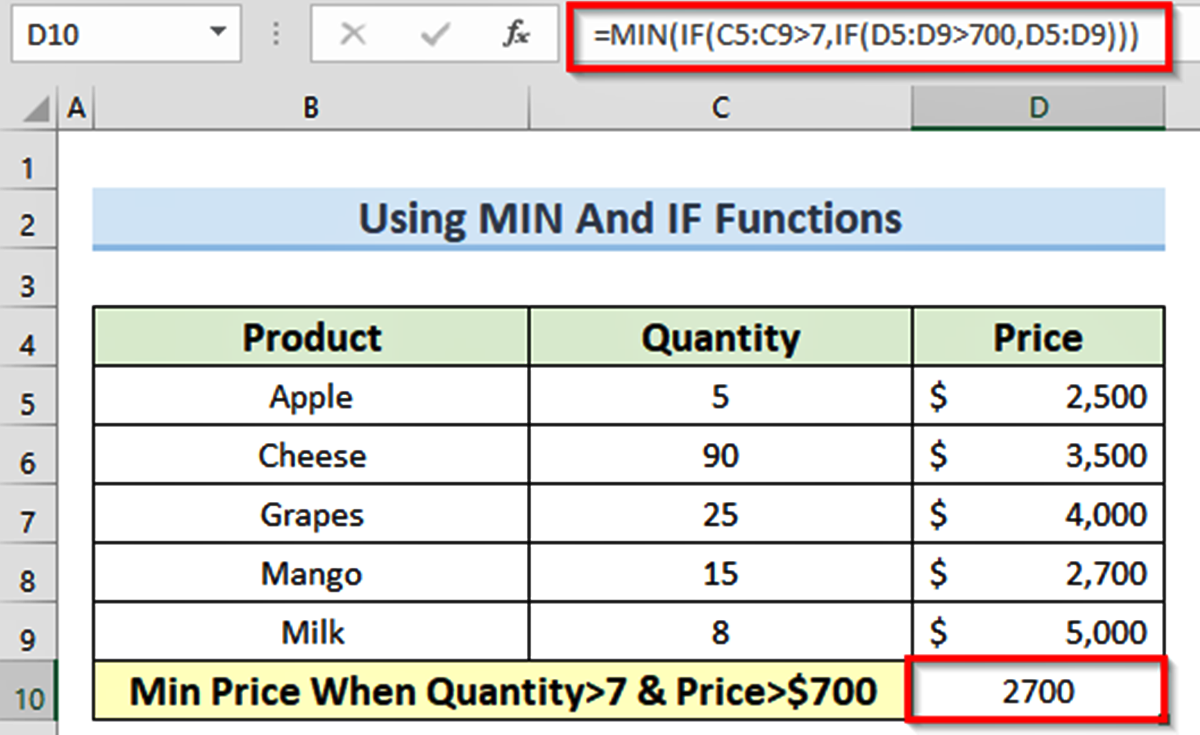
=MIN(IF(logical_test, value_if_true, value_if_false))
Do not press Enter after typing the formula. Instead, press Ctrl+Shift+Enter to indicate that it is an array formula. Excel will automatically surround the formula with curly braces {}, indicating that it is an array formula.
Step 3: Understand the formula breakdown
The formula consists of the MIN function nested within the IF function. The logical_test is the condition that defines the criteria to filter the data. The value_if_true is the value that will be considered in the calculation if the condition is met, and the value_if_false is the value that will be ignored.
Essentially, the IF function evaluates the logical_test for each value in the array and returns an array of values. The MIN function then calculates the minimum value from this array.
Step 4: Test the array formula
After entering the array formula, check if it returns the desired result. If the formula is correct, it will calculate the minimum value that satisfies the specified criteria.
Step 5: Customize the array formula for different scenarios
You can customize the array formula by modifying the logical_test part to suit different scenarios and criteria. For example, you can use comparison operators such as greater than (>), less than (<), or equal to (=) to set specific conditions. You can also combine logical operators (such as AND or OR) for more complex conditions.
By combining the MIN and IF functions in an array formula, you can unlock the potential of Excel for advanced calculations and data analysis. Experiment with different scenarios and criteria to discover the power of this combination and enhance your ability to make informed decisions based on customized conditions.
Step 1: Set up the data
The first step in combining the MIN and IF functions in an array formula is to set up the data in your Excel worksheet. This involves organizing the values you want to analyze along with the corresponding criteria that will be used to determine the minimum value. Here’s how you can set up the data:
1. Open a new or existing Excel worksheet: Launch Excel and create a new worksheet or open an existing one where you want to perform your calculations.
2. Enter your data: Input the values you want to evaluate into a range of cells. This could be a list of numbers, dates, or any other relevant data that you wish to analyze.
3. Define the criteria: Decide on the criteria that will be used to determine the minimum value. This can be based on specific conditions that must be met in order for a value to be considered in the calculation. For example, you might want to find the minimum sales figure for a particular product or the earliest date within a certain timeframe.
4. Assign the criteria: In a separate column or adjacent cells, enter the criteria that will be used to filter the data. This can be done by typing the desired values, using mathematical operators (such as greater than or equal to), or referring to other cells that contain the criteria.
5. Format the data: If necessary, apply any formatting options to enhance the readability and visual appeal of your data. You can change the font style, adjust the column widths, or add color highlighting to make it easier to interpret the results.
By setting up your data in this manner, you create a foundation for applying the MIN and IF functions in an array formula. This organized and structured approach makes it easier to perform calculations and extract the desired information based on your specific criteria.
Remember that the success of your analysis depends on the accuracy and relevance of the data you input. Take the time to ensure that your data is complete and correctly aligned with the criteria you intend to use. This will provide more meaningful and accurate results when combining the MIN and IF functions later on.
Step 2: Write the array formula
Once you have set up the data in your Excel worksheet, the next step is to write the array formula that combines the MIN and IF functions. This formula will evaluate the data based on specified criteria and calculate the minimum value that meets those criteria. Here’s how you can write the array formula:
1. Select the cell: Choose the cell where you want the result of the array formula to be displayed. This cell should be the one that will contain the minimum value based on the specified criteria.
2. Begin the formula: In the formula bar, start by typing the equal sign (=) to begin the formula entry.
3. Write the MIN function: After the equal sign, enter the MIN function. The MIN function calculates the minimum value from a range of cells or a specified set of values.
4. Nest the IF function: Within the parentheses of the MIN function, nest the IF function. The IF function performs a logical test and returns different results based on the outcome of the test.
5. Define the logical test: In the logical_test part of the IF function, specify the condition or criterion that must be met for a value to be considered in the calculation. This can involve using comparison operators (like greater than or less than) or logical operators (such as AND or OR) to create more complex conditions.
6. Specify the value_if_true and value_if_false: In the IF function, determine the result (value_if_true) if the logical_test evaluates to true, and the result (value_if_false) if the logical_test evaluates to false. For example, you might want to include a value in the calculation if it meets the specified criteria, and exclude it if it does not.
7. Finish the array formula: After completing the logical_test, value_if_true, and value_if_false parts of the IF function, close the parentheses for both the IF and MIN functions. Instead of pressing the Enter key, press Ctrl+Shift+Enter to indicate that it is an array formula. Excel will automatically surround the formula with curly braces {} to denote it as an array formula.
By following these steps, you can write the array formula that combines the MIN and IF functions in Excel. This formula will evaluate the data based on the specified criteria and return the minimum value that satisfies those criteria. Ensure that you enter the formula accurately, paying attention to the correct syntax and nesting of functions.
Remember to test the array formula to confirm that it calculates the desired result. Adjust the criteria or data as needed and verify that the formula returns the correct minimum value based on your specified conditions.
Step 3: Understand the formula breakdown
As you work with the array formula that combines the MIN and IF functions in Excel, it’s important to understand how the formula breaks down and functions. This understanding will help you troubleshoot errors, customize the formula to your needs, and gain insights into the calculation process. Here’s a breakdown of the formula:
1. MIN function: The MIN function is the outer function in the array formula. It calculates the minimum value from a range of cells or a specified set of values. In this case, it will calculate the minimum value that meets the specified criteria based on the logical test within the IF function.
2. IF function: The IF function is nested inside the MIN function. It performs a logical test and returns different results based on the outcome of the test. The logical test is the condition or criterion that you have specified, and it determines whether a value is considered in the calculation.
3. Logical test: The logical test within the IF function evaluates whether a value meets the specified criteria. This can involve using comparison operators (such as greater than, less than, or equal to) or logical operators (such as AND or OR) to create more complex conditions. If the logical test evaluates to true, the value is considered in the calculation. If it evaluates to false, the value is ignored.
4. Value_if_true and value_if_false: Within the IF function, you define the result that will be returned if the logical test evaluates to true (value_if_true) and if it evaluates to false (value_if_false). This allows you to include or exclude values from the calculation based on the specified conditions.
By understanding this formula breakdown, you can identify any issues or errors in the calculation process. You can also modify the logical test, value_if_true, and value_if_false parts of the formula to customize it to your specific needs. Experimenting with different conditions and criteria will allow you to gain more control over the calculation and extract meaningful insights from your data.
Make sure to double-check the formula’s accuracy and verify that it correctly calculates the minimum value based on your specified conditions. This will ensure that you obtain reliable results from the array formula that combines the MIN and IF functions in Excel.
Step 4: Test the array formula
Once you have entered the array formula that combines the MIN and IF functions in Excel, it is important to test the formula to ensure it accurately calculates the desired result. Testing the formula will help you verify that the minimum value is correctly determined based on the specified criteria. Here’s how you can test the array formula:
1. Check the result: After entering the array formula, examine the cell where you have placed the formula. The cell should display the calculated minimum value based on the specified criteria. Verify that the result aligns with your expectations.
2. Adjust the data: Make changes to the data or the criteria to test different scenarios. Modify the values, criteria, or conditions in the worksheet and observe how the array formula responds. This will help you understand how the formula behaves and adapts to different data sets and conditions.
3. Evaluate specific cases: Select specific subsets of data or criteria and evaluate how the array formula handles them. For example, test the formula with a subset that only includes values that meet a specific condition, and then test it with another subset that does not meet that condition. This will allow you to verify that the array formula correctly includes or excludes values based on the specified criteria.
4. Compare results: Compare the results obtained from the array formula with manual calculations or other methods you may have used. Ensure that the formula consistently produces accurate results and matches your expectations.
5. Adjust the formula if necessary: If you encounter any discrepancies or unexpected results, review the array formula and check for any errors or incorrect settings. Make necessary adjustments to the logical test, value_if_true, or value_if_false to ensure the formula operates correctly. Refine the formula until it consistently produces the desired results.
Testing the array formula is crucial to confirm its accuracy and reliability. It allows you to validate that the formula correctly calculates the minimum value based on the specified criteria. By conducting thorough testing, you can have confidence in the array formula’s ability to provide meaningful insights and support data-driven decision-making.
Step 5: Customize the array formula for different scenarios
One of the benefits of the array formula that combines the MIN and IF functions in Excel is its flexibility to cater to different scenarios and criteria. By customizing the formula, you can adapt it to specific conditions and further enhance its functionality. Here’s how you can customize the array formula for different scenarios:
1. Modify the logical test: Adjust the logical test within the IF function to reflect different conditions or criteria. You can use comparison operators (such as greater than, less than, or equal to) to define specific conditions that must be met for a value to be considered in the calculation. This allows you to extract the minimum value based on different sets of criteria.
2. Incorporate additional functions: As the array formula allows for nesting functions, you can include other functions within the formula to perform more complex calculations. For example, you can use functions like SUM or AVERAGE to calculate the sum or average of the values that meet the criteria, in addition to finding the minimum value.
3. Combine logical operators: Utilize logical operators such as AND or OR to create more advanced conditions within the logical test. This enables you to apply multiple criteria simultaneously. For instance, you might want to find the minimum value that satisfies both a condition related to product sales and another condition related to the date of the transactions.
4. Extend the data range: If you have additional data to be included in the calculation, expand the range of cells or adjust the references in the array formula accordingly. This allows you to analyze a larger dataset and extract the smallest value that meets the specified conditions.
5. Incorporate cell references: Instead of hardcoding the criteria directly into the formula, you can refer to other cells that contain the criteria. This provides the flexibility to dynamically change the criteria by simply updating the values in those referenced cells.
By customizing the array formula to different scenarios, you can obtain specific insights and adapt the calculation based on diverse criteria. This versatility allows you to perform tailored analyses, make informed decisions, and gain a deeper understanding of your data.
Remember to test and validate the customized array formula to ensure it accurately produces the desired results. Make any necessary adjustments or refinements based on the specific requirements of each scenario. With customization, you can leverage the full potential of the array formula and extract meaningful information from your data.