
Why CMOS Maintenance is Important
Proper maintenance of the CMOS (Complementary Metal-Oxide-Semiconductor) is essential for the optimal functioning of a computer system. The CMOS battery, which powers the CMOS chip, plays a crucial role in storing the hardware configuration and system settings when the computer is turned off. Without regular maintenance, the CMOS battery may lose its charge, leading to potential issues such as system clock errors, boot failures, and BIOS (Basic Input/Output System) setting discrepancies.
Ensuring System Integrity
Maintaining the CMOS battery ensures the integrity of the system's configuration and settings. When the battery is functioning optimally, it retains crucial information such as the system time, date, and hardware configuration. This information is vital for the system to boot correctly and operate smoothly. Without proper maintenance, the CMOS battery may fail, resulting in the loss of these essential settings and potentially causing the computer to malfunction.
Preventing Data Loss
Regular CMOS maintenance helps prevent data loss and system instability. When the CMOS battery loses its charge, the system may encounter issues such as the inability to boot, random reboots, or the loss of crucial BIOS settings. These issues can disrupt the user's workflow and, in extreme cases, lead to data loss. By proactively maintaining the CMOS battery, users can mitigate the risk of encountering these disruptive and potentially damaging issues.
Enhancing System Security
Maintaining the CMOS battery is also crucial for enhancing system security. The CMOS chip stores important security-related settings, such as password configurations and boot device priorities. If the CMOS battery fails, these settings may be lost, potentially compromising the system's security. Regular maintenance of the CMOS battery helps ensure that these security settings remain intact, thereby safeguarding the system from unauthorized access and other security threats.
In essence, regular CMOS maintenance is vital for preserving system integrity, preventing data loss, and enhancing system security. By taking proactive measures to maintain the CMOS battery, computer users can mitigate potential issues and ensure the smooth and secure operation of their systems.
Tools Needed for Removing the CMOS Battery
Before embarking on the task of removing the CMOS battery, it is essential to gather the necessary tools to ensure a smooth and efficient process. The following tools are commonly required for safely removing the CMOS battery:
1. Screwdriver Set
A set of precision screwdrivers is indispensable for accessing the CMOS battery, which is often housed within the computer’s motherboard or a dedicated compartment. The screwdriver set should include various types and sizes of screw heads to accommodate the specific screws securing the computer casing and motherboard.
2. Antistatic Wrist Strap
Wearing an antistatic wrist strap is crucial for preventing electrostatic discharge (ESD) that could potentially damage sensitive electronic components, including the CMOS battery and the motherboard. The wrist strap should be properly grounded to ensure the dissipation of any accumulated static charge from the body.
3. Non-Metallic Spudger or Plastic Pry Tool
A non-metallic spudger or plastic pry tool is essential for safely prying open the computer casing or accessing the motherboard without risking damage to delicate components. These tools are designed to prevent accidental scratches or punctures that could occur when using metal tools.
4. Flashlight
Due to the often confined and dimly lit spaces within a computer casing, a flashlight is invaluable for illuminating the area around the CMOS battery and motherboard. It aids in locating the battery and identifying the screws or connectors that need to be manipulated for its removal.
5. Disposable Gloves
Wearing disposable gloves can help prevent the transfer of oils, dirt, or debris from the hands onto the motherboard or CMOS battery. This simple precaution can safeguard delicate electronic components from potential contamination or damage during the removal process.
By ensuring the availability of these essential tools, individuals can effectively prepare for the safe and successful removal of the CMOS battery, minimizing the risk of damage to the computer’s internal components and facilitating a smooth maintenance procedure.
Steps to Remove the CMOS Battery
Removing the CMOS battery involves a series of careful steps to ensure the safety of the computer’s internal components and the successful extraction of the battery. The following steps outline the process of removing the CMOS battery:
1. Power Off the Computer
Prior to accessing the CMOS battery, it is crucial to power off the computer and disconnect all external cables. This includes unplugging the power cord and any peripheral devices connected to the system. Ensuring that the computer is completely powered down minimizes the risk of electrical shock and protects the components from potential damage during the removal process.
2. Ground Yourself
Grounding oneself by wearing an antistatic wrist strap connected to a grounded object helps dissipate any static charge from the body, reducing the risk of electrostatic discharge that could harm the sensitive electronic components within the computer.
3. Open the Computer Casing
Using a screwdriver from the set, carefully remove the screws securing the computer casing. Gently slide or lift off the casing, taking care not to exert excessive force or damage any internal components. A flashlight can be used to illuminate the interior of the computer for better visibility.
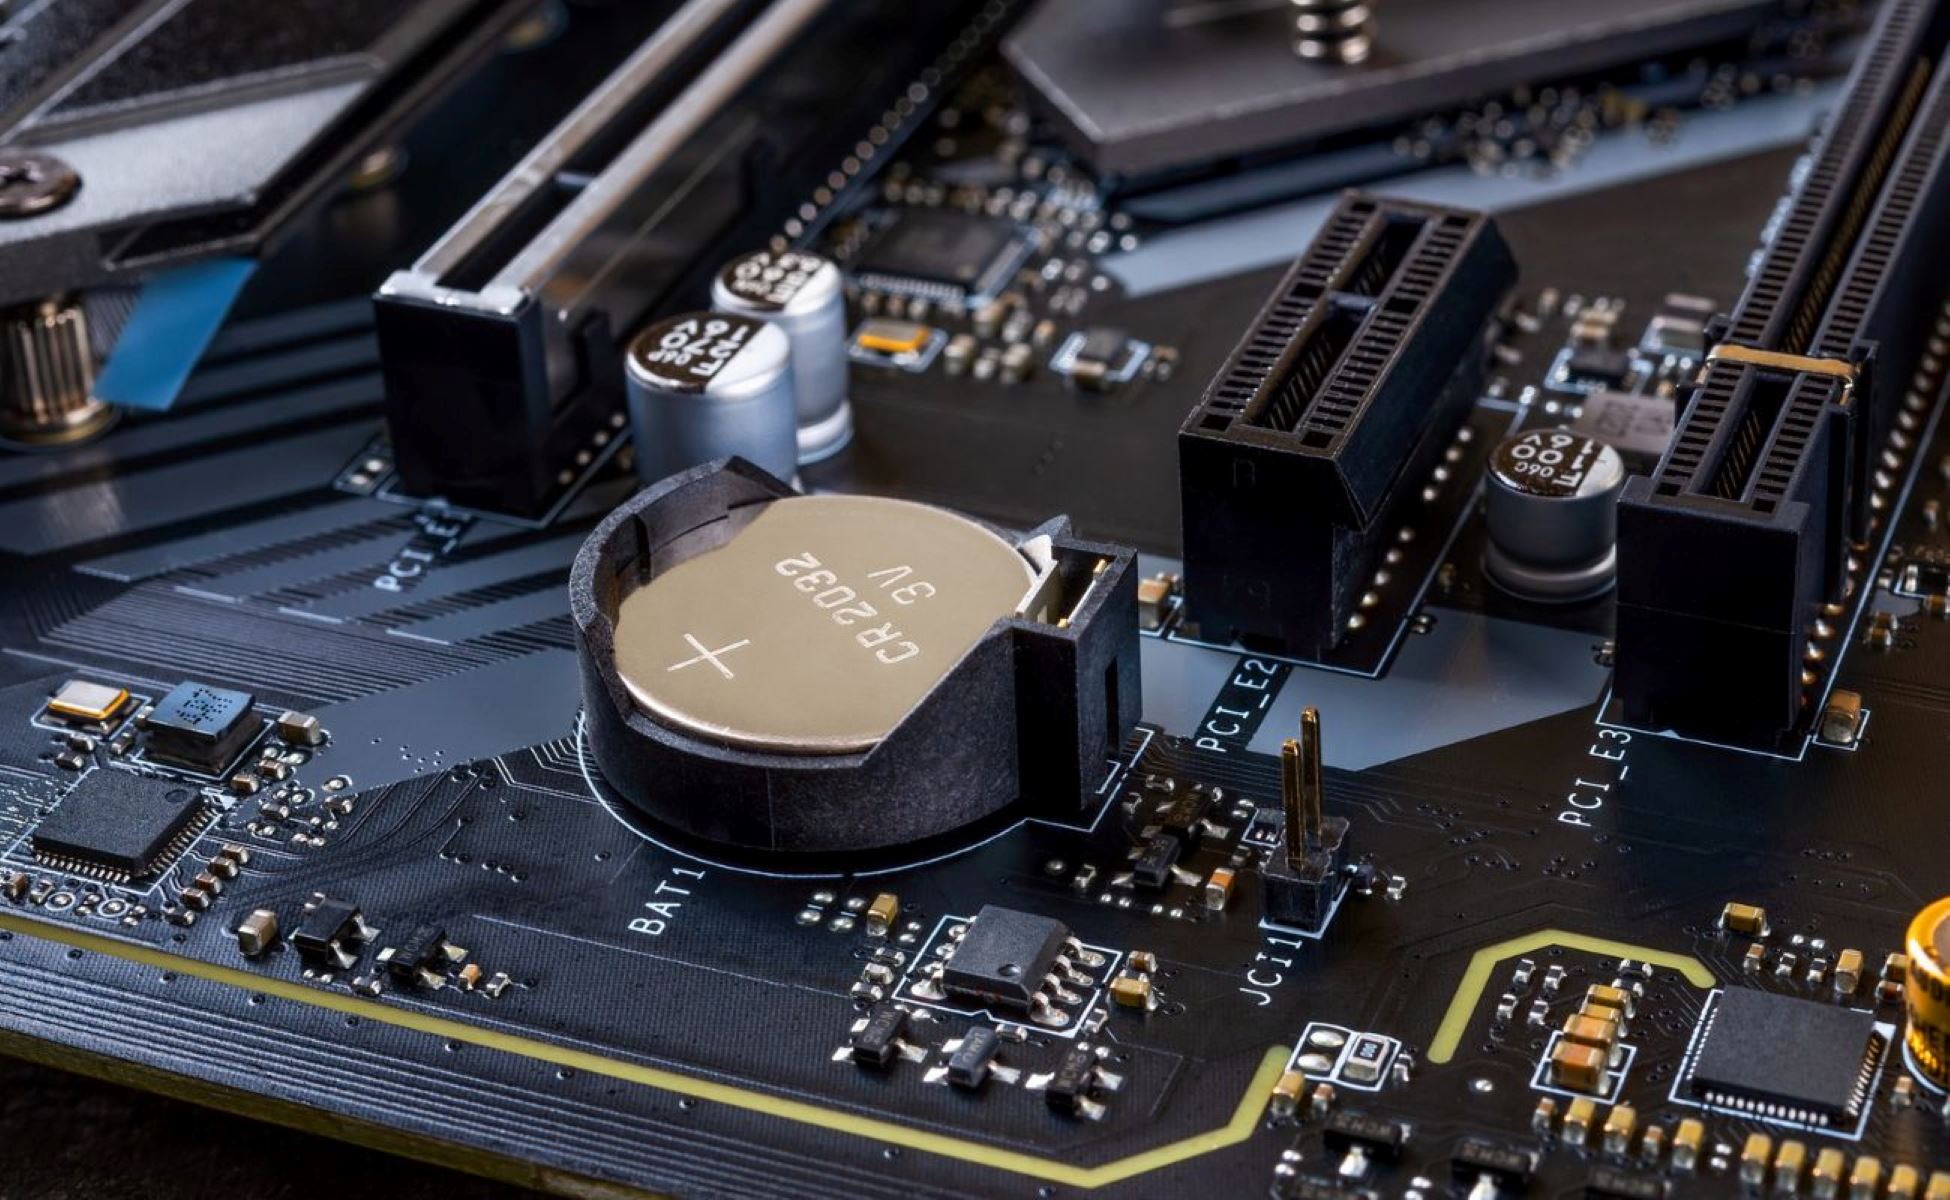
4. Locate the CMOS Battery
Once the computer casing is removed, locate the CMOS battery on the motherboard. The battery is typically a small, round, silver or black component. Take note of its position and the method of attachment, which may involve a clip, socket, or fastening mechanism.
5. Remove the CMOS Battery
Using a non-metallic spudger or plastic pry tool, carefully detach the CMOS battery from its housing, taking care not to damage the surrounding components. If the battery is secured with a clip, gently release the clip to free the battery from its socket. Exercise caution to avoid bending or damaging the battery during removal.
6. Wait for a Few Minutes
After removing the CMOS battery, wait for a few minutes to ensure that any residual electrical charge dissipates from the motherboard and components. This waiting period allows the CMOS memory to reset, which can be beneficial when troubleshooting certain system issues.
By following these meticulous steps, individuals can safely remove the CMOS battery from their computers, facilitating maintenance and potential replacement of the battery as needed.
Precautions to Take When Removing the CMOS Battery
When undertaking the task of removing the CMOS battery, it is crucial to observe several precautions to ensure the safety of both the individual performing the maintenance and the computer’s internal components. Adhering to these precautions minimizes the risk of damage and facilitates a smooth and successful removal process.
1. Electrostatic Discharge (ESD) Prevention
Electrostatic discharge poses a significant risk to sensitive electronic components, including the CMOS battery and the motherboard. To prevent ESD-related damage, it is essential to wear an antistatic wrist strap connected to a grounded object, effectively dissipating any accumulated static charge from the body. Additionally, working on a static-dissipative mat or surface further mitigates the risk of ESD.
2. Gentle Handling of Components
When accessing the CMOS battery and motherboard, it is imperative to handle the components with care and gentleness. Using non-metallic tools such as plastic pry tools or spudgers helps prevent accidental damage to delicate circuitry and connectors. Avoid applying excessive force or pressure when manipulating the components to minimize the risk of bending or breaking them.
3. Proper Disconnection of Power
Prior to removing the CMOS battery, ensure that the computer is completely powered off and disconnected from all external power sources. Unplugging the power cord and any connected peripherals minimizes the risk of electrical shock and protects the internal components from potential damage during the maintenance process.
4. Identification of Battery Orientation
Before detaching the CMOS battery, take note of its orientation and the method of attachment, such as the position of the positive and negative terminals and the type of fastening mechanism. This information is crucial for correctly reseating or replacing the battery, ensuring that it is installed in the proper orientation and alignment.
5. Avoiding Contact with Other Components
While removing the CMOS battery, take care to avoid accidental contact with other components on the motherboard. Direct contact with sensitive circuitry or connectors could lead to damage or disruption of the system’s functionality. Maintaining a clear and focused approach to the task helps minimize the risk of inadvertent contact.
By diligently observing these precautions, individuals can safeguard themselves and the computer’s internal components during the process of removing the CMOS battery, ensuring a safe and successful maintenance procedure.
Replacing the CMOS Battery
Once the CMOS battery has been removed, the next crucial step is to replace it with a new battery to ensure the continued proper functioning of the computer’s system settings and configuration. The following steps outline the process of replacing the CMOS battery:
1. Procure a Compatible Replacement Battery
Prior to replacing the CMOS battery, it is essential to obtain a compatible replacement battery that meets the specifications of the original battery. The replacement battery should match the voltage and size requirements of the original CMOS battery to ensure seamless integration and optimal performance.
2. Verify the Battery Orientation
Before installing the replacement battery, verify its orientation and the method of attachment, ensuring that the positive and negative terminals align correctly with the corresponding contacts on the motherboard. This step is crucial for the proper functioning of the CMOS battery and the retention of system settings.
3. Gently Install the New Battery
Using non-metallic tools or clean, dry hands, gently install the new CMOS battery into its designated housing on the motherboard. Exercise caution to avoid bending or damaging the battery during installation, ensuring that it is securely seated and making proper contact with the motherboard’s connectors.
4. Secure the Battery in Place
If the replacement battery features a clip or fastening mechanism, securely fasten it in place to prevent unintended dislodging or movement. Properly securing the battery ensures its stability within the housing, minimizing the risk of intermittent contact or disruption of the CMOS functionality.
5. Reassemble the Computer
Following the successful replacement of the CMOS battery, reassemble the computer by carefully securing the casing and fastening the screws with a precision screwdriver. Ensure that all components are properly reconnected, and the computer is ready to be powered on for testing.
By diligently following these steps, individuals can effectively replace the CMOS battery with a compatible and properly installed replacement, ensuring the continued integrity and smooth operation of the computer’s system settings and configuration.
Testing the System After CMOS Battery Removal
After the CMOS battery has been removed and potentially replaced, it is essential to conduct thorough testing to ensure that the computer’s system functions optimally and that the BIOS settings are retained. The following steps outline the process of testing the system after CMOS battery removal:
1. Powering On the Computer
Once the CMOS battery has been removed and, if applicable, replaced, power on the computer to initiate the boot process. Observe the startup sequence and system behavior to identify any irregularities, such as error messages, incorrect system time and date, or BIOS configuration discrepancies.
2. Accessing BIOS Settings
During the system startup, access the BIOS settings by pressing the designated key or key combination as prompted on the screen. Verify that the previously configured BIOS settings, including boot device order, system time, and hardware configurations, are retained and accurately displayed within the BIOS interface.
3. Checking System Time and Date
Upon booting into the operating system, check the system time and date to ensure that they are accurately displayed. An incorrect system time and date could indicate that the CMOS battery replacement, if performed, may not be functioning properly or that the BIOS settings were not retained effectively.
4. Verifying Hardware Functionality
Test the functionality of hardware components such as the hard drive, optical drives, and peripheral devices to ensure that they are recognized and operational. Any discrepancies in hardware detection or functionality could indicate potential issues with the CMOS settings or the replacement battery.
5. Resolving Discrepancies
If any irregularities are identified during the testing process, such as incorrect BIOS settings or system time, troubleshoot and address the issues accordingly. This may involve reseating the CMOS battery, verifying the BIOS settings, or potentially resetting the BIOS to default values to rectify any discrepancies.
By meticulously testing the system after CMOS battery removal and potential replacement, individuals can ascertain the integrity of the BIOS settings, system configuration, and hardware functionality, ensuring the smooth and reliable operation of the computer.