
Why Should You Back Up Your Google Calendar?
Your Google Calendar is a valuable tool for organizing and managing your daily schedule, appointments, and important events. It’s a convenient way to stay on top of your commitments, set reminders, and even share your calendar with others. However, relying solely on Google’s servers to store your calendar data may not always be the safest option. There are several reasons why you should consider backing up your Google Calendar regularly.
Firstly, technical issues can occur unexpectedly. While Google has robust systems in place to prevent data loss, there is always a small risk of technical glitches or server failures. If something were to happen to your online calendar, you could potentially lose all your important appointments and events. Creating backups can provide an extra layer of protection and ensure you don’t lose any vital information.
Secondly, human error is another factor to consider. We all make mistakes, and accidentally deleting or modifying a calendar event is not unheard of. Without a backup, it can be difficult to recover any lost or modified data. Having a backup of your Google Calendar allows you to easily restore any accidentally deleted events or revert back to a previous version of your calendar.
Additionally, there may be situations where you need to access your calendar offline or in a different application. Exporting your Google Calendar to an ICS (iCalendar) file format allows you to easily import and view your calendar data on other platforms, such as Microsoft Outlook or Apple Calendar. This flexibility can be particularly useful when you need to work with multiple calendar applications or share your calendar with someone who doesn’t use Google Calendar.
Last but not least, backing up your Google Calendar gives you peace of mind. Knowing that you have a secure copy of your calendar data ensures that you won’t have to start from scratch if something were to happen to your online calendar. It allows you to focus on your tasks and appointments without worrying about potential data loss.
How to Export a Single Google Calendar to an ICS File
If you want to create a backup of a single Google Calendar, you can easily export it to an ICS (iCalendar) file. Here’s how:
- Open Google Calendar in your web browser and make sure you’re signed in to your Google account.
- On the left-hand side, locate the “My calendars” section and click on the dropdown arrow next to the calendar you want to export.
- From the dropdown menu, select “Settings and sharing.”
- In the settings page, scroll down to the “Integrate calendar” section and look for the “Export calendar” option.
- Click on the “Export calendar” button, and a file will be downloaded to your computer with the .ics extension.
- Save the downloaded ICS file in a secure location on your computer or external storage device.
That’s it! You’ve successfully exported a single Google Calendar to an ICS file. This file contains all the events, reminders, and details from the selected calendar. Keep in mind that the exported ICS file will not automatically update; it is a snapshot of the calendar at the time of export. If you make any changes to the original calendar, you will need to repeat the export process to update the ICS file.
It’s important to note that the exported ICS file can be imported into other calendar applications or shared with others who use different calendar systems. This makes it a versatile backup method that provides compatibility and flexibility.
By exporting your Google Calendar to an ICS file, you can ensure that you have a secure offline copy of your important calendar data. Whether it’s for backup purposes, sharing with others, or accessing your calendar on different platforms, this export feature comes in handy.
How to Export Multiple Google Calendars to ICS Files
If you have multiple Google Calendars and want to back them up individually, you can export each calendar to an ICS (iCalendar) file. Here’s how:
- Open Google Calendar in your web browser and ensure you’re signed in to your Google account.
- In the left-hand sidebar, under the “My calendars” section, locate the calendars you want to export. You can select multiple calendars by holding down the Ctrl (Windows) or Command (Mac) key while clicking on each calendar.
- After selecting the calendars, click on the three vertical dots next to one of the calendars and choose “Settings and sharing” from the options.
- In the settings page that appears, scroll down to the “Integrate calendar” section.
- Under the “Export calendar” heading, you’ll see a list of the selected calendars to export. Click on the “Export” button next to each calendar you want to backup.
- For each calendar, a separate ICS file will be downloaded to your computer with the .ics extension.
- Save each downloaded ICS file in a secure location on your computer or external storage device.
By following these steps, you can export multiple Google Calendars to separate ICS files. Each file will contain all the events, reminders, and details from its respective calendar. Remember that the exported ICS files are static snapshots of the calendars at the time of export and won’t automatically update if you make changes to the originals.
Having individual ICS files for each calendar allows for easy management and organization. You can store them in a dedicated folder or rename them to reflect the calendar’s name, making it straightforward to identify and locate specific calendar backups if needed.
Exporting multiple Google Calendars to ICS files provides you with the convenience of having separate backups for each calendar. It ensures that you have a secure copy of all your important calendar data, giving you peace of mind in case of accidental deletions, modifications, or any other unexpected data loss situations.
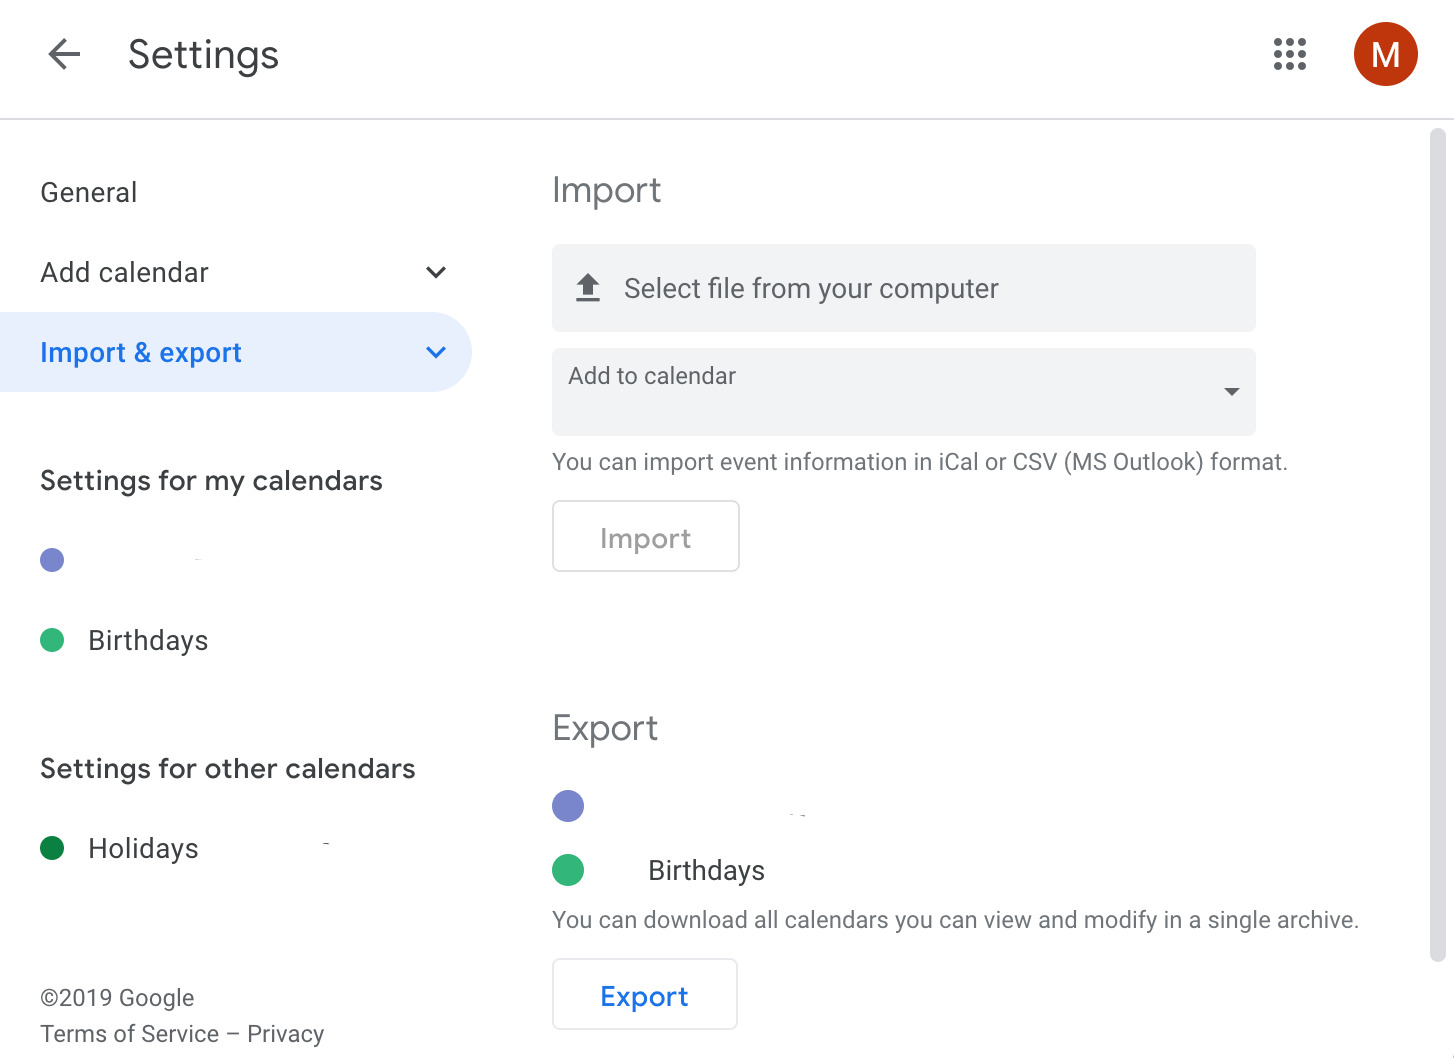
How to Import an ICS File into Google Calendar
If you have an ICS (iCalendar) file containing calendar data and want to import it into your Google Calendar, follow these steps:
- Open Google Calendar in your web browser and ensure you’re signed in to your Google account.
- In the left-hand sidebar, click on the plus (+) sign next to “Add calendar” and select “Import.”
- Click on the “Select file from your computer” button, and a file browser window will appear.
- Navigate to the location where you have saved the ICS file that you want to import, select it, and click on the “Open” button.
- After selecting the file, you’ll be returned to the import settings page. Here, you can customize the import options, such as the calendar name, color, and whether to import the events into a new calendar or an existing one.
- Review the import settings and make any necessary changes.
- Once you’re satisfied with the settings, click on the “Import” button to start the import process.
- Google Calendar will process the ICS file and import the events into the specified calendar. The imported events will now be visible in your Google Calendar.
By following these steps, you can easily import an ICS file into your Google Calendar. This allows you to add events and appointments from other calendar applications or when you receive an ICS file from someone else.
It’s important to note that the imported events will be added to your calendar based on the date and time information provided in the ICS file. You can always modify or delete these events within your Google Calendar after the import is complete.
By offering the ability to import ICS files, Google Calendar provides users with flexibility when it comes to managing their calendar data. Whether you’re merging calendars, restoring backups, or integrating data from other sources, importing ICS files can streamline the process and help you maintain an organized and up-to-date calendar.
Tips for Safely Storing and Managing Your ICS Files
When it comes to backing up and managing your ICS (iCalendar) files, it’s important to take certain precautions to ensure the safety and integrity of your calendar data. Here are some tips to help you store and manage your ICS files securely:
- Organize your ICS files: Create a dedicated folder on your computer or external storage device to store your ICS files. Keeping them in one central location makes it easier to find and manage your backups when needed.
- Regularly backup your ICS files: Make it a habit to back up your Google Calendar by exporting it to an ICS file on a regular basis. Set a reminder or schedule the backups at specific intervals to ensure you have the most up-to-date copies of your calendar data.
- Keep your ICS files secure: Protect your ICS files by storing them in a secure location. Consider encrypting the folder or using a password-protected external storage device to prevent unauthorized access.
- Consider cloud storage: If you prefer not to store your backups locally, consider using a trusted cloud storage service to store your ICS files. Make sure to choose a reputable provider and enable appropriate security measures to keep your data safe.
- Label and date your backup files: To easily identify and organize your ICS files, consider labeling them with meaningful names and including the date of the backup. This will make it easier to locate specific backups and track the timeline of your calendar data.
- Test the integrity of your backups: Periodically check the integrity of your ICS files by importing them back into your calendar application. This will ensure that the backups are working correctly and that the data can be successfully restored if needed.
- Consider automated backup solutions: If manual backups are too time-consuming or prone to forgetfulness, consider using automated backup tools or plugins that can schedule regular backups of your Google Calendar and generate ICS files without any manual intervention.
- Stay updated with Google Calendar changes: Google occasionally introduces changes to the Google Calendar platform, including updates to the way calendar data is stored and managed. Stay informed about these changes to ensure that your backup and management practices remain compatible and effective.
By following these tips, you can ensure the safety and accessibility of your ICS files, making it easier to manage and recover your important calendar data whenever needed. Remember, maintaining organized backups is crucial for safeguarding your calendar information in case of accidental deletions, technical issues, or any unforeseen events that could potentially disrupt your digital schedule.
Automating the Process: Using Third-Party Tools for Regular Backups
While manually exporting your Google Calendar to ICS (iCalendar) files is effective, it can be time-consuming and easy to forget. To streamline the backup process and ensure regular backups of your calendar data, consider using third-party tools that offer automation features. These tools can simplify the task and provide added convenience. Here’s how you can automate the process:
- Research and choose a reliable tool: Explore different third-party tools available for backing up Google Calendar. Look for reputable options that have positive reviews and offer the features you need, such as automated backups, scheduled exports, and secure storage.
- Install and configure the selected tool: Once you’ve chosen a tool, follow the installation instructions provided by the developer. Typically, you’ll need to authorize the tool to access your Google Calendar and allow it to perform backups on your behalf. Configure the backup settings according to your preferences.
- Set up the backup schedule: Most tools allow you to schedule regular backups at specific intervals, such as daily, weekly, or monthly. Choose a frequency that suits your needs and preferences. Automating the backup process ensures that you have the latest copy of your calendar data without manual intervention.
- Choose the backup location: Third-party tools often offer the option to choose the storage location for your backups. You can select a local folder on your computer, an external storage device, or even a cloud storage service. Ensure that the chosen location is secure and easily accessible for future retrieval if needed.
- Monitor the backups: Periodically check the backups to ensure that they are running successfully. Verify that the backup files are being created at the specified intervals and that the data is being stored in the designated location. Promptly address any issues or errors that arise to ensure the continuity of your backup process.
- Keep the tool updated: As with any software, make sure to keep your chosen backup tool up to date. Developers often release updates that introduce new features, improve functionality, and address any security vulnerabilities. Regularly check for updates and install them promptly.
Automating the backup process using reliable third-party tools provides an efficient and hassle-free way to ensure regular backups of your Google Calendar. By entrusting the task to these specialized tools, you can save time, reduce the risk of forgetting to perform manual backups, and maintain a consistent backup schedule for your calendar data. Remember to choose a reputable tool and periodically review your backup settings to ensure that they align with your preferences and requirements.
Restoring Your Google Calendars from ICS Files
Restoring your Google Calendars from ICS (iCalendar) files is a straightforward process that allows you to recover your calendar data after an accidental deletion, a system failure, or the need to switch to a new device or calendar application. Here’s how you can restore your Google Calendars from ICS files:
- Locate your ICS files: Ensure that you have the ICS files you want to restore readily available. These files should contain the backup copies of your calendar data that you previously exported.
- Open Google Calendar in your web browser: Make sure you are signed in to the same Google account that you used to create the original calendars.
- Click on the gear icon: Located in the top right corner of the Google Calendar interface, this icon opens the Settings menu.
- Choose “Settings” from the dropdown menu: This will take you to the calendar settings page.
- Click on the “Import & Export” tab: It’s usually located at the top of the settings page.
- Under the “Import” section: Click on the “Select file” button. A file browser window will appear.
- Navigate to the location of your ICS file: Select the ICS file you want to restore, and click on the “Open” button.
- Select the calendar to restore the events: Choose the calendar where you want to restore the events from the dropdown menu. You can restore the events to an existing calendar or create a new one.
- Configure the import options: Depending on the calendar application, you may have the option to customize settings such as event notifications and reminders during the import process.
- Click on the “Import” button: This will initiate the restoration process and import the events from the ICS file into your Google Calendar.
- Review the restored events: After the import is complete, review the restored events to ensure everything is as expected. Make any necessary adjustments, such as updating event details or modifying event reminders.
By following these steps, you can easily restore your Google Calendars from ICS files. It’s important to note that the restored events will be merged with your existing calendar data. If you don’t want to mix the restored events with your current events, consider creating a separate calendar before the restoration process.
Restoring your calendars from ICS files provides a reliable method to recover and preserve your important calendar data. It allows you to revert changes, recover lost events, and maintain a comprehensive and up-to-date schedule across different devices and calendar applications.