
Reasons for Removing Apps
Removing apps from your iPhone 10 can be a strategic decision to optimize your device's performance and streamline your digital experience. Here are several compelling reasons why you might consider removing apps from your device:
-
Freeing Up Storage Space: Over time, your iPhone 10 may accumulate a plethora of apps that you no longer use or need. These apps consume valuable storage space, which can lead to performance issues and hinder the installation of important updates. By removing unused apps, you can reclaim storage space and ensure that your device operates smoothly.
-
Improving Battery Life: Some apps run in the background and consume battery power, even when you're not actively using them. By removing these apps, you can potentially extend your iPhone 10's battery life, allowing you to enjoy longer usage between charges.
-
Enhancing Device Speed: A cluttered home screen filled with numerous apps can impact the responsiveness and speed of your iPhone 10. Removing unnecessary apps can contribute to a more fluid and efficient user experience, especially when navigating between screens and launching applications.
-
Reducing Distractions: If you find yourself constantly distracted by certain apps, removing them from your device can help you regain focus and productivity. Whether it's a time-consuming game or a social media app that constantly beckons for attention, removing these distractions can promote a healthier digital lifestyle.
-
Enhancing Security and Privacy: Unused apps may pose security risks if they are not regularly updated with the latest security patches. By removing these apps, you can reduce the potential vulnerabilities on your device and mitigate security threats.
By considering these reasons for removing apps, you can make informed decisions about optimizing your iPhone 10's app ecosystem to better suit your needs and preferences.
How to Remove Apps from the Home Screen
Removing apps from the home screen of your iPhone 10 is a straightforward process that allows you to declutter your device and customize your digital environment. Follow these simple steps to remove apps directly from the home screen:
-
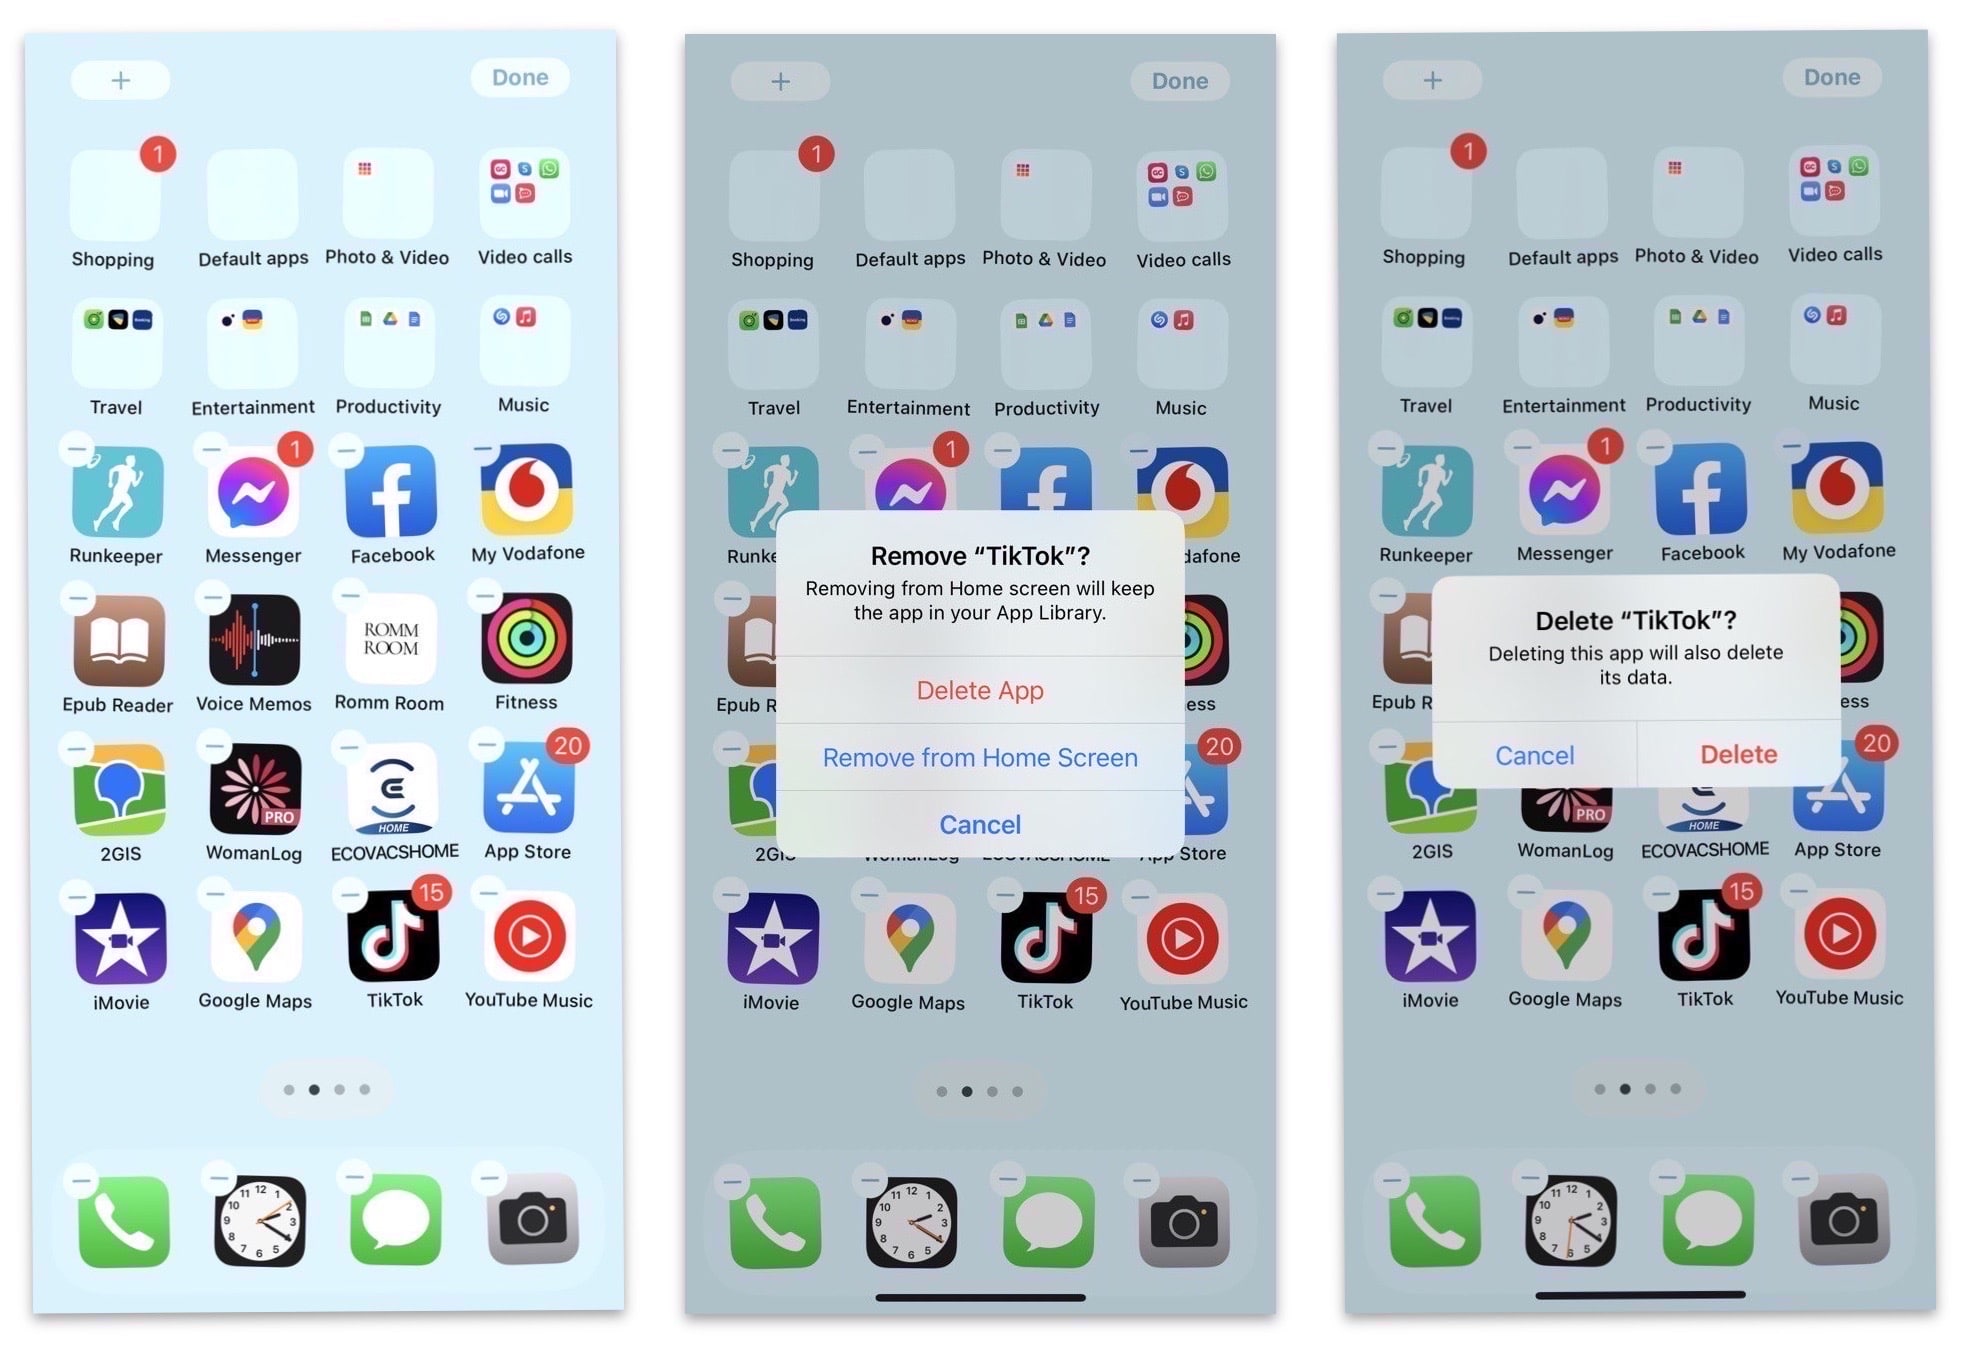
Long-Press the App Icon: Begin by locating the app that you wish to remove from your home screen. Press and hold the app icon until all the icons on the screen start to jiggle. This signifies that you have entered the editing mode, enabling you to make changes to the layout of your home screen.
-
Tap the 'X' Icon: Once the app icons are jiggling, you will notice a small 'X' icon appear in the corner of each app icon. Tap the 'X' icon on the app that you want to remove. A confirmation prompt will appear, asking if you want to delete the app.
-
Confirm Deletion: After tapping the 'X' icon, a confirmation dialog will appear, asking if you want to delete the app. Select 'Delete' to confirm the removal of the app from your home screen. This action will uninstall the app from your device, removing its icon from the home screen.
-
Press the Home Button: Once you have removed the desired apps from your home screen, press the home button to exit the editing mode. This will stop the app icons from jiggling and solidify the changes you have made.
By following these steps, you can efficiently remove apps from your iPhone 10's home screen, allowing you to tailor your device to your specific preferences and organizational needs. Whether you are decluttering your home screen, rearranging app icons, or simply removing apps that you no longer use, this process empowers you to curate a personalized and efficient digital workspace.
How to Delete Apps from Settings
Deleting apps from the Settings menu provides an alternative method for managing and removing apps from your iPhone 10. This approach offers a systematic way to view and uninstall apps, providing greater control over your device's app ecosystem. Follow these steps to delete apps from the Settings menu:
-
Open the Settings App: Begin by locating and tapping the "Settings" app on your iPhone 10's home screen. The Settings app is represented by a gear icon and serves as the central hub for customizing various aspects of your device.
-
Navigate to "General": Within the Settings app, scroll and locate the "General" option. Tap on "General" to access a wide range of device management settings and configurations.
-
Select "iPhone Storage": Under the "General" settings, find and tap on "iPhone Storage." This option allows you to view a detailed breakdown of your device's storage usage, including the space occupied by various apps and data.
-
View Installed Apps: Upon selecting "iPhone Storage," your iPhone 10 will display a list of installed apps, arranged in descending order based on their storage usage. This comprehensive view enables you to identify apps that consume significant storage space and may warrant removal.
-
Choose the App to Delete: Scroll through the list of installed apps and select the app that you wish to delete. Tapping on an app will reveal additional details, such as the app's size and documents & data associated with it.
-
Delete the App: Within the app's detailed view, you will find an option to "Delete App." Tap on this option to initiate the app deletion process. A confirmation prompt will appear, asking if you want to delete the app and its data.
-
Confirm Deletion: After selecting "Delete App," a confirmation dialog will appear, prompting you to confirm the deletion. Choose "Delete App" once again to finalize the removal of the selected app from your iPhone 10.
By following these steps, you can efficiently delete apps from the Settings menu, providing a comprehensive overview of your device's app usage and enabling you to manage and optimize your app collection with ease. This method offers a structured approach to app management, allowing you to make informed decisions about the apps installed on your iPhone 10. Whether you are freeing up storage space, decluttering your device, or optimizing its performance, the Settings menu provides a valuable tool for app deletion and maintenance.
Managing App Subscriptions
Managing app subscriptions on your iPhone 10 is essential for maintaining control over your digital expenditures and ensuring that you only pay for the services you actively use. App subscriptions often provide access to premium features, exclusive content, or ad-free experiences, but it's important to regularly review and manage these subscriptions to align with your evolving needs and preferences.
To manage app subscriptions on your iPhone 10, follow these steps:
-
Accessing Subscriptions: Begin by opening the App Store on your device and tapping on your profile icon in the top right corner. From there, select "Subscriptions" to view a comprehensive list of all your active app subscriptions. This centralized view allows you to review the details of each subscription, including the renewal date and associated costs.
-
Reviewing Subscriptions: Take the time to carefully review each subscription listed. Evaluate whether you are actively utilizing the features and content offered by the subscribed apps. Consider the value that each subscription brings to your digital experience and assess whether it aligns with your current interests and priorities.
-
Modifying or Cancelling Subscriptions: If you identify subscriptions that are no longer essential or relevant to your needs, you have the option to modify or cancel them. Tap on the subscription that you wish to manage, and you will be presented with the available actions, such as changing the subscription tier or cancelling the subscription altogether.
-
Changing Subscription Tiers: Some apps offer multiple subscription tiers with varying features and benefits. If you find that your current subscription tier does not fully align with your usage patterns, consider exploring alternative tiers that better suit your requirements. This flexibility allows you to tailor your subscriptions to match your preferences and budget.
-
Cancelling Subscriptions: Should you decide to cancel a subscription, simply follow the on-screen prompts to confirm the cancellation. Once cancelled, the app subscription will no longer renew automatically, and you will retain access to the subscription's features until the current billing period ends.
By actively managing your app subscriptions, you can optimize your digital spending, retain control over your financial commitments, and ensure that your subscriptions align with your evolving preferences and priorities. Regularly reviewing and adjusting your app subscriptions empowers you to curate a personalized digital experience that reflects your current interests and usage habits.
Reinstalling Deleted Apps
Reinstalling deleted apps on your iPhone 10 is a straightforward process that allows you to restore previously removed apps to your device. Whether you accidentally deleted an essential app or simply wish to reintroduce a previously uninstalled application, the App Store provides a convenient platform for reinstalling deleted apps. Follow these steps to seamlessly reinstall deleted apps on your iPhone 10:
-
Access the App Store: Begin by locating and tapping the "App Store" icon on your device's home screen. The App Store serves as the central marketplace for discovering, downloading, and managing apps for your iPhone 10.
-
Navigate to the "Purchased" Section: Within the App Store, tap on your profile icon in the top right corner. From the menu that appears, select "Purchased" to access a comprehensive list of all the apps you have previously downloaded or purchased using your Apple ID.
-
View Your Purchased Apps: Upon entering the "Purchased" section, you will find a complete catalog of apps associated with your Apple ID. These apps are categorized into "All" and "Not on This iPhone," providing a clear overview of your app history and current installations.
-
Locate the Deleted App: Scroll through the list of purchased apps and locate the app that you wish to reinstall. If the app was previously installed on your device, but is currently deleted, it will appear under the "Not on This iPhone" section.
-
Initiate the Reinstallation: Tap on the cloud icon or the download button next to the app you want to reinstall. This action prompts the App Store to initiate the download and installation process for the selected app, seamlessly restoring it to your iPhone 10.
-
Wait for the Installation: Once you tap the cloud icon or download button, the app will begin downloading and installing onto your device. Depending on the app's size and your internet connection speed, the process may take a few moments to complete.
By following these steps, you can effortlessly reinstall deleted apps on your iPhone 10, allowing you to restore previously removed apps with ease. Whether you are retrieving a vital productivity tool, a favorite game, or a utility app, the App Store's "Purchased" section streamlines the process of reinstalling deleted apps, ensuring that you can quickly reintegrate them into your digital ecosystem.