Restart Your Phone
When facing issues with taking screenshots on your Android device, the first step you should try is restarting your phone. A simple restart can often resolve minor software glitches that might be causing the problem.
To restart your Android device, press and hold the power button until the power menu appears. Then, tap on the “Restart” option and wait for your phone to reboot. Once it’s powered back on, try capturing a screenshot and see if it works.
Restarting your phone helps in clearing temporary system files and freeing up resources that may be hindering the screenshot functionality. In some cases, background processes or apps might interfere with the screenshot feature, and a restart can help resolve such issues.
It’s important to note that the steps to restart your phone may vary slightly depending on the model and Android version you are using. If you’re unsure, refer to your device’s user manual or do a quick web search for the specific instructions.
If restarting your phone doesn’t fix the screenshot problem, don’t worry. There are several other methods you can try to get your Android device back to capturing screenshots effortlessly.
Check for Updates
Another common reason for Android screenshot issues is outdated software. It’s crucial to ensure that both your Android operating system and the apps on your device are up to date. Developers often release updates that address known issues and improve overall performance, including screenshot-related problems.
To check for system updates, go to your phone’s settings menu and look for the “Software Update” or “System Updates” option. Tap on it and follow the prompts to check for available updates. If an update is available, download and install it on your device.
Similarly, it’s essential to keep your apps updated. Open the Google Play Store and navigate to the “My apps & games” section. Here, you’ll find a list of all installed apps that have pending updates. Tap on the “Update” button next to each app to install the latest version.
Updating your operating system and apps not only resolves existing issues but also enhances the overall security and performance of your device. Therefore, it’s recommended to regularly check for updates and install them as they become available.
If the screenshot problem persists even after updating your software and apps, don’t worry. There are other troubleshooting steps you can take to troubleshoot the issue and get your Android screenshot functionality back on track.
Clear Cache and Data of the Screenshot App
If you’re experiencing problems with taking screenshots on your Android device, the next troubleshooting step is to clear the cache and data of the screenshot app. This process can help resolve any temporary issues or corrupt files that might be affecting the app’s functionality.
To clear the cache and data of the screenshot app, follow these steps:
- Go to your phone’s settings menu and select “Apps” or “Applications”.
- Scroll through the list of installed apps and find the screenshot app (often named “Screenshots” or “Screenshot Capture”).
- Tap on the screenshot app to open its settings.
- Select the “Storage” option.
- Here, you will see two options: “Clear cache” and “Clear data”.
- Tap on “Clear cache” to remove temporary files that might be causing issues.
- If the problem persists, tap on “Clear data” to delete any stored data and reset the app to its default settings.
It’s important to note that clearing the data of the screenshot app will remove any personalized settings or preferences. However, it can often resolve issues if the app’s configuration is causing problems with taking screenshots.
After clearing the cache and data of the screenshot app, try capturing a screenshot again to see if the issue has been resolved. If not, don’t worry. There are additional troubleshooting steps you can take to get your Android device capturing screenshots smoothly.
Enable Permissions for the Screenshot App
Permissions play a crucial role in allowing apps to access certain features and functionality on your Android device. If the screenshot app doesn’t have the necessary permissions, it may encounter issues when trying to capture screenshots. Therefore, it’s essential to check and ensure that the required permissions are enabled for the screenshot app.
To enable permissions for the screenshot app, follow these steps:
- Go to your phone’s settings menu and select “Apps” or “Applications”.
- Scroll through the list of installed apps and find the screenshot app you’re using.
- Tap on the app to open its settings.
- Select the “Permissions” option.
- Here, you’ll see a list of permissions that the app requires to function properly.
- Ensure that the toggle switches next to the necessary permissions, such as “Storage” or “Screen recording”, are turned on.
Enabling the necessary permissions for the screenshot app ensures that it can access the required resources to capture screenshots successfully. If any permissions are disabled, the app may encounter issues and fail to capture screenshots.
After enabling the permissions, try taking a screenshot again and see if the problem is resolved. If not, don’t worry. There are additional troubleshooting steps you can take to address the screenshot issue on your Android device.
Use the Hardware Buttons to Take Screenshots
If you’re facing difficulties with using the screenshot app or experiencing software-related issues, an alternative method to capture screenshots on your Android device is by using the hardware buttons. Most Android devices have specific button combinations that allow you to capture a screenshot directly.
To take a screenshot using the hardware buttons, follow these steps:
- Open the screen or app that you want to capture.
- Simultaneously press and hold the power button and the volume down button.
- After a moment, you’ll see a flash animation or a notification indicating that the screenshot has been successfully taken.
Once you’ve captured the screenshot, you can access it through the notifications panel or by going to the Photos app on your Android device. The screenshots taken using the hardware buttons are typically saved in the “Screenshots” folder in your device’s gallery.
Using the hardware buttons to take screenshots bypasses any issues with the screenshot app or software settings. It’s a reliable method that works across various Android devices and versions. However, it’s important to note that the specific button combination may vary slightly depending on your device model.
If you find the software-based screenshot method still not working on your Android device, utilizing the hardware buttons can be a convenient workaround to capture screenshots efficiently.
Toggle Airplane Mode
Sometimes, network-related issues can interfere with the screenshot functionality on your Android device. In such cases, toggling Airplane Mode can help resolve the problem by temporarily disabling all wireless connections and then re-enabling them.
To toggle Airplane Mode on your Android device, follow these steps:
- Swipe down from the top of your device to access the Quick Settings panel.
- Look for the Airplane Mode icon, usually represented by an airplane symbol.
- Tap on the Airplane Mode icon to enable it. You may need to tap it again to disable it.
When Airplane Mode is enabled, all wireless connections, including cellular data, Wi-Fi, and Bluetooth, will be turned off. After a few seconds, toggle Airplane Mode off to enable the connections again.
Toggling Airplane Mode can help resolve any network-related issues that might be affecting the screenshot functionality. It refreshes the network connections and can often resolve temporary glitches that can interfere with taking screenshots.
Once you’ve disabled Airplane Mode and re-established the connections, try capturing a screenshot to see if the problem has been resolved. If not, there are additional troubleshooting steps you can follow to address the screenshot issue on your Android device.
Try a Third-Party Screenshot App
If you’re still experiencing difficulties with the built-in screenshot functionality on your Android device, consider trying a third-party screenshot app as an alternative solution. There are plenty of reliable and feature-rich screenshot apps available on the Google Play Store that can provide a seamless screenshot experience.
To try a third-party screenshot app, follow these steps:
- Open the Google Play Store on your Android device.
- Search for “screenshot app” in the search bar.
- Browse through the list of available screenshot apps and read user reviews to find a reliable and well-rated app.
- Select a suitable app and tap on the “Install” button to download and install it on your device.
- Once the app is installed, open it and follow the provided instructions to set it up.
A third-party screenshot app can offer additional features and customization options that may not be available in the default screenshot functionality of your device. They usually provide dedicated buttons, gestures, or floating icons to capture screenshots quickly and easily.
Remember to grant the necessary permissions to the third-party app, including access to storage and screen recording if required. You can do this by going to your phone’s settings, selecting “Apps,” finding the screenshot app, and enabling the necessary permissions.
After setting up the third-party screenshot app, attempt to capture a screenshot to see if the issue has been resolved. These apps often provide their own methods to capture screenshots, such as tapping on the app’s icon or using specific gestures.
If the third-party screenshot app works successfully, you can continue using it as your primary screenshot solution. However, if you still encounter issues, there are further troubleshooting steps you can take to address the screenshot problem on your Android device.
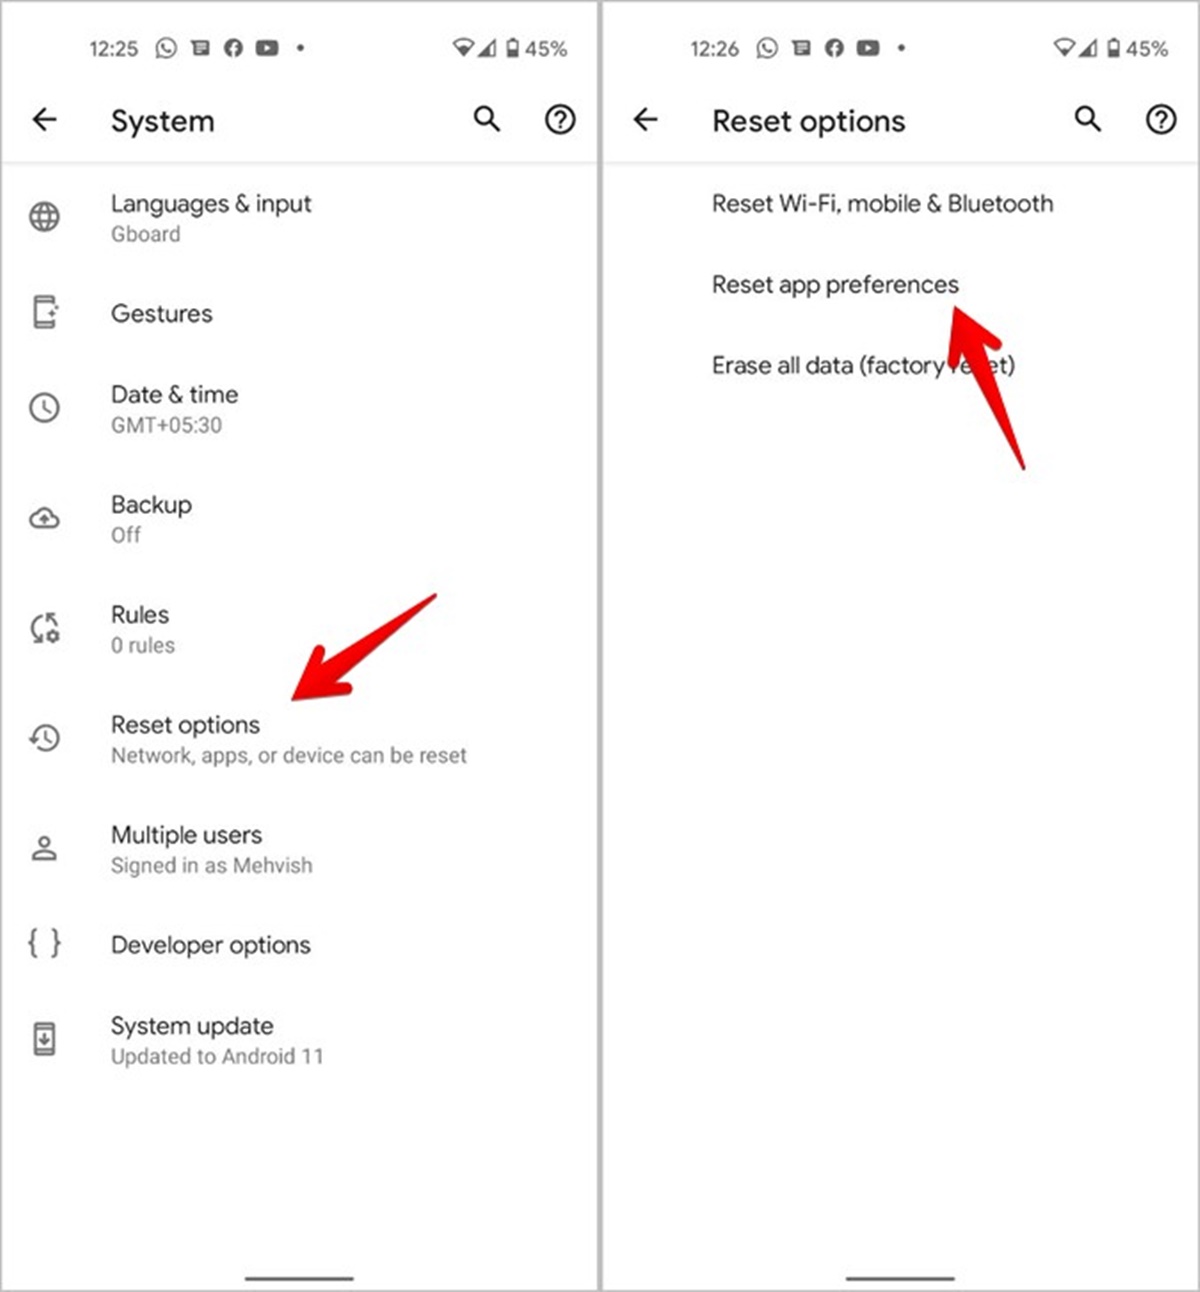
Reset App Preferences
If the screenshot issue persists on your Android device, resetting app preferences can be a useful troubleshooting step. Resetting app preferences will restore all app-related settings to their default values, including permissions, notifications, and default app configurations.
Please note that resetting app preferences will not delete any app data or personal files. It will only reset the settings associated with the apps on your device.
To reset app preferences on your Android device, follow these steps:
- Open the settings menu on your device.
- Scroll down and tap on the “Apps” or “Applications” option.
- Next, tap on the three-dot menu icon located either at the top right or bottom right corner of the screen.
- From the dropdown menu, select “Reset app preferences” or “Reset default apps”.
- A confirmation pop-up will appear. Tap on “Reset” to proceed with resetting the app preferences.
Once you’ve reset the app preferences, restart your device for the changes to take effect.
Resetting app preferences can help resolve any misconfigurations or conflicting settings that might be causing issues with the screenshot functionality. It provides a fresh start for all apps on your device, allowing them to work with default settings and permissions.
After resetting the app preferences and restarting your device, try capturing a screenshot again to see if the problem has been resolved. If not, there are further troubleshooting steps you can try to address the screenshot issue on your Android device.
Factory Reset Your Device
If all else fails and you are still unable to resolve the screenshot issue on your Android device, a last resort option is to perform a factory reset. This process will erase all data and settings on your device, essentially restoring it to its original factory state.
Before proceeding with a factory reset, it’s crucial to backup all your important data, such as contacts, photos, and documents, as it will be permanently deleted during the process. Once you’ve backed up your data, you can follow the steps below to perform a factory reset:
- Go to the settings menu on your device.
- Scroll down and select the “System” option.
- Tap on “Reset” or “Reset options”.
- Choose “Factory data reset” or “Erase all data” from the available options.
- Read the information and warnings displayed on the screen, then confirm your decision to proceed.
- Enter your device’s PIN, pattern, or password if prompted.
- Finally, select “Erase everything” to initiate the factory reset process.
Keep in mind that a factory reset will wipe your device clean, removing all installed apps, settings, and personal files. After the reset is complete, your device will be in the same state as when you first purchased it.
Once the factory reset is finished, set up your device again, reinstall the necessary apps, and restore your data from the backup. This will give you a fresh start, potentially resolving any software-related issues that may have been causing the screenshot problem.
However, exercise caution and use the factory reset option as a last resort, as it is a drastic measure that cannot be undone. If the screenshot problem persists even after a factory reset, it’s advisable to seek assistance from the device manufacturer or an authorized service center.