Installing BlueStacks
BlueStacks is a popular Android emulator that allows you to run Android apps on your Windows computer. Whether you want to play mobile games or use productivity apps, BlueStacks offers a seamless experience. Here’s a step-by-step guide on how to install BlueStacks on Windows:
- First, visit the official BlueStacks website (www.bluestacks.com) and click on the “Download BlueStacks” button.
- The download will start automatically, but you can also choose the location where you want to save the installation file.
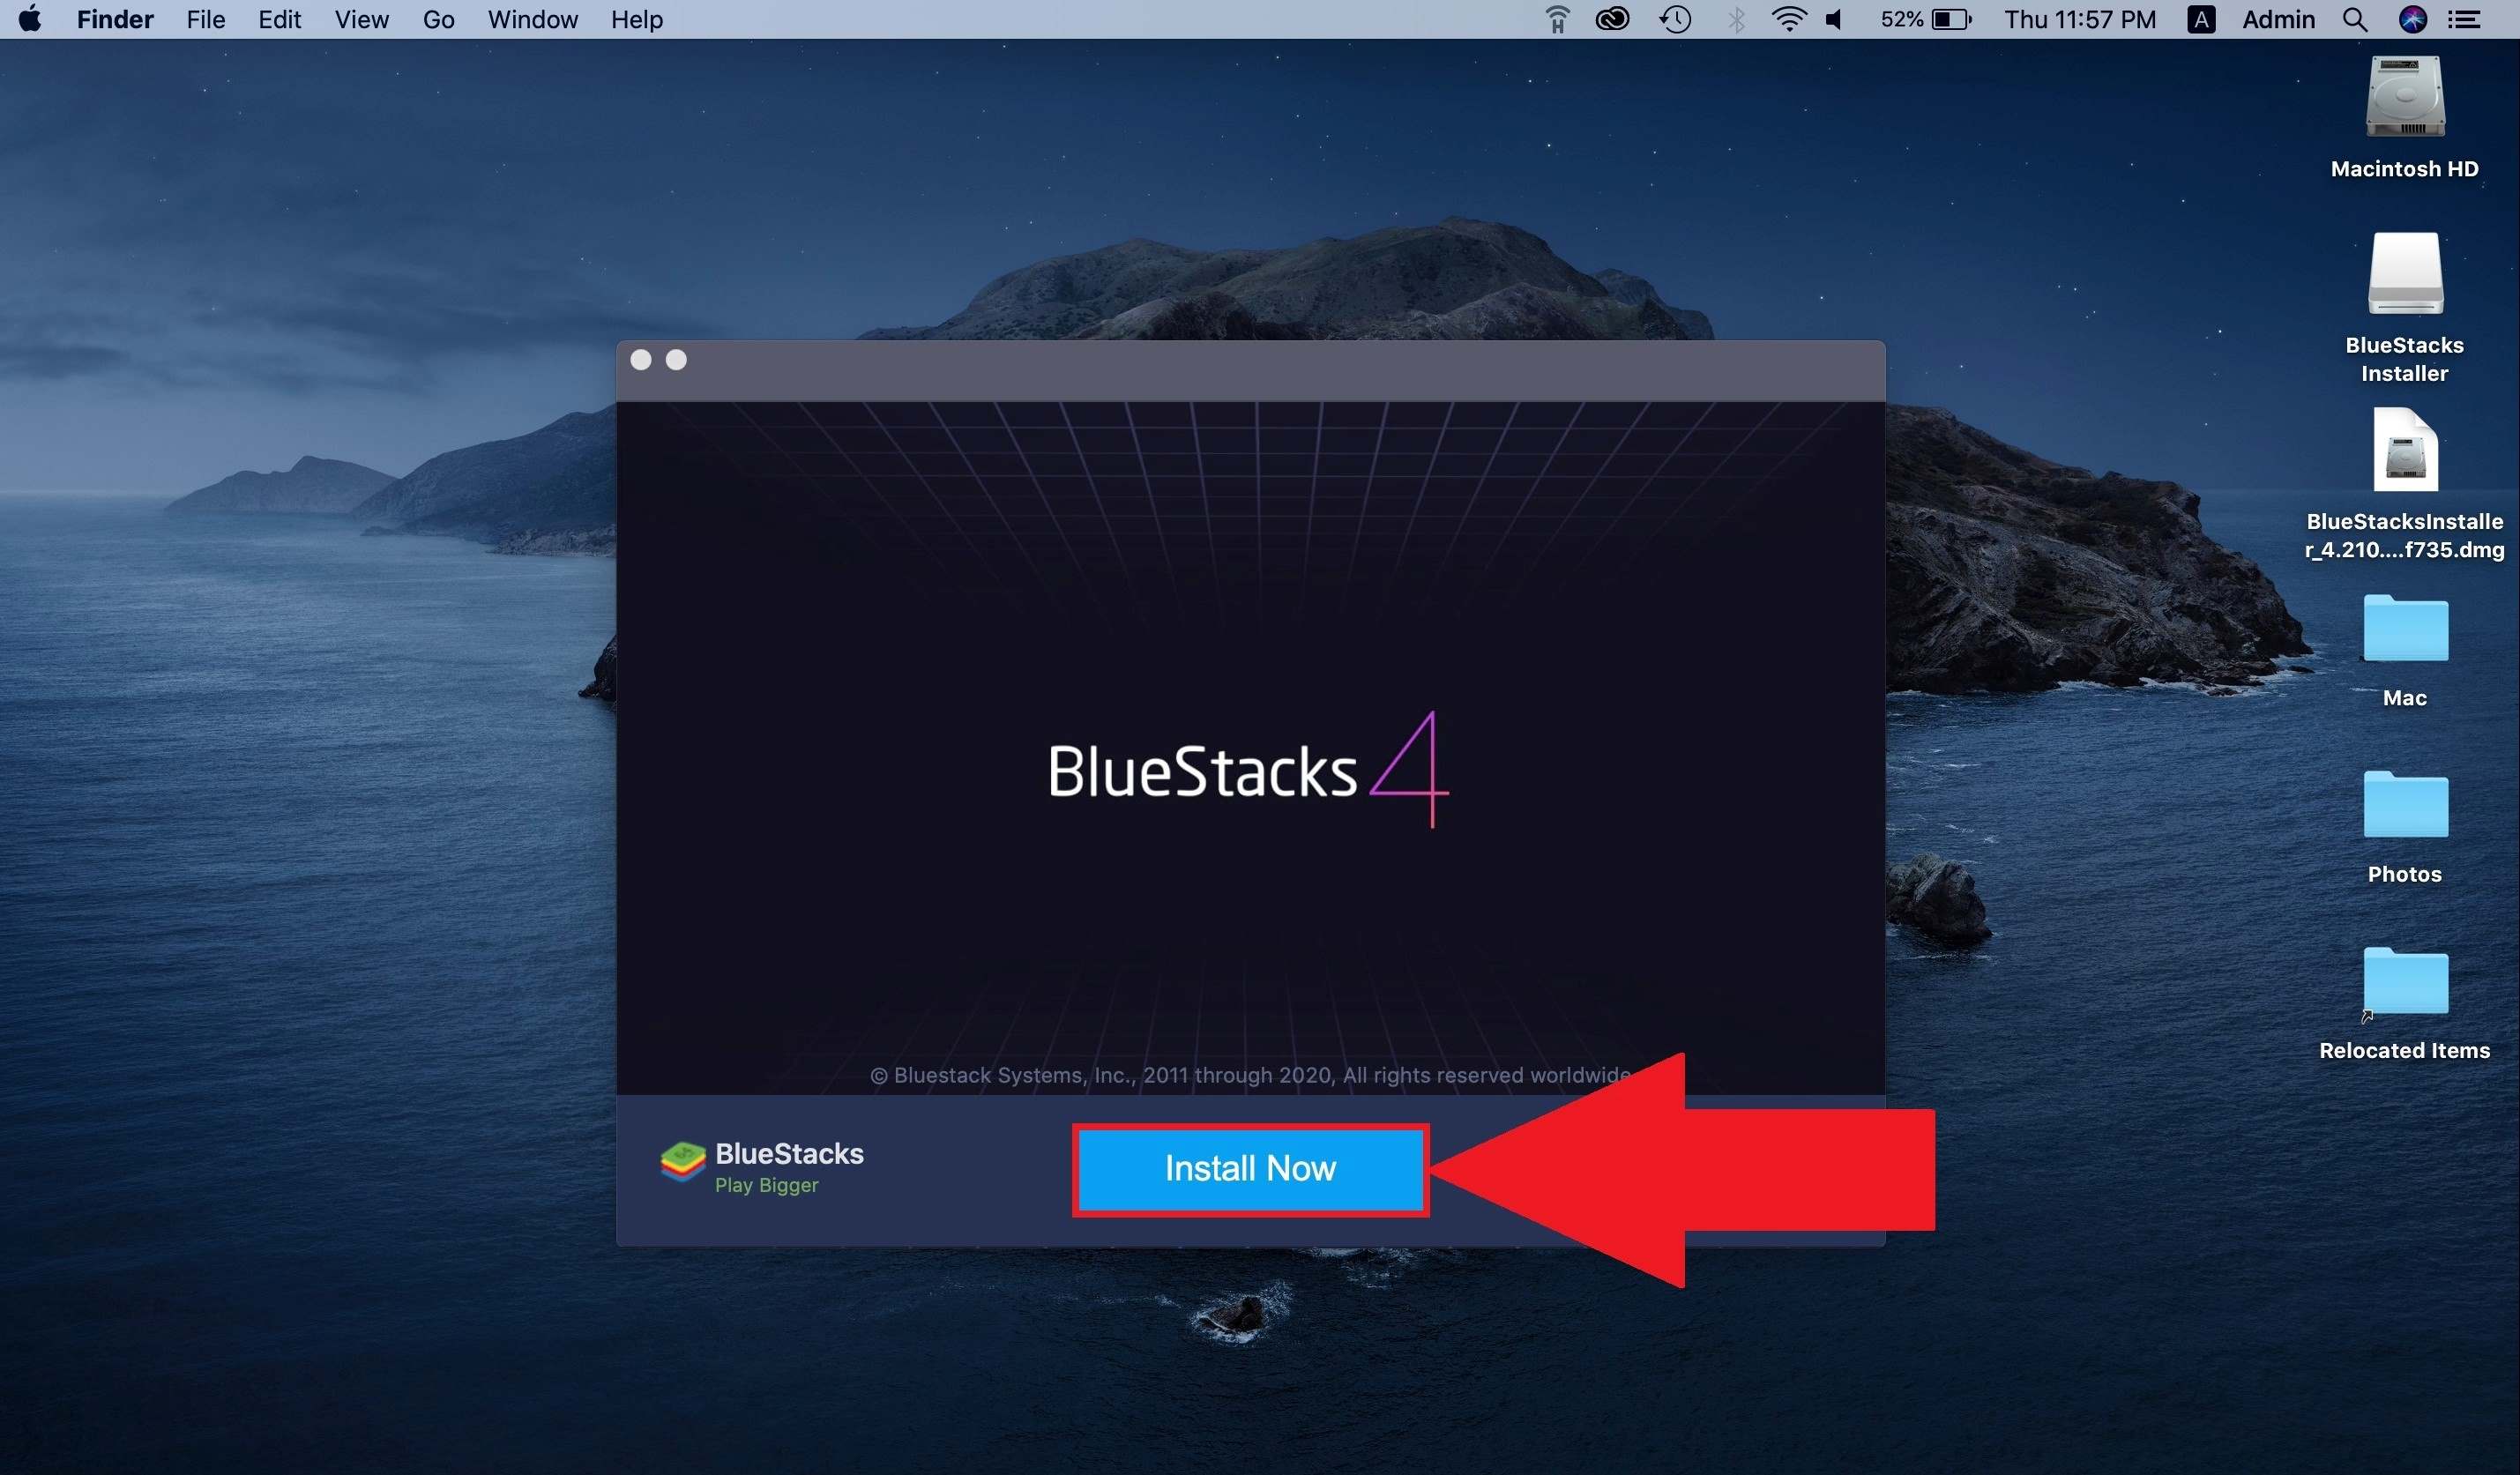
- Once the download is complete, locate the installation file and double-click on it to begin the installation process.
- Follow the on-screen instructions to install BlueStacks. Make sure to read the terms and conditions before proceeding.
- During the installation, you may be asked to enable virtualization on your computer. If prompted, follow the instructions to enable it.
- After the installation is complete, launch BlueStacks from the desktop shortcut or the Start menu.
- BlueStacks will take a few moments to initialize and set up the necessary files. Be patient during this process.
- Once BlueStacks is launched, you will be greeted with a welcome screen and asked to sign in to your Google account.
- Enter your Google account credentials and sign in. This step is necessary to access the Google Play Store and download Android apps.
- After signing in, BlueStacks will sync your Google account and display the home screen, which resembles an Android device.
That’s it! You have successfully installed BlueStacks on your Windows computer. Now you can start exploring the world of Android apps right from your desktop.
Setting up BlueStacks
Once you have installed BlueStacks on your Windows computer, it’s time to set it up and customize the settings according to your preferences. Follow these steps to get started:
- Launch BlueStacks from the desktop shortcut or the Start menu.
- On the home screen, you will find a variety of pre-installed apps and a search bar at the top.
- To customize the settings, click on the gear icon located in the top-right corner of the BlueStacks window.
- In the settings menu, you can adjust various aspects of BlueStacks, including display resolution, RAM allocation, and CPU cores.
- Under the “Preferences” tab, you can change language settings, enable or disable app notifications, and configure app storage location.
- Make sure to check the “Enable Root Access” option under the “Advanced” tab if you want to have additional control over the Android system.
- BlueStacks also offers a “Shake” feature that simulates shaking your device to trigger certain actions. You can configure the sensitivity of this feature under the “Shake” tab in settings.
- In the “Accounts” tab, you can manage the Google accounts associated with BlueStacks, as well as add new accounts or remove existing ones.
- If you encounter any issues or want to learn more about BlueStacks and its features, you can visit the “Support” tab for helpful resources, FAQs, and contact options.
- Once you have customized the settings according to your preferences, click on the “Apply” button to save the changes.
That’s it! You have successfully set up and customized BlueStacks. Now you can start enjoying your favorite Android apps on your Windows computer.
Logging in to Google Play Store
To download and install Android apps on BlueStacks, you need to log in to your Google account and access the Google Play Store. Here’s how you can do it:
- Launch BlueStacks from the desktop shortcut or the Start menu.
- On the home screen, click on the Google Play Store icon to open it.
- If you are not already logged in to a Google account, you will be prompted to sign in.
- Enter your Google account credentials (email address and password) and click on the “Next” button.
- After entering your credentials, BlueStacks will verify your account information and sign you in.
- Once you are signed in, you will have access to the vast library of Android apps available on the Google Play Store.
- You can now search for your desired apps by using the search bar located at the top of the Play Store.
- Clicking on an app will provide you with additional information, such as reviews, ratings, and screenshots.
- To install an app, click on the “Install” button, and BlueStacks will automatically download and install it on your emulator.
- Once the installation is complete, you can find the app on the BlueStacks home screen or in the app drawer.
By logging in to the Google Play Store, you can access a wide range of apps and games, allowing you to enjoy the full Android experience on your Windows computer.
Searching and Installing Android Apps
One of the great benefits of using BlueStacks is the ability to search for and install a wide variety of Android apps on your Windows computer. Here’s how you can search for and install apps on BlueStacks:
- Launch BlueStacks from the desktop shortcut or the Start menu.
- On the home screen, click on the Google Play Store icon to open it.
- Once you’re in the Play Store, you’ll see a search bar at the top. Enter the name of the app you want to install or a relevant keyword.
- As you start typing, the Play Store will display matching results. Click on the app you want to install.
- You’ll be taken to the app’s page, where you’ll find additional details such as the developer, ratings, reviews, and screenshots.
- To install the app, click on the “Install” button, and BlueStacks will begin downloading and installing it.
- Depending on the size of the app and your internet connection, the installation process may take a few moments.
- Once the installation is complete, you can find the app on the BlueStacks home screen or in the app drawer.
- Click on the app to launch it and start using it on your Windows computer.
BlueStacks offers access to millions of Android apps, allowing you to enjoy popular games, productivity tools, social media apps, and much more directly on your Windows computer. Explore the wide variety of apps available and make the most of your BlueStacks experience.
Customizing BlueStacks Settings
BlueStacks provides a range of settings that allow you to customize your emulator to suit your preferences and optimize its performance. Here’s how you can customize the settings in BlueStacks:
- Launch BlueStacks from the desktop shortcut or the Start menu.
- Once BlueStacks is open, click on the gear icon located in the top-right corner of the window to open the settings.
- In the settings menu, you will find several tabs that allow you to customize different aspects of BlueStacks.
- Under the “Display” tab, you can adjust the resolution and DPI settings to match your screen and enhance the visual experience.
- The “Engine” tab provides options to allocate CPU and RAM resources to BlueStacks to optimize its performance on your computer.
- You can also enable or disable hardware virtualization and OpenGL rendering for better graphics performance.
- The “Preferences” tab allows you to personalize various aspects of BlueStacks, such as language settings, app notifications, and storage location.
- Under the “Advanced” tab, you have the option to enable root access, which provides added control and customization options for the Android system within BlueStacks.
- The “Shake” tab allows you to configure the sensitivity of the shake feature in BlueStacks, which can be used to trigger specific actions within apps.
- In the “Accounts” tab, you can manage the Google accounts linked to BlueStacks, add new accounts, or remove existing ones.
- Once you have customized the settings to your liking, click on the “Apply” button to save the changes.
By customizing the settings in BlueStacks, you can enhance your overall experience and ensure that the emulator is optimized for your specific needs and hardware configuration.
Running Android Apps on BlueStacks
Once you have installed and set up BlueStacks on your Windows computer, you can start running Android apps seamlessly. Here’s how you can launch and use Android apps on BlueStacks:
- Launch BlueStacks from the desktop shortcut or the Start menu.
- On the home screen, you will find a variety of pre-installed apps and a search bar at the top.
- Click on an app’s icon to launch it. Alternatively, you can use the search bar to find a specific app.
- The app will open in a new window, mirroring the experience of using it on an Android device.
- You can interact with the app using your mouse and keyboard, just like you would on a touchscreen.
- BlueStacks also provides a variety of shortcuts and gestures for common actions, such as zooming, scrolling, and rotating.
- To switch between multiple running apps, click on the “App Drawer” icon located on the home screen.
- In the App Drawer, you’ll see a list of all the apps that are currently running on BlueStacks. Click on an app to switch to it.
- When you are done using an app, you can close it by clicking on the “X” button located at the top-right corner of the app’s window.
- BlueStacks also allows you to run multiple instances, meaning you can open and use different apps simultaneously in separate windows.
- To run a new instance of an app, simply click on its icon again, and BlueStacks will open another window with a fresh instance of the app.
With BlueStacks, running Android apps on your Windows computer is a smooth and user-friendly experience. Enjoy the convenience of using your favorite apps on a larger screen and take advantage of the powerful features BlueStacks has to offer.
Transferring Files between Windows and BlueStacks
Transferring files between your Windows computer and BlueStacks is a straightforward process that allows you to easily access and share documents, images, videos, and other files. Here’s how you can transfer files between Windows and BlueStacks:
- Launch BlueStacks on your Windows computer.
- In BlueStacks, locate the “Media Manager” icon on the home screen and click on it to open the File Manager.
- In the File Manager, you can browse through the different folders and storage locations within BlueStacks.
- To transfer a file from your Windows computer to BlueStacks, click on the “Import from Windows” option.
- A File Explorer window will open, allowing you to navigate to the file you want to transfer.
- Select the file and click on the “Open” button. The file will be copied to the designated location within BlueStacks.
- To transfer a file from BlueStacks to your Windows computer, click on the “Export to Windows” option in the File Manager.
- Select the file you want to transfer and choose a location on your Windows computer to save it.
- Click on the “Save” button, and the file will be copied from BlueStacks to your selected location in Windows.
- You can also transfer files between BlueStacks and Windows by using other file transfer methods, such as email, cloud storage, or USB connections.
- For example, you can upload files to cloud storage apps installed on BlueStacks, such as Google Drive or Dropbox, and access them from your Windows computer.
With the ability to easily transfer files, BlueStacks enables seamless integration between your Windows computer and the Android environment. This makes it convenient to work with files across different platforms and access them wherever you need them.
Troubleshooting Common Issues
While BlueStacks generally provides a smooth Android emulation experience on Windows, you may encounter some common issues along the way. Here are a few troubleshooting tips to help you resolve them:
- Slow Performance: If you experience slow performance, try allocating more resources to BlueStacks in the settings. Increase the CPU cores and RAM allocation to improve performance.
- Virtualization Issues: If BlueStacks prompts you to enable virtualization, but it’s already enabled in your computer’s BIOS settings, try disabling it and then enabling it again. Restart your computer after making any changes.
- App Crashes: If an app keeps crashing within BlueStacks, try clearing its cache and data. Go to the “Settings” in BlueStacks, find the “Apps” section, locate the problematic app, and clear its cache and data.
- Black Screen: If you encounter a black screen or no display on BlueStacks, try updating your graphics card driver to the latest version. You can usually download the driver from the manufacturer’s website.
- No Audio: If you’re not getting any sound in BlueStacks, ensure that your computer’s sound settings are properly configured. Check the volume levels and make sure the correct audio output device is selected.
- Installation Issues: If you face issues during the installation of BlueStacks, try downloading the installation file again from the official website. Ensure that you have a stable internet connection to prevent any interruptions.
- App Compatibility: Some apps may not be compatible with BlueStacks due to various reasons. If an app refuses to install or work correctly, check the app’s system requirements and compatibility with BlueStacks.
- Anti-virus Interference: Certain anti-virus software may interfere with the operation of BlueStacks. Temporarily disable your anti-virus software and check if the issue persists. If it does, try adding an exception for BlueStacks in your anti-virus settings.
- Cannot Connect to Google Account: If you’re unable to sign in to your Google account within BlueStacks, double-check your internet connection and ensure that your Google account credentials are entered correctly.
- Unresponsive BlueStacks: If BlueStacks becomes unresponsive or freezes, try closing it through the Task Manager and restarting it. You can access the Task Manager by pressing Ctrl+Shift+Esc on your keyboard.
These troubleshooting tips should help you resolve common issues that you may encounter while using BlueStacks on your Windows computer. If you continue to experience problems, you can visit the BlueStacks support website or forums for further assistance.
Tips and Tricks for Using BlueStacks
To get the most out of your BlueStacks experience and enhance your Android emulation on Windows, consider using these helpful tips and tricks:
- Enable Keyboard Mapping: BlueStacks allows you to map keyboard keys to specific touch actions within apps. Take advantage of this feature to assign shortcuts and enhance your gaming or productivity experience.
- Use Multi-Instance Manager: The Multi-Instance Manager in BlueStacks allows you to run multiple instances of the emulator simultaneously. This can be useful for multitasking or running different apps in separate windows.
- Backup and Restore: BlueStacks provides a backup and restore feature that allows you to save your app data and settings. Take advantage of this feature to easily transfer your BlueStacks setup to another computer or restore it if needed.
- Sync Apps with Mobile: If you have an Android device, you can sync your apps between BlueStacks and your mobile device using the “BlueStacks Cloud Connect” app. This allows you to seamlessly switch between devices and continue using your favorite apps.
- Assign RAM and CPU Cores: Adjusting the allocation of RAM and CPU cores in BlueStacks’ settings can greatly impact performance. Experiment with different configurations to find the optimal balance for your computer.
- Take Screenshots and Record Videos: BlueStacks includes built-in tools for capturing screenshots and recording videos of your app usage. Use these features to easily capture and share your Android experience on Windows.
- Install External APK Files: In addition to the Google Play Store, BlueStacks allows you to install APK files directly. This is useful for accessing apps that are not available on the Play Store, or for testing beta versions of apps.
- Customize BlueStacks Appearance: You can personalize the appearance of BlueStacks by changing the wallpaper, app icons, and theme. This can help in creating a more personalized and visually appealing interface.
- Disable Notifications: If you find app notifications within BlueStacks distracting, you can disable them in the settings. This allows you to have a more focused and uninterrupted experience while using your preferred apps.
- Stay Updated: BlueStacks regularly releases updates with bug fixes, performance enhancements, and new features. Make sure to keep your emulator up to date to take advantage of these improvements.
By implementing these tips and tricks, you can maximize the functionality of BlueStacks and tailor your Android emulation experience to suit your needs and preferences.
Frequently Asked Questions about BlueStacks
Here are answers to some frequently asked questions about BlueStacks:
- Is BlueStacks safe to use?
Yes, BlueStacks is safe to use. It is a reputable software company that has been around for many years. However, make sure to download BlueStacks from the official website to avoid downloading any potentially harmful or altered versions. - Does BlueStacks require a high-performance computer?
While BlueStacks can run on lower-end computers, it performs best on systems with high-performance specifications. To ensure a smooth experience, it is recommended to have a computer with at least 8GB of RAM, a dedicated graphics card, and a modern processor. - Can I run iOS apps on BlueStacks?
No, BlueStacks can only run Android apps. It is not compatible with iOS or iPhone apps. BlueStacks is specifically designed to emulate the Android operating system on Windows computers. - How do I uninstall BlueStacks?
To uninstall BlueStacks, go to the “Add or Remove Programs” section in the Windows Control Panel. Locate BlueStacks in the list of installed programs, click on it, and select the “Uninstall” option. Follow the on-screen instructions to complete the uninstallation process. - Can I play mobile games with a controller on BlueStacks?
Yes, BlueStacks supports controller input. You can connect a compatible controller to your computer and configure it within BlueStacks’ settings to play mobile games with a controller-like experience. - Can I use BlueStacks on a Mac?
Yes, BlueStacks is also available for macOS. You can download the macOS version from the official BlueStacks website and install it on your Mac computer. - Do I need to have a Google account to use BlueStacks?
While it is not mandatory, having a Google account is highly recommended to access the full functionality of BlueStacks. A Google account allows you to sign in to the Google Play Store and download Android apps. - Can I use BlueStacks to run multiple instances of the same app?
Yes, BlueStacks supports running multiple instances of the same app simultaneously. This can be useful for tasks like managing multiple social media accounts or playing multiple characters in a game. - Is BlueStacks available for Linux?
Currently, BlueStacks is not available for Linux operating systems. It is only compatible with Windows and macOS. - Is BlueStacks free?
BlueStacks offers both a free and a premium version. The free version includes ads, while the premium version, known as BlueStacks Premium, provides an ad-free experience along with additional features and priority support.
These are some of the frequently asked questions about BlueStacks. If you have any other queries or concerns, you can refer to the BlueStacks support website or community forums for further assistance.