
Best Time to Plant Flower Bulbs
Planting flower bulbs at the right time is crucial for their successful growth and blooming. The timing varies depending on the type of flower bulbs and your geographical location. Understanding the optimal planting time will ensure that your flower bulbs establish strong roots and produce beautiful blooms. Here are some general guidelines to help you determine the best time to plant flower bulbs.
Factors to Consider:
Before diving into specific planting times, it’s important to consider a few key factors:
- Climate: Different flower bulbs have different temperature and climate preferences. Some thrive in cooler climates, while others prefer warmer conditions. Research the specific requirements of the flower bulbs you plan to plant and consider how well they will adapt to your local climate.
- Hardiness Zone: Determine your garden’s hardiness zone, which indicates the average minimum winter temperature in your region. This information will help you choose flower bulbs that are suitable for your climate.
- Type of Flower Bulb: Flower bulbs can be categorized based on their blooming season. It’s important to know whether your bulbs are spring, summer, fall, or winter bloomers.
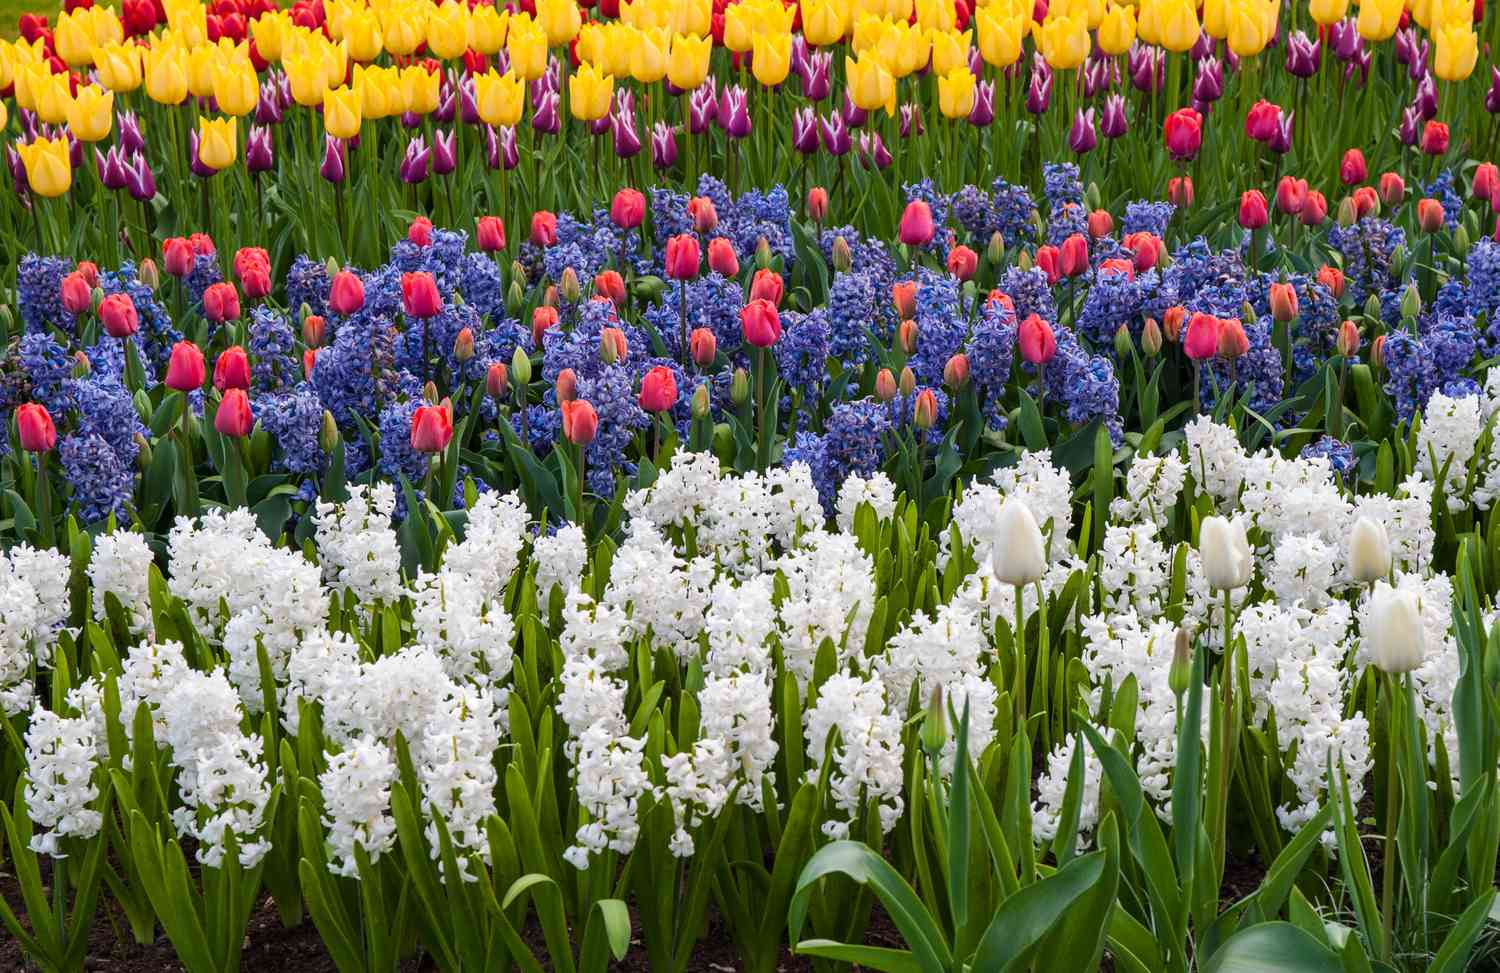
Spring Flower Bulbs:
Spring-flowering bulbs, such as tulips, daffodils, and hyacinths, should generally be planted in the fall. These bulbs require a period of cold dormancy for proper growth and flowering. Planting them in the fall allows them to root deeply and gather necessary nutrients before the arrival of spring.
Summer Flower Bulbs:
Summer-flowering bulbs, such as dahlias, lilies, and gladiolus, are typically planted in the spring after the danger of frost has passed. These bulbs prefer warmer soil temperatures for growth. Planting them too early can expose them to cool temperatures that may hinder their development.
Fall Flower Bulbs:
Fall-flowering bulbs, like autumn crocus and colchicum, should be planted in late summer or early fall. These bulbs have a shorter dormancy period and will quickly burst into vibrant blooms during the autumn months.
Winter Flower Bulbs:
Winter-flowering bulbs, such as snowdrops and winter aconite, are typically planted in the early fall. These bulbs are hardy and can withstand freezing temperatures. They will bring a splash of color to your garden during the winter months when everything else seems dormant.
Remember that these timelines are general guidelines, and it’s always a good idea to check the specific recommendations for the flower bulbs you are planting. By selecting the right planting time, you give your flower bulbs the best chance to thrive and provide a stunning display of color in your garden.
Factors to Consider
When it comes to planting flower bulbs, several factors need to be taken into consideration to ensure optimal growth and blooming. By considering these factors, you can create the ideal conditions for your bulbs to flourish. Here are some important factors to keep in mind:
- Climate: Different flower bulbs have varying temperature and climate preferences. Some bulbs thrive in cooler climates, while others prefer warmer conditions. Before planting, research the specific requirements of the flower bulbs you intend to grow and consider how well they will adapt to your local climate.
- Hardiness Zone: Determining your garden’s hardiness zone is crucial as it provides information about the average minimum winter temperature in your region. Knowing your hardiness zone helps you choose flower bulbs that can withstand the winter conditions in your area.
- Type of Flower Bulb: Flower bulbs can be categorized based on their blooming season. It’s important to understand the specific type of bulb you are planting to ensure proper planting and care. Some bulbs, like tulips and daffodils, prefer a period of cold dormancy, while others, like dahlias and gladiolus, thrive in warmer conditions.
- Soil Conditions: Before planting flower bulbs, it’s essential to assess the soil conditions in your garden. Ensure that the soil is well-drained to prevent bulbs from sitting in waterlogged soil, which can lead to rot. Additionally, consider the pH level of the soil and amend it if necessary to create an optimal growing environment for your bulbs.
- Sunlight: Different flower bulbs have varying sunlight requirements. Some bulbs thrive in full sun, while others prefer partial shade. Assess the light conditions in your garden and choose bulbs that match the sunlight levels in each planting area.
- Maintenance: Consider the level of maintenance required by the flower bulbs you want to plant. Some bulbs may need regular deadheading or dividing, while others are low-maintenance. Ensure that you have the time and resources to provide the necessary care for your bulbs.
By taking these factors into account, you can create the ideal planting environment for your flower bulbs. Understanding and meeting the specific requirements of your bulbs will increase the chances of successful growth and abundant blooming in your garden.
Spring Flower Bulbs
Spring-flowering bulbs bring a burst of color and beauty to gardens after a long and dreary winter. These bulbs are planted in the fall to establish strong roots and undergo a period of cold dormancy before blooming in the spring. Here are some popular spring-flowering bulbs and tips for planting them:
- Tulips: Tulips are one of the most recognizable spring flowers, known for their vibrant hues and elegant shapes. They come in a variety of colors and sizes, allowing you to create stunning displays in your garden. Plant tulip bulbs in well-drained soil during the fall, typically around September or October. Choose a location that receives full sunlight or light shade.
- Daffodils: Daffodils, also known as narcissus, are another classic spring bulb. They bring cheerful yellow or white flowers with their signature trumpet-shaped blooms. Daffodils prefer well-drained soil and thrive in sunny or partially shaded areas. Plant daffodil bulbs in the fall, around October or November, at a depth of about 6 inches.
- Hyacinths: Hyacinths are known for their fragrant clusters of colorful flowers. Plant hyacinth bulbs in the fall, around September or October, in well-drained soil. Choose a location that receives full sunlight or partial shade. Hyacinth bulbs should be planted at a depth of about 4-6 inches.
- Crocuses: Crocuses are early bloomers that bring pops of vibrant purple, yellow, or white flowers to gardens. Plant crocus bulbs in the fall, typically in late September or October. These bulbs prefer well-drained soil and can be planted in sunny or partially shaded areas. Plant crocus bulbs at a depth of about 3-4 inches.
When planting spring-flowering bulbs, it’s important to choose bulbs that are firm and free from any signs of damage or disease. Dig a hole that is two to three times deeper than the height of the bulb. Place the bulb in the hole with the pointed end facing upward and cover it with soil. Water the newly planted bulbs thoroughly to ensure proper root establishment.
During the winter, the bulbs will undergo a period of cold dormancy which is essential for their growth and development. In the spring, as the temperatures rise, you will be rewarded with a vibrant display of blooms that will bring joy and beauty to your garden.
Summer Flower Bulbs
Summer-flowering bulbs add a splash of color and vibrancy to gardens during the warmer months. These bulbs are typically planted in the spring, after the danger of frost has passed, to ensure optimal growth and blooming. Here are some popular summer-flowering bulbs and tips for planting them:
- Dahlias: Dahlias are known for their showy, large blooms in a wide range of colors and forms. They require well-drained soil and full sun to thrive. Plant dahlia tubers in the spring, once the soil has warmed up and frost is no longer a concern. Dig a hole and place the tubers horizontally, about 4-6 inches deep, with the growing eyes facing up.
- Lilies: Lilies come in various shapes, sizes, and colors, adding elegance to any garden. They prefer well-drained soil and a location with full sun or partial shade. Plant lily bulbs in the spring, about 6-8 inches deep, with the pointed side facing up. Space the bulbs apart to allow air circulation and prevent overcrowding.
- Gladiolus: Gladiolus bulbs produce tall spikes adorned with colorful flowers. They thrive in well-drained soil and full sun. Plant gladiolus corms in the spring, at a depth of about 4-6 inches, with the pointed end facing up. Space the corms a few inches apart to give each bulb room to grow and flourish.
- Calla Lilies: Known for their elegant, trumpet-shaped blooms, calla lilies are a favorite choice for summer gardens. They prefer well-drained soil and partial shade. Plant calla lily bulbs in the spring, at a depth of about 2-4 inches, with the pointed end facing up. Water the bulbs regularly but avoid overwatering, as they can be susceptible to rot.
When planting summer-flowering bulbs, it’s important to prepare the soil by loosening it and removing any weeds or debris. Mix in some organic matter, such as compost, to improve soil fertility and drainage. Space the bulbs according to the specific plant’s requirements, ensuring proper air circulation and room for growth.
After planting, water the bulbs thoroughly to promote root establishment. Throughout the summer, continue to water the bulbs regularly, especially during dry periods. Applying a layer of mulch around the base of the plants can help retain moisture and suppress weed growth.
As summer progresses, you will be greeted with a stunning display of color and beauty as your summer-flowering bulbs burst into full bloom. From the vibrant dahlias to the graceful lilies, these bulbs will bring a touch of charm and elegance to your garden throughout the summer season.
Fall Flower Bulbs
Fall-flowering bulbs bring a burst of color to gardens when the days are becoming shorter and cooler. These bulbs are typically planted in late summer or early fall, allowing them to establish roots before the onset of winter. Here are some popular fall-flowering bulbs and tips for planting them:
- Autumn Crocus: Autumn crocus bulbs produce delicate, jewel-toned flowers that add elegance to the autumn garden. Plant autumn crocus bulbs in late summer or early fall, at a depth of about 3-4 inches. Choose a location with well-drained soil and partial shade.
- Colchicum: Colchicum, also known as autumn crocus or meadow saffron, offers large, showy flowers that emerge in the fall. Plant colchicum corms in late summer or early fall, at a depth of about 4-6 inches. These bulbs prefer well-drained soil and can tolerate full sun or partial shade.
- Cyclamen: Cyclamen bulbs produce charming, upward-facing flowers in shades of pink, red, or white. Plant cyclamen bulbs in late summer or early fall, at a depth of about 1-2 inches. They prefer well-drained soil and partial shade, making them an excellent choice for woodland gardens or shady areas.
- Hardy Amaryllis: Hardy amaryllis bulbs, also known as Nerine, offer vibrant blooms late in the growing season. Plant hardy amaryllis bulbs in late summer or early fall, at a depth of about 4-6 inches. They prefer well-drained soil and full sun or partial shade.
When planting fall-flowering bulbs, prepare the soil by removing any weeds or debris and loosening it with a garden fork. Amend the soil with compost or well-rotted manure to improve drainage and fertility. Space the bulbs according to the specific plant’s requirements, typically a few inches apart.
After planting, water the bulbs thoroughly to help settle the soil and encourage root establishment. During the fall, continue to water the bulbs as needed, ensuring the soil remains slightly moist but not waterlogged. Applying a layer of mulch around the bulbs can help conserve moisture and provide insulation for the colder months.
As autumn arrives, you will witness a dazzling display of colors as your fall-flowering bulbs burst into bloom. From the delicate autumn crocus to the showy colchicum, these bulbs will bring a touch of beauty and charm to your garden during the transition into the cooler season.
Winter Flower Bulbs
Winter-flowering bulbs bring beauty and cheer to gardens during the cold and often barren winter months. These hardy bulbs are planted in the early fall, allowing them to establish roots before the harsh winter weather sets in. Here are some popular winter-flowering bulbs and tips for planting them:
- Snowdrops: Snowdrops are delicate white flowers that often emerge while snow is still on the ground. Plant snowdrop bulbs in the early fall, at a depth of about 3 inches. They prefer well-drained soil and partial shade, and can even tolerate full shade.
- Winter Aconite: Winter aconite bulbs burst forth with bright yellow blooms, signaling the arrival of spring. Plant winter aconite bulbs in the early fall, at a depth of about 2-3 inches. They prefer well-drained soil and can thrive in partial shade or full sun.
- Christmas Rose: Also known as hellebores, Christmas rose bulbs produce elegant flowers in shades of white, pink, or purple. Plant Christmas rose bulbs in the early fall, at a depth of about 2-3 inches. They prefer well-drained soil and partial shade.
- Winter Daphne: Winter daphne bulbs offer clusters of sweetly scented flowers that bloom in late winter. Plant winter daphne bulbs in the early fall, at a depth of about 2 inches. They prefer well-drained soil and partial shade.
When planting winter-flowering bulbs, select a location that provides the right amount of sunlight and shelter from harsh winds. Prepare the soil by removing any weeds or debris and ensure it is well-drained. Space the bulbs according to the specific plant’s requirements, typically a few inches apart.
After planting, water the bulbs thoroughly to settle the soil and encourage root establishment. During the winter, ensure the bulbs receive adequate moisture, especially if there is limited rainfall. Adding a layer of mulch around the bulbs can help insulate the soil and protect them from freezing temperatures.
As winter arrives, these resilient bulbs will brave the cold and bloom amidst the frosty landscape. From the delicate snowdrops to the vibrant winter aconite, these winter-flowering bulbs will bring a touch of color and life to your garden when everything else seems dormant.
When to Prepare the Soil
Preparing the soil is an essential step in creating a favorable environment for your flower bulbs to grow and thrive. The timing for soil preparation depends on various factors and can differ based on the type of bulbs you are planting. Here are some guidelines to help you determine when to prepare the soil:
Fall-Planted Bulbs:
If you are planting flower bulbs in the fall, it’s best to prepare the soil a few weeks before planting. This gives you enough time to clear the area of any weeds or debris and amend the soil if necessary. Removing weeds is important to prevent them from competing with the bulbs for nutrients and water. Amending the soil with organic matter, such as compost or well-rotted manure, can improve its structure and drainage.
Spring-Planted Bulbs:
If you are planting flower bulbs in the spring, aim to prepare the soil a few weeks prior to planting. This allows you to loosen the soil, remove any weeds or grass, and amend it if necessary. Adding organic matter to the soil can enhance its fertility and improve drainage, which is beneficial for bulb growth.
When preparing the soil, it’s important to assess its quality and make any necessary improvements. In general, flower bulbs prefer well-drained soil that is loose and rich in organic matter. However, each type of bulb may have specific soil preferences, so it’s helpful to research the requirements of the bulbs you are planting.
Before planting, test the soil pH to ensure it falls within the appropriate range. Most flower bulbs prefer a slightly acidic to neutral pH (around 6 to 7). You can adjust the pH by adding lime to raise it or sulfur to lower it, following the instructions on the soil test result.
By preparing the soil prior to planting, you create a favorable environment for your flower bulbs to establish strong roots and thrive. Investing time and effort in soil preparation will yield healthier, more vibrant blooms in your garden.
How to Plant Flower Bulbs
Planting flower bulbs properly is crucial for their successful growth and blooming. Following the correct planting techniques ensures that the bulbs establish strong roots and have the best chance of producing beautiful flowers. Here is a step-by-step guide on how to plant flower bulbs:
1. Choose the Right Location:
Select a planting area that receives the appropriate amount of sunlight for the specific type of flower bulbs you are planting. Most bulbs prefer full sun to partial shade, so ensure the location matches their sunlight requirements.
2. Prepare the Soil:
Loosen the soil in the planting area using a garden fork or shovel. Remove any weeds or debris to create a clean planting space. If the soil is heavy or compacted, you can improve drainage and aeration by adding organic matter, such as compost or well-rotted manure.
3. Dig the Hole:
Dig a hole that is two to three times deeper than the height of the bulb. The general rule of thumb is to dig a hole that is about 4-6 inches deep. Consult the specific planting instructions for your bulb variety to determine the exact depth.
4. Plant the Bulb:
Place the bulb in the hole with the pointed end facing up. If the bulb does not have a distinct point, look for any roots or growth buds and position it accordingly. Gently cover the bulb with soil, pressing it down to eliminate air pockets around the roots.
5. Space the Bulbs:
Space the bulbs according to the recommended planting distance for the specific type of bulb. This information can be found on the packaging or bulb label. Proper spacing allows the bulbs to grow and spread without overcrowding, promoting healthier plants.
6. Water Thoroughly:
After planting, water the bulbs thoroughly to settle the soil and provide moisture for the roots. Make sure the soil is evenly moist but not waterlogged. Maintain regular watering, especially during dry spells, to support root development.
7. Mulch, if Desired:
Applying a layer of mulch around the planted bulbs can help conserve moisture, suppress weed growth, and provide insulation. Use organic mulch, such as wood chips or straw, and spread it around the base of the plants, being careful not to cover the bulbs themselves.
By following these steps, you’ll give your flower bulbs the best chance to thrive and produce beautiful, vibrant blooms. Proper planting techniques combined with suitable sunlight, soil conditions, and maintenance will result in a breathtaking display of flowers in your garden.
How Deep to Plant Flower Bulbs
The depth at which you plant flower bulbs is crucial for their successful growth and development. Planting bulbs at the correct depth ensures that they establish strong roots and emerge at the right time. The depth of planting can vary depending on the type and size of the bulb, so it’s important to follow specific guidelines for each variety. Here are some general tips on how deep to plant flower bulbs:
Bulb Size:
The size of the bulb determines how deep it should be planted. As a general rule, bulbs should be planted at a depth that is two to three times their own height. For example, if a bulb is about 2 inches tall, it should be planted at a depth of about 4 to 6 inches. Larger bulbs typically require deeper planting compared to smaller ones.
Type of Bulb:
Different types of bulbs have specific planting depth requirements. For example, most tulips and daffodils are planted at a depth of 6 to 8 inches, while crocuses are typically planted at a shallower depth of 3 to 4 inches. The specific planting instructions for each bulb variety should be indicated on the packaging or bulb label.
Soil Conditions:
The soil conditions can also impact the planting depth. If the soil is heavy or clayey, bulbs are typically planted slightly shallower to ensure good drainage and prevent rot. In contrast, if the soil is sandy or loose, bulbs may need to be planted slightly deeper to anchor them securely.
Climate:
The climate in your region can also influence planting depth. In colder climates, where the ground freezes deeply, bulbs are generally planted at a greater depth to protect them from extreme temperatures. Deeper planting helps insulate the bulbs and prevents frost damage.
Planting Depth for Layers:
If you want to create a layered look with different types of bulbs, the planting depth becomes important to ensure harmonious growth and blooming. In this case, plant the larger bulbs at the deeper recommended depth and then place the smaller bulbs on top, adjusting their planting depth accordingly.
Remember, these guidelines are general recommendations and it’s always best to consult the specific planting instructions for the bulbs you are planting. When in doubt, it’s better to err on the side of planting slightly deeper rather than too shallow, as deeper planting provides better protection and stability for the bulbs.
By planting bulbs at the appropriate depth, you provide them with the optimal conditions for healthy growth and beautiful blooms. Paying attention to planting depth, along with other important factors like sunlight, soil conditions, and watering, will contribute to the overall success of your flower bulbs in the garden.
How Far Apart to Plant Flower Bulbs
The spacing of flower bulbs plays a vital role in their growth and overall appearance in the garden. Proper spacing ensures that each bulb has enough room to develop roots, gather nutrients, and receive adequate light. The distance between bulbs may vary depending on the specific type of flower and its growth habit. Here are some general guidelines on how far apart to plant flower bulbs:
Spacing Recommendations:
As a general rule of thumb, bulbs should be spaced apart at a distance that is two to three times their own width. This provides sufficient space for the bulbs to grow without overcrowding each other. For example, if a bulb measures 2 inches in width, it should be planted with a spacing of about 4 to 6 inches.
Consider the Mature Size:
When determining spacing, it’s important to consider the mature size of the bulb and the growth habit of the plant. Some bulbs, like daffodils and tulips, form clumps or multiply over time. These bulbs require more spacing between them to allow for the clumps to expand without becoming crowded.
Planting in Groups or Clusters:
In certain cases, it may be desirable to plant bulbs in groups or clusters for a more visually impactful display. When planting in groups, bulbs are spaced closer together to create a more concentrated burst of color. For example, you may plant three or five bulbs in a triangle shape, with each bulb spaced a few inches apart from the others within the group.
Consider the Overall Design:
In addition to spacing individual bulbs, it’s also important to consider the overall design and arrangement of your garden. Consider the desired effect and aesthetic appeal you want to achieve. For a more formal and orderly look, bulbs can be planted with exact spacing and alignment. For a more natural and wildflower-like effect, bulbs can be planted in a more random pattern.
Special Considerations:
Some types of bulbs, such as smaller varieties or those with narrow foliage, may be planted closer together for a denser display. On the other hand, bulbs that have larger or wide-spreading foliage may require greater spacing to accommodate their growth. Always refer to the specific instructions for the bulb variety you are planting, as they may have unique spacing recommendations.
By giving flower bulbs the appropriate spacing, you provide them with the necessary room to grow, access nutrients, and receive sunlight. Proper spacing not only promotes healthy growth but also allows for a more visually appealing garden display. Take into account the size of the bulb, the growth habit of the plant, and your desired design aesthetic to determine the ideal spacing for your flower bulbs.
When to Water Flower Bulbs
Proper watering is crucial for the health and vitality of flower bulbs throughout their growth and blooming stages. The timing and frequency of watering are essential factors in ensuring that bulbs receive adequate moisture without becoming waterlogged. Here are some general guidelines on when to water flower bulbs:
At Planting Time:
After planting flower bulbs, it’s important to water them thoroughly to settle the soil and provide moisture for the initial root establishment. Water the bulbs immediately after planting, ensuring that the soil is evenly moist. This helps the bulbs to anchor in the soil and kick-start their growth.
During Active Growth:
Once the bulbs have sprouted and are in active growth, they need regular watering to support their development. Monitor the soil moisture and water the bulbs when the top inch of soil feels dry to the touch. It’s important to maintain consistent, moderate soil moisture to prevent the bulbs from drying out.
During Dry Spells:
During periods of dry weather or when there is a lack of rainfall, pay close attention to the moisture level in the soil. Bulbs may require additional watering to compensate for the lack of natural precipitation. Aim to provide enough water to thoroughly moisten the root zone without overwatering.
Be Mindful of Overwatering:
While it’s important to provide adequate moisture, it’s equally crucial to avoid overwatering flower bulbs. Overwatering can lead to rot and fungal diseases, which can be detrimental to the health of the bulbs. Avoid letting the bulbs sit in waterlogged soil, as this can suffocate the roots and promote root rot.
Consider Soil Drainage:
Soil drainage is an important factor to consider when determining watering frequency. Well-drained soil allows excess water to flow away, preventing waterlogging. However, heavy or clayey soils may hold onto water and require less frequent watering. Conversely, sandy soils drain quickly, potentially requiring more frequent watering.
Adjust Based on Weather Conditions:
Take into account the prevailing weather conditions when determining the watering needs of your flower bulbs. Hot and dry weather may necessitate more frequent watering, while cool and moist conditions may require less frequent watering.
Monitor Bulb Health:
Pay attention to the health and appearance of the foliage and blooms. If the foliage begins to wilt or appear stressed, this may indicate a lack of water. Adjust your watering schedule and provide additional moisture as needed to revive the bulbs.
By following these guidelines, you can ensure that your flower bulbs receive the right amount of water at the appropriate times. Proper watering practices will promote healthy growth, robust blooms, and the longevity of your flower bulbs in the garden.
When to Fertilize Flower Bulbs
Fertilizing flower bulbs is an important aspect of their care and can significantly impact their growth and blooming. Timing the application of fertilizer correctly ensures that bulbs receive the necessary nutrients to thrive. Here are some factors to consider when deciding when to fertilize your flower bulbs:
Fertilize at Planting Time:
When planting flower bulbs, it is beneficial to incorporate fertilizer into the soil. This provides an initial boost of nutrients to support the bulbs’ early growth and helps establish healthy roots. Use a balanced, slow-release fertilizer formulated for bulbs, following the recommended application rate indicated on the packaging.
After Bulbs Sprout:
Once the bulbs have sprouted and are actively growing, it is a good time to feed them with fertilizer. This helps sustain their growth and provides the essential nutrients they need to develop strong stems and healthy foliage. Apply a granular fertilizer around the base of the plants, following the package instructions for the recommended amount and frequency of application.
When Bulbs are Dormant:
Some gardeners prefer to fertilize their bulbs after they have finished flowering and entered a dormant stage. Applying a slow-release bulb fertilizer during this time can help replenish nutrient reserves in the bulb for the following growing season. Make sure to follow the recommended application rates provided by the fertilizer manufacturer.
Avoid Fertilizing Too Late in the Season:
Avoid applying fertilizer too late in the growing season, as it may encourage excessive foliage growth at the expense of bulb development. Fertilizing in late summer or early fall is generally the latest recommended time to provide nutrients before the bulbs enter dormancy.
Consider Bulb Needs:
Different flower bulbs have varying nutrient requirements. Some bulbs, like daffodils and tulips, benefit from a single application of fertilizer at planting time and may not require additional feeding during the growing season. Other bulbs, like dahlias or gladiolus, may benefit from multiple applications of fertilizer throughout the growing season to support their vigorous growth and continuous blooming.
Monitor Plant Health:
Pay attention to the overall health and appearance of your flower bulbs. If the foliage appears pale, weak, or exhibits signs of nutrient deficiencies, it may indicate that the bulbs need additional feeding. Adjust your fertilization schedule or consider applying a liquid fertilizer to provide a quick nutrient boost.
Avoid Over-fertilizing:
It is important to strike a balance when applying fertilizer to flower bulbs. Over-fertilizing can lead to excessive foliage growth, reduced flower production, and may even burn the plant’s roots. Always follow the recommended application rates and remember that less is often better than too much.
By timing your fertilizer applications appropriately, you can provide your flower bulbs with the necessary nutrients to support their growth and flowering. Proper fertilization, combined with other essential care practices like watering and sunlight, will result in thriving bulbs that yield vibrant blooms in your garden.
When to Deadhead Flower Bulbs
Deadheading is the process of removing spent or faded flowers from plants. When it comes to flower bulbs, deadheading plays a crucial role in maintaining the appearance of the plants and promoting continuous blooming. The timing of deadheading can vary depending on the specific flower bulb variety. Here are some general guidelines on when and how to deadhead your flower bulbs:
Remove Spent Flowers:
Deadheading should be done as soon as the flowers on your bulb plants start to fade and wilt. This is important because allowing spent flowers to remain on the plant can divert energy towards seed production rather than new growth or additional blooming.
Spring-Flowering Bulbs:
For spring-flowering bulbs, such as tulips, daffodils, and hyacinths, deadheading is typically not necessary. These bulbs naturally go through a process where their foliage turns yellow and dies back after blooming. It is best to allow the foliage to remain intact until it naturally withers and can be easily removed without damaging the bulb. This allows the bulb to store energy for next year’s growth.
Summer-Flowering Bulbs:
Deadheading is beneficial for many summer-flowering bulbs, such as dahlias and lilies. For these bulbs, removing spent flowers not only improves the plant’s appearance but also encourages additional blooms. Cut the flower stem just above a leaf node or bud to promote new growth and potentially extend the flowering period.
Fall-Flowering Bulbs:
For fall-flowering bulbs, like autumn crocus and colchicum, deadheading is generally not necessary. These bulbs tend to produce a limited number of flowers and often go dormant shortly after blooming. As with spring-flowering bulbs, it is best to allow the foliage to naturally yellow and die back before removing it.
Proper Deadheading Technique:
When deadheading, use sharp, clean pruning shears or scissors to make a clean cut just above a leaf node or lateral bud. This helps to minimize damage to the plant and promotes healthy regrowth. Take care not to remove any emerging leaves or buds that may be nearby.
Monitor for Seed Development:
While deadheading is important, it’s also worth noting that some flower bulbs produce attractive seed pods or can self-seed. If you wish to allow your bulb plants to produce seeds or naturalize, avoid deadheading these specific flowers. This can add another dimension to your garden and create additional interest.
By deadheading your flower bulbs at the appropriate time, you can help maintain the overall health and appearance of your plants. Deadheading allows the bulbs to focus their energy on new growth and future blooms, ensuring a longer-lasting and more visually appealing display in your garden.
When to Divide Flower Bulbs
Dividing flower bulbs is an important task to maintain the vitality and productivity of the plants. Over time, bulbs can become overcrowded, resulting in reduced blooming and weaker growth. Dividing bulbs rejuvenates them, promotes better airflow, and allows for the creation of new plants. The timing for dividing flower bulbs depends on the specific type of bulb and its growth habit. Here are some general guidelines on when to divide your flower bulbs:
Spring-Flowering Bulbs:
Spring-flowering bulbs, such as tulips and daffodils, should ideally be divided in late summer or early fall, once the foliage has yellowed and withered. Dividing these bulbs shortly after they finish blooming can disrupt their natural cycle and affects their ability to store energy for the following year. Allow the foliage to remain until it naturally declines, then carefully dig up the bulbs and separate them for replanting.
Summer-Flowering Bulbs:
Summer-flowering bulbs, like dahlias and gladiolus, are typically divided in late winter or early spring, before new growth emerges. This allows ample time for the bulbs to rest during the dormant season. Dig up the clumps and separate the individual bulbs, ensuring that each division has healthy roots and shoots. Discard any damaged or diseased bulbs and replant the divisions in their desired locations.
Fall-Flowering Bulbs:
Fall-flowering bulbs, such as autumn crocus and colchicum, are not commonly divided. These bulbs typically produce small clumps and multiply slowly. If you notice that your fall-flowering bulbs have become crowded or are not performing well, you can choose to divide them in the late summer or early fall, after the foliage has withered. Be cautious when handling these delicate bulbs, as they may be more susceptible to damage during division.
Signs that Bulbs Need Dividing:
There are a few indicators that can help you determine when it’s time to divide your flower bulbs. Look for overcrowding, a decline in blooming, smaller or fewer flowers, and clumps that are pushing out of the ground. These signs suggest that the bulbs have become congested and would benefit from division.
Replanting Divisions:
When dividing bulbs, it’s important to replant the divisions promptly. Dig a hole slightly larger than the bulb and plant them at the appropriate planting depth. Discard any weak, damaged, or diseased divisions and only replant the healthy ones.
Dividing flower bulbs at the right time allows you to rejuvenate the plants, increase their productivity, and maintain a healthy garden. By paying attention to signs of overcrowding and following the timing recommendations for each type of bulb, you can ensure the continued beauty and vitality of your flower beds.
When to Lift and Store Flower Bulbs
Lifting and storing flower bulbs is a necessary practice to protect delicate bulbs from harsh winter conditions and ensure their survival for the following growing season. The timing for lifting and storing bulbs depends on the specific type of bulb and the climate in your region. Here are some general guidelines on when to lift and store your flower bulbs:
Spring-Flowering Bulbs:
Spring-flowering bulbs, such as tulips and daffodils, generally do not require lifting and storing each year. These bulbs are typically left in the ground to go through their natural cycle of foliage growth, blooming, and dormancy. However, if you live in an area with extremely cold winters or have issues with pests or diseases, you may choose to lift and store these bulbs after the foliage has withered and turned yellow. Lift the bulbs in late spring or early summer and store them in a cool, dry place until replanting in the fall.
Summer-Flowering Bulbs:
Summer-flowering bulbs, like dahlias and gladiolus, require lifting and storing each year in regions with cold winters. Wait until after the first frost or when the foliage has turned yellow and withered. Carefully dig up the bulbs, taking care not to damage them. Remove excess soil and allow the bulbs to dry in a well-ventilated area for a few days. Store them in a cool, dry place with good airflow, such as a basement or garage. Be sure to label the bulbs for easy identification and protect them from extreme temperatures.
Fall-Flowering Bulbs:
Fall-flowering bulbs, such as autumn crocus and colchicum, do not typically require lifting and storing. These bulbs are usually hardy and can remain in the ground throughout the winter and into the next growing season. If you choose to lift and store fall-flowering bulbs, do so in late spring or early summer after the foliage has withered. Follow the same steps as for spring-flowering bulbs, drying and storing them in a cool, dry place until replanting in the fall.
Signs that Bulbs Need Lifting:
There are several signs that may indicate the need to lift and store your flower bulbs. These include crowded clumps, declining blooms, poor drainage in the planting area, or the desire to propagate or relocate bulbs to a different area of the garden. Additionally, if you live in an area with extremely cold winters or have specific pest or disease concerns, you may choose to lift and store bulbs as a protective measure.
By lifting and storing flower bulbs at the appropriate time, you can protect them from adverse winter conditions and ensure their continued health and vitality. Careful handling and proper storage techniques will allow you to enjoy beautiful blooms year after year from your treasured bulbs.