
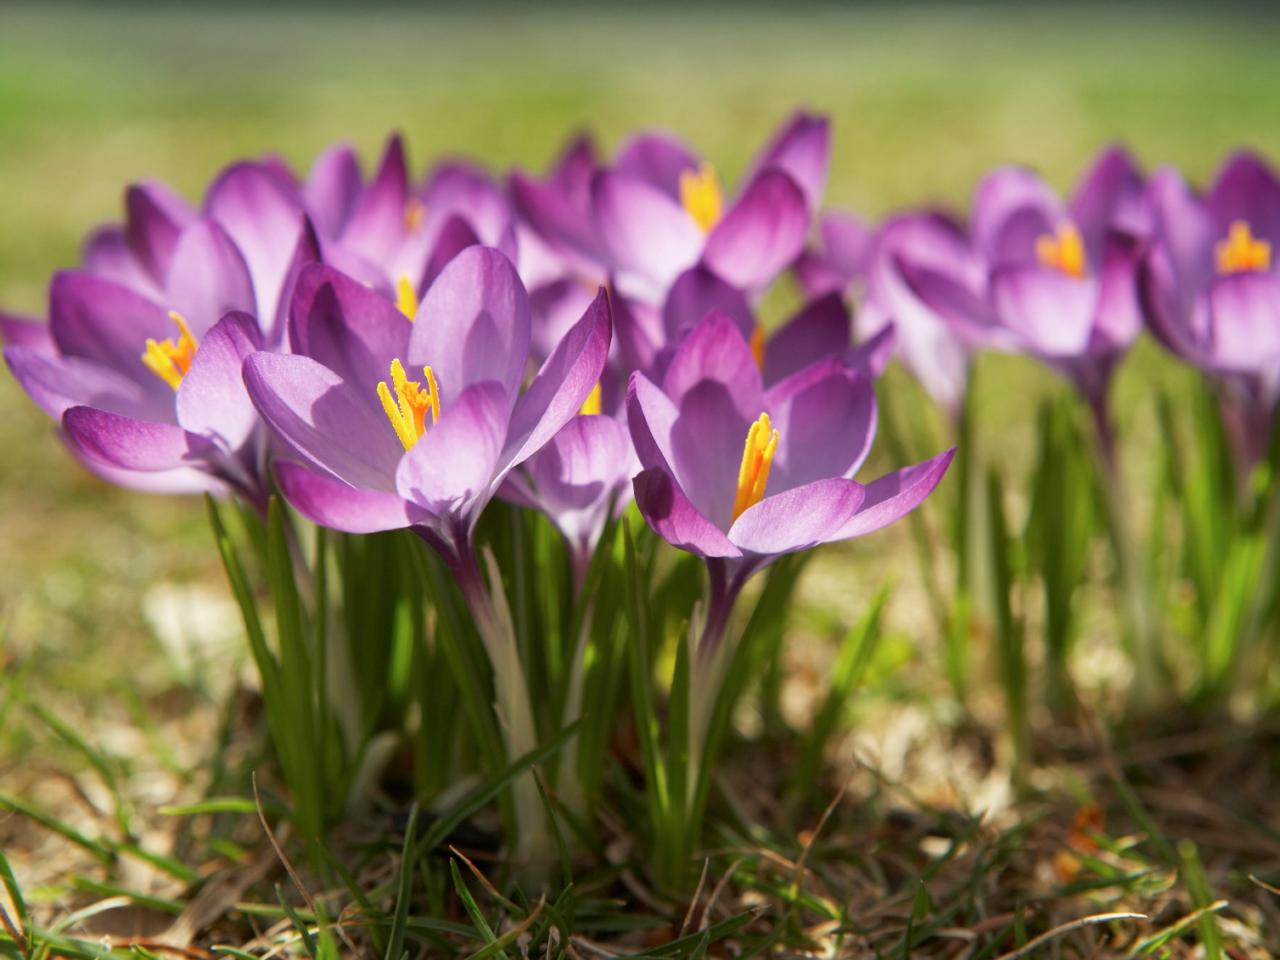
Best Time to Plant Crocus Bulbs
When it comes to planting crocus bulbs, timing is crucial. These beautiful flowers are known for their early bloom, often signaling the arrival of spring. The best time to plant crocus bulbs is in the fall, ideally about six to eight weeks before the first frost is expected in your area. This will give the bulbs enough time to establish their root systems before the cold winter months.
Planting crocus bulbs in the fall allows them to go through a necessary period of dormancy during the winter. This period of rest is essential for the bulbs to develop and store energy, ensuring vigorous growth and vibrant blooms in the following spring.
It’s important to note that the exact planting time may vary depending on your location and climate. If you live in a region with milder winters, you may be able to plant crocus bulbs as late as November. However, if you reside in an area with harsher winters, it is recommended to plant them earlier in the fall, around September or October.
Another factor to consider when determining the best time to plant crocus bulbs is the soil temperature. Ideally, the soil temperature should be around 50°F (10°C) for successful bulb growth. If the soil is too warm, the bulbs may sprout prematurely and be susceptible to damage from frost. On the other hand, if the soil is too cold, the bulbs may not establish proper root systems.
By following the general guideline of planting crocus bulbs in the fall, you can ensure optimal growing conditions for these resilient flowers. Remember to keep track of the local weather patterns and adjust the planting time accordingly. With proper timing and care, you’ll be rewarded with a stunning display of vibrant crocus blooms in the early spring.
Factors to Consider Before Planting Crocus Bulbs
Before diving into planting crocus bulbs, there are a few important factors to consider. These considerations will help ensure that your crocus bulbs thrive and produce beautiful blooms. Here are some key factors to keep in mind:
1. Climate: Crocus bulbs are generally suited for temperate climates with cold winters and moderate springs. They prefer climates with well-defined seasons and a period of dormancy. Consider the climate in your region and whether it aligns with the requirements of crocus bulbs.
2. Soil Conditions: Crocus bulbs prefer well-draining soil that is rich in organic matter. Conduct a soil test to assess the pH level and make any necessary adjustments. Crocus bulbs thrive in slightly acidic to neutral soil, with a pH range of 6.0 to 7.0.
3. Sunlight Exposure: Crocus bulbs prefer full sun to partial shade. Ensure that the planting location receives at least 6 hours of direct sunlight each day. Avoid areas with excessive shade, as this can hinder their growth and reduce the number of blooms.
4. Watering Requirements: Crocus bulbs require well-drained soil but also need consistent moisture. Before planting, consider the natural water drainage in the chosen location. Avoid areas prone to excessive moisture or waterlogging, as this can cause the bulbs to rot.
5. Pest Control: Take into account any potential pests that are common in your region. Some common pests that can affect crocus bulbs include squirrels, mice, and voles. Implement preventive measures like using wire mesh or planting bulbs in containers to protect them from these pests.
6. Companion Planting: Crocus bulbs can be planted alongside other early blooming bulbs or perennials to create a visually appealing garden. Consider selecting companion plants that have similar growing requirements and complement the colors and textures of crocus blooms.
By carefully considering these factors, you can ensure that your crocus bulbs are planted in the most suitable conditions for their growth and development. This will contribute to vibrant spring blooms that enhance the beauty of your garden or landscape.
Crocus Bulb Types: Which One to Choose?
When it comes to crocus bulbs, there is a wide variety of types to choose from, each offering its own unique characteristics and charm. Here are some popular crocus bulb types to consider when planning your garden:
1. Dutch Crocus (Crocus vernus): Dutch crocus bulbs are among the most common and widely available types. They produce large, cup-shaped blooms in vibrant shades of purple, white, and yellow. Dutch crocus bulbs are known for their early spring flowering and compact size, making them suitable for both garden beds and containers.
2. Giant Crocus (Crocus flavus): As the name suggests, giant crocus bulbs produce larger blooms compared to other varieties. Their flowers come in a range of colors, including yellow, white, purple, and striped combinations. Giant crocus bulbs are ideal for naturalizing, meaning they can be left undisturbed to multiply and create stunning displays over time.
3. Snow Crocus (Crocus chrysanthus): Snow crocus bulbs are known for their delicate and dainty blooms that often appear even before the snow has completely melted. These early bloomers boast a wide range of colors, including white, yellow, and striped varieties. Snow crocus bulbs are great for rock gardens, borders, and naturalized plantings.
4. Autumn Crocus (Crocus speciosus): Unlike other crocus varieties that bloom in the spring, autumn crocus bulbs produce their flowers in the fall. They offer a splash of color when most gardens are winding down for the season. Autumn crocus bulbs feature delicate, star-shaped blooms in shades of purple and pink. These bulbs are usually planted in late summer for fall blooms.
5. Wild Crocus (Crocus tommasinianus): Wild crocus bulbs, also known as the Tommasini crocus, are native to the Balkans and are admired for their natural and casual appearance. They produce slender, cup-shaped blooms in shades of lilac, mauve, and white. Wild crocus bulbs are ideal for naturalized plantings, rock gardens, and woodland areas.
When choosing crocus bulb types, consider factors such as bloom time, color preferences, and suitability to your growing conditions. Mix and match different types to create a diverse and visually captivating display in your garden. Regardless of the crocus bulb types you choose, these stunning flowers are sure to bring joy and beauty to your outdoor space.
Choosing the Right Location for Planting Crocus Bulbs
Choosing the right location is key to the success of your crocus bulbs. By providing the optimal growing conditions, you can ensure that these vibrant flowers thrive and create a stunning display. Consider the following factors when selecting a location for planting crocus bulbs:
1. Sunlight: Crocus bulbs prefer full sun to partial shade. Look for a location that receives at least 6 hours of direct sunlight per day. This will help promote healthy growth and vibrant blooms. However, if you live in an area with hot summers, consider planting them in a spot with partial shade to protect the bulbs from excessive heat.
2. Soil Drainage: Crocus bulbs require well-draining soil to prevent them from sitting in waterlogged conditions. Avoid areas with heavy clay soils that can retain too much moisture. Instead, opt for loamy or sandy soils that allow excess water to drain away. If your soil tends to be heavy and poorly drained, you can improve the drainage by adding organic matter like compost or peat moss.
3. Soil pH: Crocus bulbs prefer slightly acidic to neutral soil, with a pH range of 6.0 to 7.0. Test your soil’s pH level using a soil testing kit, and make any necessary adjustments. If your soil is too acidic, you can add lime to raise the pH. Conversely, if the soil is too alkaline, you can add elemental sulfur to lower the pH.
4. Protection from Strong Winds: Strong winds can damage the delicate blooms of crocus flowers. Choose a location that is sheltered from strong winds, such as near a fence, hedge, or building. This protection will help preserve the beauty of the blooms and prevent the bulbs from being knocked over or damaged.
5. Accessibility: Consider the accessibility of the planting area. Planting crocus bulbs in an area that is easy to access will make it more convenient for maintenance tasks such as watering, fertilizing, and deadheading. It will also allow you to fully enjoy the beauty of the blooms and easily monitor the health of the plants.
By carefully selecting the right location, you can provide the best growing conditions for your crocus bulbs. This will contribute to their overall health, vigor, and impressive display of colorful blooms. Take the time to assess your garden or landscape, keeping in mind the specific needs of crocus bulbs, and prepare a suitable spot to ensure their successful growth.
Preparing the Soil for Crocus Bulbs
Preparing the soil is an essential step in ensuring the success of your crocus bulbs. By providing a fertile and well-prepared planting bed, you can create an ideal environment for these stunning flowers to grow and thrive. Here are some steps to follow when preparing the soil for crocus bulbs:
1. Clear the Area: Start by clearing the planting area of any weeds, rocks, or debris. Removing these obstacles will allow the crocus bulbs to establish themselves without competition for nutrients and space.
2. Loosen the Soil: Loosen the soil using a gardening fork or a tiller. This will help improve drainage and allow the crocus bulbs’ roots to penetrate the soil more easily. Aim for a depth of about 8 to 10 inches (20 to 25 cm) to ensure that the soil is loose and friable.
3. Amend the Soil: Depending on the soil quality, you may need to amend it with organic matter. Add compost, well-rotted manure, or organic fertilizer to improve the soil’s nutrient content and structure. This will provide a fertile base for the crocus bulbs to receive the essential nutrients they need for growth.
4. Adjust pH if Needed: Test the soil’s pH level using a soil testing kit. Crocus bulbs prefer slightly acidic to neutral soil, with a pH range of 6.0 to 7.0. If the pH is too low, add lime to raise it. If the pH is too high, add elemental sulfur to lower it. Follow the instructions on the product packaging for the correct application rate.
5. Incorporate Organic Matter: Work the organic matter into the soil with a garden fork or tiller. This will help improve the soil’s fertility, structure, and ability to retain moisture. Organic matter also enhances the soil’s beneficial microbial activity, which aids in nutrient availability for the crocus bulbs.
6. Level the Soil: Once the soil amendments are mixed in, level the planting area using a rake. This will ensure a uniform surface for planting and provide an even growing environment for the crocus bulbs.
7. Water the Soil: Before planting the crocus bulbs, thoroughly water the prepared soil. This will help settle the soil and ensure proper moisture distribution for the bulbs’ initial growth.
By taking the time to properly prepare the soil, you are setting the stage for successful crocus bulb growth and vibrant blooms. The improved soil structure and fertility will provide the bulbs with the necessary nutrients and drainage, resulting in healthy plants and a stunning display of flowers.
How Deep to Plant Crocus Bulbs?
The depth at which you plant your crocus bulbs is crucial for their successful growth and development. Planting them at the correct depth ensures that they establish strong roots and emerge at the right time in the growing season. Here are some guidelines on how deep to plant crocus bulbs:
1. General Rule: As a general guideline, plant crocus bulbs at a depth of around 3 to 4 inches (7.5 to 10 cm). This measurement is taken from the base of the bulb to the soil surface. Planting at this depth allows the bulbs to be securely anchored and reduces the risk of damage from severe weather conditions or digging animals.
2. Lighter Soil: If you have lighter, sandy soil, it is advisable to plant crocus bulbs slightly deeper, around 4 inches (10 cm). Lighter soils tend to dry out more quickly, and planting at a slightly deeper depth will help the bulbs retain moisture and prevent them from becoming dehydrated.
3. Heavier Soil: If you are dealing with heavier, clay-based soil, plant the crocus bulbs at a shallower depth of approximately 3 inches (7.5 cm). Heavy soils retain more moisture and can lead to bulb rot if planted too deeply. Planting at a slightly shallower depth helps promote better drainage and reduces the risk of bulb rot.
4. Weather Considerations: Consider the weather conditions in your area when determining planting depth. If you live in a region with extremely cold winters, it may be beneficial to plant crocus bulbs slightly deeper to provide additional insulation and protect them from frost heaving.
5. Spacing Between Bulbs: Leave a spacing of about 3 to 4 inches (7.5 to 10 cm) between crocus bulbs. This will allow each bulb to have enough space for proper root development and prevent overcrowding, which can lead to competition for nutrients and restricted growth.
6. Planting in Groups: To create a more impactful display, consider planting crocus bulbs in groups rather than individually. Planting in clusters of 5 to 7 bulbs will create a visually appealing effect and provide a stronger visual impact when the flowers bloom.
By following these guidelines, you can ensure that your crocus bulbs are planted at the appropriate depth, promoting healthy growth and abundant blooms. Remember to adjust the planting depth based on your soil type, weather conditions, and desired visual effect. With the right planting depth, your crocus bulbs will emerge at the perfect time, adding vibrant color and beauty to your garden or landscape.
Spacing and Planting Crocus Bulbs
Proper spacing and planting of crocus bulbs are important factors in ensuring healthy growth and an attractive display of flowers. Adequate spacing allows each bulb to have sufficient access to nutrients and sunlight, while strategic planting techniques can create visually appealing arrangements. Here’s what you need to know about spacing and planting crocus bulbs:
1. Spacing: Leave a spacing of about 3 to 4 inches (7.5 to 10 cm) between crocus bulbs. This spacing is necessary to prevent overcrowding, which can result in restricted growth and competition for nutrients. Proper spacing also promotes good air circulation, reducing the risk of fungal diseases.
2. Planting in Clumps: For a more stunning visual impact, consider planting crocus bulbs in clumps or drifts rather than individual bulbs. Planting in groups of 5 to 7 bulbs creates a denser display and mimics their natural growth patterns. This technique is particularly effective when planting larger areas or creating a naturalized look.
3. Arranging Colors: If you have multiple colors of crocus bulbs, think about how you want to arrange them in your garden bed or container. Planting bulbs of the same color together creates a bold and uniform display, while interspersing different colors can create a vibrant and dynamic look. Experiment with different color combinations to find the arrangement that suits your aesthetic preferences.
4. Planting Depth: Refer to the recommended planting depth for crocus bulbs, which is generally around 3 to 4 inches (7.5 to 10 cm). Ensure that all bulbs are planted at a consistent and appropriate depth for uniform growth and flowering.
5. Planting Technique: To plant crocus bulbs, use a hand trowel or bulb planter to dig a hole at the appropriate depth. Gently place the bulb in the hole with the pointed end facing upwards. Cover the bulb with soil and firm it down gently to remove any air pockets. Water the area lightly to help settle the soil and initiate growth.
6. Layering with Other Bulbs: Consider layering crocus bulbs with other early spring-blooming bulbs, such as daffodils or tulips. Planting larger bulbs at a deeper depth and then adding a layer of crocus bulbs on top creates a visually stunning effect, with a burst of color from multiple types of flowers emerging at different heights.
Taking these factors into consideration when spacing and planting crocus bulbs will help you achieve an attractive and well-organized display. By providing the right amount of spacing and implementing strategic planting techniques, you can create a visually stunning garden or container filled with vibrant crocus blooms.
Mulching and Watering Crocus Bulbs
Mulching and watering are essential aspects of caring for crocus bulbs, providing them with the necessary moisture and protection. Proper mulching helps conserve soil moisture, regulates soil temperature, and suppresses weed growth, while adequate watering ensures the bulbs receive adequate hydration for healthy growth. Here’s what you need to know about mulching and watering crocus bulbs:
1. Mulching: Apply a layer of organic mulch, such as shredded bark or straw, around the planted crocus bulbs. Mulching helps retain soil moisture by reducing evaporation and helps regulate soil temperature, protecting the bulbs from extreme heat or cold. Additionally, mulch acts as a natural weed barrier, preventing weeds from competing with the bulbs for nutrients.
2. Mulch Depth: Spread a layer of mulch about 1 to 2 inches (2.5 to 5 cm) thick around the base of the crocus plants. Avoid piling the mulch directly on top of the bulbs, as this can lead to excess moisture retention and potential rotting. Leave a small gap around each bulb to allow for proper air circulation.
3. Watering: Crocus bulbs require consistent moisture, especially during their active growth period. Water the bulbs regularly, keeping the soil slightly moist but not overly saturated. Aim to provide about 1 inch (2.5 cm) of water per week, supplementing natural rainfall if needed.
4. Watering Frequency: Monitor the moisture level in the soil and adjust the watering frequency accordingly. Watering may be more frequent during dry spells or in areas with sandy soils that drain quickly. Be cautious not to overwater, as waterlogged soil can cause bulb rot. Allow the soil to dry slightly between watering to prevent excessive moisture retention.
5. Rainfall Considerations: Take into account the amount of rainfall in your area when determining the timing and frequency of watering. If there has been adequate rainfall, you may need to reduce or suspend supplemental watering. However, if there has been a lack of rain, be diligent about providing enough water to sustain the crocus bulbs.
6. Watering after Blooming: After the crocus flowers have faded and the plants enter their dormant phase, reduce watering. This allows the bulbs to gradually enter their resting period. Minimal watering during dormancy helps prevent excessive moisture that can lead to bulb rot or fungal diseases.
By applying a layer of mulch around the crocus bulbs and providing consistent moisture through proper watering, you can help ensure their overall health and vitality. These care practices contribute to the longevity and beauty of the crocus blooms, enhancing the enjoyment of these early spring flowers in your garden or landscape.
Caring for Crocus Bulbs during the Growing Season
Caring for crocus bulbs during the growing season is crucial for maintaining their health and maximizing the beauty of their blooms. These small but resilient flowers require minimal care, but there are a few key practices to keep in mind to ensure their optimal growth. Here are some tips for caring for crocus bulbs during the growing season:
1. Regular Monitoring: Keep a close eye on the crocus bulbs throughout the growing season. Check for any signs of pests, diseases, or nutrient deficiencies. Promptly address any issues that may arise to prevent problems from worsening and impacting the bulbs’ health.
2. Weed Control: Keep the planting area free from weeds that can compete with the crocus bulbs for nutrients and moisture. Regularly remove any weeds that sprout near the bulbs, taking care not to disturb the bulbs’ roots. Hand-pulling weeds or using a small hand tool is recommended to avoid damaging the bulbs.
3. Fertilizing: Crocus bulbs generally do not require regular fertilization. However, if your soil is lacking in nutrients, you can apply a balanced slow-release fertilizer once a year in early spring. Follow the manufacturer’s instructions for application rates and avoid overfertilizing, as this can lead to excessive foliage growth at the expense of flower production.
4. Deadheading: After the crocus flowers fade, remove the spent blooms by gently pinching them off or snipping them at the base. Deadheading prevents the plants from diverting energy to seed production and encourages the bulbs to invest energy in storing nutrients for future growth and blooming.
5. Leave Foliage Intact: Allow the crocus foliage to remain intact until it naturally withers and turns yellow. The green foliage helps nourish the bulbs and replenish their energy reserves for the following year’s blooms. Once the foliage has completely dried out, it can be gently removed.
6. Avoid Overwatering: While crocus bulbs require consistent moisture during their active growth period, be cautious not to overwater. Excessive moisture can lead to bulb rot and other root-related issues. Ensure that the soil drains well and allow it to dry out slightly between watering to avoid waterlogged conditions.
7. Pest and Disease Management: Monitor for common pests like squirrels, mice, and voles that may dig up or feed on crocus bulbs. Implement appropriate pest control measures, such as using wire mesh or covering the bulbs with netting, to protect them. Additionally, be on the lookout for signs of diseases, such as fungal infections, and promptly address any issues to protect the bulbs’ health.
By following these care practices during the growing season, you can support the overall health and vitality of your crocus bulbs. With just a little attention and care, you’ll be rewarded with a breathtaking display of colorful blooms that add charm and beauty to your garden.
When to Expect Blooms from Crocus Bulbs
Crocus bulbs are known for their early spring blooms, often among the first signs of color and life after a long winter. The timing of when to expect blooms can vary depending on various factors such as the crocus variety, regional climate, and specific weather conditions. Here are some general guidelines on when to anticipate the arrival of crocus blooms:
1. Early Spring Emergence: Crocus bulbs typically emerge from the ground in early spring, signaling the end of winter and the beginning of the growing season. The exact timing can vary, but in most regions, you can expect to see the first foliage emerge in late winter or early spring when the soil begins to warm up.
2. Blooming Period: Once the foliage emerges, crocus blooms follow shortly after. The duration of the blooming period can vary depending on the crocus variety and environmental conditions. On average, crocus blooms can last for about 1 to 3 weeks, adding a burst of vibrant color to your garden or landscape.
3. Early-, Mid-, or Late-Spring Varieties: Crocus bulbs are often categorized into early-, mid-, or late-spring varieties based on their expected bloom time. Early-spring crocus bulbs tend to bloom in late winter to early spring, while mid-spring varieties bloom in mid to late spring. Late-spring crocus bulbs bloom towards the end of the spring season, extending the floral display.
4. Climate and Regional Factors: The climate and region in which you live play a significant role in determining the specific timing of crocus blooms. In colder northern regions, crocus blooms may appear later in spring when the weather warms up. In milder southern regions, crocus blooms may appear earlier, sometimes as early as the late winter months.
5. Year-to-Year Variations: It’s important to note that the exact timing of crocus blooms can vary from year to year due to weather fluctuations and other environmental factors. Unusually warm or cold spells can influence the emergence and blooming timeline of crocus bulbs. Pay attention to local weather patterns and the current growing season to get a better understanding of when to expect the blooms.
By considering the above factors and observing the growth patterns of your crocus bulbs, you can have a general idea of when to expect their delightful blooms. The anticipation of these early spring flowers adds excitement to the changing seasons and brings joy and color to your outdoor space.
How to Extend the Blooming Season of Crocus Bulbs
The blooming season of crocus bulbs is a delightfully ephemeral period, but there are ways to prolong their beautiful display and enjoy their vibrant colors for an extended period. By employing certain techniques and practices, you can extend the blooming season of crocus bulbs in your garden. Here’s how:
1. Plant Different Crocus Varieties: Select a variety of crocus bulbs with staggered bloom times. Choose early-spring, mid-spring, and late-spring varieties to ensure a continuous succession of blooms throughout the season. This strategy allows you to enjoy crocus flowers for a more extended period, as each variety will come into bloom at a different time.
2. Mix Bulb Sizes: Plant crocus bulbs of different sizes to prolong the blooming season. Smaller bulbs typically bloom earlier, while larger bulbs tend to bloom later. By mixing bulb sizes when planting, you can stagger the bloom times and enjoy a more extended show of crocus flowers.
3. Choose Different Color Combinations: Consider selecting crocus bulbs in various color combinations. Planting bulbs with different colors in a specific area can create an impressive and diverse display. As each color variety blooms at its own pace, the combination of colors will add visual interest and extend the blooming season.
4. Provide Adequate Sunlight: Ensure that your crocus bulbs receive adequate sunlight. Optimal exposure to sunlight helps promote healthy growth and encourages earlier blooms. Choose a planting location with full sun to partial shade, as this will maximize the energy production of the bulbs and extend their blooming season.
5. Maintain Adequate Moisture: Be diligent about watering your crocus bulbs during their active growth periods. Adequate moisture keeps the bulbs healthy and encourages longer blooming periods. Soil that is too dry can shorten the blooming time, while overwatering can lead to bulb rot. Strike a balance by ensuring the soil remains consistently moist but not overly saturated.
6. Deadhead Spent Blooms: Regularly deadhead the spent blooms by gently removing them once they fade. Deadheading prevents the plant from expending energy on producing seeds and redirects its resources toward propagating more flowers. This practice can help prolong the blooming season and encourage the growth of new buds.
7. Mulching: Apply a layer of organic mulch around the crocus bulbs. Mulching helps maintain soil moisture and regulate soil temperature, which can extend the blooming season. It also helps suppress weeds that could compete with the bulbs for nutrients, allowing the crocus flowers to flourish.
By implementing these strategies, you can extend the blooming season of crocus bulbs and enjoy their vibrant display for a longer period. Embrace the variety of crocus types, colors, and planting techniques to create a visually stunning and prolonged show of these early spring beauties in your garden.
When and How to Harvest Crocus Bulbs
Harvesting crocus bulbs is an important step in the plant’s lifecycle, as it allows you to propagate new bulbs and maintain a healthy and vibrant flower display in your garden. Timing is crucial when it comes to harvesting crocus bulbs to ensure their successful storage and future growth. Here’s a guide on when and how to harvest crocus bulbs:
1. Harvesting Time: Crocus bulbs are typically harvested in late spring after the foliage has completely withered and turned yellow. This usually occurs a few weeks after the flowers have finished blooming. The yellow foliage indicates that the bulbs have finished storing nutrients for the following year’s growth.
2. Foliage Removal: Once the foliage has yellowed, carefully lift it away from the soil using your hands or a small gardening fork. Gently pull the foliage to remove it from the bulbs, taking care not to damage the bulbs in the process. Do not cut the foliage prematurely, as this can hinder nutrient absorption and weaken the bulbs.
3. Bulb Extraction: After removing the foliage, gently dig around the bulbs using a small hand trowel or garden fork. Be cautious not to damage the bulbs as you unearth them. Once the bulbs are exposed, carefully lift them out of the soil, shaking off any excess dirt or debris.
4. Bulb Cleaning: After harvesting, gently clean the bulbs to remove any remaining soil or debris. You can lightly rinse the bulbs with water or brush off the excess dirt using a soft brush. Avoid washing the bulbs with excessive force, as this can damage their outer protective layer.
5. Bulb Division: If you notice clumps or clusters of bulbs during harvest, you can divide them for propagation and future planting. Gently separate the bulbs from the clumps, ensuring that each bulb has healthy roots attached. Discard any damaged or rotting bulbs and keep only the healthy ones for replanting.
6. Drying and Storage: After harvesting and cleaning, allow the bulbs to dry in a well-ventilated area for a few days. This drying period helps harden the bulbs’ outer layers and prevents fungal growth. Once the bulbs are completely dry, store them in a cool, dry, and dark place until the next planting season. You can store them in mesh bags, paper bags, or wooden crates, ensuring good airflow to prevent rot.
By harvesting crocus bulbs at the right time and following the appropriate techniques for bulb extraction and storage, you can ensure their successful propagation and maintain a healthy and abundant crocus flower display in your garden for years to come.
How to Store Crocus Bulbs for Next Season
Properly storing crocus bulbs after harvest is essential for their long-term survival and successful growth in the following season. By providing the correct conditions and handling the bulbs with care, you can ensure their viability and vibrant blooms year after year. Here’s a step-by-step guide on how to store crocus bulbs for the next season:
1. Drying the Bulbs: After harvesting, allow the crocus bulbs to dry in a well-ventilated area for about 1 to 2 weeks. Lay them out on a clean surface or use a drying rack. This period helps the bulbs harden and prepare for storage.
2. Cleaning the Bulbs: Once the bulbs are dry, gently brush off any remaining soil or debris. Avoid using water, unless absolutely necessary, as excess moisture can promote rot during storage. Inspect the bulbs and discard any that appear damaged, diseased, or shriveled.
3. Preparing for Storage: Place the cleaned and inspected bulbs in a breathable container or bag. Mesh bags, paper bags, or wooden crates are suitable options. Do not use airtight containers, as this can trap moisture and lead to bulb deterioration.
4. Choosing the Storage Location: Find a cool, dry, and dark place to store the crocus bulbs. Basements, garages, or unheated areas are often suitable. The temperature should remain steady between 35°F and 50°F (1.5°C to 10°C). Avoid locations that are prone to excessive temperature fluctuations, high humidity, or direct sunlight.
5. Monitoring Moisture Levels: Regularly check the bulbs during their storage period to ensure they remain dry. If any bulbs show signs of mold, rot, or moisture condensation, remove them immediately to prevent the spread of disease. Good airflow is crucial to prevent moisture buildup and maintain bulb health.
6. Timing for Replanting: Approximately 4 to 6 weeks before the desired planting time in the next season, remove the crocus bulbs from storage. This timing allows them to adjust to room temperature and initiate root development before planting.
7. Inspecting and Preparing for Planting: Prior to planting, carefully inspect the bulbs for any signs of damage or rot. Trim off any soft or diseased sections, leaving only healthy parts. Soak the bulbs in a bowl of water for a few hours before planting, which helps rehydrate them and promotes root growth.
By following these storage guidelines, you can safeguard the health and viability of crocus bulbs for the next planting season. With proper care and handling, these bulbs will continue to delight you with their vibrant blooms and bring beauty to your garden year after year.
Common Problems and Solutions with Crocus Bulbs
While crocus bulbs are generally low-maintenance plants, they may encounter a few common problems that can affect their health and flowering. Recognizing and addressing these issues promptly is crucial in maintaining the vitality and beauty of the crocus bulbs. Here are some common problems and their corresponding solutions:
1. Pest Damage: Squirrels, mice, and voles are known to dig up and feed on crocus bulbs. To protect your bulbs, consider using wire mesh or planting bulbs in containers with secure lids. Alternatively, try plants with strong scents, like daffodils, as a natural deterrent.
2. Fungal Diseases: Common fungal diseases that can affect crocus bulbs include botrytis, fusarium rot, and basal rot. To prevent fungal diseases, ensure proper drainage by planting in well-draining soil. Keep the area around the bulbs clean and free from debris. If fungal issues arise, treat with an appropriate fungicide according to the product instructions.
3. Overwatering: Excessive moisture can lead to bulb rot and fungal diseases. Avoid overwatering by allowing the soil to dry out slightly between watering. Ensure proper drainage in the planting area and avoid excessive use of watering systems.
4. Bulb Munching Pests: Some insects, such as narcissus bulb flies and onion thrips, may damage crocus bulbs by feeding on them. Inspect bulbs for insect activity and treat with appropriate insecticides or neem oil if necessary. Use organic methods of pest control whenever possible.
5. Improper Planting Depth: Planting crocus bulbs at the wrong depth can affect their growth and ability to bloom. Follow the recommended planting depth for the specific variety of crocus bulbs. Planting too shallow may expose the bulbs to frost damage, while planting too deep can hinder their emergence and flowering.
6. Lack of Blooms: If crocus bulbs fail to produce blooms, it may be due to several factors. Insufficient sunlight, overcrowding, or poor soil conditions could be the culprits. Ensure that the bulbs receive adequate sunlight, address overcrowding by dividing clumps, and improve soil fertility and drainage with organic matter.
7. Weather Extremes: Weather fluctuations, such as unseasonal frosts or extreme heat, can impact the blooming and overall health of crocus bulbs. Protect bulbs from frost by covering them with a layer of mulch or a frost cloth. Shield bulbs from excessive heat by providing adequate shade or planting them in a location with partial shade.
By familiarizing yourself with these common problems and their solutions, you can effectively address any issues that arise with your crocus bulbs. Providing proper care and attention, along with taking preventive measures, will contribute to the long-term success and vitality of these charming spring flowers.
Frequently Asked Questions about Planting Crocus Bulbs
Planting crocus bulbs can be an exciting and rewarding experience, but it’s natural to have questions. Here are answers to some frequently asked questions about planting crocus bulbs:
1. When is the best time to plant crocus bulbs?
The best time to plant crocus bulbs is in the fall, about six to eight weeks before the first frost in your area. This allows them to establish their root systems before winter.
2. How deep should I plant crocus bulbs?
Crocus bulbs should be planted at a depth of about 3 to 4 inches (7.5 to 10 cm). However, this may vary depending on the size of the bulbs and your specific climate.
3. Where should I plant crocus bulbs?
Crocus bulbs prefer a location with full sun to partial shade and well-draining soil. Choose a spot that receives at least 6 hours of direct sunlight per day.
4. How far apart should I space crocus bulbs?
Space crocus bulbs approximately 3 to 4 inches (7.5 to 10 cm) apart. This allows each bulb enough space to grow and prevents overcrowding.
5. Do crocus bulbs need to be watered regularly?
Crocus bulbs require consistent moisture during their active growth periods. Water them regularly, keeping the soil slightly moist but not overly saturated. Avoid overwatering, as it can lead to bulb rot.
6. Do I need to fertilize crocus bulbs?
Crocus bulbs generally do not require regular fertilization. However, if your soil lacks nutrients, you can apply a balanced slow-release fertilizer in early spring. Follow the product instructions for application rates.
7. Can I plant crocus bulbs in containers?
Yes, crocus bulbs can be successfully planted in containers. Choose a container with good drainage, use well-draining potting soil, and ensure the container is large enough to accommodate the bulbs.
8. Can I naturalize crocus bulbs?
Yes, crocus bulbs are excellent for naturalizing. After the initial planting, they can multiply and spread over time, creating a beautiful carpet of blooms. Plant them in areas where they can freely naturalize, such as lawns or meadows.
9. How long does it take for crocus bulbs to bloom?
Depending on the variety and growing conditions, crocus bulbs usually bloom within 1 to 3 weeks after their foliage emerges in early spring.
10. Do crocus bulbs need to be lifted and stored?
While crocus bulbs are generally hardy and can be left in the ground, lifting and storing them can be beneficial in areas with harsh winters or if you want to propagate new bulbs. Lift the bulbs after the foliage has yellowed and store them in a cool, dry place until replanting.
By understanding these common questions and their answers, you’ll be well-equipped to successfully plant and care for your crocus bulbs, ensuring a beautiful display of colorful blooms in your garden.