
What is a Stipple Brush?
A stipple brush is a type of makeup brush that is characterized by its unique bristle arrangement. It consists of bristles that are cut at varying lengths and arranged in a dense, rounded shape. This brush is specifically designed to create a stippled or airbrushed effect on the skin when used with various makeup products.
The bristle arrangement of a stipple brush allows it to pick up and distribute makeup products in a unique way. When applied to the skin, the brush lightly taps or stipple the product onto the surface, creating a diffused and natural-looking finish. The result is a flawless and airbrushed appearance that is highly sought after in the world of makeup.
Stipple brushes are commonly used with liquid or cream-based products such as foundation, blush, bronzer, powder, and highlighter. They can also be used with other makeup products, depending on the desired effect.
Stipple brushes are an essential tool for both professional makeup artists and makeup enthusiasts. They offer precise control and provide a seamless application, making them a popular choice for achieving a natural-looking and flawless complexion.
How does a Stipple Brush Work?
A stipple brush works by utilizing its unique bristle arrangement to create a stippled or airbrushed effect on the skin. The bristles, which are cut at varying lengths and densely packed together, play a crucial role in achieving a flawless and natural-looking finish.
When using a stipple brush, the bristles lightly tap or stipple the makeup product onto the skin. This tapping motion allows for controlled and even distribution of the product, preventing it from looking heavy or cakey. The varying lengths of the bristles help to blend the product seamlessly, ensuring a smooth and natural result.
The stipple brush technique is particularly effective with liquid or cream-based products. These types of formulas tend to have a more fluid consistency, and the stipple brush excels at evenly spreading and blending them into the skin.
The unique bristle arrangement of a stipple brush also enables it to create a soft-focus effect on the skin. By lightly stippling the product onto the surface, the brush helps to blur imperfections and create a more radiant and airbrushed appearance.
Additionally, the stipple brush allows for greater control and precision when applying makeup. Whether you’re looking for a sheer and natural finish or a more buildable coverage, the stipple brush can be adjusted to achieve the desired effect.
Overall, the stipple brush provides a versatile and effective application method for achieving a flawless complexion. Its ability to create a natural-looking and airbrushed finish makes it a popular choice among makeup enthusiasts and professionals alike.
What are the Different Types of Stipple Brushes?
Stipple brushes come in various shapes, sizes, and materials. Each type of stipple brush is designed to cater to specific makeup needs and preferences. Here are some of the different types of stipple brushes:
- Round Stipple Brush: This is the most common type of stipple brush, characterized by its rounded shape and densely-packed bristles. It is versatile and works well with liquid, cream, and powder products.
- Flat Stipple Brush: This stipple brush has a flat top, making it ideal for applying foundation or cream products in larger areas of the face. It provides a smooth and even application.
- Duo-Fiber Stipple Brush: This type of stipple brush features a combination of natural and synthetic bristles. The duo-fiber bristles allow for a more controlled and sheer application of product, resulting in a natural and lightweight finish.
- Angled Stipple Brush: An angled stipple brush has bristles cut at an angle, which makes it perfect for contouring or applying blush. The angled shape helps to create defined and precise lines.
- Mini Stipple Brush: This stipple brush is smaller in size and is often used for applying concealer, highlighter, or precise touch-ups. Its compact size allows for more targeted and detailed application.
Some stipple brushes are made with synthetic bristles, while others may have a combination of natural and synthetic bristles. Synthetic bristles are typically easier to clean and maintain, making them a popular choice for many makeup artists and enthusiasts.
It’s important to choose a stipple brush that suits your specific makeup needs and preferences. Consider factors such as the type of product you will be using, the area of application, and the desired finish. Experimenting with different types of stipple brushes can help you find the one that works best for you.
What are the Benefits of Using a Stipple Brush?
Using a stipple brush in your makeup routine offers several benefits that contribute to achieving a flawless and natural-looking finish. Here are some of the advantages of using a stipple brush:
- Natural-looking Finish: One of the main benefits of using a stipple brush is its ability to create a natural-looking, airbrushed finish. The unique bristle arrangement and tapping motion of the brush help to blend the makeup product seamlessly into the skin, giving it a soft and diffused appearance.
- Buildable Coverage: Stipple brushes allow for buildable coverage, meaning you can apply thin layers and gradually build up the intensity of the product. This feature makes it suitable for achieving both sheer and full coverage looks, depending on your preference.
- Even Distribution: The bristles of a stipple brush evenly distribute the makeup product onto the skin, preventing it from looking heavy or cakey. This ensures a smooth and uniform application, especially with liquid or cream-based products.
- Blurs Imperfections: The stipple brush technique can help to blur imperfections on the skin, such as acne scars, blemishes, or fine lines. The tapping motion of the brush disperses the product and diffuses light, resulting in a softer focus effect on the skin.
- Great for Sensitive Skin: Stipple brushes are gentle on the skin, making them suitable for individuals with sensitive or easily irritated skin. The soft and gentle tapping motion of the brush minimizes the risk of causing irritation while still achieving a flawless finish.
- Versatile: Stipple brushes can be used with a variety of makeup products, including foundation, blush, bronzer, powder, and highlighter. This versatility makes them a valuable tool in any makeup collection.
By incorporating a stipple brush into your makeup routine, you can enjoy these benefits and achieve a professional-looking makeup application. Whether you’re going for a natural or more glam look, a stipple brush can help you achieve a flawless and airbrushed finish.
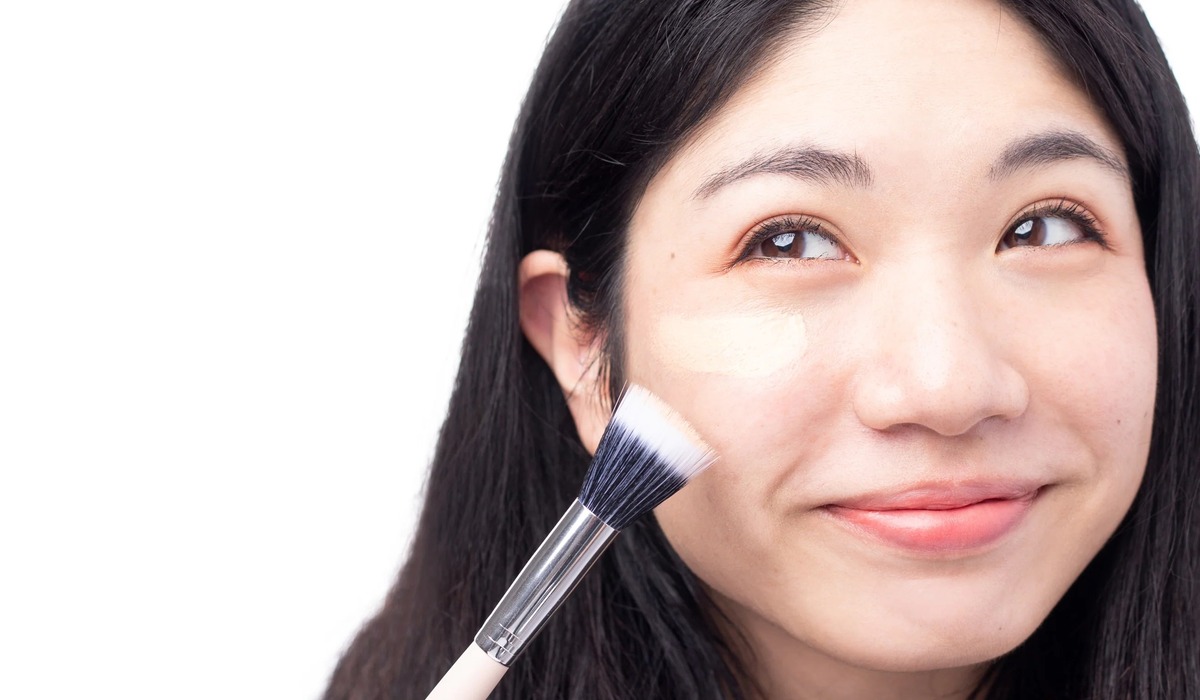
How to Use a Stipple Brush for Foundation?
Using a stipple brush for applying foundation can help you achieve a flawless and natural-looking finish. Here’s a step-by-step guide on how to use a stipple brush for foundation:
- Prep your skin: Start by cleansing and moisturizing your face. This will create a smooth canvas for foundation application.
- Choose the right foundation: Select a foundation that matches your skin tone and desired coverage. It’s important to choose a formula that works well with a stipple brush.
- Dispense the foundation: Squeeze a small amount of foundation onto the back of your hand or a clean palette. This will make it easier to pick up the product with the stipple brush.
- Dab the stipple brush into the foundation: Dip the tips of the stipple brush into the foundation product. Avoid picking up too much product at once to prevent a heavy application.
- Stipple the foundation onto the skin: Starting from the center of your face, lightly tap or stipple the brush onto your skin. Use gentle and rapid tapping motions to distribute the foundation evenly. Gradually work your way outwards, covering your entire face.
- Blend the foundation: Once you have stippled the foundation onto your skin, gently blend it in using circular or sweeping motions. This will ensure a seamless and blended finish.
- Build up the coverage: If desired, you can repeat the stippling and blending process to build up the coverage of the foundation. Remember to use a light hand to avoid a heavy or cakey appearance.
- Check for any uneven spots: Take a moment to check for any areas that may need extra blending or coverage. Use the stipple brush to gently tap or blend those spots until they blend seamlessly with the rest of your complexion.
- Set the foundation: Once you are satisfied with the coverage and overall finish, you can set the foundation with a loose or pressed powder for longer-lasting wear.
Using a stipple brush for foundation application allows for precise control and a natural-looking finish. Practice and experimentation will help you determine the amount of product and technique that work best for you.
How to Use a Stipple Brush for Blush?
Using a stipple brush for blush application can help you achieve a natural-looking flush to the cheeks. Follow these steps to effectively use a stipple brush for blush:
- Choose the right blush: Start by selecting a blush shade that complements your skin tone and desired look. Cream or powder blush formulas work well with a stipple brush.
- Prep your skin: Ensure that your skin is clean and moisturized before applying blush. This will help the product blend seamlessly onto the skin.
- Load the stipple brush: Dip the tips of the stipple brush into the blush product. Tap off any excess product to prevent an overly intense application.
- Apply to the cheeks: Smile softly to identify the apples of your cheeks. Lightly stipple the brush onto the apples of your cheeks, using gentle tapping motions. Start with a light application and gradually build up the intensity if desired.
- Blend for a natural finish: After applying the blush, use circular or sweeping motions with the stipple brush to blend the color into your skin. This will create a natural and seamless flush.
- Check for symmetry: Take a moment to ensure that the blush is evenly distributed on both cheeks. If needed, make any necessary adjustments by gently adding more blush or blending it out.
- Avoid harsh lines: To prevent harsh lines, continue blending the edges of the blush into your skin until the color seamlessly fades. This will create a soft and blended finish.
- Adjust intensity as desired: If you prefer a more subtle look, you can use a clean stipple brush to lightly blend over the blush. Conversely, if you desire a more intense color payoff, apply an additional layer of blush using the stipple brush.
Using a stipple brush for blush application allows for precise control and a natural-looking flush. Remember, practice and experimentation will help you find the technique and amount of product that suits your preferences and desired look.
How to Use a Stipple Brush for Bronzer?
Using a stipple brush for bronzer application can help you achieve a sun-kissed and natural-looking glow on the skin. Follow these steps to effectively use a stipple brush for bronzer:
- Choose the right bronzer: Start by selecting a bronzer shade that complements your skin tone and desired look. Opt for a matte or satin finish bronzer that matches your skin tone or is one to two shades darker.
- Prep your skin: Make sure your skin is clean and moisturized before applying bronzer. This will create a smooth canvas for the product to blend seamlessly.
- Load the stipple brush: Dip the tips of the stipple brush into the bronzer product. Tap off any excess product to prevent heavy application.
- Apply to the desired areas: Identify the areas where the sun naturally hits your face, such as the forehead, temples, cheekbones, and jawline. Lightly stipple the brush onto these areas, using gentle tapping motions.
- Blend for a natural finish: After applying bronzer, use circular or sweeping motions with the stipple brush to blend the color into your skin. This will create a natural and seamless sun-kissed glow.
- Check for symmetry: Take a moment to ensure that the bronzer is evenly distributed on both sides of your face. If needed, make any necessary adjustments by adding more bronzer or blending it out.
- Define your features: To contour and add dimension, use the stipple brush to apply bronzer to the hollows of your cheeks, along the hairline, and under the jawline. Blend well to create a natural-looking contour effect.
- Avoid harsh lines: To prevent harsh lines, continue blending the edges of the bronzer into your skin until the color seamlessly fades. This will create a soft and blended finish.
- Build up intensity gradually: Start with a light application of bronzer and gradually build up the intensity as desired. You can always add more product if needed, but it’s easier to add than to remove excess bronzer.
Using a stipple brush for bronzer application allows for precise control and a natural-looking sun-kissed glow. Remember, practice and experimentation will help you find the technique and amount of product that suits your preferences and desired look.
How to Use a Stipple Brush for Powder?
A stipple brush can be a useful tool for applying powder products, such as setting powder or powder foundation, for a seamless and natural-looking finish. Here’s a step-by-step guide on how to use a stipple brush for powder:
- Prep your skin: Start with a clean and moisturized face. This will provide a smooth base for the powder application.
- Choose the right powder: Select a powder product that suits your needs, whether it’s a setting powder to mattify the skin or a powder foundation for additional coverage. Ensure the shade matches your skin tone.
- Load the stipple brush: Dip the tips of the stipple brush into the powder product. Gently tap off any excess powder to avoid an overly heavy application.
- Apply the powder: Starting from the center of your face, lightly stipple the brush onto your skin. Use gentle tapping motions to distribute the powder evenly. Gradually work your way outward, covering your entire face.
- Blend for a seamless finish: After applying the powder, use circular or sweeping motions with the stipple brush to blend the product into your skin. This ensures a seamless and natural-looking finish.
- Set your makeup: If using the stipple brush for setting powder, focus on the areas where makeup tends to crease or become shiny, such as the T-zone. Lightly tap the brush to set your foundation and concealer in place.
- Build up coverage (if desired): If using powder foundation, you can layer the product by repeating the stippling and blending process to achieve the desired coverage. However, be mindful of not applying too much powder, as it can make the skin appear cakey.
- Check for any excess powder: Take a moment to check for any areas where there might be excess powder. If necessary, use the stipple brush to gently blend or dust off any excess, ensuring an even application.
Using a stipple brush for powder application allows for a precise and even distribution of product. Practice and experimentation will help you discover the amount of powder and technique that works best for your desired finish.
How to Use a Stipple Brush for Highlighter?
A stipple brush can provide a beautiful and natural-looking glow when used to apply highlighter. Here’s a step-by-step guide on how to use a stipple brush for highlighter:
- Prep your skin: Start with a well-prepped and foundation-applied face. Highlighter is typically applied as the final step in your makeup routine.
- Choose the right highlighter: Select a highlighter shade that suits your skin tone and desired level of shimmer. Opt for a shade that complements your undertones for the most flattering effect.
- Load the stipple brush: Dip the tips of the stipple brush into the highlighter product. Tap off any excess to avoid an intense or glittery application.
- Apply the highlighter: Lightly stipple the brush onto the high points of your face that catch the light. These typically include the tops of your cheekbones, bridge of the nose, cupid’s bow, and the inner corners of the eyes.
- Blend for a seamless finish: Gently blend the highlighter with circular or sweeping motions using the stipple brush. This will ensure a natural and seamless glow that is blended into your base makeup.
- Build intensity gradually: If you want a more intense highlight, apply additional layers of the product using the stipple brush. Start with a light hand and build up as desired, as it is easier to add more product than to remove it.
- Check for symmetry: Take a moment to ensure that the highlighter is evenly applied on both sides of your face. Make any necessary adjustments by adding more highlight or blending it out with the stipple brush.
- Avoid harsh lines: To create a seamless and blended effect, continue blending the edges of the highlighter into your skin until it seamlessly fades. This will result in a natural-looking glow.
- Adjust for different finishes: Depending on the type of highlighter (powder, cream, or liquid), adjust your application technique accordingly. Stipple brushes work well with all types, but it’s important to adapt based on the formula.
Using a stipple brush for highlighter application allows for precise control and a radiant finish. Practice and experimentation will help you find the technique and amount of product that suits your preferences and desired level of glow.
Can a Stipple Brush be Used for Other Makeup Applications?
While stipple brushes are most commonly associated with foundation and blush application, they can also be used for other makeup applications. The unique bristle arrangement and tapping motion of a stipple brush make it versatile for various purposes. Here are some other makeup applications where a stipple brush can be utilized:
- Contouring: Stipple brushes can be used for contouring by applying contour products in the hollows of the cheeks, along the jawline, and on the sides of the nose. The precise control offered by a stipple brush helps in achieving a well-blended and natural-looking contour.
- Highlighter: Stipple brushes are great for applying highlighter to the high points of the face, such as the cheekbones, bridge of the nose, and brow bone. The tapping motion allows for a precise and controlled placement of the highlight, creating a radiant glow.
- Bronzer: A stipple brush can be used to apply bronzer for a sun-kissed glow. The stippling technique helps to evenly distribute the bronzer and blend it seamlessly onto the skin, creating a natural-looking tan effect.
- Setting Powder: Stipple brushes are effective for applying setting powder to lock in your makeup. The gentle tapping motion helps to distribute the powder evenly, ensuring a matte and long-lasting finish.
- Powder Foundation: If you prefer a lighter coverage, you can use a stipple brush to apply powder foundation. The stippling technique allows for a sheer and natural-looking application, ensuring a lightweight and flawless finish.
- Applying Skincare Products: Stipple brushes can also be used to apply skincare products, such as moisturizers or serums. The soft bristles of the brush provide a gentle and even application, ensuring that your skincare products are well-distributed on the skin.
These are just a few examples of how a stipple brush can be used for other makeup applications. The versatility of the brush enables you to be creative and adapt it to various products and techniques, providing you with a seamless and professional-looking makeup application.
Tips and Tricks for Using a Stipple Brush Effectively
Using a stipple brush can elevate your makeup application and help you achieve a flawless and natural-looking finish. Here are some tips and tricks to make the most out of your stipple brush:
- Choose the Right Brush: Make sure to invest in a high-quality stipple brush with soft, synthetic bristles. The right brush will ensure a smooth and comfortable application.
- Start with a Light Hand: Begin by applying a small amount of product, whether it’s foundation, blush, or bronzer. You can always build up the intensity, but starting light will prevent a heavy or cakey appearance.
- Tap Off Excess Product: Before applying the brush to your face, tap off any excess product to avoid overloading the brush and creating an uneven application.
- Use Different Brushes for Different Products: Consider having separate stipple brushes for different types of products, such as one for foundation and another for blush or bronzer. This helps to prevent cross-contamination and ensures optimal performance.
- Experiment with Techniques: Play around with different techniques, such as stippling, swirling, or tapping motions, to see which gives you the desired effect with each product. Every brush and application technique can create a unique finish.
- Blend, Blend, Blend: To achieve a seamless finish, always blend the product into your skin using circular or sweeping motions. This ensures that there are no harsh lines or uneven patches.
- Work in Light Layers: Apply your makeup products in thin, light layers and gradually build up the intensity to achieve the desired coverage or effect. This prevents a heavy and unnatural appearance.
- Clean Your Brush Regularly: Cleaning your stipple brush regularly helps to maintain its performance and prevent product buildup. Use a gentle brush cleanser or mild soap to keep your brush clean and free of bacteria.
- Practice and Experiment: Like any makeup tool, using a stipple brush effectively takes practice. Take the time to experiment with different products, techniques, and brushes to find what works best for you and your desired look.
- Follow the Natural Contours of Your Face: When applying products like blush or bronzer, follow the natural contours of your face for a more flattering and realistic result. This enhances your features and creates dimension.
By incorporating these tips and tricks into your makeup routine, you can maximize the effectiveness of your stipple brush and achieve professional-looking results. Remember, practice makes perfect, so don’t be afraid to experiment and find the techniques that work best for you.
How to Clean and Care for a Stipple Brush
Proper cleaning and care of your stipple brush is essential to maintain its performance and longevity. Here’s a step-by-step guide on how to clean and care for your stipple brush:
- Gather Your Supplies: You will need a gentle brush cleanser or mild soap, lukewarm water, a clean towel, and a brush cleaning mat or your hand for cleaning.
- Rinse the Bristles: Start by rinsing the bristles of your stipple brush under lukewarm water. Make sure to aim the water downwards to prevent any water from seeping into the ferrule (the metal part that holds the bristles).
- Apply Gentle Cleanser: Squeeze a small amount of brush cleanser or mild soap into your hand or onto a brush cleaning mat. Gently swirl the bristles of the stipple brush in the cleanser, working up a lather.
- Deep Clean the Bristles: Massage the bristles of the stipple brush against your hand or brush cleaning mat, working the cleanser through each bristle. Pay attention to any areas with stubborn product buildup.
- Rinse Thoroughly: Rinse the bristles under lukewarm water until the water runs clear and all traces of cleanser have been removed. Continue rinsing while gently squeezing the bristles to remove any remaining cleanser.
- Gently Squeeze Out Water: After rinsing, gently squeeze the bristles of the stipple brush to remove excess water. Avoid twisting or pulling on the bristles, as this can cause damage.
- Reshape and Dry: Gently reshape the bristles of the stipple brush into their original form while the brush is still damp. Lay the brush flat on a clean towel or hang it upside down, allowing it to air dry completely.
- Store Properly: Once dry, store your stipple brush upright or in a brush holder to maintain its shape and protect the bristles from becoming bent or warped.
- Clean Regularly: Aim to clean your stipple brush at least once a week, or more frequently if you use it daily. Regular cleaning prevents product buildup, residue, and bacteria from accumulating on the brush.
- Be Gentle: When cleaning the stipple brush, be gentle with the bristles and avoid excessive force or pulling, as this can damage them. Treat the brush with care to ensure its longevity.
By following these steps and incorporating regular cleaning into your brush care routine, you can keep your stipple brush clean, hygienic, and in optimal condition for flawless makeup application.
Where to Buy a Stipple Brush and How Much Does it Cost?
Stipple brushes can be purchased from various retailers both online and in-store. Here are some common places to buy a stipple brush:
- Beauty Supply Stores: Beauty supply stores, such as Sephora, Ulta, or Sally Beauty, often carry a wide range of makeup brushes, including stipple brushes. You can visit these stores in person to see and feel the brushes before making a purchase.
- Online Beauty Retailers: Online beauty retailers like Beautylish, Dermstore, or Cult Beauty offer a vast selection of makeup brushes, including stipple brushes. Shopping online allows you to compare prices, read reviews, and have the brush delivered to your doorstep.
- Makeup Brand Websites: Many makeup brands have their own websites where you can purchase their stipple brushes directly. This is a great option if you prefer a specific brand or want to explore their full range of brush options.
- Online Marketplaces: Websites like Amazon, eBay, or Walmart.com also offer a wide variety of stipple brushes from different brands. These platforms often provide customer reviews and competitive prices.
- Physical Stores: Department stores, beauty specialty stores, and drugstores often have a makeup section where you can find stipple brushes. This option allows you to see and feel the brushes in person before making a purchase.
The price of a stipple brush can vary depending on the brand, quality, and where you purchase it. On average, stipple brushes range in price from $5 to $30. Higher-end brush brands may offer more expensive options, while drugstore or budget-friendly brands tend to have more affordable options. Keep in mind that price doesn’t always determine quality, and there are excellent stipple brushes available at various price points.
When purchasing a stipple brush, consider your budget, desired quality, and preference for specific brands. Read reviews and compare prices to make an informed decision. Ultimately, finding a stipple brush that suits your needs and fits within your budget is key.