
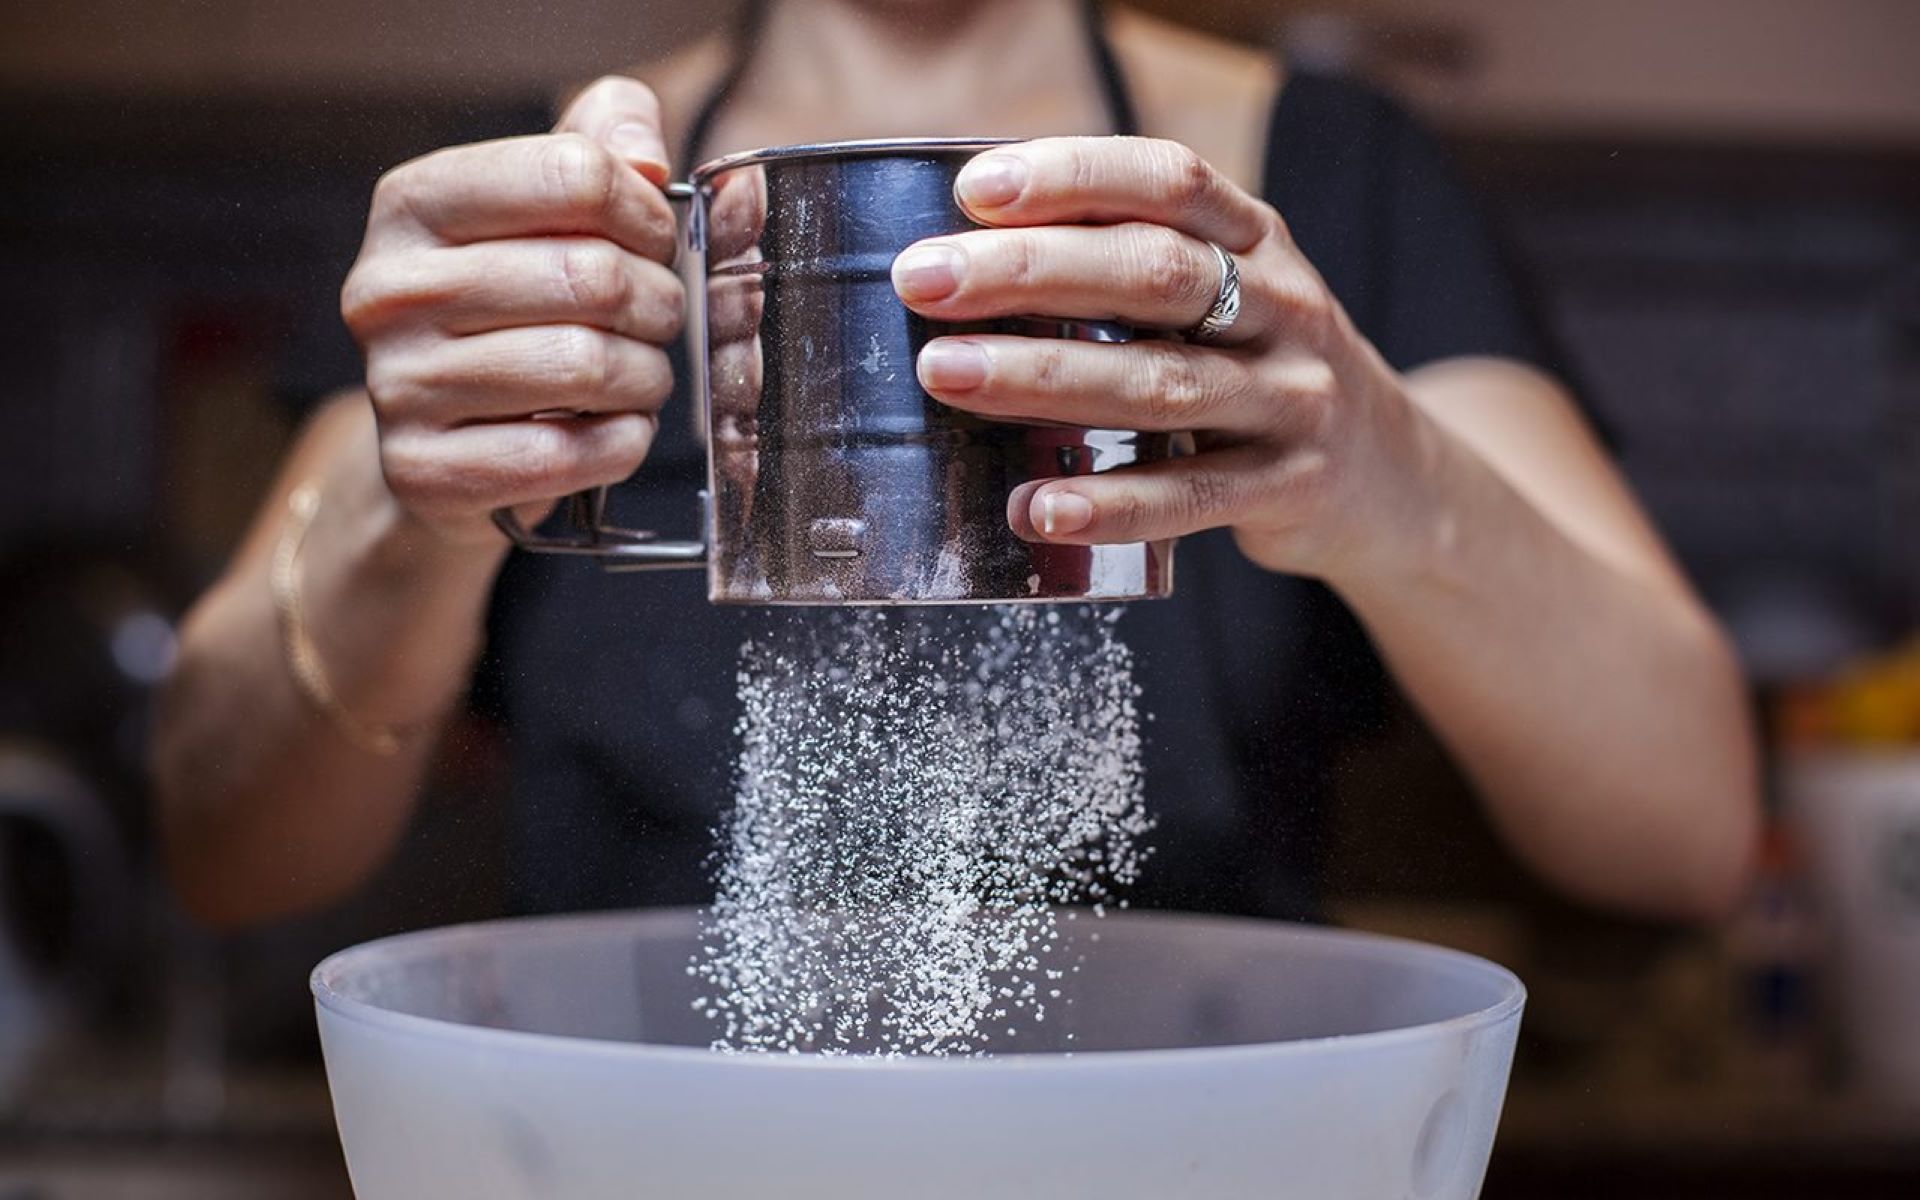
Using a Fine-Mesh Sieve
A fine-mesh sieve is one of the most effective tools for sifting ingredients without the need for a sifter or strainer. This versatile kitchen essential is particularly useful in removing lumps and refining dry ingredients like flour, powdered sugar, and cocoa powder.
To use a fine-mesh sieve, simply place it over a bowl or container and add the ingredient you want to sift. Gently tap or shake the sieve to allow the fine particles to pass through while trapping any larger particles or lumps. You can also use a spoon to press and push the ingredient against the sieve for better results.
When using a fine-mesh sieve, it’s important to choose one with a tight mesh to ensure efficient sifting. Look for a sieve with a small gap between the wires or a fine mesh fabric that can effectively filter out larger particles.
This method is ideal for sifting dry ingredients that require a light and airy texture, such as cake flour or confectioners’ sugar. It helps break up any clumps and aerates the ingredients, resulting in a smoother and more evenly mixed batter or dough.
Additionally, using a fine-mesh sieve can eliminate any foreign particles or impurities from your ingredients, ensuring a cleaner and more refined final product. It’s a quick and convenient alternative to a sifter or strainer, especially when you don’t have one on hand.
Overall, a fine-mesh sieve is an excellent tool that serves as a multipurpose sifting solution in the absence of a traditional sifter or strainer. Its versatility, ease of use, and ability to produce smooth and refined results make it a valuable addition to any kitchen.
Utilizing a Colander or Tea Strainer
If you don’t have a sifter or fine-mesh sieve on hand, a colander or tea strainer can be used as a makeshift alternative. While they may not be as effective at removing all lumps, they can still help achieve a reasonably sifted result.
To use a colander or tea strainer, place it over a bowl or container and pour the ingredients you want to sift into the colander or strainer. Gently shake or tap the colander to allow the smaller particles to pass through the holes, while any larger particles or lumps remain on top.
Keep in mind that colanders and tea strainers typically have larger holes compared to fine-mesh sieves or sifters, which means some larger particles may still pass through. This method works best for sifting larger-grained ingredients, such as grains, pasta, or vegetables. However, it may not be as effective for finer ingredients like flour or powdered sugar.
If you choose to use a tea strainer, make sure it has a fine, tightly woven mesh to prevent smaller particles from passing through. This will help achieve a more refined sifting result.
Using a colander or tea strainer as a sifting alternative may not produce the same level of refinement as a dedicated sifter or fine-mesh sieve. However, in a pinch, they can help remove some lumps and separate larger particles, making them a viable option when sifting is necessary but other tools are unavailable.
Remember to clean and rinse the colander or tea strainer thoroughly before and after use to remove any residue or particles that may affect the flavor or quality of your ingredients.
Creating a DIY Strainer with Cheesecloth or Muslin
If you find yourself without a sifter or strainer in your kitchen, you can easily create a makeshift strainer using cheesecloth or muslin fabric. These lightweight and porous fabrics are ideal for sifting fine ingredients and removing any unwanted particles or lumps.
To create your DIY strainer, you will need a piece of cheesecloth or muslin fabric and a container or bowl to catch the sifted ingredients. Start by cutting a square or rectangular piece of fabric large enough to cover the opening of the container.
Next, place the fabric over the container, making sure it’s stretched tight and securely held in place. You can use a rubber band or string to secure it around the rim of the container, ensuring that no gaps are present.
Once your DIY strainer is assembled, simply pour the ingredients you want to sift onto the fabric. Gently shake or tap the fabric to allow the finer particles to pass through, while any larger particles or lumps will remain on top of the fabric.
If necessary, you can gather the edges of the fabric together to create a makeshift pouch or bag and gently squeeze it to further separate the sifted ingredients from the larger particles. This can be particularly helpful when working with ingredients like homemade nut milk or curd cheese.
Keep in mind that cheesecloth and muslin fabric can have larger gaps between the threads compared to a fine-mesh sieve or sifter. While they are effective at removing larger particles and straining liquids, they may not provide the same level of refinement for fine, powdery ingredients like flour or powdered sugar.
After use, clean the fabric thoroughly by rinsing it under running water and gently squeezing out any trapped particles. Allow it to air dry before storing it for future use.
Creating a DIY strainer with cheesecloth or muslin fabric is a practical solution when you don’t have a traditional sifter or strainer available. It allows you to sift and strain ingredients effectively, providing a viable alternative in a pinch.
Employing a French Press to Sift Ingredients
A French press, commonly used for brewing coffee, can also serve as a handy tool for sifting ingredients in your kitchen. With its built-in mesh filter, a French press can effectively separate finer particles from larger ones, making it an unconventional but effective sifting alternative.
To use a French press for sifting, start by removing the plunger from the glass carafe. Pour the ingredients you want to sift into the empty carafe, making sure not to exceed the maximum fill line.
Next, place the plunger with the filter attached over the carafe, ensuring that it fits securely. Slowly press down on the plunger to compress the ingredients inside the carafe.
As you press down, the finer particles will be forced through the mesh filter, while any larger particles or lumps will remain above the filter. This process effectively sifts and separates the ingredients, providing a smooth and refined result.
Keep in mind that a French press may not be suitable for all types of ingredients, especially those that require very fine sifting, like powdered sugar or cocoa powder. However, it can be particularly useful for sifting coarser ingredients such as flour, spices, or ground coffee.
After sifting, carefully remove the plunger from the French press carafe, ensuring that the filtered ingredients remain in the carafe while the larger particles are above the filter. Dispose of the larger particles and transfer the sifted ingredients to a separate container for use in your recipe.
Remember to clean the French press thoroughly after each use, as residue from the sifted ingredients can affect the flavor of your next brew. Wash the glass carafe, plunger, and filter with warm, soapy water, and rinse them well before drying and storing.
Employing a French press as a sifting alternative adds versatility to this kitchen tool, making it useful beyond its traditional coffee brewing capabilities. It offers a convenient method for sifting certain ingredients, providing a practical solution when a traditional sifter or strainer is not available.
Making a Sifter with Parchment Paper or Aluminum Foil
If you don’t have a sifter on hand, you can easily create a makeshift sifter using parchment paper or aluminum foil. While unconventional, these materials can effectively separate finer particles from larger ones, providing a simple solution for sifting ingredients in your kitchen.
To make a sifter with parchment paper, start by folding a sheet of parchment paper in half to create a crease. Unfold the paper and cut along the crease to create two equal-sized pieces.
Take one piece of parchment paper and fold it in half again, creating another crease. Unfold the paper, and using a fork or toothpick, poke small holes in the paper, spacing them evenly across the surface. These holes will act as the sifting mechanism.
To use the parchment paper sifter, simply place it over a bowl or container and pour the ingredients you want to sift onto the surface. Gently shake or tap the paper to encourage the finer particles to pass through the holes, while any larger particles or lumps remain on top.
If you prefer to use aluminum foil as a sifter, the process is quite similar. Take a sheet of aluminum foil and fold it several times to create a smaller square or rectangle. Using a fork or toothpick, poke small holes in the foil, ensuring they are evenly spaced.
Place the aluminum foil sifter over a bowl or container and pour the ingredients onto the surface. Shake or tap the foil to sift the finer particles through the holes, while any larger particles or lumps will be left on top.
It’s important to note that using parchment paper or aluminum foil as a sifter may not be as effective as using a dedicated sifter or sieve. The size and spacing of the holes may not provide the same level of refinement, especially for fine, powdery ingredients like flour or powdered sugar.
After using the parchment paper or aluminum foil sifter, dispose of the larger particles or lumps, and transfer the sifted ingredients to a separate container for use in your recipe.
Creating a sifter with parchment paper or aluminum foil is a quick and easy solution when you don’t have a traditional sifter or strainer available. While it may not deliver the same level of refinement, it can effectively separate larger particles, providing a reasonably sifted result for your culinary endeavors.
Using a Wire Whisk as a Sifting Alternative
A wire whisk, a common tool found in most kitchens, can be surprisingly effective as a makeshift sifting alternative. While it may not produce the same level of refinement as a traditional sifter or sieve, it can still help break up clumps and separate larger particles, making it a practical option in a pinch.
To use a wire whisk as a sifting alternative, start by placing the dry ingredients you want to sift in a mixing bowl. Holding the wire whisk handle, vigorously whisk the ingredients in a back-and-forth motion.
The action of whisking will help break up any clumps and sift the finer particles through the gaps between the wire loops. As you whisk, make sure to press the clumps against the sides of the bowl to encourage them to break apart.
Continue whisking until you achieve a reasonably sifted texture. While this method may not filter out all the particles and lumps, it can still effectively distribute ingredients and combine them more evenly.
It’s important to note that using a wire whisk as a sifting alternative works best for coarser ingredients like flour, sugar, or cocoa powder. For very fine powders or highly refined results, a dedicated sifter or sieve may still be preferable.
After using the wire whisk to sift your dry ingredients, transfer them to a separate container for use in your recipe. Take caution to remove any clumps or larger particles that may have remained in the bowl.
Remember to clean the wire whisk thoroughly after each use to remove any residue or trapped particles. Rinse it under running water and use a brush or sponge to remove any stubborn bits. Dry the whisk before storing it away.
While using a wire whisk as a sifting alternative may not be as efficient or precise as a traditional sifter, it can still help achieve a reasonably sifted result. Its widespread availability in kitchens makes it a convenient option when other sifting tools are not readily available.
Try the Shake Method: Jar or Plastic Container with Holes
If you don’t have a traditional sifter or strainer, you can try the shake method using a jar or a plastic container with holes. While not as refined as a dedicated sifter, this method can effectively separate larger particles while allowing finer ingredients to pass through.
To use the shake method, start by selecting a clean jar or plastic container with a tight-fitting lid. Using a small sharp object like a nail or a pin, create evenly spaced holes on the lid. The size of the holes will depend on the texture of the ingredients you plan to sift.
Once you have prepared the container, pour the ingredient you want to sift into the jar or plastic container. Close the lid tightly, ensuring that it is securely in place.
With the lid tightly secured, shake the container vigorously, employing quick and deliberate movements to allow the finer particles to pass through the holes while keeping the larger particles contained within.
Continue shaking for a few seconds to ensure that the sifting process is thorough. You can adjust the intensity of the shaking based on the desired sifting result and the texture of the ingredient you are working with.
After shaking, open the lid and inspect the contents. Remove any larger particles or clumps that may have remained in the container. Transfer the sifted ingredients to a separate container for use in your recipe.
When using the shake method, keep in mind that it may not be as effective as a traditional sifter when it comes to refining fine powders or achieving an even texture. However, it can still provide a reasonable level of sifting, especially for coarser ingredients like flour, sugar, or breadcrumbs.
Clean the jar or plastic container and the lid thoroughly after each use to ensure that no residue or trapped particles contaminate future sifting. Wash them with warm soapy water, rinse well, and allow them to air dry before storage.
The shake method using a jar or plastic container with holes is a convenient sifting alternative when a traditional sifter is not available. While it may not provide the same level of refinement, it can effectively separate larger particles and help achieve a more desirable texture in your culinary creations.
Utilizing a Slotted Spoon for Coarser Ingredients
A slotted spoon, typically used for straining liquids or lifting solid ingredients from liquids, can also be a reliable tool for sifting coarser ingredients in your kitchen. While it may not be suitable for finer powders or refined results, it can effectively remove larger particles and separate them from the desired ingredient.
To utilize a slotted spoon as a sifting alternative, start by placing your dry ingredients that require sifting in a bowl or on a flat surface. Hold the slotted spoon over the bowl or surface and scoop a portion of the ingredients onto the spoon.
While holding the spoon over the bowl or surface, gently shake or tap the spoon to allow the finer particles to pass through the slots, while any larger particles or lumps remain on top of the spoon.
Continue the process of scooping, shaking, and tapping until you have sifted the desired amount of ingredients. As you sift, remember to remove any clumps or larger particles that may have accumulated on the spoon.
It’s important to note that a slotted spoon is most effective for sifting coarser ingredients like breadcrumbs, grated cheese, or cooked vegetables. For finer powders, such as flour or powdered sugar, a dedicated sifter or sieve may be necessary to achieve a more refined result.
After sifting, transfer the sifted ingredients from the slotted spoon to a separate container for use in your recipe. Dispose of any larger particles or clumps that were collected on the spoon.
Clean the slotted spoon thoroughly after each use, paying extra attention to remove any residue or trapped particles. Wash it with warm, soapy water, rinse it well, and allow it to air dry before storing.
Utilizing a slotted spoon as a sifting alternative offers a practical solution when a traditional sifter or sieve is not available. While it may not provide the same level of refinement, it can effectively remove larger particles and contribute to achieving a desirable texture in your dishes.
Reusing a Flour Bag as a Homemade Strainer
If you have an empty flour bag lying around, you can repurpose it as a homemade strainer for sifting ingredients in your kitchen. A flour bag typically has a fine, tightly woven fabric that can effectively filter out larger particles while allowing finer ingredients to pass through.
To reuse a flour bag as a strainer, start by thoroughly cleaning and rinsing the bag to ensure the removal of any flour residue or contaminants. Once cleaned, place the bag over a bowl or container, ensuring that it hangs securely with enough space for the sifted ingredients to pass through.
Pour the ingredients you want to sift onto the center of the flour bag. Gently lift the edges of the bag and twist them together to create a makeshift pouch. Hold the twisted end tightly and shake the bag over the bowl or container, allowing the finer particles to sift through the fabric while any larger particles or lumps remain inside the pouch.
For better results, gently squeeze the pouch to separate the sifted ingredients from any remaining clumps. This can be particularly helpful for ingredients like homemade cheese or nut milk.
Using a flour bag as a homemade strainer offers a sustainable alternative to traditional sifters or sieves. The tightly woven fabric effectively filters out larger particles while allowing finer ingredients to pass through, resulting in a reasonably sifted texture.
After sifting, dispose of any larger particles or clumps that remain inside the flour bag. Transfer the sifted ingredients to a separate container for use in your recipe.
Clean the flour bag thoroughly after each use to remove any residue or trapped particles. Hand wash or machine wash the bag with mild detergent, rinse it well, and air dry it before storing for future use.
Reusing a flour bag as a homemade strainer not only saves on waste but also provides a practical solution for sifting ingredients in your kitchen. Its fine fabric texture effectively separates particles, making it a convenient alternative to a dedicated sifter or sieve.
Using a Coffee Filter for Fine Powders or Liquids
A coffee filter, commonly used for brewing coffee, can also serve as a useful tool for sifting fine powders or straining liquids in your kitchen. With its fine, porous texture, a coffee filter can effectively filter out small particles while allowing liquids to pass through.
To use a coffee filter for sifting or straining, start by selecting a clean, unused filter that fits securely in a strainer or over a container. Place the filter in the strainer or position it securely over the opening of the container.
If you are using a coffee filter to sift dry ingredients, such as flour or powdered sugar, pour the ingredients into the filter. Gently tap or shake the filter, allowing the finer particles to pass through into the container while any larger particles or clumps remain in the filter.
For straining liquids using a coffee filter, pour the liquid into the filter. Allow the liquid to slowly pass through the filter, capturing any solid particles or impurities in the process. This method is particularly useful for straining homemade stocks, infused oils, or removing sediment from wines or homemade juices.
For better results, avoid overloading the coffee filter with a large quantity of dry ingredients or excessive liquid volume. This allows the filter to effectively separate the particles without compromising its filtering ability.
Keep in mind that a coffee filter may have limited capacity, and multiple filters may be needed when sifting or straining larger quantities or thicker mixtures. Plan accordingly and empty or replace the filter as needed.
After using the coffee filter, carefully remove it from the strainer or container. Dispose of any trapped particles, rinse the filter under running water to remove any residue, and allow it to air dry before storing for future use.
Using a coffee filter as a sifting or straining tool offers a simple and efficient solution when traditional sifters or strainers are not available. Its fine texture effectively filters out small particles, making it ideal for fine powders or achieving a smooth texture in liquids.
Whether you’re sifting flour, straining stocks, or filtering liquids, a coffee filter can be a versatile and readily accessible tool in your kitchen.