
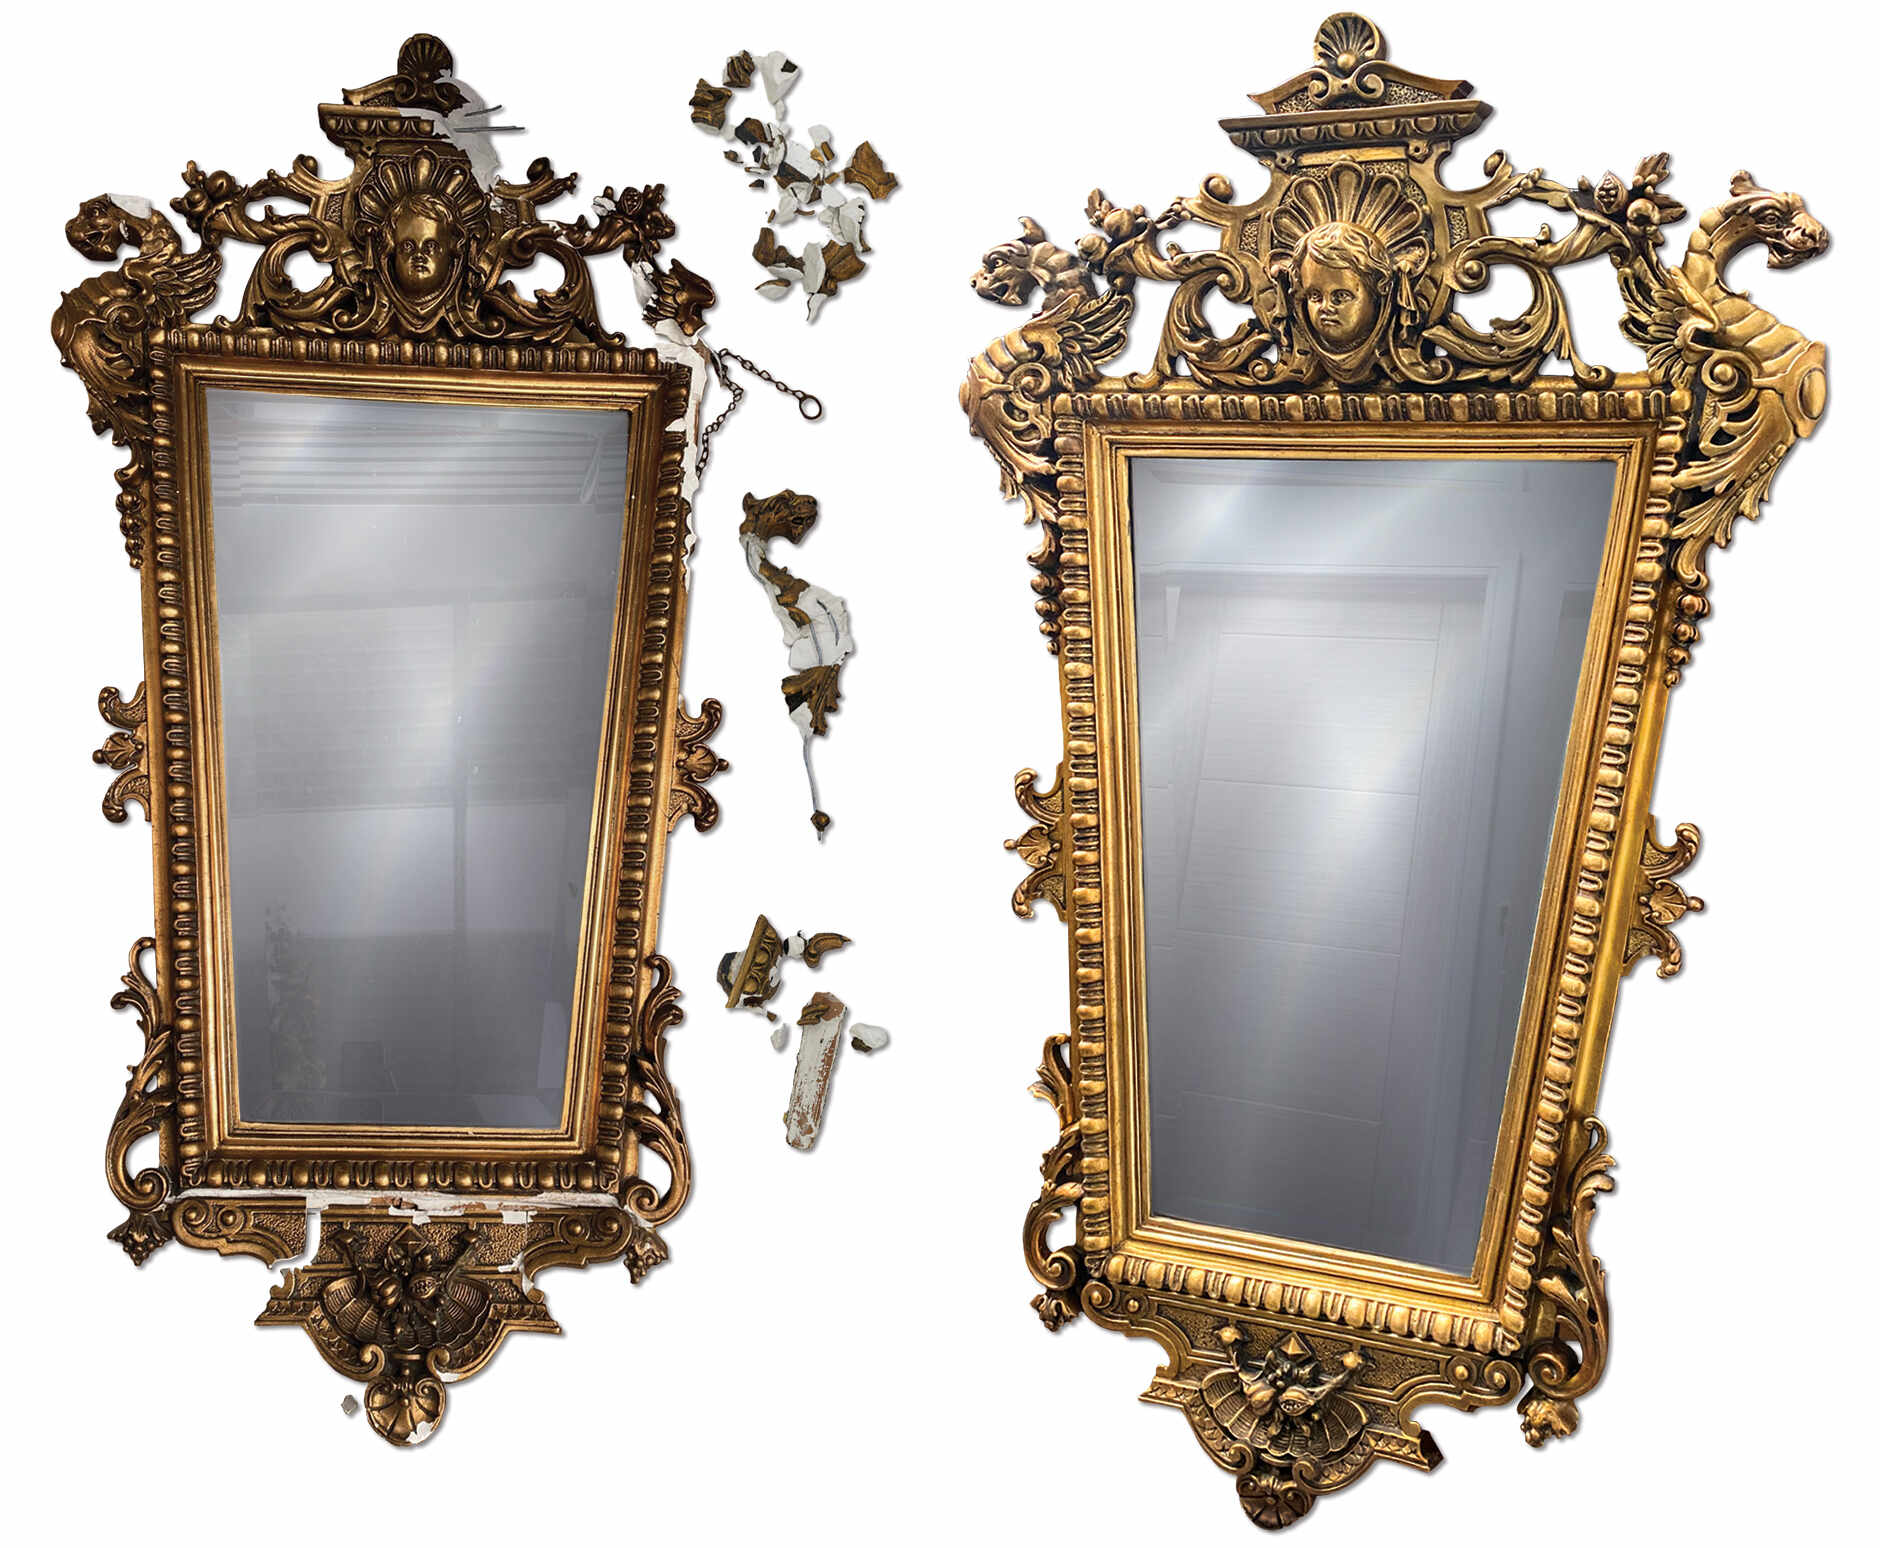
Assessing the Damage
Restoring an old mirror requires careful assessment of the damage it has sustained over the years. Before starting the restoration process, it’s crucial to thoroughly evaluate the mirror’s condition to determine the extent of repairs needed. Here’s a step-by-step guide on how to assess the damage and prepare for the restoration journey.
1. Inspect for cracks and chips: Carefully examine the mirror surface for any cracks or chips. These could be signs of previous accidents or mishandling. Note down the location and size of each damaged area as a reference for future repairs.
2. Check for discoloration: Look out for any spots or discoloration on the mirror. Over time, exposure to moisture and aging can cause the silvering to tarnish and lose its reflective properties. Make a note of these areas as they will need special attention during the restoration process.
3. Assess the frame: Evaluate the condition of the mirror frame, if any. Look for signs of wear and tear, such as peeling paint, cracks, or loose joints. Take note of any repairs or refinishing needed to restore the frame’s original beauty.
4. Identify scratches: Carefully examine the mirror surface for any scratches. These can occur from everyday use or cleaning mishaps. Note the severity of the scratches and their location, as deeper scratches may require additional repair steps.
5. Consider the age and value: If the mirror is an antique or has sentimental value, it’s important to consider preserving its originality. Consult with experts or do research to determine the best restoration approach that maintains the mirror’s authenticity and value.
By thoroughly assessing the damage, you will have a better understanding of the restoration process required for your old mirror. This evaluation will guide you in gathering the necessary supplies and planning the appropriate techniques for cleaning, repairing, and preserving the mirror.
Gathering Your Supplies
Before embarking on the journey of restoring your old mirror, it’s essential to gather the necessary supplies. Having the right tools and materials at hand will make the restoration process smoother and more efficient. Here’s a comprehensive list of supplies you’ll need:
1. Cleaning solutions: Choose gentle and non-abrasive cleaning solutions specifically formulated for mirrors. Avoid using harsh chemicals or abrasive cleaners as they can damage the glass surface.
2. Soft lint-free cloths: Have several lint-free cloths on hand for cleaning and polishing the mirror. Microfiber cloths or cotton balls are ideal for gently wiping away dirt and grime without scratching the glass.
3. Scratch repair kit: Invest in a high-quality scratch repair kit designed for mirrors. These kits typically include different grits of sandpaper, a polishing compound, and a buffing pad to effectively remove minor scratches and restore the mirror’s surface.
4. Silvering kit: If the mirror has significant tarnishing or loss of silvering, consider purchasing a silvering kit. These kits usually include silvering chemicals, a spray bottle, and instructional materials to guide you through the silvering process.
5. Patina or antique finish: Depending on the desired outcome, you may want to add a patina or antique finish to give your mirror an aged or vintage look. Look for patina solutions or antiquing agents that are compatible with mirror glass.
6. Adhesive: In case the mirror has any chipped or cracked areas, you’ll need an appropriate adhesive to repair them. Look for a clear and strong adhesive that is safe for use on glass surfaces.
7. Protective sealant: After restoring the mirror, it’s important to apply a protective sealant to keep it looking its best for years to come. Look for a sealant specifically formulated for glass surfaces that provides long-lasting protection against moisture and environmental damage.
8. Paint and brushes: If the mirror has a frame that requires refinishing, gather the necessary paint and brushes to restore its original beauty. Choose a paint color that complements the mirror and ensure the brushes are suitable for delicate work.
Remember to follow the instructions provided with each product and use caution when handling and applying chemicals. By gathering the essential supplies beforehand, you’ll be well-prepared to begin the restoration process and achieve the best possible results for your old mirror.
Cleaning the Mirror
Cleaning the mirror is an essential step in restoring its beauty and removing dirt and grime that have accumulated over time. However, it’s important to be gentle and use the right cleaning solutions to avoid damaging the delicate glass surface. Here’s a step-by-step process for cleaning your old mirror:
1. Prepare the cleaning solution: Dilute a small amount of mild glass cleaner or vinegar with water in a spray bottle. Avoid using abrasive cleaners or strong chemicals that can scratch or damage the mirror.
2. Spray the cleaning solution: Mist the cleaning solution onto a soft lint-free cloth or directly onto the mirror surface. Make sure not to oversaturate the mirror to prevent liquid seeping into the frame or silvering.
3. Gently wipe the mirror: Using the damp cloth, gently wipe the mirror surface in circular motions. Start from the top and work your way down, ensuring you cover the entire area. Be careful not to apply too much pressure as it may cause the mirror to flex or crack.
4. Pay attention to corners and edges: Use a cotton swab or a soft brush to clean hard-to-reach areas such as corners and edges. These areas are more prone to accumulating dirt and grime, so take extra care to remove any buildup.
5. Remove stubborn stains: If there are stubborn stains or spots on the mirror, gently rub them with a paste made from baking soda and water. Apply the paste using a soft cloth, and then rinse it off with a clean, damp cloth.
6. Dry the mirror: Once the mirror is clean, use a dry lint-free cloth to gently buff the surface and remove any streaks or moisture. It’s important to thoroughly dry the mirror to prevent water spots or streaks from forming.
7. Avoid using paper towels or rough materials: Paper towels, newspaper, or rough materials can scratch the mirror surface. Stick to soft lint-free cloths to ensure gentle and safe cleaning.
Remember to take your time and be patient while cleaning the mirror. Rushing or using aggressive scrubbing motions can result in damage. Regular and gentle cleaning will help maintain the mirror’s brilliance and clarity, laying the foundation for further restoration steps.
Removing Scratches and Stains
Over time, mirrors can develop scratches and stains that affect their appearance. Fortunately, there are methods and techniques to effectively remove these imperfections and restore the mirror’s smooth and flawless surface. Here’s a step-by-step guide on how to remove scratches and stains from your old mirror:
1. Assess the severity of scratches: Inspect the mirror surface and determine the depth and severity of the scratches. If they are minor surface scratches, they can be easily buffed out. Deeper scratches may require more extensive repairs.
2. Apply a scratch repair compound: Utilize a high-quality scratch repair compound designed for glass surfaces. Apply a small amount of the compound onto a soft cloth, and gently rub it over the scratched area in a circular motion. Continue until the scratches are less visible or entirely removed.
3. Use toothpaste as a makeshift solution: In the absence of a dedicated scratch repair compound, toothpaste can be used as a makeshift solution. Apply a small amount of non-gel toothpaste onto a soft cloth and rub it onto the scratched area using gentle circular motions. Wipe away excess toothpaste and assess the results.
4. Address deep scratches: For deeper scratches that cannot be fixed through buffing alone, consider using a glass scratch removal kit. These kits typically consist of different grits of sandpaper or polishing discs. Follow the kit instructions carefully, starting with coarser grits and gradually moving to finer ones to sand away the scratches.
5. Handle deep scratches with caution: Keep in mind that attempting to remove deep scratches yourself carries the risk of further damage. If you’re unsure or concerned about maintaining the integrity of the mirror, it’s best to seek assistance from a professional restoration service.
6. Address stains with vinegar: For stubborn stains on the mirror surface, mix equal parts white vinegar and water in a spray bottle. Spray the mixture onto the stained area and let it sit for a few minutes. Gently wipe the area with a soft cloth until the stain is removed. Rinse with clean water and dry thoroughly.
7. Consider professional help for tough stains: If the stains persist despite your efforts, it may be necessary to seek professional help. Experienced mirror restorers have specialized techniques and products to tackle tough stains effectively.
Remember to always work in a well-ventilated area and follow product instructions carefully. Taking the time to address scratches and stains will significantly improve the overall appearance of your old mirror, bringing it one step closer to its former glory.
Repairing Chipped or Cracked Areas
Chips and cracks in an old mirror can be unsightly and compromise its structural integrity. However, with the right techniques and materials, you can repair these damaged areas and restore the mirror’s functionality and appearance. Here’s a step-by-step process for repairing chipped or cracked areas on your old mirror:
1. Clean the damaged area: Before proceeding with repairs, ensure the chipped or cracked area is clean and free from any debris or loose glass. Gently clean the surrounding area with a soft cloth and glass cleaner to provide a clean surface to work on.
2. Apply a clear adhesive: Select a clear adhesive specifically designed for use on glass surfaces. Carefully apply a small amount of adhesive to the chipped or cracked area using a toothpick or a fine brush. Be cautious not to apply too much adhesive, as it may create a mess or interfere with the repair process.
3. Align the pieces for cracks: For cracks, gently push the sides of the crack together to align them as closely as possible. The adhesive will help hold the pieces in place during the repair process.
4. Fill in the chipped area: For chipped areas, use a small amount of clear adhesive to fill in the missing portion. Use a toothpick or a fine brush to spread the adhesive evenly, ensuring it fills the chipped area completely.
5. Smooth the surface: Once the adhesive is applied, carefully smooth the surface with a clean cloth or your fingertip. This will help ensure that the repaired area is flush with the rest of the mirror surface.
6. Allow the adhesive to dry: Give the adhesive ample time to dry and cure according to the manufacturer’s instructions. Avoid handling or applying any pressure to the repaired area until the adhesive has fully set.
7. Inspect and make necessary touch-ups: After the adhesive is dry, inspect the repaired area. If any touch-ups are needed to further smooth or blend the repaired section, apply a small amount of adhesive and follow the same steps as before.
If the damage is too severe or extensive, it’s advisable to seek professional assistance for the repair. Professional restorers have the expertise and tools to handle complex repairs and ensure the best possible results.
By following these steps, you can effectively repair chipped or cracked areas on your old mirror, extending its lifespan and restoring its aesthetic appeal.
Applying New Silvering
Over time, the silvering on a mirror can deteriorate, resulting in a diminished reflective surface. To restore the mirror’s reflectivity and give it a fresh new look, applying new silvering is necessary. While this process requires precision and careful handling, it can be done with the right materials and techniques. Here’s a step-by-step guide on how to apply new silvering to your old mirror:
1. Prepare the workspace: Set up a well-ventilated and clean workspace to ensure optimal conditions for silvering. Keep in mind that this process can be a bit messy, so protect the area with newspapers or plastic sheets.
2. Remove the mirror from the frame: If your mirror is framed, carefully remove it to access the mirror surface. Follow the manufacturer’s instructions or use appropriate tools to detach the mirror from its frame without causing any damage.
3. Clean the mirror: Thoroughly clean the mirror surface using a gentle glass cleaner or a mixture of vinegar and water. Ensure that all dirt, oils, and debris are removed before proceeding.
4. Prepare the silvering solution: Mix the silvering solution according to the instructions on the product package. Typically, this involves combining silvering chemicals and distilled water in specific proportions. Be sure to follow the instructions carefully to ensure proper silvering.
5. Apply the silvering solution: Using a spray bottle, mist the silvering solution evenly onto the mirror surface. Be careful not to oversaturate or create puddles, as this can lead to an uneven finish. Apply the solution in thin layers, allowing each layer to dry slightly before applying the next.
6. Monitor and adjust the silvering process: Watch the mirror closely as the silvering solution begins to dry. Gradually, a reflective silver coating will form. Adjust the process by applying more solution in areas where silvering appears uneven or using a soft brush to spread the solution evenly.
7. Allow the silvering to fully dry: Once the desired level of silvering is achieved, allow the mirror to dry completely. This may take several hours or even overnight, depending on the product used. Avoid touching or disturbing the mirror during this crucial drying period.
8. Reassemble the mirror: After the silvering is dry, carefully reattach the mirror to its frame, following the appropriate method or using recommended adhesive. Take care to protect the newly silvered surface from any scratches or damage during reassembly.
The process of applying new silvering requires meticulousness and patience, but it can significantly improve the mirror’s reflectivity and breathe new life into it. If you are uncomfortable with the silvering process, consider seeking professional assistance to ensure a flawless and long-lasting result.
Adding Patina or Antique Finish
Adding a patina or antique finish to your restored mirror can further enhance its character and give it a unique and vintage look. Whether you want to achieve an aged appearance or match the mirror with your decor, applying a patina or antique finish can be a transformative step. Here’s a step-by-step guide on how to add a patina or antique finish to your old mirror:
1. Clean the mirror: Ensure that the mirror is clean and free from any dust or residue before applying the patina or antique finish. Use a gentle glass cleaner or a mixture of vinegar and water to thoroughly clean the surface.
2. Choose your patina or antique finish: Decide on the desired finish for your mirror. There are various options available, such as specialty paints, glazes, or antiquing agents specifically formulated for glass surfaces. Consider the existing color scheme and aesthetic of the room to determine the most suitable finish.
3. Prepare the patina or antique finish: Follow the manufacturer’s instructions to prepare the chosen patina or antique finish product. This may involve mixing, diluting, or shaking the product to achieve the desired consistency.
4. Apply the patina or antique finish: Using a brush, sponge, or cloth, apply the patina or antique finish to the mirror surface in a controlled and deliberate manner. Start from one corner and work your way across the mirror, applying the finish evenly. Depending on the desired effect, you can apply a light coat or build up layers for a more pronounced aged look.
5. Blend and distress: Depending on the specific product and desired effect, you may need to blend or distress the patina or antique finish. Use a soft cloth, sponge, or even sandpaper to gently blend the finish or create distressed areas, giving it a worn or weathered appearance.
6. Allow the finish to dry and cure: Follow the manufacturer’s instructions regarding drying and curing time for the patina or antique finish. Be patient and avoid touching or applying any pressure to the surface until the finish has fully dried and cured.
7. Inspect and make necessary touch-ups: Once the finish is dry, inspect the mirror for any areas that may need additional blending or touch-ups. Use the same patina or antique finish product to address any inconsistencies or missed spots, ensuring a cohesive and authentic look.
Adding a patina or antique finish gives your old mirror a personal touch and can complement various interior design styles. Experiment with different finishes or techniques to achieve the desired aesthetic, and remember to take your time and enjoy the process of transforming your restored mirror into a unique and captivating piece.
Sealing and Protecting the Mirror
After restoring an old mirror, it’s crucial to seal and protect it to ensure its longevity and maintain its newly regained beauty. By applying a protective sealant, you can safeguard the mirror surface from damage caused by moisture, dust, and environmental factors. Here’s a step-by-step guide on how to seal and protect your restored mirror:
1. Clean the mirror surface: Before applying any sealant, ensure that the mirror surface is clean and free from any residue or fingerprints. Use a soft lint-free cloth and a glass cleaner to gently clean the mirror, removing any dust or smudges.
2. Choose an appropriate sealant: Select a sealant specifically formulated for glass surfaces. Look for one that provides long-lasting protection against moisture, UV rays, and environmental pollutants. It’s important to choose a sealant that won’t leave a hazy or streaky residue on the mirror.
3. Apply the sealant: Following the manufacturer’s instructions, apply the sealant to the mirror surface using a clean lint-free cloth or a soft brush. Work in small sections and use even and gentle strokes to ensure thorough coverage. Take care not to apply an excessive amount of product or allow it to pool in any areas.
4. Allow the sealant to dry: Once the sealant is applied, let it dry according to the instructions provided. Avoid touching or disturbing the mirror during this drying period to prevent any smudges or damage to the newly applied sealant.
5. Inspect and repeat if necessary: After the initial application, inspect the mirror to ensure that the sealant has been evenly applied and has sealed the mirror surface effectively. If any areas appear uneven or untreated, apply another thin layer of sealant to those spots and allow it to dry.
6. Handle with care: It’s important to handle the restored mirror with care to prevent any potential damage. Avoid using abrasive cleaners or rough materials that can scratch the surface. Clean the mirror gently using a soft cloth and a mild glass cleaner, and avoid placing heavy objects or applying excessive force on the mirror.
By sealing and protecting your restored mirror, you can prolong its lifespan and maintain its newly restored appearance. Regularly clean the mirror and periodically check the sealant for any signs of wear or damage. Taking these steps will help ensure that your mirror remains a cherished piece for years to come.
Restoring the Frame
In the process of restoring an old mirror, don’t overlook the importance of restoring the frame as well. The frame not only provides structural support but also contributes to the overall aesthetic appeal of the mirror. Whether it’s a wooden, metal, or ornate frame, here’s a step-by-step guide on how to restore and revitalize the frame of your old mirror:
1. Inspect the frame: Carefully examine the frame for any signs of damage, such as cracks, chipped paint, or loose joints. Take note of areas that require repair or refinishing to restore the frame’s original beauty.
2. Repair any damage: If the frame has cracks or loose joints, use an appropriate adhesive or wood filler to repair them. For wooden frames, consider using clamps to hold the cracked or loose areas together while the adhesive or filler dries.
3. Strip or sand the existing finish: If the frame has an existing finish that is worn or damaged, you may need to strip it off or sand it down to prepare for a fresh finish. Use appropriate tools and techniques based on the type of frame material. Be cautious and follow safety guidelines when working with chemical strippers or sanding materials.
4. Apply a new finish: Depending on your preference and the style you want to achieve, apply a new finish to the frame. This could involve painting the frame with a suitable paint or stain, or applying a clear coat to enhance the natural beauty of the wood or metal.
5. Consider distressed or antique finishes: If you want to achieve a distressed or antique look for your frame, consider techniques such as sanding along the edges or applying a patina or antiquing agent. Experiment with different techniques and finishes to achieve the desired effect.
6. Allow the finish to dry and cure: After applying the new finish, follow the instructions on the product to allow it to dry and cure properly. Avoid touching or placing any objects on the frame until the finish has fully dried to prevent any damage or smudging.
7. Reattach the mirror: Once the frame finish is dry, carefully reattach the restored mirror to the frame. Use recommended adhesives or mounting techniques to secure the mirror in place. Take caution not to damage the newly restored frame or mirror surface during this step.
By restoring and revitalizing the frame of your old mirror, you complete the overall transformation and ensure that the mirror is a stunning focal point in any space. The restored frame not only enhances the mirror’s appearance but also adds charm and character to the entire room.
Final Touches and Tips
As you near the completion of restoring your old mirror, there are a few final touches and tips to consider that can elevate the overall result and ensure the longevity of your restored mirror. Here are some important final touches and tips to keep in mind:
1. Inspect for any imperfections: Thoroughly inspect the mirror and frame for any imperfections or missed spots. Address any areas that require touch-ups or additional repairs before considering the restoration process complete.
2. Consider additional embellishments: If you want to further enhance the mirror’s charm, consider adding decorative elements such as beading, trims, or appliques to the frame. These can be painted or finished to match the overall style of the mirror.
3. Secure the mirror: Ensure that the mirror is securely hung or displayed in its desired location. Use appropriate hanging hardware or mounting techniques that can support the weight of the mirror and prevent accidents or damage.
4. Regularly clean and maintain: Once the restoration is complete, establish a regular maintenance routine for the mirror. Clean the surface gently with a soft lint-free cloth and avoid using harsh chemicals or abrasive cleaners that can damage the newly restored finish.
5. Avoid exposure to direct sunlight: To prevent the silvering from prematurely tarnishing or fading, avoid placing the restored mirror in direct sunlight. Excessive exposure to sunlight can damage the reflective surface over time.
6. Consider professional restoration: If you have a valuable or antique mirror that requires extensive restoration, consider seeking professional help. Skilled mirror restorers have the expertise and experience to handle delicate or complex restoration projects.
7. Share the story and enjoy: Once your old mirror is fully restored, take pride in your achievement and share the story behind its restoration. Whether it’s a family heirloom or a vintage find, appreciate the beauty and history that the mirror brings to your space.
With these final touches and tips, you can ensure that your restored mirror becomes a cherished piece that adds character and charm to your home. By taking the time to complete the necessary finishing touches and implementing ongoing maintenance, your restored mirror can continue to shine for years to come.