
What You’ll Need
Changing the side mirror glass on your vehicle is a relatively straightforward process that can be done with a few basic tools and supplies. Before you begin, make sure you have the following items:
- A new mirror glass: Make sure you purchase the correct replacement mirror glass for your specific make and model of vehicle. You can usually find this at an auto parts store or online.
- Gloves: It’s always a good idea to wear gloves when handling any automotive parts to protect your hands from cuts or scratches.
- Safety goggles: Safety goggles will help safeguard your eyes from any debris or broken glass that may come loose during the removal process.
- Clean cloth: A soft, lint-free cloth will be needed to clean the mirror housing and ensure a clear surface for the new mirror glass.
- Screwdriver: Depending on the type of mirror housing you have, you may need either a flathead or Phillips head screwdriver to remove the screws holding the old mirror glass in place.
- Adhesive or double-sided tape: Some mirror glass replacements come with adhesive backing or require double-sided tape for installation. Check the instructions that came with your replacement glass to determine if you need to apply adhesive or tape.
- Alcohol wipes or glass cleaner: Before installing the new mirror glass, it’s important to clean the mirror housing thoroughly. Alcohol wipes or a glass cleaner can help remove any dirt, grime, or adhesive residue.
Having these items on hand before you start the process will help ensure a smooth and efficient replacement of your side mirror glass. Remember to carefully read the instructions provided by the manufacturer of the replacement mirror glass to ensure proper installation. With the right tools and materials, you’ll be able to change your side mirror glass with confidence and have your vehicle looking good as new.
Step 1: Assess the Damage
Before you begin the process of changing the side mirror glass, it’s important to assess the damage and determine if a replacement is necessary. Start by carefully examining the mirror to identify any cracks, chips, or other forms of damage. If the mirror is completely shattered or missing, it’s evident that a replacement is needed. However, minor damage such as a small crack may be repairable without replacing the entire glass. Assessing the damage will help you determine the appropriate course of action.
Once you’ve identified the extent of the damage, take note of any specific details about your mirror and its housing. This information will be useful when purchasing the new mirror glass. Pay attention to factors such as the shape, dimensions, and any additional features like heating or signal indicators that may be present on your mirror. It’s important to ensure that the replacement glass matches these specifications for a proper fit.
Additionally, take the time to inspect the mirror housing itself. Check for any signs of damage, such as loose or broken clips, that may affect the installation of the new mirror glass. It’s essential to address any housing issues before proceeding with the replacement.
Keep in mind that it’s always a good idea to consult your vehicle’s manual or reach out to a professional if you have any doubts or questions about the assessment process. They can provide valuable insights and guidance to help you make an informed decision.
By thoroughly assessing the damage and understanding the unique characteristics of your mirror and its housing, you’ll be better equipped to proceed with the replacement process effectively. Remember, taking the time to evaluate the situation beforehand will save you from potential complications or errors during the installation of the new mirror glass.
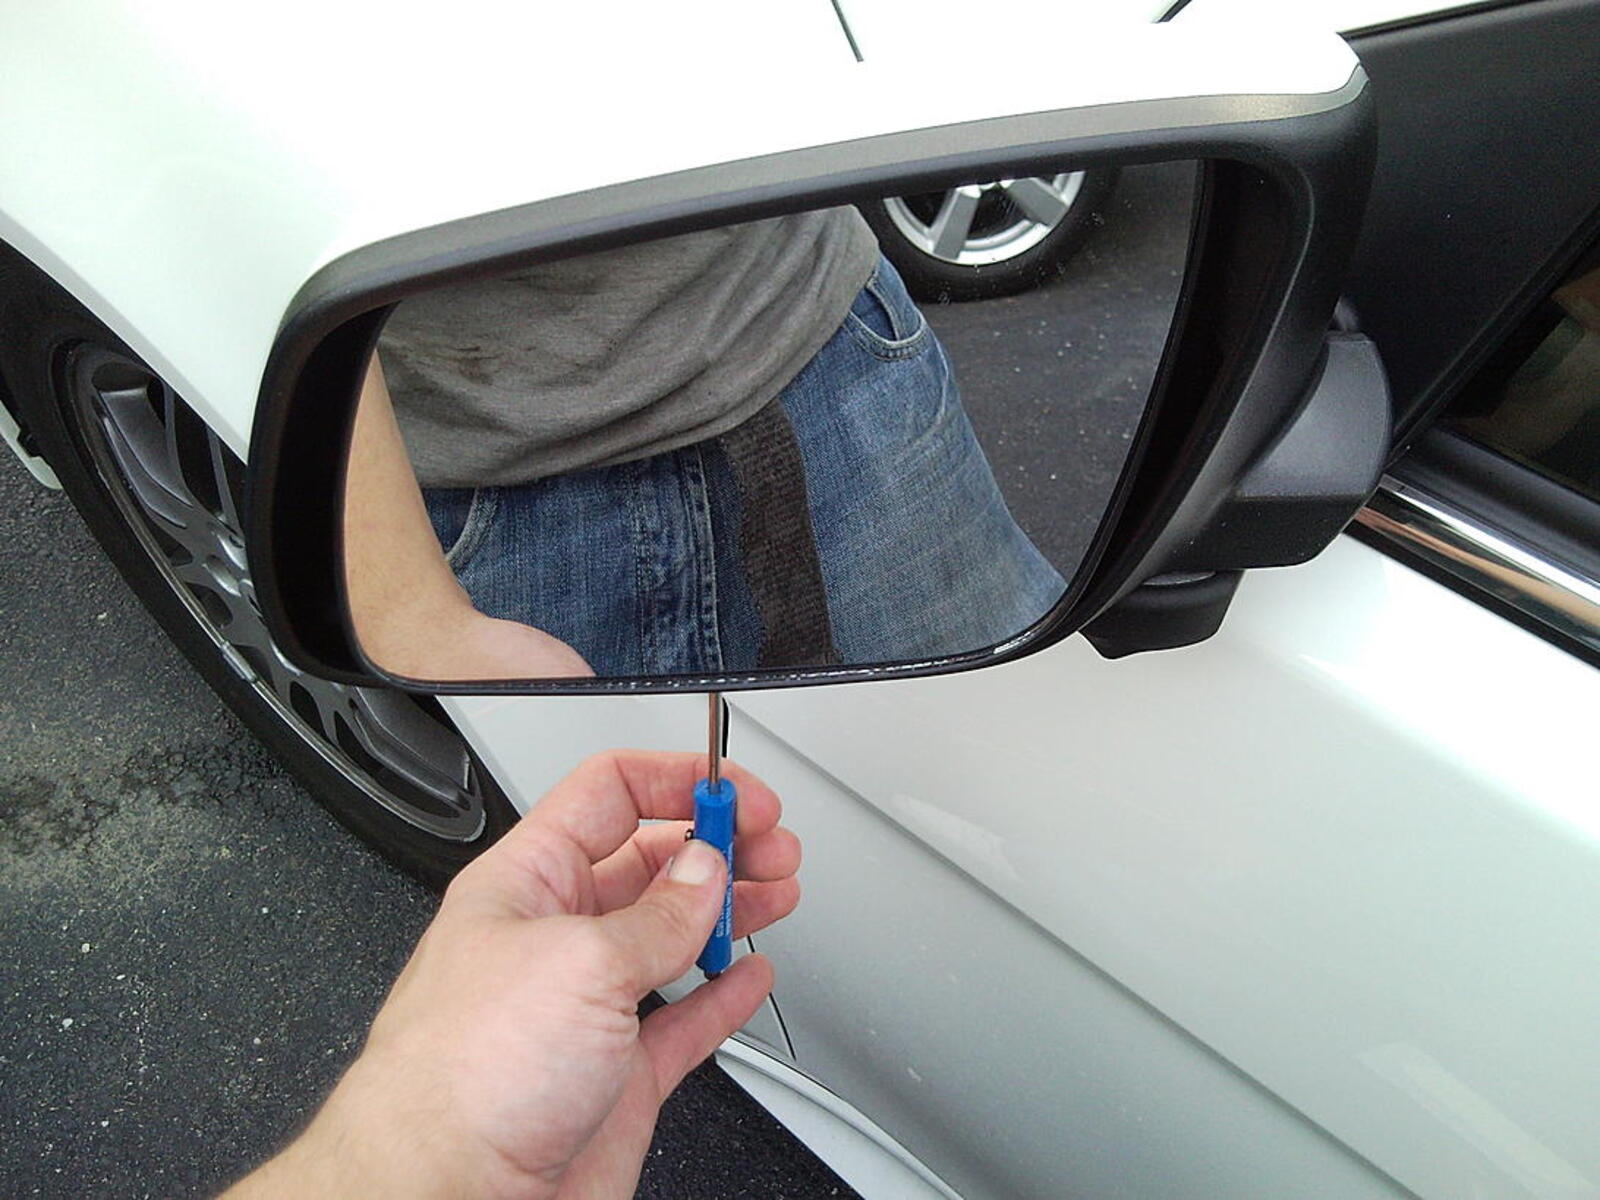
Step 2: Remove the Old Mirror Glass
Now that you’ve assessed the damage and determined a replacement is necessary, it’s time to remove the old mirror glass. Follow these steps to safely and effectively remove the old glass:
- Put on your gloves and safety goggles to protect yourself from any potential hazards during the removal process.
- Inspect the mirror housing for any screws or fasteners that may be holding the glass in place. Different vehicles may have different mechanisms for securing the mirror glass, so refer to your vehicle’s manual for specific instructions, if needed.
- If screws are present, use a screwdriver (flathead or Phillips) to carefully remove them. Be sure to keep track of the screws for later reinstallation.
- If there are no visible screws, the mirror glass may be attached using adhesive or clips. Gently and firmly try to wiggle the glass to determine how it is secured.
- If adhesive is used, use a hairdryer or heat gun on low setting to warm the adhesive, which will make it easier to remove. Be cautious not to overheat the glass or the housing.
- Once the adhesive is softened, use a flathead screwdriver or a plastic trim removal tool to gently pry the old mirror glass away from the housing. Start from one corner and work your way around, applying even pressure to avoid damaging the housing or the surrounding components.
- If the glass is held in place by clips, locate the clips and carefully release them by either pressing or squeezing them, depending on their design. Take your time and be gentle to prevent any breakages.
- Once the old mirror glass is fully detached, carefully lift it out of the housing and set it aside. Be cautious as broken glass or adhesive residue may still be present.
With the old mirror glass removed, you’re now ready to move on to the next steps of the replacement process. Take a moment to clean the mirror housing and prepare for the installation of the new mirror glass.
Step 3: Clean the Mirror Housing
After removing the old mirror glass, it’s essential to clean the mirror housing thoroughly before installing the new mirror glass. A clean surface will ensure proper adhesion and a secure fit for the replacement. Follow these steps to clean the mirror housing effectively:
- Start by using a soft, clean cloth to remove any dirt or debris from the mirror housing. Wipe the surface gently to avoid scratching or damaging the housing.
- If there is any adhesive residue left behind from the old mirror glass, use an appropriate remover or adhesive solvent to dissolve it. Follow the instructions on the product carefully and ensure it is safe for use on your vehicle’s surface.
- Alternatively, you can use alcohol wipes or a glass cleaner to clean the mirror housing. Apply the cleaner to a clean cloth and wipe the surface thoroughly to remove any remaining dirt, residue, or adhesive.
- Pay close attention to the edges and corners of the housing, as these areas tend to accumulate more dirt and debris. Use a cotton swab or a soft brush to reach these tight spaces if necessary.
- Allow the mirror housing to dry completely before proceeding to the next step. This will ensure a secure bond between the new mirror glass and the housing.
By taking the time to clean the mirror housing, you’ll create an optimal surface for the installation of the new mirror glass. A clean housing reduces the risk of any interference with the adhesive or tape and improves the overall appearance of the side mirror. Once the housing is thoroughly cleaned and dried, you’re ready to move on to the next step of the replacement process.
Step 4: Prepare the New Mirror Glass
With the mirror housing cleaned and ready, it’s time to prepare the new mirror glass for installation. Proper preparation ensures a secure and accurate fit. Follow these steps to prepare the new mirror glass:
- Start by carefully unpacking the new mirror glass and inspecting it for any visible defects or damage. If everything looks good, proceed with the next steps.
- Refer to the instructions provided by the manufacturer of the replacement mirror glass. These instructions may vary depending on the specific make and model of your vehicle.
- If the new mirror glass has an adhesive backing, remove the protective film or paper from the adhesive side. Be cautious not to touch the adhesive surface with your fingers to prevent any oil or dirt from interfering with the adhesion.
- If adhesive is not pre-applied, you will need to apply a thin layer of automotive-grade adhesive or use double-sided tape according to the manufacturer’s instructions. Apply the adhesive or tape evenly on the backside of the mirror glass, ensuring full coverage and proper alignment with any heating elements or signal indicators.
- Double-check the size, shape, and features of the new mirror glass to ensure it matches the specifications of your vehicle’s mirror housing. Verify that it fits snugly and securely into the housing without any gaps or loose areas.
- If necessary, make any necessary adjustments or modifications to the new mirror glass before proceeding with the installation. This may include trimming excess adhesive or tape, or sanding down any sharp edges to ensure a proper fit.
By carefully preparing the new mirror glass, you’ll ensure a successful and long-lasting installation. Double-checking the specifications, applying the adhesive or tape correctly, and making any necessary adjustments will contribute to a secure fit and optimal functionality of the side mirror. Once the new mirror glass is prepared, you’re ready to move on to the next step of attaching it to the mirror housing.
Step 5: Attach the New Mirror Glass
Now that the new mirror glass is prepared, it’s time to attach it to the mirror housing. Follow these steps carefully to ensure a secure and proper installation:
- Take the prepared new mirror glass and align it with the mirror housing, making sure the dimensions and shape match perfectly. Double-check that any heating elements or signal indicators line up correctly.
- If the new mirror glass has an adhesive backing, firmly press it onto the mirror housing, applying even pressure to ensure full contact and adhesion. Take care not to touch the adhesive surface with your fingers to avoid contaminating it.
- If adhesive was not pre-applied, carefully position the new mirror glass in the housing, ensuring proper alignment. If necessary, use adhesive or double-sided tape to secure the mirror glass according to the manufacturer’s instructions.
- Apply pressure to the mirror glass, pressing it firmly onto the housing to ensure a strong bond between the adhesive or tape and the mirror housing. Follow any specific instructions from the manufacturer regarding the recommended pressure and duration of application.
- Take a moment to double-check that the mirror glass is securely in place and properly aligned. Look for any gaps or areas where the glass may not be fully attached.
Attaching the new mirror glass may vary depending on the specific instructions provided by the manufacturer. It’s essential to follow those instructions closely to ensure a successful installation. A properly attached mirror glass will provide clear visibility and enhance the safety of your vehicle on the road. Once the new mirror glass is securely attached, move on to the next step to test its functionality.
Step 6: Test the New Mirror Glass
After attaching the new mirror glass, it is crucial to test its functionality to ensure proper installation. Follow these steps to test the new mirror glass:
- Adjust the mirror using the controls inside your vehicle to ensure it moves smoothly and allows for proper visibility.
- If your vehicle has any special features on the mirror, such as heating or signal indicators, test them to make sure they are functioning correctly.
- Take a moment to visually inspect the mirror from different angles. Look for any distortions or obstructions that may affect the clarity and accuracy of your reflection.
- Manually adjust the mirror by physically moving it to different positions to ensure it stays securely in place without any wobbling.
- Test the mirror by driving your vehicle under different conditions, such as on a straight road, making turns, and checking blind spots. Ensure that the mirror provides a clear view of your surroundings.
Testing the new mirror glass is crucial for your safety on the road. The mirror should provide accurate visibility and allow you to see clearly while driving. Any issues or abnormalities should be addressed promptly to ensure optimal performance. If you encounter any problems during the testing process, consult a professional to resolve the issue. Once you are satisfied with the functionality and performance of the new mirror glass, move on to securing the mirror housing in the next step.
Step 7: Secure the Mirror Housing
After successfully testing the new mirror glass, it’s time to secure the mirror housing to ensure it stays in place. Follow these steps to securely fasten the mirror housing:
- Refer to your vehicle’s manual or the manufacturer’s instructions to determine the specific method of securing the mirror housing.
- If the mirror housing is held in place by screws, carefully reinsert and tighten them using the appropriate screwdriver. Ensure that they are securely fastened but avoid over-tightening, which can lead to damage.
- If the mirror housing uses clips, align the housing with the clips and push it firmly until it snaps into position.
- Double-check the mirror housing to ensure it is securely attached and properly aligned. Gently give it a slight tug to confirm it is firmly in place.
By securely fastening the mirror housing, you ensure that the mirror glass remains stable and properly positioned. This step is vital to avoid any vibrations or movements that may affect the functionality and visibility of the mirror. Take your time to ensure a snug fit and refer to any specific instructions provided by the manufacturer if necessary.
It’s important to note that if you encounter any difficulties or are unsure about securing the mirror housing, seeking assistance from a professional or referring to your vehicle’s manual is always a good idea. They can provide valuable guidance and ensure that the mirror is securely mounted.
With the mirror housing securely in place, you are one step closer to completing the replacement process. Proceed to the next step for the final steps and safety precautions before concluding the process.
Step 8: Final Steps and Safety Precautions
Congratulations! You’re nearing the end of the process to change your side mirror glass. Before you wrap up, take note of these final steps and safety precautions:
- Inspect the mirror and its surroundings once more to ensure everything is in order. Check for any loose screws, clips, or other components and tighten or secure them if necessary.
- Double-check that the mirror glass is firmly attached and properly aligned.
- Take a moment to clean the mirror glass using a lint-free cloth and a suitable glass cleaner for optimal visibility.
- Review any specific instructions or recommendations provided by the manufacturer of the mirror glass regarding maintenance or care.
- Be aware of any electrical connections or wiring associated with the mirror glass, such as those for heating or signal indicators. Ensure they are properly connected and in good condition.
- Verify that all controls for adjusting the mirror from inside the vehicle are functioning correctly.
- Regularly check the mirror after installation to ensure it remains secure and undamaged. Address any issues promptly to maintain optimal performance.
- Finally, always remember to exercise caution and practice safe driving habits. The side mirror is an essential component for visibility, but it’s important to be aware of your surroundings and use other mirrors and blind spot checks as necessary.
By following these final steps and safety precautions, you’ll ensure that your new mirror glass is properly installed, functional, and ready for use. Regular maintenance and attentive driving will help keep your side mirror in good condition, providing a clear view of your surroundings and enhancing safety on the road.
Keep in mind that the process of changing side mirror glass may vary depending on the make and model of your vehicle. Always refer to the manufacturer’s instructions and guidelines specific to your vehicle to ensure the best results.