
Using Rug Grippers
Rugs are a great way to add warmth and style to any room, but one common issue is that they have a tendency to slide around on smooth surfaces, such as hardwood or tile floors. This can not only be annoying but also pose a safety hazard. To prevent your rug from sliding, one effective solution is to use rug grippers.
Rug grippers, also known as rug anti-slip pads or rug anchors, are adhesive pads that adhere to both the rug and the floor to keep the rug in place. They are available in various shapes, sizes, and materials, including rubber, silicone, or felt.
Using rug grippers is simple and straightforward. Here’s a step-by-step guide:
- Clean the floor: Start by ensuring that the floor surface is clean and free from dust or debris.
- Measure and position the rug grippers: Take measurements of your rug and determine the placement for the rug grippers. Typically, you’ll need to attach them near each corner of the rug, as well as along the edges.
- Peel off the backing and attach the rug grippers: Carefully peel off the backing of the rug grippers to expose the adhesive side. Press them firmly onto the rug, making sure they are properly aligned with the corners and edges.
- Place the rug on the floor: Once the rug grippers are attached, position the rug on the desired spot on the floor.
- Press the rug down: Apply firm pressure to ensure that the rug firmly sticks to the rug grippers and the floor surface.
Rug grippers are a convenient and affordable solution to keep your rug in place. They are not only effective but also removable, so you can easily adjust your rug’s position or remove them without leaving any residue on the floor.
Whether you have a small area rug or a large rug, using rug grippers can help prevent slipping and bunching, making your space safer and more comfortable.
Using rug grippers is an excellent preventive measure to keep your rug firmly in place and avoid any potential accidents. By following the simple steps outlined above, you can enjoy your rug without the hassle of constant readjustments.
Applying Double-Sided Tape
Another effective method to prevent your rug from sliding is by using double-sided tape. This simple yet powerful solution provides a strong adhesive bond between the rug and the floor, keeping it securely in place.
Here’s how you can apply double-sided tape to keep your rug from sliding:
- Clean the floor: Start by ensuring that the floor surface is clean and free from any dirt or debris. This will help the tape adhere better to the floor.
- Measure and cut the tape: Measure the length and width of your rug and cut the double-sided tape accordingly. It’s recommended to cut the tape into strips that are slightly shorter than the width of your rug.
- Position the tape: Place the strips of double-sided tape along the edges of the rug, making sure to leave a small gap between the tape and the edge of the rug. You can also add additional strips of tape to the center of the rug for added security.
- Remove the backing: Carefully peel off the backing of the double-sided tape to expose the adhesive side.
- Secure the rug: Position the rug on the desired spot on the floor, making sure to align it with the tape. Press down firmly on the rug to ensure it sticks to the tape.
Double-sided tape is a versatile and inexpensive solution to maintain the position of your rug. It provides a strong grip without damaging your flooring, making it ideal for both temporary and permanent use.
When it comes to removing the rug, double-sided tape can be easily taken off without leaving any residue on the floor. However, it’s essential to note that some adhesives may vary, so it’s always a good idea to follow the manufacturer’s instructions for the best results.
By applying double-sided tape, you can ensure that your rug stays in place, providing a safe and comfortable environment for you and your family. Enjoy the benefits of a well-positioned rug without the frustration of it constantly sliding around.
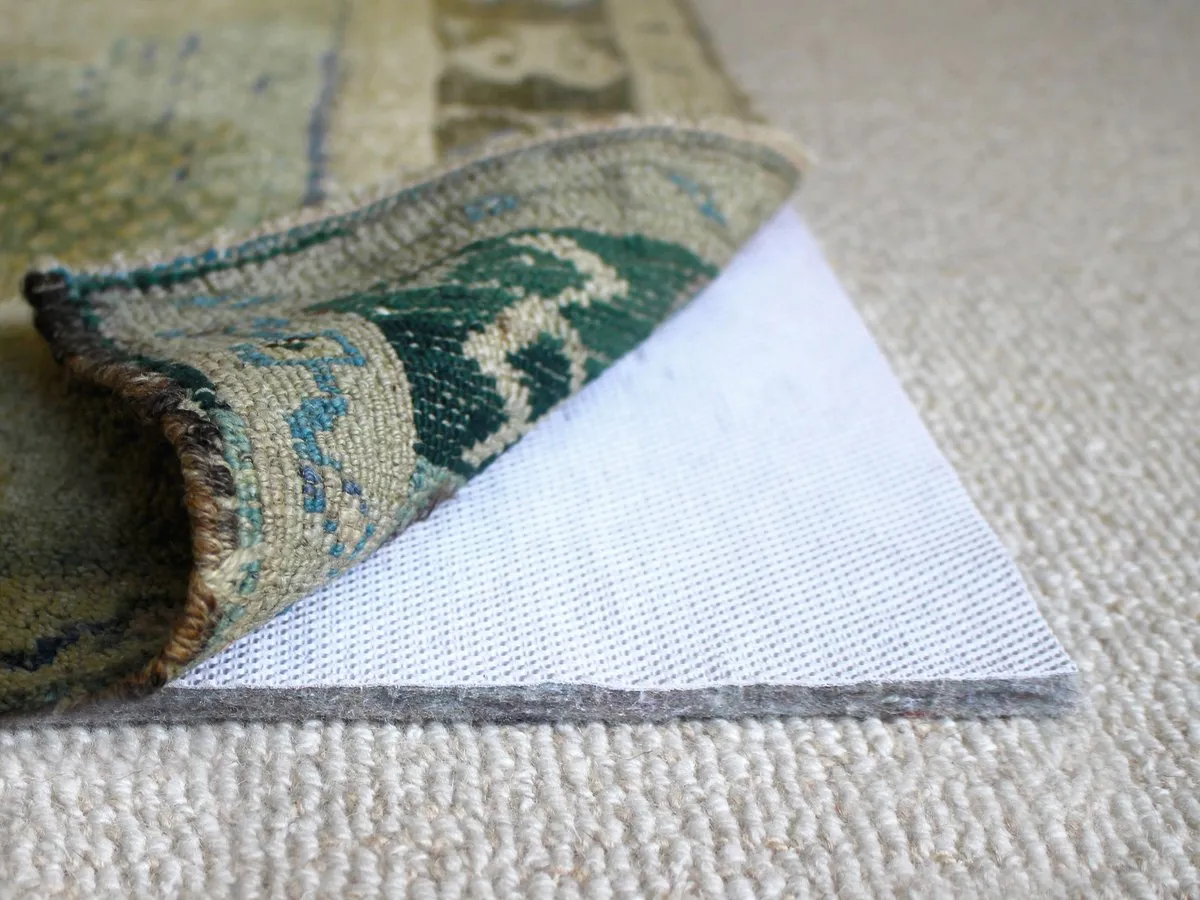
Using a Non-Slip Rug Pad
A non-slip rug pad is an excellent solution to prevent your rug from sliding on hard floors, such as laminate or tile. These pads provide a cushioned layer between the rug and the floor, offering both safety and comfort.
Here’s how you can use a non-slip rug pad to keep your rug in place:
- Clean the floor: Start by ensuring that the floor is clean and free from any dirt or debris.
- Measure and choose the right rug pad: Measure the dimensions of your rug and select a non-slip rug pad that matches the size and shape. Rug pads are available in various thicknesses and materials, including rubber, felt, or natural fibers.
- Place the rug pad: Lay the rug pad on the floor where you intend to place your rug. Make sure the pad is slightly smaller than the rug to avoid it being visible from the edges.
- Position the rug: Carefully place your rug on top of the rug pad, ensuring that it is centered and aligned properly.
- Smooth out the rug: Once the rug is positioned, smooth out any wrinkles or bumps to ensure it lies flat on the rug pad.
A non-slip rug pad provides several benefits. It not only prevents your rug from sliding but also adds a layer of cushioning, making it more comfortable to walk or stand on. Additionally, rug pads can help protect your flooring from scratches caused by the rug’s backing.
When selecting a rug pad, consider the type of floor you have and the thickness desired. For example, if you have a thin rug, a thicker rug pad will add more comfort and stability.
Using a non-slip rug pad is a versatile solution, as it can be used with various types of rugs and easily adjusted or moved when needed. It provides a long-lasting and reliable way to keep your rug securely in place without any additional adhesives.
Investing in a non-slip rug pad is a proactive measure to ensure the safety and longevity of your rug. By creating a stable foundation, you can enjoy your rug without the worry of it shifting or causing any accidents.
Placing Velcro Strips
If you’re looking for a secure and adjustable solution to prevent your rug from sliding, using Velcro strips can be an effective option. Velcro strips provide a strong grip that holds your rug in place while still allowing for easy repositioning if needed.
Here’s how you can use Velcro strips to keep your rug from sliding:
- Clean the floor: Ensure the floor is clean and free from any dust or debris to promote better adhesion.
- Measure and choose the right Velcro strips: Measure the dimensions of your rug and select Velcro strips that are long enough to match the edges of your rug. Opt for heavy-duty Velcro strips to ensure a secure bond.
- Attach the Velcro strips: Peel off the backing of one side of the Velcro strip and firmly attach it along the edge of your rug. Repeat this process for the other side of the Velcro strip, ensuring it aligns with the corresponding edge on the floor.
- Press down firmly: Once the Velcro strips are attached, press down firmly on the rug to ensure a strong bond between the Velcro and the floor.
Using Velcro strips provides the advantage of easy adjustability. If you need to reposition or remove the rug, simply detach the Velcro strips and readjust as desired.
Velcro strips are versatile and can be used on various types of rugs and flooring surfaces. They offer excellent grip strength and are a great option for rugs in high traffic areas.
However, it’s important to note that certain types of delicate flooring, such as hardwood, may be susceptible to scratching or damage when using Velcro strips. In such cases, it’s recommended to use caution or opt for alternative methods to secure your rug.
Using Velcro strips is a convenient and adjustable solution to keep your rug in place. With their strong grip and versatility, you can enjoy a slip-free rug while maintaining the flexibility to reposition the rug as needed.
Using Silicone Caulk
If you’re dealing with a persistent sliding rug issue and want a more permanent solution, using silicone caulk can be an effective option. Silicone caulk provides a strong bond between the rug and the floor, keeping it securely in place.
Here’s how you can use silicone caulk to prevent your rug from sliding:
- Clean the floor: Start by cleaning the floor surface to ensure it is free from any dirt, dust, or debris.
- Apply silicone caulk: Squeeze a line of silicone caulk along the edges and corners of the underside of the rug. Make sure to apply an even layer without any gaps or breaks.
- Smooth the caulk: Use a putty knife or your finger to smooth out the silicone caulk evenly along the edges of the rug. This helps to create a strong bond between the rug and the floor.
- Place the rug on the floor: Carefully position the rug on the desired spot on the floor, pressing it firmly onto the caulked areas.
- Allow the caulk to cure: Let the caulk cure according to the manufacturer’s instructions. This usually takes around 24 to 48 hours, but it’s always best to refer to the specific caulk’s curing time.
Using silicone caulk provides a more permanent solution compared to other methods. It creates a strong adhesive bond between the rug and the floor, ensuring that the rug stays in place over time.
While silicone caulk offers a secure hold, it’s important to consider the surface you’re applying it to. Some flooring materials, such as hardwood, may be sensitive to the adhesive properties of silicone caulk. If you’re concerned about potential damage, it’s advisable to test a small, inconspicuous area first or seek alternative methods.
Using silicone caulk is particularly useful for heavy or large rugs that are prone to sliding. It’s best suited for situations where you don’t need to frequently reposition or remove the rug.
By using silicone caulk, you can ensure that your rug stays securely in place, providing stability, safety, and peace of mind.
Adding Furniture Weight
If your rug tends to slide around on the floor, one practical solution is to add furniture weight to keep it in place. By placing furniture on or around the edges of the rug, you can create additional stability and prevent the rug from moving.
Here’s how you can add furniture weight to prevent your rug from sliding:
- Identify the problem areas: Determine the spots where your rug is most prone to sliding. These are typically the corners or edges of the rug.
- Select heavy furniture pieces: Choose heavy furniture items, such as sofas, coffee tables, or bookshelves, to place on or around the rug’s edges. These pieces will help anchor the rug in place.
- Position the furniture strategically: Move the selected furniture items so that they sit partially or completely on top of the rug. This will apply downward pressure and help keep the rug from shifting.
- Use furniture pads or non-slip mats: To protect both the rug and the floor, place furniture pads or non-slip mats under the legs or base of the furniture items. These pads will prevent any damage to the rug or scratches on the floor.
Adding furniture weight is a simple yet effective method to keep your rug in place, and it also serves the purpose of enhancing the overall aesthetic of the room.
Keep in mind that this method may require some trial and error to find the right furniture pieces and their placement. Additionally, it might not be suitable for lightweight rugs or rugs in areas with high foot traffic, as the constant movement can displace the furniture and cause the rug to slide.
By strategically arranging furniture on or around the rug, you create a physical barrier that helps keep the rug in place. Not only does this method prevent slipping, but it also adds an element of design and functionality to your space.
Make sure to periodically check and readjust the furniture weight to ensure that the rug remains in its desired position over time.
Using Rug Corner Clips
When it comes to preventing your rug from sliding, using rug corner clips can be a simple and effective solution. Rug corner clips help to secure the corners of your rug to the floor, keeping it in place and preventing any unwanted movement.
Here’s how you can use rug corner clips to prevent your rug from sliding:
- Identify the problem corners: Determine which corners of your rug tend to slide the most. These are the areas where you’ll need to apply the rug corner clips.
- Place the rug corner clips: Fold back the corner of the rug slightly to expose the underside. Attach the rug corner clips to the edge of the rug, ensuring they securely grip both the rug and the floor.
- Press firmly: Press down firmly on the rug corner clips to ensure a tight and secure hold on the rug and the floor.
- Repeat for all corners: Repeat the process for each problem corner of the rug, attaching the rug corner clips to provide stability and prevent sliding.
Rug corner clips are designed to be discreet and unobtrusive, so they won’t detract from the overall appearance of your rug or room. They provide a reliable hold without damaging the rug or the floor underneath.
This solution works best with thinner rugs and is particularly effective when combined with other methods such as rug grippers or a non-slip rug pad.
It’s important to note that rug corner clips may not be suitable for all types of rugs or flooring surfaces. Ensure that your rug and floor are compatible with the rug corner clips to avoid any potential damage.
Rug corner clips offer a quick and hassle-free method to keep your rug securely in place. They are a great option if you want to maintain the appearance and style of your rug while preventing sliding and bunching.
By using rug corner clips, you can enjoy the comfort and aesthetic appeal of your rug without the frustration of it constantly shifting or slipping.
Securing the Edges with Carpet Tacks
If you’re looking for a more traditional and long-lasting solution to prevent your rug from sliding, securing the edges with carpet tacks can be an effective method. Carpet tacks are small nails or pins that are used to secure the edges of the rug to the floor, providing a secure hold.
Here’s how you can use carpet tacks to keep your rug in place:
- Identify the problem edges: Determine which edges of your rug tend to slide the most. These are the areas where you’ll need to apply the carpet tacks.
- Prepare the carpet tacks: Make sure you have enough carpet tacks to secure the edges of the rug. Choose tacks that are the appropriate size and length for your rug and floor.
- Position the rug: Place the rug in its desired position on the floor, making sure it is aligned properly.
- Start securing the edges: Begin by folding back a small section of the edge of the rug. Insert a carpet tack into the folded edge and gently hammer it into the floor, ensuring it goes through both the rug and the underlying surface.
- Continue securing the edges: Proceed to fold and secure the remaining edges of the rug, placing carpet tacks at regular intervals to ensure a secure hold.
Using carpet tacks provides a durable and long-lasting solution to prevent rug movement. However, it’s important to note that this method may leave small holes or marks on the floor if the rug is eventually removed.
When using carpet tacks, it’s crucial to exercise caution to avoid hammering the tacks too forcefully, as this can damage the rug or the floor. Take care to secure the edges without causing any unnecessary harm.
This method is recommended for thicker rugs or carpets that require a stronger hold to prevent slipping and sliding. It’s also worth considering if you have a rug in a high-traffic area.
By securing the edges of your rug with carpet tacks, you can enjoy the peace of mind that comes with knowing your rug will remain in place, even in areas with heavy foot traffic.
Adding a Layer of Caulk
If you’re looking for a versatile and effective solution to prevent your rug from sliding, adding a layer of caulk along the edges can provide a strong grip and help keep the rug in place. Caulk is a waterproof sealant that forms a strong bond and creates friction between your rug and the floor.
Here’s how you can add a layer of caulk to prevent your rug from sliding:
- Clean the floor: Start by cleaning the floor surface to ensure it is free from any dust, debris, or moisture.
- Choose the right caulk: Select a silicone or acrylic-latex caulk that is suitable for your specific flooring type. Check the manufacturer’s instructions to ensure it is safe for use on your floor.
- Apply the caulk: Squeeze a continuous line of caulk along the edges and corners of the underside of the rug. Make sure to distribute the caulk evenly and cover the entire edge area that comes into contact with the floor.
- Smooth and spread the caulk: Use a putty knife or your finger to smooth out the caulk along the edges of the rug. This helps to create a consistent layer that promotes better adherence and grip.
- Let the caulk dry: Allow the caulk to dry completely according to the manufacturer’s instructions. This usually takes around 24 to 48 hours, but it’s best to refer to the specific caulk’s drying time.
Adding a layer of caulk provides a strong and durable grip between your rug and the floor. The caulk acts as a barrier that helps to minimize sliding and keeps the rug securely in place.
It’s crucial to consider the compatibility of the caulk with your rug and flooring type. Some caulk formulations may not be suitable for certain materials, such as hardwood or delicate surfaces. Always check the manufacturer’s guidelines and recommendations before applying the caulk.
By applying a layer of caulk, you can enjoy the benefits of a rug that stays firmly in place and prevents any potential accidents caused by sliding or shifting.
Note that removing the caulk may require some effort, and it may leave residual marks or require touch-ups on the floor and rug. Consider this when deciding to use caulk as a long-term solution.
Applying Non-Slip Spray
If you’re looking for a convenient and temporary solution to prevent your rug from sliding, applying a non-slip spray can be an effective option. Non-slip sprays create a tacky surface that helps grip the rug and keeps it securely in place.
Here’s how you can apply a non-slip spray to prevent your rug from sliding:
- Clean the floor: Start by cleaning the floor surface to ensure it is free from any dust, dirt, or moisture. This will promote better adhesion of the non-slip spray.
- Choose the right non-slip spray: Select a non-slip spray that is specifically designed for use on rugs and floors. Consider the type of flooring you have to ensure compatibility.
- Test a small area: Before applying the non-slip spray to the entire rug, test it on a small, inconspicuous section first. This will help you gauge the effectiveness and compatibility of the spray with your rug and floor.
- Apply the non-slip spray: Once you’ve tested the spray, apply it evenly across the back of the rug. Follow the manufacturer’s instructions for the recommended distance and coverage.
- Let it dry: Allow the non-slip spray to dry completely according to the manufacturer’s instructions. This typically takes a few hours, but the drying time can vary.
Applying a non-slip spray provides a temporary solution to keep your rug from sliding. It’s a convenient option because it doesn’t require any permanent alterations to the rug or floor.
However, it’s important to note that the effectiveness of non-slip sprays may vary depending on factors such as the rug material, floor type, and foot traffic. Regular reapplication may be necessary to maintain the desired level of grip.
Non-slip sprays are often a popular choice for rugs that need occasional repositioning or if you want the flexibility to change your rug’s placement over time.
By using a non-slip spray, you can enjoy the convenience of a rug that stays securely in place, without the need for long-term commitments or alterations to your rug or floor.
Always follow the manufacturer’s instructions and recommendations when using non-slip sprays to ensure optimal results.
Installing Rug Anchors
If you’re looking for a reliable and long-lasting solution to prevent your rug from sliding, installing rug anchors can be an effective option. Rug anchors are hardware devices designed to securely hold down the corners and edges of your rug, keeping it firmly in place.
Here’s how you can install rug anchors to prevent your rug from sliding:
- Clean the floor: Start by ensuring that the floor surface is clean and free from any dirt, dust, or debris.
- Identify the problem areas: Determine which corners and edges of your rug tend to slide the most. These are the areas where you’ll need to install rug anchors.
- Position the rug anchors: Place the rug anchors on the underside of the rug, near the problem corners and edges. Align them with the corners and edges of the rug, ensuring they are on the same side as the sliding direction.
- Attach the rug anchors: Press the rug anchors firmly into the rug, ensuring they penetrate through the rug’s backing and grip securely.
- Secure the rug anchors to the floor: Use screws or nails to fasten the rug anchors to the floor, ensuring they are securely attached. Make sure to choose appropriate fasteners based on your specific flooring type.
Installing rug anchors provides a strong and permanent solution to keep your rug in place. They offer excellent grip and stability, even in high-traffic areas.
It’s important to note that installing rug anchors requires making small holes in your rug and possibly the floor. Consider this if you plan to remove or reposition the rug in the future.
Rug anchors are particularly beneficial for larger or heavier rugs that are prone to significant sliding or movement. They provide added security and peace of mind, ensuring your rug stays firmly in place.
By installing rug anchors, you can enjoy the convenience of a rug that remains secure and stable, without the need for constant readjustment or worrying about potential accidents caused by slipping or tripping.
Remember to carefully follow the manufacturer’s instructions when installing rug anchors to ensure proper placement and attachment for optimal results.
Using Command Strips
If you’re looking for a non-damaging and removable solution to prevent your rug from sliding, using Command Strips can be an effective option. Command Strips are adhesive strips that provide a strong hold and can be easily removed without causing any damage to your rug or flooring.
Here’s how you can use Command Strips to keep your rug in place:
- Clean the floor: Begin by cleaning the floor surface to ensure it is free from any dirt, dust, or debris. This will help the Command Strips adhere properly.
- Choose the right Command Strips: Select Command Strips that are suitable for your rug’s weight and the type of surface you have. Follow the manufacturer’s recommendations to ensure the strips are strong enough to hold your rug in place.
- Attach the Command Strips: Remove the backing from the Command Strips and attach them to the corners and edges of the underside of your rug. Make sure to press down firmly to ensure a secure bond.
- Position the rug: Place the rug in its desired position on the floor, ensuring it aligns with the Command Strips.
- Press firmly: Apply firm pressure on the rug to ensure it sticks to the Command Strips and remains securely in place.
Using Command Strips provides a temporary and damage-free solution to prevent your rug from sliding. They are ideal for situations where you may need to frequently move or reposition your rug without leaving any residue or marks behind.
It’s important to note that Command Strips may not be suitable for all types of rugs or flooring surfaces. Test a small area of the rug and floor first to ensure proper adhesion and compatibility.
Command Strips offer convenience and flexibility, allowing you to enjoy a secure rug while maintaining the freedom to adjust or remove it as needed.
By using Command Strips, you can keep your rug in place without the hassle of permanent adhesives or damaging your rug or floor.
Follow the manufacturer’s instructions for proper usage and weight limits to ensure optimal performance of the Command Strips.