
Selecting the Right Containers for Planting
When it comes to planting sprouted potatoes in containers, selecting the right containers is key to ensuring successful growth and a bountiful harvest. The ideal containers for this purpose are both functional and practical.
First and foremost, consider the size of the containers. They should be large enough to accommodate the potato plants as they grow, allowing sufficient space for the roots to spread out. A depth of at least 12 inches is recommended to give the tubers ample room to develop.
Next, choose containers with good drainage. Potatoes need well-drained soil to thrive, so look for containers with drainage holes at the bottom. This will prevent water from pooling and causing root rot, which can severely hinder plant growth.
The material of the containers is another important factor to consider. While there are various options available, such as plastic, ceramic, or fabric containers, the best choice for planting sprouted potatoes is typically plastic or fabric. Plastic containers are lightweight, durable, and retain moisture well, while fabric containers offer excellent aeration and drainage. Both options promote healthy root development.
In addition to the size, drainage, and material, consider the location where the containers will be placed. If you plan to keep them outdoors, ensure they are made of weather-resistant material that can withstand the elements. Place the containers in a sunny location that receives at least six hours of sunlight per day, as potatoes require ample sunlight to grow and produce a bountiful crop.
Lastly, consider the number of potatoes you intend to plant. If you have limited space, but still want to enjoy homegrown potatoes, you can opt for smaller containers or even repurpose items such as buckets or grow bags. Just ensure they meet the requirements mentioned earlier.
By carefully selecting the right containers for planting sprouted potatoes, you provide the optimal environment for their growth. This sets the stage for a successful and enjoyable gardening experience.
Preparing the Potatoes for Planting
Before planting sprouted potatoes in containers, it’s important to properly prepare the potatoes to ensure healthy growth and maximum yield. This preparation involves several important steps:
Inspect the potatoes: Start by examining the sprouted potatoes for any signs of disease, damage, or rot. Remove any visibly damaged or diseased parts, as they can negatively affect the overall health of the plant.
Chitting the potatoes: Chitting is the process of encouraging the sprouts to grow before planting. Place the potatoes in a cool, well-ventilated area with indirect sunlight. Allow them to develop sprouts that are about 1-2 inches in length. This process can take anywhere from a few days to a couple of weeks, depending on the variety of the potato.
Cutting larger potatoes: If you are using larger potatoes, you may need to cut them into smaller pieces. Ensure that each piece has at least one sprout or “eye” on it. Allow the cut pieces to dry out slightly for a day or two before planting to reduce the risk of disease.
Preventing disease: To minimize the risk of disease, you can dust the cut sides of the potatoes with a powdered organic fungicide before planting. This step helps protect the potatoes from fungal infections during the initial growth stage.
Pre-sprouting in water: Another option is to pre-sprout the potatoes in water before planting. Place the sprouted potatoes in a container with water, ensuring that only the sprouts are submerged. Change the water daily to keep it fresh and prevent the growth of algae or bacteria. Once the sprouts have grown to a suitable length, they are ready to be planted.
By following these preparation steps, you give your sprouted potatoes the best chance of thriving in the containers. This attention to detail will contribute to a successful potato-growing experience and a satisfying harvest.
Preparing the Containers for Planting
Preparing the containers before planting sprouted potatoes is essential for creating an optimal growing environment. Taking the time to properly prepare the containers will set the stage for healthy plant growth and a successful harvest. Here are the steps to follow:
Cleaning the containers: Start by thoroughly cleaning the containers to remove any dirt, debris, or lingering plant matter. This helps prevent the risk of disease or pests infesting the new plants. Wash the containers with warm, soapy water, and rinse them well.
Sanitizing the containers: After cleaning, sanitize the containers to kill any remaining bacteria, fungi, or pests. One effective method is to use a mixture of one part bleach to nine parts water. Apply this solution to the inside of the containers, let it sit for a few minutes, and then rinse thoroughly. Alternatively, you can use a natural sanitizer, such as a vinegar-water solution.
Ensuring proper drainage: Check that the containers have adequate drainage holes at the bottom. If the holes are inadequate or non-existent, use a drill or hammer and nails to create several evenly spaced drainage holes. Proper drainage is crucial to prevent waterlogged soil, which can lead to root rot and other plant diseases.
Adding a drainage layer: To further enhance drainage, add a layer of small stones, pebbles, or broken pottery pieces to the bottom of the container. This layer acts as a barrier, allowing excess water to flow freely away from the roots and preventing them from sitting in soaked soil.
Filling the containers: Use a high-quality potting soil or a well-draining mix specifically formulated for container gardening. Fill the containers up to about two-thirds full, leaving enough space for the potato plants and additional soil as they grow. Avoid using garden soil, as it may harbor pests and diseases and can become compacted in containers.
Adding organic matter: Incorporate organic matter into the soil to improve its fertility and drainage. Compost, well-rotted manure, or coconut coir are excellent choices for enhancing the nutrient content and overall health of the soil.
Moistening the soil: Before planting, lightly moisten the soil in the containers. Avoid drenching it completely, as excessively wet soil can hinder seedling development. A slightly moist soil provides a favorable environment for the potato seeds to germinate and establish.
By following these steps, you will ensure that your containers are clean, well-drained, and ready for planting. This preparation will create an optimal growing environment for your sprouted potatoes and contribute to their overall health and productivity.
Planting the Sprouted Potatoes
Now that you have prepared the sprouted potatoes and the containers, it is time to plant the potatoes and give them a favorable start to their growth journey. Follow these steps to ensure successful planting:
1. Positioning the sprouted potatoes: Place the sprouted potatoes on top of the moistened soil in the containers, with the sprouts facing upwards. Space them out evenly, ensuring that there is enough room for each potato to grow and spread without crowding.
2. Covering the potatoes: Gently cover the sprouted potatoes with a layer of soil, adding enough to completely bury the potatoes while leaving the sprouts exposed above the soil surface. This helps protect the potatoes and encourages root development.
3. Adding more soil: As the potato plants grow and develop, continue adding soil around the plants to support their upward growth. Be careful not to cover the foliage completely, as the leaves need exposure to sunlight for photosynthesis.
4. Watering the potatoes: After planting, water the containers thoroughly, making sure the soil is evenly moist. Avoid overwatering, as excessive moisture can lead to fungal diseases and root rot. Regularly check the moisture level and water as needed, typically when the top inch of soil feels dry to the touch.
5. Providing adequate sunlight: Place the containers in a sunny location that receives at least six hours of direct sunlight daily. Potatoes thrive in full sun, and adequate sunlight is essential for their growth and the development of tubers.
6. Monitoring and maintenance: Keep a close eye on the potato plants as they grow. Watch out for any signs of pests, such as potato beetles or aphids, and promptly address them to prevent damage. Also, regularly remove any weeds that may compete with the potato plants for nutrients and space.
7. Fertilizing as needed: Depending on the quality of the soil and the growth of the potato plants, you may need to provide supplemental fertilization. Use a balanced organic fertilizer specifically formulated for vegetable plants, following the package instructions for application rates and frequency.
By following these planting steps, you will ensure that your sprouted potatoes are well-positioned for healthy growth and development in the containers. Providing the ideal conditions and care will set the stage for a successful harvest in the months to come.
Caring for the Plants
Caring for your sprouted potatoes is essential to promote their health and ensure a productive harvest. By following these care guidelines, you can provide the optimal conditions for your potato plants to flourish:
1. Watering: Regular and consistent watering is vital for the growth of potato plants. Keep the soil consistently moist, but avoid overwatering, as it can lead to fungal diseases and rot. Water deeply and thoroughly, ensuring the moisture reaches the roots. Monitor soil moisture levels and adjust your watering schedule accordingly, especially during hot and dry periods.
2. Mulching: Applying a layer of organic mulch around the base of the potato plants helps conserve moisture, control weed growth, and maintain a more consistent soil temperature. Opt for straw, grass clippings, or shredded leaves as mulching materials. Be careful not to pile the mulch directly against the stems, as it can cause moisture retention and promote rot.
3. Fertilizing: Potatoes are heavy feeders and benefit from regular fertilization. Apply a balanced, slow-release organic fertilizer according to the package instructions. Alternatively, you can feed the plants with compost or diluted liquid organic fertilizers every few weeks during the growing season. This extra boost of nutrients will support their growth and tuber development.
4. Providing support: As the potato plants grow, they may require support to prevent them from toppling over. Install stakes or cages near the plants and gently tie the stems to the support as needed. This helps maintain an upright growth and prevents damage to the foliage and tubers.
5. Managing pests and diseases: Be vigilant in monitoring for common potato pests such as potato beetles, aphids, and nematodes. Taking preventative measures like crop rotation, companion planting, and regular inspection can help minimize pest infestations. If necessary, use organic pest control methods to protect your plants. Additionally, keep an eye out for signs of diseases such as late blight or powdery mildew, and promptly address them to prevent the spread.
6. Pruning: Remove any yellowing or damaged leaves to maintain plant health. This allows the plants to direct their energy towards healthy growth and tuber development. Regularly inspect the plants and trim any unwanted foliage to improve air circulation and reduce the risk of disease.
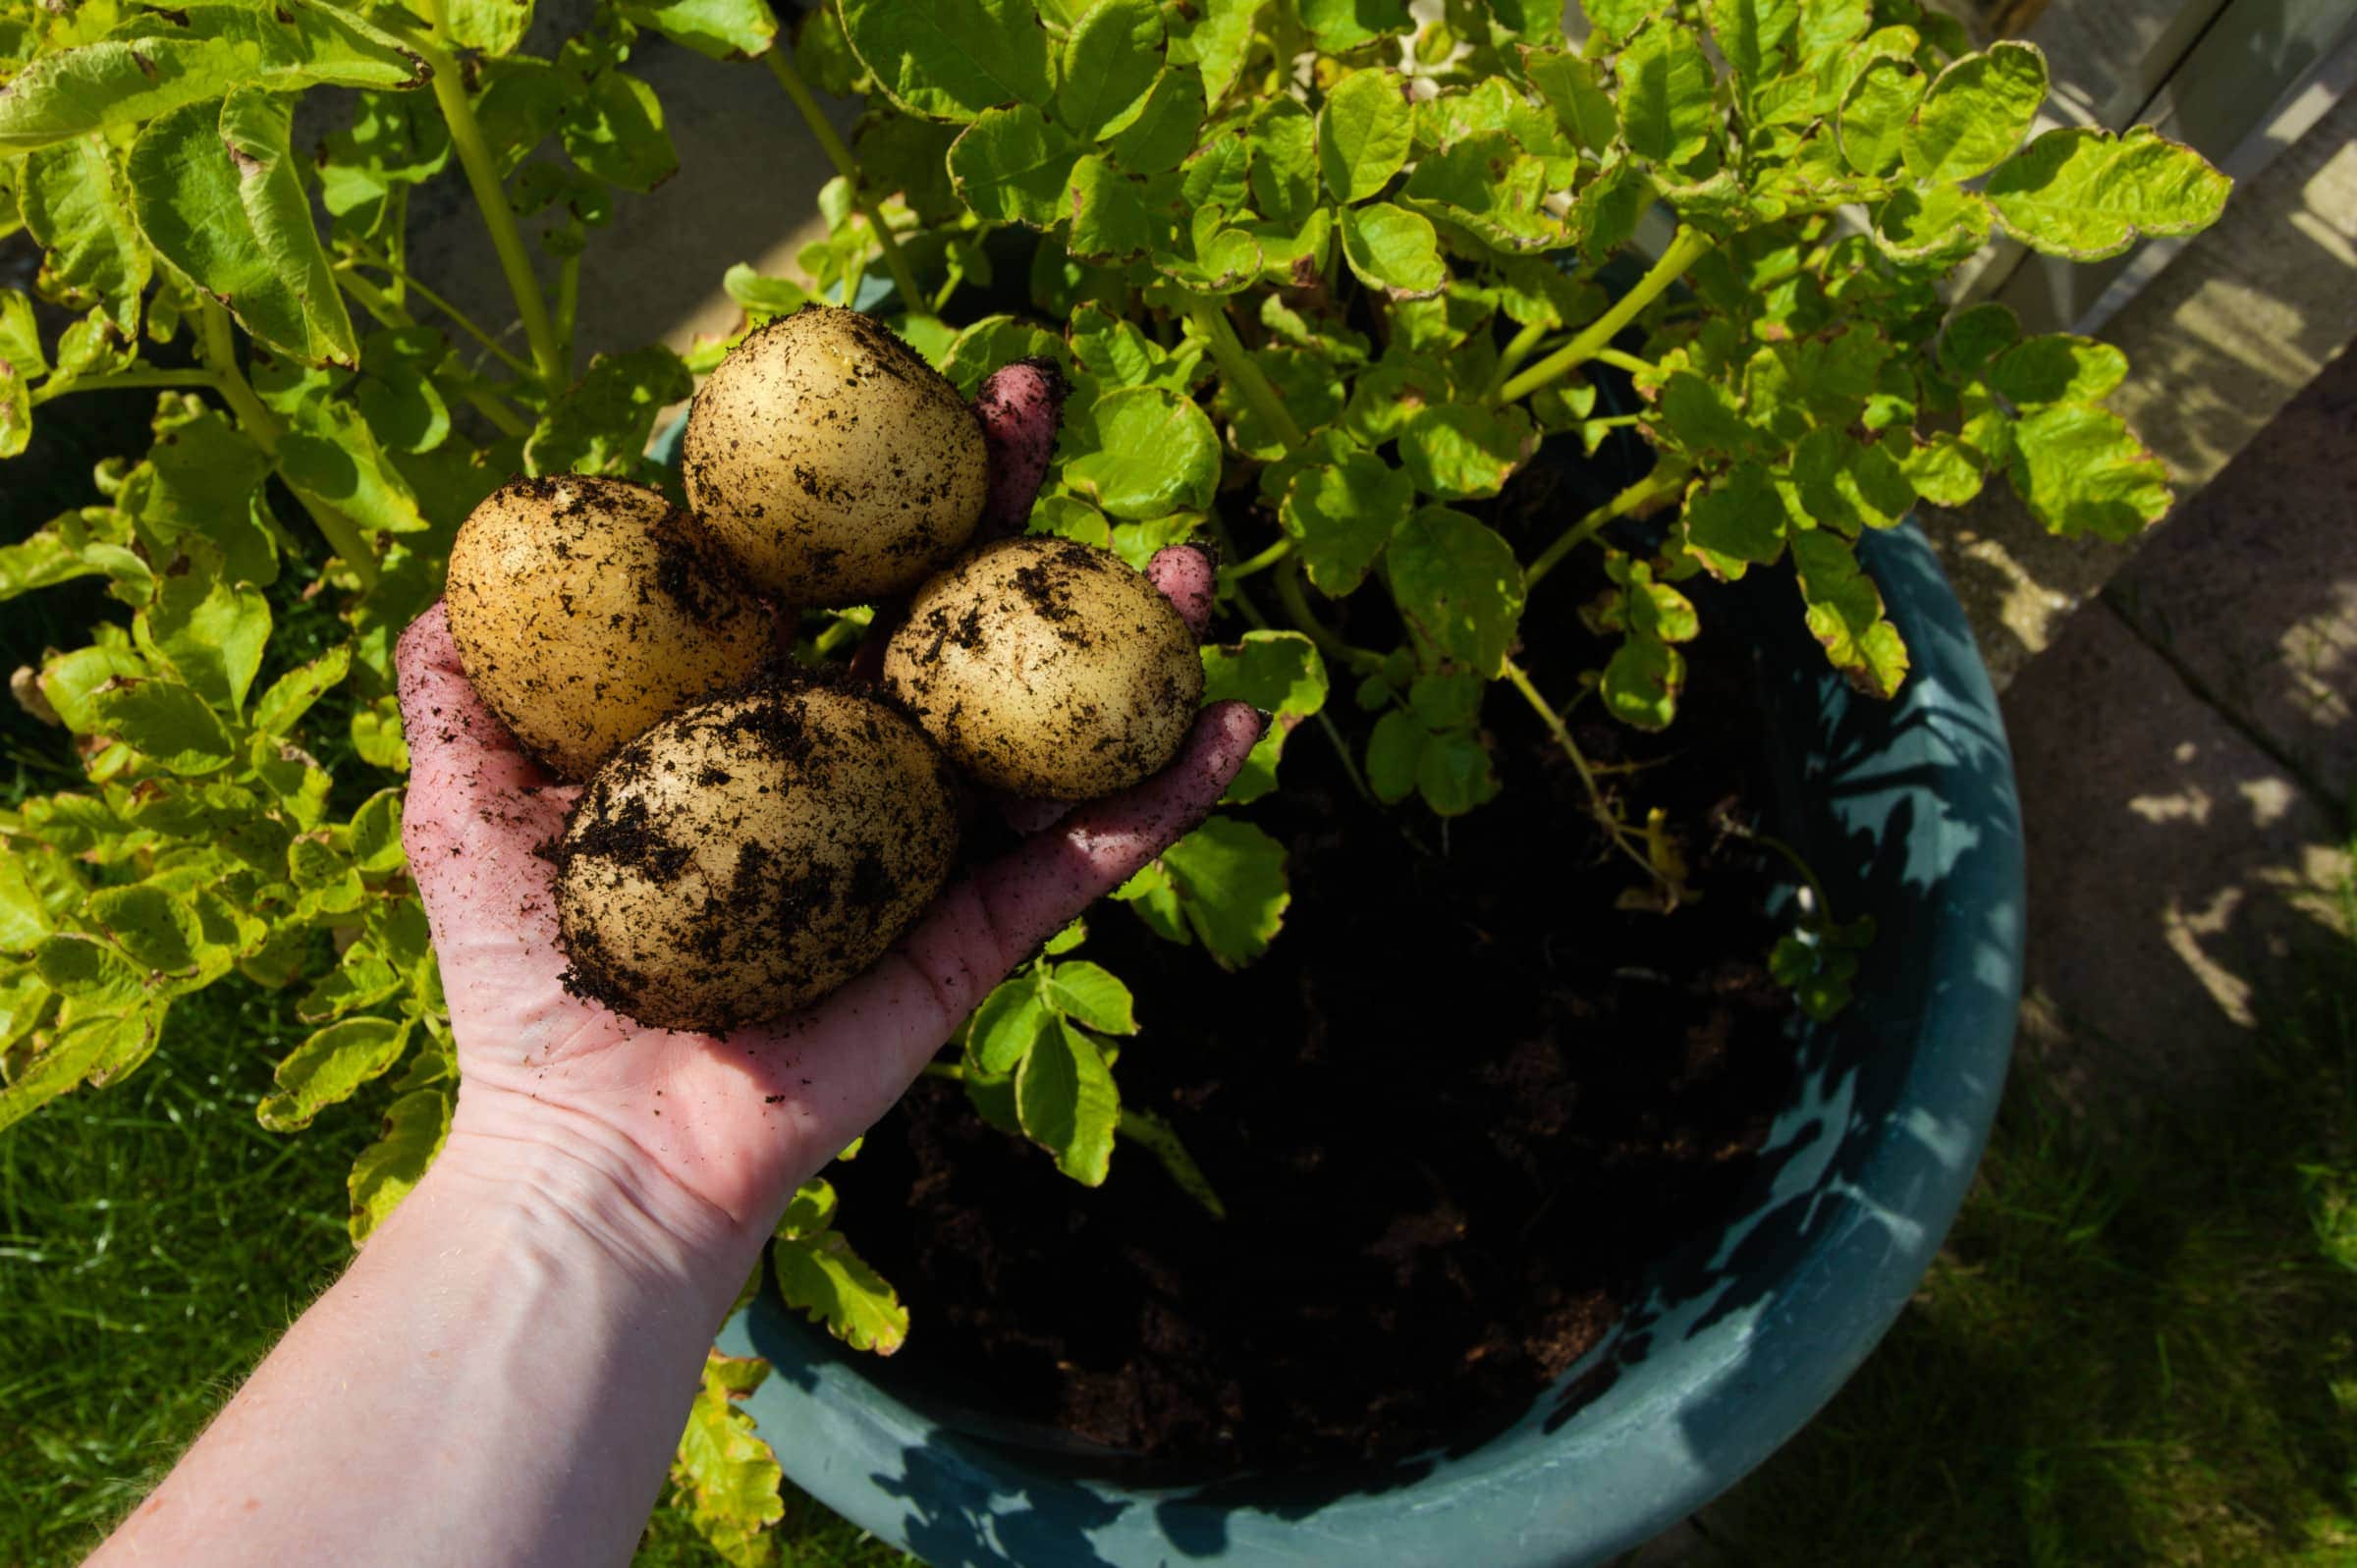
7. Monitoring tuber formation: Keep an eye on the potato plants as they develop. Once they start flowering, it’s a sign that tuber formation has begun. Avoid excessive digging around the plants, as it can damage the developing tubers. Instead, gently brush away soil to expose the tubers for harvesting when they have reached the desired size.
By providing proper care and attention to your potato plants, you can ensure their well-being and optimize their yield. With consistent maintenance, you’ll be rewarded with a bountiful harvest of delicious homegrown potatoes.
Harvesting the Potatoes
Harvesting potatoes is an exciting and rewarding experience, as it signifies the culmination of your hard work and care. When it comes to harvesting, it’s important to choose the right time and employ the proper techniques to ensure the best flavor and storage potential. Follow these steps for a successful potato harvest:
1. Timing: The timing of the harvest depends on the variety of potato you planted and your desired potato size. Most potatoes are ready for harvesting 70-90 days after planting when the foliage has turned yellow and begun to die back. However, if you prefer smaller “new” potatoes, you can harvest them earlier when the plants are still green and the tubers are small.
2. Prepare the soil: Before harvesting, gently dig around the base of the potato plants using a garden fork or shovel. Loosen the soil around the plants to make it easier to lift the potatoes without damaging them.
3. Digging: Carefully use a garden fork or shovel to dig around the plants, starting a few inches away from the base. Lift the soil gently, taking care not to spear or damage the tubers. Work your way around the plant in a circular motion until you can lift the entire plant out of the ground.
4. Harvesting the tubers: Gently remove the soil from the roots of the plant, exposing the tubers. Be cautious not to bruise or cut the potatoes during this process. Use your hands or a small garden tool to carefully lift the tubers from the soil. Avoid excessive handling, as this can cause damage and bruising.
5. Curing: Once harvested, allow the potatoes to air dry for a few hours to toughen the skin and reduce moisture. This process, known as curing, helps improve their shelf life and makes them less susceptible to rotting during storage.
6. Sorting: Sort the harvested potatoes, removing any damaged, bruised, or diseased tubers. Set these aside for immediate consumption rather than storage. Select only the healthy, blemish-free potatoes for long-term storage.
7. Storage: To store the harvested potatoes, place them in a cool, dark, and dry location. Optimal storage conditions include temperatures between 45-55°F (7-13°C) with moderate humidity levels. Avoid storing potatoes near fruits like apples, as they can release ethylene gas which leads to early spoilage.
8. Enjoying the harvest: Potatoes are incredibly versatile and can be cooked in a multitude of ways. From creamy mashed potatoes to crispy roasted potatoes, the possibilities are endless. Enjoy your homegrown potatoes in all your favorite recipes!
By following these steps, you will be able to harvest your potatoes at the right time and preserve their quality for an extended period. Enjoy the satisfaction of digging up your own potatoes and savor the delicious flavors that come from growing your own food.
Storing the Harvested Potatoes
After a successful harvest of potatoes, proper storage is crucial to preserve their quality and prevent spoilage. By following these storage guidelines, you can enjoy your homegrown potatoes for an extended period:
1. Curing: Allow the harvested potatoes to cure for about two weeks in a cool, dry, and well-ventilated area. This step helps toughen the skin and promotes healing of any minor cuts or bruises.
2. Sorting: Before storing, sort through the potatoes and separate any damaged, bruised, or diseased ones. These potatoes should be consumed immediately to avoid affecting the quality of the others. Only select firm, healthy potatoes for long-term storage.
3. Cleaning: Lightly brush off any excess soil from the potatoes; do not wash them. Washing can remove the protective layer, making them more prone to deterioration. Removing clumps of dirt will help prevent the spread of decay.
4. Storage containers: Choose appropriate storage containers that provide good airflow and darkness. Suitable options include burlap sacks, paper bags, or wooden crates. Avoid using plastic bags or airtight containers as they can trap moisture, leading to rot.
5. Storage location: Find a cool, dark, and well-ventilated area to store your potatoes. The ideal temperature for potato storage is around 45-55°F (7-13°C). Avoid areas with direct sunlight, as exposure can cause the potatoes to sprout prematurely.
6. Avoiding moisture: Moisture is the enemy of stored potatoes. Ensure the storage area is dry, with a humidity level of around 65-75%. Excessive moisture can lead to rotting and the growth of mold. If the humidity is too high, you can use a dehumidifier or place a moisture-absorbing agent, such as rice or silica gel packets, near the potatoes.
7. Checking for spoilage: Regularly inspect your stored potatoes for any signs of spoilage. Check for soft spots, wrinkling, sprouting, or a foul odor. Remove any spoiled potatoes immediately to prevent the spread of decay to the rest of the stored tubers.
8. Rotating the stock: To ensure you consume the oldest potatoes first, practice rotating your stock. Place the most recently harvested potatoes at the back of the storage area and use the older ones first.
9. Monitoring: Periodically check your stored potatoes for any signs of sprouting or decay. Remove any sprouting potatoes promptly, as they can release ethylene gas and lead to spoilage in neighboring potatoes.
10. Enjoying your harvest: Throughout the storage period, remember to enjoy the fruits of your labor by incorporating your homegrown potatoes into various delicious recipes. From creamy mashed potatoes to crispy roasted ones, savor the rewards of your successful potato growing journey.
By following these storage tips, you can extend the shelf life of your harvested potatoes and enjoy their freshness and flavor for many months to come.
Troubleshooting Common Problems
While growing potatoes can be a rewarding experience, it is not without its challenges. Understanding and addressing common problems can help ensure the health and productivity of your potato plants. Here are some troubleshooting tips for common potato-growing issues:
1. Disease prevention: Potatoes are susceptible to various diseases, including late blight, early blight, and powdery mildew. To prevent disease, practice crop rotation, choose disease-resistant potato varieties, and maintain proper spacing between plants to promote airflow.
2. Pest control: Potato beetles, aphids, and nematodes are common pests that can damage your potato plants. Regularly inspect the foliage and plants for signs of pest infestation, such as chewed leaves or sticky residue. Use natural pest control methods, such as hand-picking pests, applying insecticidal soap, or introducing beneficial insects like ladybugs.
3. Nutrient deficiency: Yellowing leaves or stunted growth may indicate a nutrient deficiency in your potato plants. Conduct a soil test to determine which specific nutrients are lacking and adjust your fertilization accordingly. Use organic fertilizers or amendments to replenish nutrients and promote healthy plant growth.
4. Excessive foliage growth: If your potato plants produce excessive foliage but limited tuber development, this may be due to an imbalance between nitrogen and potassium. Reduce nitrogen-rich fertilizers and increase potassium-rich ones to encourage tuber growth.
5. Overwatering: Excessive watering can lead to root rot, yellowing leaves, and stunted growth. Ensure proper drainage in your containers and only water when the top inch of soil feels dry. Allow the soil to dry out slightly between watering to prevent overhydration.
6. Lack of water: Consistently dry soil can result in wilted or yellowing leaves. Water your potato plants regularly, providing enough moisture to keep the soil evenly moist. Adjust your watering schedule based on weather conditions, ensuring that the plants receive adequate hydration.
7. Sunscald: Sunscald occurs when potato tubers are exposed to direct sunlight, causing them to turn green and develop a bitter taste. Avoid this issue by hilling up soil around the plants to cover the tubers, shielding them from direct sunlight. Additionally, harvest potatoes promptly after the foliage has died back to prevent any further sun exposure.
8. Environmental stress: Extreme temperatures, heatwaves, or frost can stress potato plants, leading to reduced growth and yield. Provide shade during especially hot periods and cover the plants during unexpected frost. Creating a favorable growing environment through proper temperature and climate management will help the potato plants thrive.
9. Improper curing: Failure to properly cure potatoes after harvest can result in decreased storage life. Ensure that harvested potatoes are cured in a cool, dry area with good ventilation for about two weeks before storage. This allows the skins to toughen and heal, enhancing their ability to resist decay.
10. Inadequate harvesting: When harvesting, be gentle to avoid bruising or damaging the potatoes. Dig carefully around the plants, lift them out of the soil, and handle the tubers with care. Damaged potatoes should be used promptly rather than stored.
By addressing these common problems and taking appropriate preventive measures, you can overcome hurdles and cultivate healthy, thriving potato plants in your containers. Regular monitoring, quick action, and proper plant care will contribute to a fruitful and successful potato-growing experience.