
Materials Needed
Before you begin melting candles on the stove, it’s important to gather all the necessary materials. Here is a list of items you will need:
- A candle – Choose a candle that you want to melt. It can be a partially burned candle or a new one.
- A heat-resistant container – Select a container that can withstand high temperatures without melting, such as a glass jar or a metal tin. Avoid using plastic or flammable containers.
- A stove – You will need a stove or a hot plate to apply heat and melt the candle.
- A double boiler – A double boiler is recommended for melting candles safely. It consists of two pots, one smaller pot that sits inside a larger pot. If you don’t have a double boiler, you can create one using a heat-resistant glass or metal bowl placed over a pot with simmering water.
- A stirring utensil – Use a metal or heat-resistant spoon or spatula for stirring the melted wax.
- Gloves – It’s a good idea to wear heat-resistant gloves to protect your hands from hot wax splatters or burns.
- An apron or protective clothing – Wax can be messy, so wearing an apron or clothes that you don’t mind getting dirty is recommended.
- A thermometer (optional) – If you want precise temperature control, you can use a candy or candle-making thermometer to monitor the wax temperature.
These materials are essential for safely melting candles on the stove. Make sure to gather them all before you begin the process.
Choosing the Right Candle
When it comes to melting candles on the stove, selecting the right candle is crucial for a successful melting process. Here are some factors to consider when choosing a candle:
- Candle type – Different types of candles have different melting points. It’s important to choose a candle made from materials that are safe to melt, such as soy wax, beeswax, or paraffin wax. Avoid candles with additives or decorations that may release harmful fumes when melted.
- Size – The size of the candle will determine the amount of wax you will have to melt. If you’re planning to make a large batch of melted wax, choose a larger candle. For smaller projects, a smaller candle will suffice.
- Scent and color – Consider the scent and color of the candle if you want to infuse fragrance or add a pop of color to your melted wax. Some candles come with pre-added fragrance or dye, while others are unscented and colorless.
- Quality – Opt for candles made from high-quality materials to ensure a clean and even melt. Cheap or low-quality candles may contain impurities or burn unevenly, which can affect the melting process.
Remember to read the label or packaging of the candle for any specific instructions or warnings. Some candles are not suitable for melting or may require special considerations.
By choosing the right candle, you can ensure a smooth and successful melting process on the stove, resulting in high-quality melted wax that can be used for various applications.
Safety Precautions
Melting candles on the stove requires caution and adherence to certain safety precautions to prevent accidents and ensure your well-being. Here are some essential safety measures to follow:
- Ventilation – Ensure that the area where you are melting candles is well-ventilated. Open windows or use exhaust fans to prevent the accumulation of fumes.
- Fire safety – Keep a fire extinguisher nearby in case of emergencies. Never leave the stove unattended while the candle is melting, and always have a lid or a fire-resistant cover available to smother any potential flames.
- Protective gear – Wear heat-resistant gloves and an apron to protect your skin and clothing from hot wax splatters and spills. Additionally, consider wearing safety goggles to shield your eyes from any potential debris.
- Heat management – Be cautious when working with heat sources. Maintain a safe distance from the stove, and never touch the heated containers or pots directly. Always handle hot items using oven mitts or heat-resistant tools.
- Child and pet safety – Keep children and pets away from the area where you’re melting candles. The hot wax and equipment pose potential dangers to curious little hands and paws.
- Proper equipment – Use appropriate equipment, such as heat-resistant containers and a double boiler, to minimize the risk of melting materials or causing accidental fires. Avoid using flammable or plastic containers that can melt or catch fire easily.
- Clean workspace – Ensure that your workspace is clean and free of any flammable materials or clutter. This will help prevent accidents and maintain a safe environment.
By implementing these safety precautions, you can minimize the risks associated with melting candles on the stove and enjoy a safe and smooth candle melting experience.
Preparing the Stove
Before you start melting candles on the stove, it’s important to properly prepare the stove to ensure a safe and efficient process. Follow these steps to get your stove ready:
- Clean the stove – Begin by ensuring the stovetop is clean and free from any debris or residue. Wipe down the surface with a damp cloth to remove any dirt or grease that could interfere with the melting process.
- Remove any flammable objects – Clear the area around the stove of any flammable items, such as paper towels, oven mitts, or plastic utensils. Keeping a clutter-free workspace reduces the risk of accidental fires.
- Place a heat-resistant mat or trivet – Protect your stovetop by placing a heat-resistant mat or trivet on the burner you will be using for melting the candle. This will help distribute the heat evenly and prevent direct contact between the container and the burner.
- Select the appropriate burner – If you have a gas stove, choose a burner that matches the size of your container to ensure maximum heat transfer and stability. For electric stoves, select a burner and adjust the temperature according to the melting requirements of your candle.
- Turn on the stove – Once the setup is complete, turn on the stove to start the heating process. Follow the manufacturer’s guidelines for your specific stove model to ensure proper operation and avoid any accidents.
By following these steps and properly preparing the stove, you’re setting the stage for a successful and safe candle melting experience on the stove.
Precautions for Gas Stoves
Using a gas stove to melt candles requires specific precautions to ensure your safety and prevent any mishaps. Follow these precautions when using a gas stove:
- Check for leaks – Before using the gas stove, inspect the gas connections and check for any leaks. Apply a soapy water solution to the connections and look for bubbles. If you notice any leaks, turn off the gas supply and seek professional assistance.
- Keep the area well-ventilated – Gas stoves produce combustion gases that need proper ventilation to dissipate. Ensure that the area is well-ventilated by opening windows or using exhaust fans to prevent the buildup of any potentially harmful fumes.
- Avoid drafts – Gas flames can be affected by drafts, so be cautious about placing the melting container in an area with strong drafts. This can lead to uneven heating or even extinguishing the flame.
- Use a stable burner – Ensure that the burner you choose for melting the candle is stable and can securely hold the container. This will prevent any accidental spills or tipping over of the wax during the melting process.
- Monitor the flame – Keep a close eye on the gas flame throughout the melting process. If the flame becomes unstable, sputters, or changes color, it could indicate a gas supply issue or improper combustion. In such cases, turn off the stove and address the problem before continuing.
- Use a flame diffuser – To distribute the heat evenly and prevent direct contact between the flame and the container, consider using a flame diffuser or a heat-resistant plate. This will help regulate the temperature and avoid hot spots that could cause the wax to burn or scorch.
- Be cautious with open flames – As with any open flame, be mindful of flammable materials nearby. Keep them at a safe distance to avoid accidental fires. Never leave the stove unattended while the candle is melting.
By following these precautions, you can safely and effectively melt candles on a gas stove, enjoying the process without compromising your well-being.
Precautions for Electric Stoves
Melting candles on an electric stove requires specific precautions to ensure your safety and the efficient melting of the wax. Here are some precautions to keep in mind when using an electric stove:
- Check the burner size – Ensure that the size of the burner matches the size of your container for optimal heat distribution. Using a burner that is too small or too large can result in uneven melting or overheating.
- Adjust the temperature – Electric stoves usually have temperature control settings. Adjust the temperature according to the melting requirements of your candle. Start with a lower heat setting and gradually increase it if needed.
- Avoid overheating – Be cautious about overheating the wax. High temperatures can cause the wax to scorch, produce smoke, or even catch fire. It’s crucial to monitor the temperature closely and adjust the heat accordingly.
- Use a heat-resistant mat – Place a heat-resistant mat or trivet on the burner to protect both the stovetop and the bottom of the container. This will help distribute the heat evenly and prevent direct contact between the container and the burner surface.
- Handle with care – Electric burners can retain heat even after being turned off. Avoid touching the burner or the surrounding area immediately after use to prevent burns.
- Keep cords away – If your electric stove has a cord, make sure it is kept away from the heat source to prevent accidental melting or damage.
- Use a timer – To avoid accidentally leaving the stove unattended, consider using a timer. Set a designated time for the melting process and be sure to stay nearby during that period.
- Be cautious of water – When cleaning the electric stove or the area around it, be careful not to let any water or liquid come into contact with the electric components. This can lead to electrical shorts or other hazards.
By following these precautions, you can safely and effectively melt candles on an electric stove, ensuring a smooth and enjoyable candle melting experience.
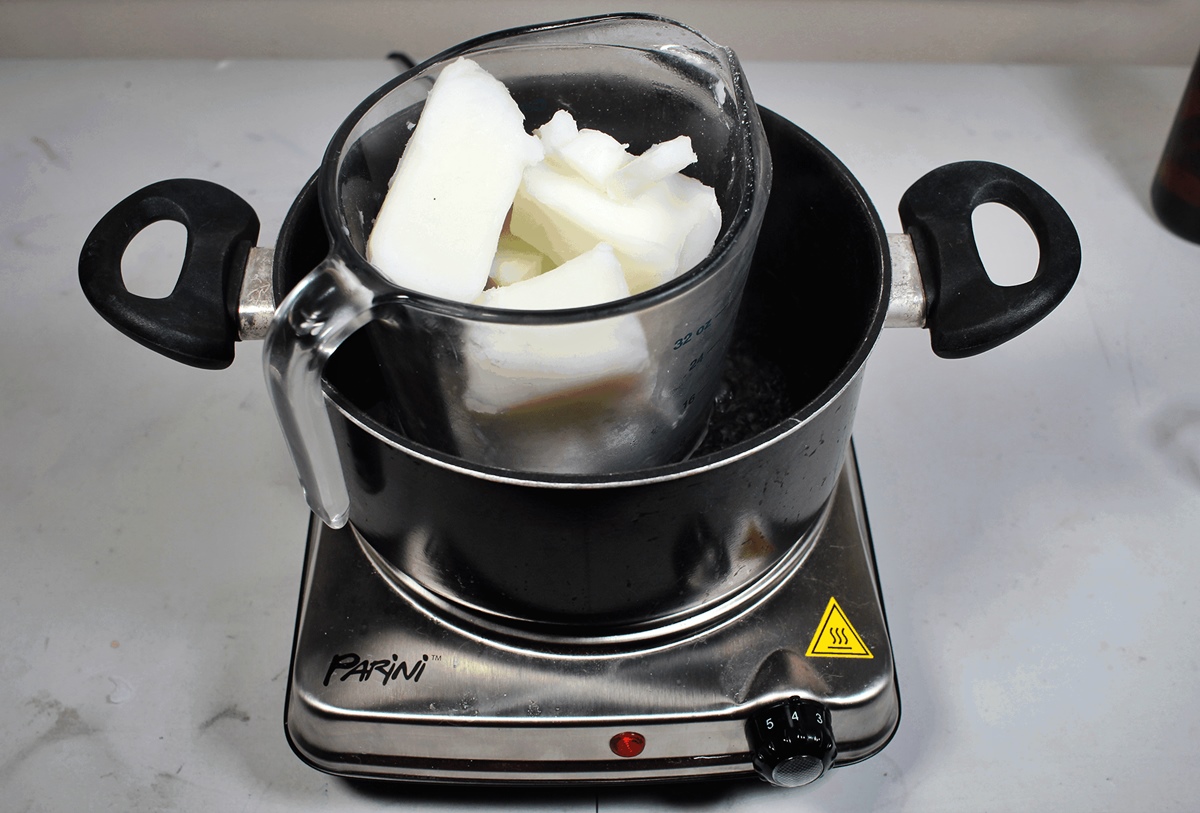
Using a Double Boiler
A double boiler is a recommended and safe method for melting candles on the stove. It allows for gentle and controlled heating of the wax without direct contact with the heat source. Here’s how you can use a double boiler:
- Fill the bottom pot with water – Start by filling the bottom pot of the double boiler with water. The amount of water will depend on the size of the pot and the amount of wax you’re melting. Ensure that the water level is below the top pot or bowl.
- Place the top pot or bowl – Next, place the top pot or heat-resistant bowl on top of the bottom pot. Ensure that the top pot fits securely and is stable on the bottom pot. The water in the bottom pot will create gentle heat, melting the wax in the top pot.
- Add the wax to the top pot – Carefully place the candle or chunks of wax into the top pot of the double boiler. It’s best to break up larger pieces to promote a quicker and more even melt.
- Heat the double boiler – Turn on the stove to medium heat and allow the water in the bottom pot to come to a gentle simmer. The indirect heat will gradually melt the wax in the top pot without overheating or burning it.
- Stir occasionally – As the wax begins to melt, use a heat-resistant utensil to stir it gently. This will help promote even melting and prevent any scorching or sticking to the sides of the pot. Avoid excessive stirring to minimize air bubbles in the melted wax.
- Monitor the temperature – If desired, you can use a thermometer to monitor the wax temperature. Most candles have a specific melting point, so it’s important to maintain the wax at the recommended temperature to avoid any texture or quality issues.
- Continue until fully melted – Keep heating and stirring the wax until it is completely melted and smooth. Once melted, you can add fragrance or color, if desired, and stir gently to incorporate them.
Using a double boiler provides a safe and efficient way to melt candles on the stove, ensuring that the wax is evenly melted without direct exposure to high heat.
Melting the Candle
Once you have prepared the stove and gathered the necessary materials, it’s time to start melting the candle. Follow these steps to melt the candle on the stove:
- Choose a heat-resistant container – Select a container that can withstand high temperatures, such as a glass jar or a metal tin. Place the candle in the chosen container.
- Set up the double boiler – If you are using a double boiler, fill the bottom pot with water and place the top pot or bowl on top. Ensure a secure fit between the two to create a gentle heating environment.
- Place the container in the double boiler – If using a double boiler, place the container with the candle into the top pot or bowl. The indirect heat from the steam will melt the wax slowly and evenly.
- Apply direct heat (optional) – If you don’t have a double boiler, you can melt the candle directly on the stove. Place the heat-resistant container with the candle on the stove’s burner, taking care to select the appropriate burner size for stability.
- Turn on the stove – For both the double boiler and direct heat methods, turn on the stove to low or medium heat. Take caution not to have the heat too high, as this can cause the wax to overheat or burn.
- Monitor the melting process – Keep a close eye on the melting process, observing the wax as it begins to liquefy. Stir the wax occasionally to promote even melting and prevent any sticking or burning.
- Continue until fully melted – Heat the candle until it has completely melted, turning into a liquid state. This may take some time, depending on the amount of wax and the heat level. Be patient and avoid rushing the process.
By following these steps, you can successfully melt the candle on the stove, whether by using a double boiler or applying direct heat. Remember to exercise caution and use proper heat-resistant containers to ensure a safe and efficient melting process.
Stirring the Wax
While melting the candle on the stove, it’s important to stir the wax periodically to ensure even heating and a smooth consistency. Here are some tips for stirring the wax effectively:
- Choose the right utensil – Select a heat-resistant spoon or spatula specifically designed for candle-making or one made from metal. Avoid using wooden utensils, as they can absorb the wax and become difficult to clean.
- Stir gently – Use a gentle and slow stirring motion to avoid introducing air bubbles into the melted wax. Stirring too vigorously can result in a frothy consistency, which may impact the quality of the final product.
- Scrape the sides – While stirring, be sure to scrape the sides of the container to incorporate any unmelted wax. This will help ensure that all the wax is heated and melted evenly.
- Monitor the temperature – Keep an eye on the temperature of the wax to ensure it stays within the recommended melting range. Adjust the heat if necessary to maintain the desired temperature.
- Remove from heat when fully melted – Once the wax is completely melted and reaches the desired consistency, remove it from the heat source. Continuing to heat the wax unnecessarily can cause it to become overheated or scorched.
- Continue stirring when adding fragrance or color – If you plan to add fragrance or color to the melted wax, continue stirring gently to ensure even distribution. This will help achieve a consistent scent or color throughout the candle.
- Stir until smooth – Stir the wax until it becomes smooth and all the added ingredients are fully incorporated. This will create a uniform texture and enhance the overall quality of the candle.
Remember, stirring the wax is an essential step in the melting process, as it promotes even heating and helps to achieve a desired consistency and quality for your candles. Take your time, stir gently, and enjoy the craftsmanship of candle-making.
Adding Fragrance or Color (optional)
Adding fragrance or color to your melted wax can enhance the sensory experience of your candles. Here’s how you can incorporate fragrance or color into your melted wax:
- Select the desired fragrance – Choose a fragrance oil or essential oil that is specifically formulated for candle-making. Be sure to follow the recommended usage guidelines provided by the manufacturer.
- Choose the right colorant – If you wish to add color to your candles, select a candle dye or pigment that is suitable for use with wax. Avoid using water-based or food coloring, as they are not compatible with wax and can cause poor adhesion or discoloration.
- Measure the fragrance or colorant – Follow the recommended measurements for the fragrance or colorant. Add too much of either, and it could adversely affect the fragrance throw or the burn quality of the candle.
- Stir gently – Once you’ve measured the fragrance or colorant, gently stir the melted wax to ensure thorough distribution. Take care not to introduce excess air bubbles while stirring.
- Continue stirring periodically – To maintain an even distribution of fragrance or color, stir the wax periodically as it cools. This will help prevent any settling or separation of the additives.
- Test for desired strength – If you’re unsure about the desired strength of the fragrance, consider conducting a small test by pouring a small amount of wax into a container and allowing it to set. This will help you gauge the intensity of the scent before proceeding with the rest of the melted wax.
- Adjust as needed – If the fragrance or color is not to your liking, you can make adjustments by adding more or less in subsequent batches. Remember to keep a record of the measurements and any adjustments made for future reference.
Adding fragrance or color to your melted wax can personalize your candles and create a more captivating sensory experience. Experiment with different scents and colors to find combinations that resonate with you and your intended audience.
Pouring the Wax
Once the wax has been melted and any desired fragrance or color has been added, it’s time to pour the wax into your chosen candle molds or containers. Follow these steps for a successful pouring process:
- Prepare the molds or containers – Prior to pouring, ensure that your candle molds or containers are clean, dry, and properly prepared. If using molds, apply a release agent to make it easier to remove the candles once they have cooled and solidified.
- Secure the wick – If using a pre-tabbed wick, affix it to the bottom center of your container or mold using a small amount of melted wax or wick adhesive. If using an untabbed wick, center it in the container and secure it in place with a wick holder or a weighted object.
- Pour slowly and steadily – Start pouring the melted wax into your molds or containers slowly and steadily, taking care not to overflow or spill. Aim for a smooth and controlled pour to avoid any air bubbles or splashing.
- Leave space for expansion (optional) – If using heat-resistant containers, leave a small amount of space at the top for the wax to expand as it cools. This will help prevent any overflow or cracking of the candles.
- Tap out air bubbles – After pouring, gently tap the molds or containers on a solid surface to release any trapped air bubbles. This will help ensure a smooth and even appearance for your candles.
- Allow to cool and solidify – Once poured, allow the candles to cool and solidify at room temperature. Avoid moving or disturbing the candles while they set to prevent any disturbances in their final shape and texture.
- Trim the wick – After the candles have completely hardened, trim the wick to a suitable length, usually around ½ an inch (1.3 cm). This will help ensure a clean and even burn when the candles are lit.
- Label and package – If desired, label and package your candles in a way that is visually appealing and aligns with your personal style or brand. This step is optional but can add a professional touch to your finished candles.
Pouring the wax is the final step in the candle-making process. With careful attention to detail and precision, you can create beautifully crafted candles ready to be enjoyed or gifted to others.
Switching Off the Stove
After you have successfully poured the wax and your candles are cooling, it’s important to properly switch off the stove to ensure safety and conserve energy. Follow these steps:
- Turn off the heat source – For both gas and electric stoves, turn off the heat source once you have finished pouring and removed the melted wax from the stove. This will prevent any accidental overheating and potential hazards.
- Verify the stove is off – Double-check that the stove is completely turned off. Ensure that the burners are no longer in operation, and the knobs or buttons are in the “off” position to prevent any unintended heat generation.
- Allow the stove to cool – Give ample time for the stovetop to cool down. Depending on the type of stove, it may retain heat for some time. Avoid touching or cleaning the stovetop until it has cooled to a safe temperature.
- Clean any spills or splatters – If any wax or spills occurred during the melting process, wait for them to cool and solidify before cleaning them up. For hardened wax, gently scrape it off using a plastic or wooden utensil, ensuring not to scratch the stovetop surface.
- Wipe down the stovetop – Use a damp cloth or non-abrasive cleaner to wipe down the stovetop, removing any remaining residue or stains. This will help keep your stove in good condition and ready for future use.
- Check for any issues – Take a moment to inspect the stove for any signs of damage or malfunction. Look for loose connections, worn-out parts, or any abnormalities that may require maintenance or professional attention.
- Store the melted wax – Once the stove is safely switched off and cleaned, store any excess melted wax in a sealed container for future use. Properly label the container with the type of wax and any additional information for your reference.
Switching off the stove properly after melting candles is crucial for safety and energy conservation. By following these steps, you can ensure a secure and efficient candle-making experience.
Cleaning Up
As you wrap up your candle-making session, it’s important to clean up the work area and tools to maintain a tidy and organized space. Here are some steps to follow for effective cleaning up:
- Let the tools cool – Allow any heated utensils or tools used during the melting process to cool down completely before handling them. This will prevent accidental burns or injuries.
- Scrape excess wax – If there is excess wax stuck to your utensils or containers, use a plastic or wooden scraper to gently remove the residue. Be cautious not to damage the tools or containers in the process.
- Wash with hot, soapy water – Wash any heat-resistant utensils, containers, or equipment used in the candle-making process with hot, soapy water. Use a non-abrasive sponge or cloth to thoroughly clean away any residual wax or fragrance oil.
- Remove wax spills – If any wax drips or spills onto surfaces, allow it to cool and solidify. Then, carefully scrape it off using a plastic or wooden scraper. Wipe down the surface with a damp cloth or cleaning solution to remove any remaining wax residue.
- Dispose of wax waste – Collect any small wax scraps or waste in a sealable bag or container for proper disposal. Check with your local waste management guidelines to determine if it can be disposed of in regular household trash or if there are specific instructions for wax disposal.
- Clean the stove – If there are any spills or splatters on the stovetop, clean them using a gentle cleaner suitable for your stove type. Ensure the stove is cool before cleaning and follow the manufacturer’s instructions for the appropriate cleaner.
- Organize your tools – Once everything is cleaned and dried, organize your candle-making tools in a designated area. This will make it easier to find them for future candle-making sessions and keep your workspace tidy.
- Dispose of cleaning materials properly – Dispose of any used cleaning materials, such as paper towels or cloths, according to your local waste management guidelines. If they contain wax residue, consider sealing them in a bag to prevent any mess or contamination.
Cleaning up after your candle-making session is essential for maintaining cleanliness and ensuring a safe and enjoyable environment for future projects. By following these steps, you can efficiently clean up and be ready for your next creative candle-making endeavor.
Storing the Melted Wax
If you find yourself with leftover melted wax after your candle-making project, it’s important to store it properly for future use. Follow these guidelines to ensure the longevity and quality of your stored wax:
- Cool the wax – Allow the melted wax to cool to room temperature before storing it. This will prevent any heat buildup or condensation inside the storage container, which can impact the wax’s texture and quality.
- Select a suitable container – Choose a container that is made of a material compatible with wax, such as glass or metal. Avoid using plastic containers, as they may not withstand the heat of melted wax or potential chemical interaction.
- Label the container – Properly label the container with the type of wax, date of melting, and any additional information that may be useful for future reference. This will help you identify the wax easily and ensure proper usage.
- Seal the container tightly – Ensure that the container is tightly sealed to prevent air and moisture from entering. This will help maintain the wax’s consistency and prevent any contamination or deterioration over time.
- Store in a cool, dark place – Find a cool and dark area to store the container of melted wax. Excessive heat or exposure to light can cause the wax to melt or oxidize, which may result in changes in color or scent.
- Avoid extreme temperature fluctuations – Try to avoid storing the wax in areas with significant temperature fluctuations, as this can lead to expansion and contraction of the wax. Ideally, keep the storage area at a consistent room temperature.
- Protect from moisture and humidity – Moisture and humidity can affect the quality of stored wax. Ensure that the storage area is dry and free from any water leaks or high humidity levels that could compromise the wax’s integrity.
- Keep away from direct sunlight – Exposure to direct sunlight can cause the wax to soften or fade in color. Store the container in a shaded area or use opaque containers to protect the wax from UV rays.
- Use within a reasonable time frame – While properly stored wax can remain usable for an extended period, it’s recommended to use it within a year for optimal quality. Over time, the wax may degrade or lose its desirable characteristics.
By following these storage guidelines, you can extend the shelf life of your melted wax, allowing you to use it for future candle-making projects and ensuring consistent results.
Troubleshooting Tips
Even with careful planning and execution, you may encounter some challenges during the candle-making process. Here are some troubleshooting tips to help address common issues:
- Sinking wicks – If your wicks start to sink or disappear into the wax as it cools, it may be due to shrinkage. To prevent this, ensure that you have adequately secured the wick at the base of the container and avoid pouring the wax at too high of a temperature.
- Frosting – Frosting refers to the white, crystalline appearance that can develop on the surface of the candles. This is a common occurrence with natural waxes and can be caused by temperature fluctuations during cooling. To minimize frosting, try cooling the candles slowly and storing them at a consistent temperature.
- Poor scent throw – If your candles are not emitting a strong or desired fragrance when burned, it could be due to using an insufficient amount of fragrance oil or not allowing the candles to cure for a long enough period. Try increasing the fragrance load in your wax or allowing your finished candles to cure for a few days before testing them.
- Tunneling – Tunneling occurs when the wax burns down the center of the candle instead of evenly across the entire surface. This is often caused by not allowing the candle to achieve a full melt pool during the initial burn or using a wick that is too small for the container size. To prevent tunneling, always trim the wick before burning and ensure the first burn allows for an even melt pool.
- Sooty or smoky flames – Sooty or smoky flames can occur when the wick is too long or the candle is placed in a drafty area. Trim the wick to an appropriate length of about 1/4 inch (0.6 cm) before lighting the candle and ensure it is placed in a draft-free location to avoid excessive smoking.
- Uneven coloring – If your colored candles appear uneven or patchy, it may be due to improper dispersal of the colorant. Ensure the colorant is thoroughly mixed into the melted wax before pouring, and consider using a liquid dye or pre-dissolving powdered dye for better distribution.
- Cracking or air pockets – Cracking or the formation of air pockets in the candles can occur when the wax cools too quickly or when pouring at too high of a temperature. To avoid this, pour the wax slowly and allow it to cool gradually. Preheating the containers can also help prevent rapid cooling and minimize the chances of cracking or air pockets.
By utilizing these troubleshooting tips, you can overcome common challenges in candle-making and improve the quality and consistency of your finished candles.