
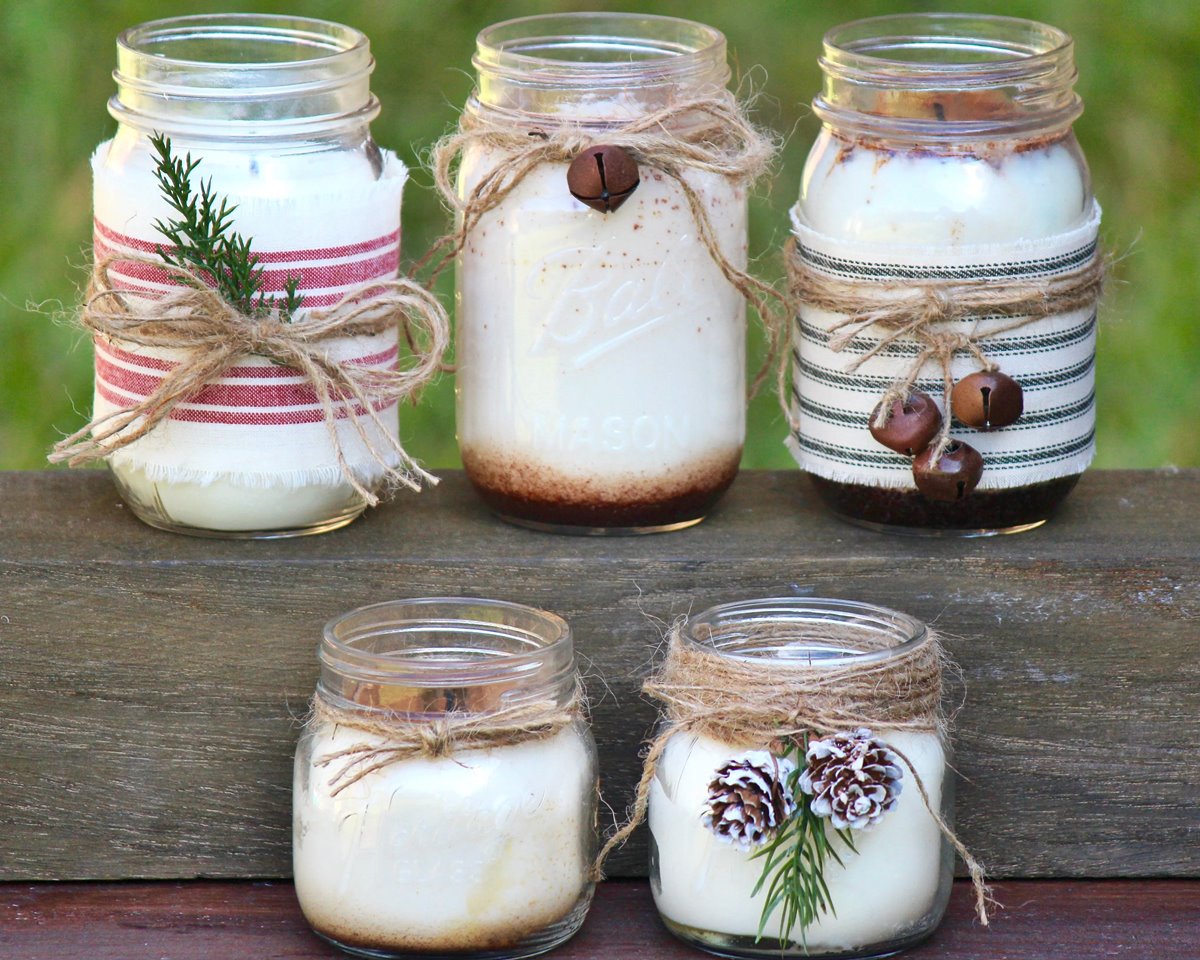
Choosing the Right Jar
When making a candle in a jar, selecting the right jar is crucial for both functionality and aesthetics. The jar not only holds the melted wax but also adds to the overall appeal of the finished candle. Here are some key factors to consider when choosing the perfect jar for your homemade candle:
- Size: The size of the jar will determine the burn time of the candle. If you want a longer-lasting candle, opt for a larger jar. Keep in mind that the size should be proportional to the amount of wax you have.
- Material: Jars made of glass or metal are commonly used for candle making. Glass jars provide a transparent view of the candle, allowing the beauty of the flickering flame to shine through. Metal jars, on the other hand, offer a more modern and industrial look.
- Shape: From classic cylindrical shapes to unique geometrical designs, the shape of the jar can greatly impact the visual appeal of your candle. Consider the style of your home decor or the theme of the occasion to help you decide on the ideal shape.
- Lid: A lid can be a practical addition to a candle jar, as it helps preserve the fragrance and keeps dust away when the candle is not in use. Choose a jar with a fitting lid if you prefer to have the option to cover your candle.
- Heat Resistance: Ensure that the chosen jar is heat-resistant, as it will be exposed to the hot melted wax and the heat of the burning wick. This is especially important for glass jars, as some may crack under high temperatures.
- Style: Consider the overall style you want to achieve with your candle. Whether it’s rustic, elegant, minimalist, or bohemian, there is a wide variety of jar styles available to suit your preference.
By considering these factors and taking your personal style into account, you can choose a jar that not only complements your candle-making project but also adds a beautiful touch to your home decor.
Gathering the Supplies
Before you can start making a candle in a jar, it’s important to gather all the necessary supplies. Here is a list of essential items you’ll need:
- Candle Wax: Choose a wax that is specifically formulated for container candles. Soy wax, beeswax, and paraffin wax are popular options.
- Candle Jar: As discussed in the previous section, select a jar of the desired size, material, shape, and style.
- Candlewick: Pick a wick that is suitable for the diameter of your jar. Pre-tabbed wicks are convenient as they come with a metal tab that can be easily secured to the jar’s bottom.
- Fragrance Oil: If desired, choose a fragrance oil that suits your preferences. There are various scents available, such as lavender, vanilla, or citrus.
- Candle Dye: Opt for candle dye if you wish to add color to your candle. Liquid and dye chips are commonly used options.
- Double Boiler or Microwavable Container: To melt the wax, you’ll need a heat-resistant vessel. A double boiler setup or a microwave-safe container can be used.
- Thermometer: A candle thermometer will help ensure that the wax is at the correct temperature for pouring.
- Stirring Utensil: Use a heat-resistant spoon or stir stick to mix the fragrance oil and dye into the melted wax.
- Heat Source: You’ll need a heat source to melt the wax, such as a stove, hot plate, or microwave.
- Protective Gear: It’s a good idea to wear gloves and protective eyewear when handling hot wax to prevent burns.
Make sure to gather all the supplies before starting the candle-making process. Having everything ready and within reach will streamline the process and help ensure a successful and enjoyable candle-making experience.
Preparing the Candlewick
Before you can start making your candle in a jar, it’s important to properly prepare the candlewick. Here’s a step-by-step guide to help you prepare the wick for a successful candle-making process:
- Measure the Wick: Determine the length of the wick by measuring it against the height of your jar. Leave a few inches extra for attaching it to the jar and trimming later.
- Trim the Wick: Use sharp scissors to trim the wick to the desired length. Make sure to remove any frayed or uneven ends.
- Attach the Wick to the Jar: If you’re using pre-tabbed wicks, secure the metal tab to the bottom center of the jar. If you have an untabbed wick, use a small adhesive dot or a hot glue gun to fix it to the jar’s bottom.
- Center the Wick: Ensure that the wick is centered in the jar by gently pulling it taut. This will help the candle burn evenly when lit.
- Secure the Wick in Place: To prevent the wick from moving during the pouring process, you can use a wick holder or a clothespin to keep it upright and in position.
- Double-check the Wick Placement: Take a final look at the wick’s position to ensure it is straight and secure at the bottom of the jar.
By properly preparing the candlewick, you are setting the foundation for a well-made candle. Taking the time to measure, trim, and secure the wick will help ensure a clean and consistent burn, allowing you to fully enjoy the warmth and ambiance of your homemade candle.
Melt the Wax
Now that you have prepared the wick and the jar, it’s time to melt the wax for your candle. Follow these steps to safely and effectively melt the wax:
- Prepare the Double Boiler: If using a double boiler, fill the bottom pot with water and place it on the stove over low to medium heat. If using a microwave, pour the desired amount of wax into a microwavable container.
- Place the Wax in the Boiler: Place the wax in the top pot of the double boiler or in the microwave-safe container. It’s important to cut the wax into smaller chunks or use wax pellets to facilitate the melting process.
- Monitor the Temperature: Use a thermometer to monitor the temperature of the wax. Different types of wax have specific melting points, so refer to the manufacturer’s instructions for the recommended temperature range.
- Stir Occasionally: While the wax is melting, stir it occasionally to ensure even heating. This will help the wax melt uniformly and prevent any clumping or scorching.
- Remove from Heat: Once the wax has completely melted and reached the desired temperature, remove it from the heat source. Be cautious and use oven mitts or heat-resistant gloves to handle the hot containers.
Pouring the melted wax at the appropriate temperature is crucial for achieving a smooth and professional-looking candle. Following these steps will help ensure that your wax is melted properly and ready for the next steps in creating your homemade candle in a jar.
Add Fragrance and Color
Adding fragrance and color to your candle can elevate its appeal and create a unique sensory experience. Follow these steps to incorporate fragrance and color into your homemade candle:
- Choose Your Fragrance: Select a fragrance oil or essential oil that aligns with your personal preference. Consider scents that complement the atmosphere or theme you wish to create.
- Measure the Fragrance: Follow the recommended guidelines provided by the fragrance oil manufacturer to determine the appropriate amount of oil to add. Typically, it is recommended to use 1 ounce of fragrance oil per pound of wax.
- Add the Fragrance: Once the wax has melted, remove it from the heat source and carefully stir in the measured fragrance oil. Mix the oil thoroughly to ensure even distribution throughout the melted wax.
- Select Your Candle Dye: If you desire a colored candle, choose a candle dye in a hue that complements your fragrance or matches your decor. Liquid dyes or dye chips are commonly used options.
- Measure the Candle Dye: Follow the instructions provided with your chosen candle dye to determine the appropriate amount to add. Start with a small amount and gradually add more until you achieve the desired color intensity.
- Add the Candle Dye: While stirring the melted wax, slowly add the measured candle dye. Continue stirring until the dye is fully incorporated and the wax is evenly colored.
- Test and Adjust: If you’re unsure about the fragrance or color intensity, you can pour a small amount of the colored and scented wax into a test jar or container. Allow it to cool and solidify, then assess the final result to make any necessary adjustments.
Adding fragrance and color to your homemade candle allows you to personalize and enhance the aromatic and visual experience. Follow these steps carefully to achieve a beautifully scented and visually appealing candle that will captivate the senses.
Pouring the Wax into the Jar
Now that you have melted the wax, added fragrance, and color, it’s time to pour the wax into the jar. Follow these steps to ensure a smooth and successful pouring process:
- Prepare the Work Area: Place a heat-resistant surface, such as a silicone mat or a newspaper, on your work area to catch any drips or spills.
- Secure the Wick: Check that the wick is still centered and secure in the jar. Use a wick holder or a clothespin to keep it upright during the pouring process.
- Pour Slowly: Slowly and evenly pour the melted wax into the jar, avoiding any sudden movements. Pouring too quickly can create air bubbles or cause the wax to overflow.
- Leave Some Head Space: Keep about 1/2 inch to 1 inch of space at the top of the jar. This will minimize the risk of the wax overflowing when the candle burns.
- Allow the Wax to Cool: Let the jar of poured wax sit undisturbed for several hours until it cools and solidifies completely. Avoid touching or moving the jar during this time.
- Check for Sinkholes: Once the wax has cooled, check if any sinkholes have formed in the center. If so, gently poke small holes near the wick and pour a small amount of melted wax to fill the depressions.
Pouring the melted wax into the jar requires patience and steady hands. Take your time and pour slowly to ensure a clean and professional-looking candle. Allow the candle to cool and solidify completely before moving on to the next steps in the candle-making process.
Letting the Candle Cure
After pouring the wax into the jar, it’s important to let the candle cure and set properly. This process allows the wax to cool and harden completely, which is essential for optimal burning and performance. Follow these steps to ensure proper curing of your homemade candle:
- Find a Safe Location: Place the jar in a cool, undisturbed location where it won’t be exposed to direct sunlight or fluctuations in temperature.
- Allow Sufficient Curing Time: The curing time will depend on the type of wax used and the size of your candle. In general, it is recommended to let the candle cure for at least 24 hours, but some waxes may require longer curing times.
- Avoid Disturbing the Candle: Resist the temptation to touch or move the candle during the curing process. Any disturbance can disrupt the wax’s solidification and affect the candle’s overall quality.
- Observe and Inspect: After the initial curing period, inspect the candle for any sinkholes or uneven surfaces. If necessary, top off the candle with additional melted wax to even out the surface.
- Test the Wick: Trim the wick to the desired length, typically around 1/4 inch to 1/2 inch, to ensure a clean and steady burn. Remove any excess debris around the wick.
Allowing the candle to cure is a crucial step in the candle-making process. This period allows the wax to fully set and prepares the candle for optimal burning. By following these guidelines, you will ensure a well-cured candle that is ready to be enjoyed.
Trimming the Wick
Properly trimming the wick of your candle is essential for a safe and efficient burn. Follow these steps to ensure you have the right wick length for optimal candle performance:
- Wait Until the Candle Is Fully Cooled: Ensure that the wax is completely solidified and cooled before attempting to trim the wick. This prevents any accidents or damage to the candle.
- Use Sharp Scissors or Wick Trimmers: Choose a pair of scissors or specialized wick trimmers to trim the wick. This ensures a clean and precise cut.
- Trim to the Recommended Length: Check the recommended wick length for your specific candle type, usually around 1/4 inch to 1/2 inch. Trim the wick to this length to prevent excessive smoking, uneven burning, and mushrooming.
- Dispose of the Trimmed Wick: Collect the trimmed wick remnants and discard them properly. Removing them from the candle helps maintain a clean burn and prevents any interference with the flame.
- Regularly Trim the Wick: After each burn, check the wick length and trim it if necessary. Keeping the wick at the recommended length ensures a consistent and efficient burn every time you light your candle.
Trimming the wick may seem like a small task, but it can significantly impact the performance of your candle. By following these steps and regularly trimming the wick, you’ll promote a safe and enjoyable candle-burning experience while maximizing the candle’s lifespan.
Enjoying Your Homemade Candle
Now that your homemade candle is complete and ready to be enjoyed, it’s time to create a relaxing and cozy atmosphere with its warm glow and aromatic scent. Here are some tips for making the most of your homemade candle:
- Choose the Right Setting: Find a suitable location for your candle, such as a coffee table, bedroom nightstand, or bathroom countertop. Place it away from any flammable objects and ensure proper ventilation.
- Create Ambiance: Dim the lights and set the mood by lighting your candle. The soft flickering flame and delicate fragrance can instantly create a soothing and calming ambiance.
- Practice Safety: While enjoying your candle, it’s important to prioritize safety. Never leave a burning candle unattended, keep it out of reach of children and pets, and ensure it is placed on a heat-resistant surface.
- Experiment with Candle Placement: Move the candle around your space to experience varying scents and lighting effects. You may find that different areas of your home benefit from the cozy atmosphere and soothing aroma created by your homemade candle.
- Experiment with Burning Time: Consider the burn time of your candle and plan accordingly. For shorter burns, light the candle during a relaxing bath or a cozy evening at home. For longer burns, enjoy the scent and ambiance while reading a book or practicing meditation.
- Appreciate the Craftsmanship: Take a moment to appreciate the effort and care you put into making your homemade candle. Enjoy the satisfaction of knowing that you created a unique and personalized item that adds beauty and warmth to your space.
As you relax and unwind with your homemade candle, take time to enjoy the sensory experience it offers. Whether it’s the flickering flame, the comforting scent, or the cozy atmosphere it creates, your candle is a reflection of your creativity and craftsmanship.