
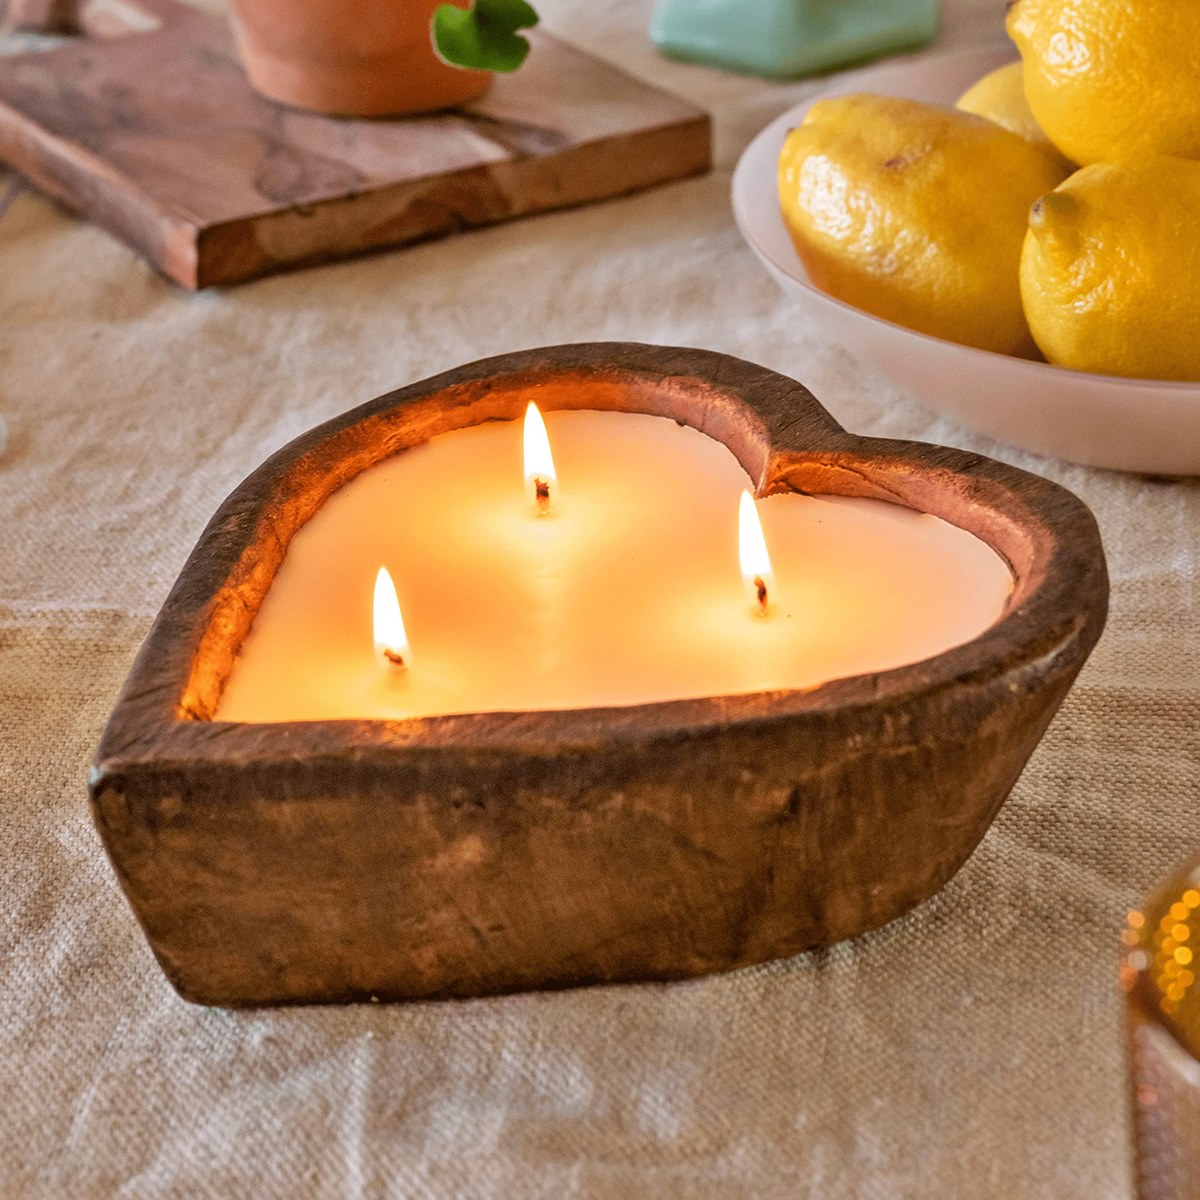
Choosing the Right Dough Bowl
When it comes to making a dough bowl candle, choosing the right dough bowl is crucial. Not only does it serve as the vessel for your candle, but it also adds a touch of rustic charm to your decor. Here are some factors to consider when selecting the perfect dough bowl:
- Size: Consider the size of the space where you plan to place the candle. If you have a large table or shelf, a bigger dough bowl will make a bold statement. On the other hand, if you have limited space, a smaller dough bowl will fit better.
- Shape: Dough bowls come in various shapes, such as oval, rectangular, or round. Think about the aesthetic you want to achieve and choose a shape that complements your style and existing decor.
- Material: Traditional dough bowls were made from wood, like antique dough bowls made from solid hardwoods. However, you can also find dough bowls made from ceramic or resin. Consider the overall look you want to achieve and select a material that fits your style.
- Finish: The finish of the dough bowl can greatly impact the overall appearance of your candle. Some dough bowls have a natural, unfinished look for a more rustic feel, while others have a stained or painted finish for a polished look. Decide on the finish that best matches your personal taste and desired aesthetic.
- Texture: Pay attention to the texture of the dough bowl. Some bowls have a smooth surface, while others have a more distressed or weathered texture. The texture can enhance the rustic appeal of your candle, so choose one that aligns with your vision.
Remember, the dough bowl you choose sets the stage for your candle, so take your time to find the perfect one. Whether you opt for a vintage-inspired wooden dough bowl or a sleek ceramic one, selecting the right dough bowl will elevate the beauty of your handmade dough bowl candle.
Preparing the Dough Bowl
Before you can start making your dough bowl candle, you need to prepare the dough bowl to ensure a smooth candle-making process. Follow these steps to prepare your dough bowl:
- Clean the bowl: Thoroughly clean the dough bowl to remove any dust, dirt, or debris. Use a mild soap and warm water to gently wash the bowl. Rinse it thoroughly and allow it to dry completely.
- Seal any cracks: Inspect the dough bowl for any cracks or gaps. If you find any, use wood filler or epoxy resin to seal them. This will prevent any wax from leaking out during the candle-making process.
- Smooth the surface: If the dough bowl has a rough or uneven surface, consider sanding it down to create a smooth base for your candle. Use fine-grit sandpaper and gently sand the bowl, following the direction of the wood grain. Wipe away any dust after sanding.
- Apply a protective coat: To protect the dough bowl and enhance its longevity, consider applying a protective coat. If you chose a wooden dough bowl, you can use a clear wood finish or beeswax. Apply the protective coat according to the manufacturer’s instructions and allow it to dry completely.
By taking the time to prepare your dough bowl, you are ensuring a clean, sturdy, and visually appealing foundation for your candle. These simple steps will help you create a professional-looking dough bowl candle that will bring warmth and ambiance to any space.
Selecting the Candle Wax
Choosing the right candle wax is an essential step in making a dough bowl candle. The type of wax you select will not only determine the appearance and texture of your candle but also its burn time and scent throw. Here are some popular candle wax options to consider:
- Soy Wax: Soy wax is a popular choice among candle makers due to its natural and eco-friendly properties. It is made from soybean oil and offers a clean and long-lasting burn. Soy wax candles have a creamy appearance and excellent scent throw.
- Paraffin Wax: Paraffin wax is a widely used and affordable option for making candles. It offers a smooth and glossy finish and has a great scent throw. However, keep in mind that paraffin is a petroleum by-product and may not be as eco-friendly as other alternatives.
- Beeswax: Beeswax is a natural wax that is known for its subtle honey-like scent and warm glow. It has a longer burn time compared to other waxes and produces very little soot. Beeswax candles have a beautiful, natural appearance but can be more expensive than other options.
- Coconut Wax: Coconut wax is a renewable and sustainable option that offers a smooth and creamy appearance. It has a great scent throw and provides a clean burn. Coconut wax candles are also known for their excellent fragrance retention.
Consider your priorities, such as sustainability, burn time, and fragrance, when selecting the candle wax for your dough bowl candle. You can also experiment by mixing different waxes to achieve a custom blend that suits your preferences. Keep in mind that each wax has its unique characteristics, so take the time to research and choose the one that aligns with your vision for the perfect dough bowl candle.
Adding Fragrance to the Candle
Adding fragrance to your dough bowl candle is a delightful way to enhance the ambiance and create a pleasant sensory experience. Here’s how you can add fragrance to your candle:
- Selecting the fragrance: Choose a fragrance that suits your preference and complements the atmosphere you want to create. There are endless options available, ranging from floral and fruity scents to warm and cozy aromas like vanilla or cinnamon. Consider the mood and purpose of your candle to guide your fragrance selection.
- Using fragrance oils: Most candle makers use fragrance oils specifically designed for candle-making. These oils are specially formulated to disperse well in the wax and provide a strong and lasting scent. Read the manufacturer’s instructions to determine the recommended fragrance oil concentration for your chosen wax.
- Measuring the fragrance: Follow the recommended fragrance load for your candle wax. Generally, it is recommended to use about 6-10% fragrance oil per pound of wax. Use a digital scale to measure the fragrance oil accurately, ensuring that the scent is neither too overpowering nor too weak.
- Blending the fragrance: If you desire a unique scent, you can experiment by blending different fragrance oils. Mix small amounts of the oils together and test them to find the desired combination. Remember to keep track of your measurements so that you can recreate the blend in the future.
- Adding the fragrance: Once you’ve determined the amount and blend of fragrance oils, gently stir them into the melted wax. Stir well to ensure that the fragrance is evenly distributed. Be cautious not to introduce air bubbles during the stirring process.
Adding fragrance to your dough bowl candle allows you to personalize the scent and create a more enjoyable and relaxing experience. Whether you choose a single fragrance or create your custom blend, the aroma of your handmade dough bowl candle will fill the room and create a cozy atmosphere.
Selecting the Wick
Choosing the right wick for your dough bowl candle is crucial for achieving a clean and efficient burn. The wick size and type will determine how well your candle performs. Here are some factors to consider when selecting the wick:
- Size: The size of the wick is determined by the diameter of your dough bowl. You want a wick that is large enough to create a full melt pool, but not too large that it causes excessive smoking or soot. Consult a wick size guide or refer to the manufacturer’s recommendations to ensure you choose the appropriate size for your dough bowl.
- Type: There are various types of wicks available, such as cotton wicks, wood wicks, and ribbon wicks. Cotton wicks are the most common and versatile choice for dough bowl candles. They are known for their clean and consistent burn. Wood wicks provide a unique crackling sound and offer a cozy ambiance. Ribbon wicks are often used for wider vessels and offer a more decorative look.
- Coating: Some wicks come pre-coated with a substance like beeswax or soy wax. This coating helps the wick to ignite more easily and promotes a more even burn. Consider using a coated wick to enhance the performance of your dough bowl candle.
- Testing: It’s a good idea to perform test burns with different wicks to determine which one works best for your specific dough bowl and wax combination. Pay attention to how well the wick burns, if there is excessive soot or smoking, and how evenly the wax melts. Adjust the wick size or type accordingly based on your observations.
- Safety: Always prioritize safety when selecting a wick. Ensure that the wick is lead-free and made from high-quality materials. Trim the wick to a proper length (around 1/4 inch) before lighting it, and never leave a burning candle unattended.
Choosing the right wick is essential for the overall performance and longevity of your dough bowl candle. Take the time to research and experiment to find the perfect wick that will provide a clean, even burn and enhance the beauty of your homemade creation.
Melting the Wax
Now that you have your dough bowl prepared and your wick selected, it’s time to melt the wax and prepare it for pouring into the dough bowl. Follow these steps to safely and effectively melt the wax for your dough bowl candle:
- Prepare a double boiler: Fill a large pot with water and place it on the stove. Choose a smaller heat-resistant container or a pouring pitcher to hold the wax. Place the smaller container inside the larger pot, creating a double boiler setup.
- Measure the wax: Refer to the instructions provided by the wax manufacturer to determine the amount of wax needed for your dough bowl candle. Use a digital scale to measure the wax flakes or chunks accurately.
- Place the wax in the pouring container: Transfer the measured wax into the pouring container. This will ensure that the wax melts evenly and facilitates easy pouring into the dough bowl.
- Heat the water: Turn on the stove and heat the water in the large pot over medium heat. As the water heats up, it will create gentle, indirect heat to melt the wax in the pouring container.
- Melt the wax: Place the pouring container with the wax into the pot of heated water. Stir the wax occasionally with a heat-resistant utensil to promote even melting. Avoid overheating the wax, as excessive heat can affect its quality.
- Monitor the temperature: To ensure the wax melts at the appropriate temperature for your specific wax type, use a thermometer to monitor the temperature. Different waxes have different melting points, so it’s important to stay within the recommended temperature range.
- Optional: Add dye or colorant: If you want to add color to your candle, you can incorporate liquid or block dye into the melted wax. Stir in the dye until it is evenly distributed. Remember to test a small amount of the colored wax to ensure you achieve the desired shade before pouring the entire candle.
By following these steps, you will safely melt the wax for your dough bowl candle, ensuring a smooth and consistent pour into the dough bowl. Remember to exercise caution when working with hot wax and never leave it unattended during the melting process.
Pouring the Wax into the Dough Bowl
Now that you have melted your candle wax, it’s time to carefully pour it into your prepared dough bowl. Here are the steps to follow to ensure a successful pour:
- Prepare the workspace: Find a flat and heat-resistant surface to place your dough bowl and any necessary tools or equipment. It’s also a good idea to cover the area with newspaper or a disposable tablecloth to catch any potential spills.
- Secure the wick: Before pouring the wax, make sure the wick is centered and secured in the dough bowl. You can use a wick centering device or tie the wick to a pencil or chopstick placed across the top of the bowl to keep it upright and centered during the pouring process.
- Pour slowly and steadily: Begin pouring the melted wax into the dough bowl, starting at the center. Pour slowly and steadily to avoid splashing or overflowing. Aim to fill the dough bowl to a level that leaves a small amount of space at the top to accommodate any decorative elements or additional wax layers.
- Avoid air bubbles: As you pour the wax, be vigilant about avoiding air bubbles. Gently tap the sides of the dough bowl or use a long skewer to stir the wax and release any trapped air bubbles. This will ensure a smooth and even finish to your candle.
- Optional: Adding decorative elements: If you desire, you can add decorative elements to your dough bowl candle. This could include dried flowers, herbs, or even small decorative objects that complement the fragrance or theme of your candle. Arrange these elements on the surface of the wax before it completely solidifies.
Pouring the wax into the dough bowl requires patience and attention to detail. Take your time to pour slowly and eliminate air bubbles, as this will result in a more visually appealing and better-performing candle. Once you have poured the wax, allow it to cool and solidify completely before moving on to the next steps.
Allowing the Candle to Set
After pouring the wax into the dough bowl, it’s important to allow the candle to set and solidify properly. This process ensures that your candle will burn evenly and effectively. Here are the steps to follow when allowing your dough bowl candle to set:
- Find a suitable location: Choose a safe and undisturbed location where your candle can sit as it sets. Avoid placing it in direct sunlight or in a drafty area, as this may affect the cooling process.
- Patience is key: It’s essential to exercise patience and let the wax cool and set naturally. Avoid moving or disturbing the dough bowl during this time. The cooling process can take several hours, depending on the size of the candle and the ambient temperature.
- Check for any sinkholes: As the wax cools and solidifies, it may form sinkholes or uneven areas on the surface. If you notice any depressions or imperfections, you can use a heat gun or a lighter to gently melt the surface and fill in the gaps with additional melted wax.
- Trim the wick: Once the wax has completely set, it’s time to trim the wick. Use sharp scissors or wick trimmers to trim the wick to a length of about 1/4 inch. This will promote a cleaner and more efficient burn when you light the candle.
- Allow the candles to cure: Although your dough bowl candle may be ready to burn, it’s recommended to allow it to cure for a couple of days before lighting it. This will allow the fragrance to fully blend with the wax and contribute to a better scent throw when the candle is lit.
Allowing the dough bowl candle to properly set and cure ensures optimal burning performance and longevity. Take the time to patiently allow the wax to cool and solidify before trimming the wick and enjoying your handmade dough bowl candle.
Trimming the Wick
Trimming the wick of your dough bowl candle is an important step in maintaining a safe and efficient burn. A well-trimmed wick not only helps to control the flame but also promotes an even and steady burn. Follow these steps to properly trim the wick of your dough bowl candle:
- Ensure the candle is cool: Before attempting to trim the wick, ensure that the candle has completely cooled down. This will prevent any accidental burns or damage to the candle.
- Inspect the wick: Take a close look at the wick and remove any debris or charred pieces by gently pinching or brushing them off with a clean, dry cloth. This will help to maintain a cleaner burn.
- Measure the wick length: Use a ruler or wick trimmers to measure the desired length for your wick. Generally, it is recommended to trim the wick to a length of about 1/4 inch (6mm) before lighting the candle. Maintain this length for subsequent trimmings as well.
- Trim the wick: With a steady hand, carefully trim the wick to the desired length. It’s crucial to make a clean cut to ensure a smooth and even burn. Dispose of the trimmed wick in a safe manner, away from the candle.
- Remove any excess debris: After trimming the wick, check for any loose or trimmed wick debris that may have fallen into the wax. Use a clean, dry cloth or a small brush to gently remove any remnants from the surface of the wax.
- Dispose of trimmings properly: It’s important to safely discard the trimmed wick. Do not let it accumulate in the candle or fall back into the melted wax. Clean up any trimmed wick remnants and dispose of them in a suitable waste bin.
Regularly trimming the wick of your dough bowl candle is essential for maintaining a safe and enjoyable burning experience. By following these steps and keeping your wick at the recommended length, you’ll ensure that your candle burns cleanly and evenly while prolonging its overall lifespan. Enjoy the warm glow and inviting ambiance of your perfectly trimmed dough bowl candle.
Enjoying Your Dough Bowl Candle
Now that you have successfully made your dough bowl candle, it’s time to sit back, relax, and enjoy its warm glow and cozy ambiance. Here are some ways to fully embrace and appreciate your handmade creation:
- Choose the perfect location: Find the ideal spot to display your dough bowl candle. Whether it’s on a coffee table, shelf, or centerpiece, select a location where the candle can be admired and appreciated.
- Create a soothing atmosphere: Light your dough bowl candle when you want to create a calming and inviting atmosphere. The soft flickering flame and gentle fragrance will help you unwind and relax after a long day.
- Experiment with different scents: If you enjoy variety, try different fragrances with each new dough bowl candle you make. Explore a range of scents to reflect different moods, seasons, or occasions.
- Decorate around the candle: Enhance the visual appeal of your dough bowl candle by complementing it with decorative accents. Place it on a decorative tray, surround it with dried flowers or greenery, or add seasonal elements to further elevate its aesthetic.
- Practice candle safety: Always prioritize safety when using your dough bowl candle. Never leave it unattended, keep it away from flammable objects, and place it on a heat-resistant surface. Remember to extinguish the candle before leaving the room or going to bed.
- Enjoy the relaxing glow: Dim the lights and allow the soothing glow of your dough bowl candle to create a tranquil atmosphere. Whether you’re reading a book, taking a bath, or spending quality time with loved ones, the warm ambiance of the candle will enhance the experience.
- Extend the burning time: To prolong the burning time of your dough bowl candle, trim the wick before each use and ensure that it is centered. This will help prevent excessive smoking, soot, and uneven burning.
- Gift a dough bowl candle: Spread the joy of handmade candles by gifting a dough bowl candle to friends and family. The unique and rustic charm of these candles makes them perfect for special occasions or as thoughtful tokens of appreciation.
Relish the cozy atmosphere and delightful fragrance that your dough bowl candle brings to your space. With proper care and enjoyment, your handmade candle will continue to fill your home with warmth and beauty for many hours of relaxation and comfort.