
Choosing the Right Materials
When it comes to making a rug loom, choosing the right materials is crucial for a successful and durable project. Here are some important considerations to keep in mind:
1. Frame Material: Opt for a sturdy and durable material for the main frame of your rug loom. Hardwoods like oak or maple are popular choices due to their strength and stability.
2. Pegs: Select pegs that are smooth and strong, preferably made of hardwood or metal. Make sure they are of consistent size and shape to ensure even tension and weaving.
3. Weaving Surface: The material for the weaving surface should be strong enough to withstand the tension of the warp threads. Common options include cotton or linen fabric or even a rigid mesh.
4. Warp Threads: Choose a warp thread that is suited for your specific rug project. Cotton or linen warp threads are widely used due to their strength and resistance to stretching.
5. Weft Yarn: Select a weft yarn that complements the design and desired texture of your rug. Wool, cotton, or yarn blends are popular choices, offering a range of colors and textures.
6. Tools: You will need a few essential tools for your rug loom project, including scissors, a shuttle, a beater, and a shed stick. Ensure they are of good quality and designed for rug weaving.
7. Additional Materials: Depending on your project and design, you may need additional materials such as dyes for coloring the yarn, rug backing material, or decorative elements like beads or tassels.
By choosing the right materials, you lay the foundation for a successful rug weaving project. Each material plays a crucial role in the overall quality, strength, and aesthetic appeal of your rug. Take the time to research and invest in high-quality materials to ensure a rewarding rug weaving experience.
Designing Your Rug Loom
Designing your rug loom is an exciting process that allows you to customize the loom according to your specific weaving needs and preferences. Here are some key considerations to keep in mind when designing your rug loom:
1. Loom Size: Determine the size of the rug you want to weave and adjust the dimensions of the loom accordingly. Consider both the width and length of the rug to ensure it fits within the weaving area.
2. Frame Structure: Design the main frame of your loom to be sturdy and stable. Consider the weight and tension the loom will need to handle and choose materials that can withstand the pressure.
3. Height and Angles: Determine the height and angle of the loom that will be most comfortable for you to work with for extended periods. Consider factors such as your height, seating arrangement, and ergonomic considerations.
4. Shed Mechanism: Decide on the shed mechanism you want to incorporate into your loom design. This is what creates the opening between the warp threads for easy weaving. Options include a rigid heddle, a string heddle, or a dobby mechanism.
5. Tensioning Mechanism: Choose a tensioning mechanism that allows you to adjust the tension of the warp threads easily. This ensures even tension throughout your weaving process and produces a consistent rug.
6. Optional Features: Consider incorporating additional features into your loom design, such as a tray for holding weaving tools, a storage space for yarn, or pegs for hanging finished rugs.
7. Portability: If you plan to move or transport your loom frequently, design it with portability in mind. Consider features such as foldability or lightweight materials for ease of transportation.
When designing your rug loom, take the time to plan and consider your specific needs as a weaver. A well-designed loom will not only enhance your weaving experience but also contribute to the overall quality and success of your rug projects.
Gathering the Necessary Tools
Before you can start building your rug loom, it’s important to gather all the necessary tools to ensure a smooth and efficient construction process. Here are some essential tools you’ll need:
1. Measuring Tape: A measuring tape will come in handy when determining the dimensions of your rug loom, ensuring precise measurements for accurate construction.
2. Saw: Depending on the type of wood you’re using, you’ll need a saw to cut the main frame components to the desired lengths. Choose a saw appropriate for the thickness of the wood.
3. Drill: A drill will be necessary to create holes for attaching pegs and other components securely. Make sure you have the appropriate drill bits for your chosen fasteners.
4. Screwdriver: You’ll need a screwdriver for tightening screws and securing various parts of the loom. Consider having different types and sizes of screwdrivers to accommodate different screw heads.
5. Sandpaper: Sandpaper is essential for smoothing rough edges, ensuring a seamless and safe finish for your rug loom. Choose sandpaper with different grits for varying levels of smoothness.
6. Clamps: Clamps are useful for holding pieces together while you work, providing stability and ensuring the alignment of components during the assembly process.
7. Pliers: Pliers can be handy for gripping and manipulating small components, such as attaching screws or tightening nuts and bolts.
8. Level: A level is useful for ensuring that your rug loom is straight and aligned properly during construction. This will help prevent any misalignment or instability in the final product.
9. Safety Gear: Don’t forget to prioritize safety by wearing appropriate protective gear such as safety glasses and gloves. This will help prevent any accidents or injuries while working with tools.
By gathering these necessary tools before starting your rug loom construction, you’ll have everything you need to build a sturdy and functional loom. Remember to check the condition of your tools and replace any worn-out or damaged ones for optimal performance.
Building the Main Frame
Building the main frame of your rug loom is a crucial step in the construction process that provides stability and support for your weaving project. Here’s a step-by-step guide to help you build the main frame:
1. Prepare your materials: Gather the wood pieces you’ll need for the main frame, including the top and bottom beams, side beams, and any additional support beams if required. Ensure they are cut to the appropriate lengths according to your loom design.
2. Align the beams: Lay out the top and bottom beams parallel to each other. Position the side beams between them, aligning them vertically to create the desired height for your loom. Make sure all beams are flush and even.
3. Attach the beams: Use clamps to hold the beams securely in place. Pre-drill pilot holes to prevent splitting, and then use screws or nails to attach the beams. Ensure they are tightly secured to provide a stable frame for your loom.
4. Reinforce the frame: For added stability, consider reinforcing the corners of the frame with brackets or angle irons. This will help prevent any warping or twisting of the frame during use.
5. Check for levelness: Use a level to ensure that your frame is straight and level. Make any necessary adjustments by loosening or tightening the screws to achieve a balanced and stable frame.
6. Test the frame: Once the main frame is built, give it a gentle shake to check for any wobbling or instability. Make any necessary adjustments to ensure the frame is solid and sturdy.
7. Consider additional features: Depending on your design and weaving preferences, you may want to incorporate additional features into the frame, such as a tray or storage space for weaving tools and materials. Plan and attach these features as desired.
Remember, the main frame is the foundation of your rug loom, so it’s important to take your time and build it carefully. A well-constructed main frame will provide the stability and support needed for successful and enjoyable rug weaving projects in the future.
Attaching the Pegs
The pegs on your rug loom play a crucial role in holding the warp threads taut and maintaining even tension throughout the weaving process. Here’s a step-by-step guide on how to attach the pegs to your loom:
1. Determine the placement: Decide on the spacing and number of pegs you’ll need for your specific rug project. This will depend on the width and design of the rug you intend to weave.
2. Mark the locations: Use a measuring tape and pencil to mark the positions of the pegs on both sides of the loom. Ensure that your marks are evenly spaced to maintain the desired tension.
3. Pre-drill holes: Before attaching the pegs, pre-drill holes in the marked locations on the loom. The size of the holes should accommodate the chosen pegs, ensuring a secure fit.
4. Attach the pegs: Insert the pegs into the pre-drilled holes, making sure they are level and protruding enough to hold the warp threads securely. Use screws, nuts, or bolts to secure the pegs in place.
5. Test the tension: After attaching all the pegs, test the tension by wrapping the warp threads around them. Make any necessary adjustments to ensure even tension across the width of the loom.
6. Consider enhancing peg grip: If you find that the pegs are slipping or not gripping the warp threads securely, consider adding adhesive-backed grip tape or wrapping the pegs with rubber bands or cloth to improve their grip.
7. Double-check peg alignment: Before proceeding with your weaving project, double-check that all the pegs are properly aligned and securely attached. This will ensure that the warp threads remain in place during weaving.
By following these steps, you will be able to attach the pegs to your rug loom properly. Properly secured and aligned pegs will contribute to the stability and tension control necessary for a smooth and successful rug weaving experience. Take your time and ensure that the pegs are securely attached before moving on to the next step.
Creating the Weaving Surface
The weaving surface of your rug loom is where the actual weaving process takes place. It provides a stable foundation for the warp threads and allows you to interlace the weft yarn to create your rug. Here’s a step-by-step guide on how to create the weaving surface:
1. Prepare the weaving material: Choose a suitable material for the weaving surface, such as a sturdy fabric or a rigid mesh. Cut the material to match the width and length of your loom, leaving enough excess for attaching and tensioning.
2. Attach the weaving material to the top and bottom beams: Begin by securing the fabric or mesh to one end of the top beam using staples, tacks, or clips. Stretch it tightly and then attach the opposite end to the bottom beam, ensuring even tension throughout.
3. Align the edges: Make sure the edges of the weaving material are straight and aligned with the sides of the loom. This will result in an even and professional-looking weaving surface.
4. Secure the edges: Use a strong adhesive or tape to secure the edges of the weaving material to the side beams of the loom. This will prevent any shifting or movement during the weaving process.
5. Check for even tension: After attaching the weaving material, check the tension by gently tugging on different sections. Adjust as needed to ensure that the surface is evenly tensioned from top to bottom.
6. Consider adding a weaving header: For a clean start to your weaving project, consider adding a weaving header at the beginning. This involves weaving a few rows with scrap yarn or a contrasting color before starting your actual rug design.
7. Test the weaving surface: Before starting your rug weaving project, test the weaving surface by weaving a few rows with a small piece of yarn. This will help you identify any issues with tension or alignment before committing to your full-sized rug.
By following these steps, you’ll be able to create a sturdy and reliable weaving surface on your rug loom. A well-prepared weaving surface is essential for smooth and enjoyable rug weaving, allowing you to bring your artistic vision to life with precision and control.
Adding Tensioning Mechanisms
Proper tensioning of the warp threads is crucial for successful rug weaving. Adding tensioning mechanisms to your loom ensures consistent and even tension throughout the weaving process. Here’s a guide on how to add tensioning mechanisms to your rug loom:
1. Determine the type of tensioning mechanism: There are various types of tensioning mechanisms you can use, such as ratchets and pawls, springs, or a tensioning rod. Choose the mechanism that best suits your loom design and personal preference.
2. Prepare the tensioning components: Gather the necessary components for your chosen tensioning mechanism, such as screws, brackets, springs, or rods. Ensure they are of appropriate size and strength for the tension required.
3. Attach the tensioning mechanism: Determine the location for the tensioning mechanism on your loom. Typically, it is placed at one end of the loom, near the warp beam. Attach the components securely to the loom frame, following the specific instructions for your chosen mechanism.
4. Adjust the tension: Once the tensioning mechanism is in place, test it by winding the warp threads onto the warp beam. Use the tensioning components to adjust the tension of the warp threads, ensuring they are evenly and securely tensioned.
5. Check for even tension: As you wind the warp threads onto the warp beam, periodically check for even tension throughout the width of the loom. Adjust the tension as needed to achieve a consistent tension across the warp threads.
6. Fine-tune tensioning: Once your rug weaving project is underway, you may need to make small adjustments to the tensioning mechanism as you progress. This will help maintain the desired tension as the warp threads are woven and the rug takes shape.
7. Regularly monitor tension: Throughout the weaving process, regularly check the tension of the warp threads to ensure they remain taut and even. Fine-tune the tensioning mechanism as necessary to maintain optimal weaving conditions.
Adding tensioning mechanisms to your rug loom allows for precise control over the tension of the warp threads. By following these steps and regularly monitoring the tension, you’ll be able to achieve consistent and high-quality results in your rug weaving projects.
Securing the Loom
Securing your rug loom in place is important to ensure stability and prevent any unwanted movement or shifting during the weaving process. Here are some steps to help you securely anchor your loom:
1. Determine the location: Choose a suitable location for your rug loom, preferably a space with enough room for you to move around comfortably and work on your weaving projects.
2. Choose a mounting option: There are different mounting options available, depending on the type and size of your loom. Common options include attaching the loom to a sturdy table or workbench, or using clamps to secure it to a tabletop.
3. Attach the loom to the surface: Depending on your chosen mounting option, use screws or clamps to secure the loom to the surface. Ensure that the screws are long enough to go through the loom and into the table or workbench securely.
4. Check for stability: Once the loom is attached, check for stability by giving it a gentle shake or tug. Adjust the mounting or tighten any screws or clamps if needed to ensure the loom is firmly secured and doesn’t wobble or shift during weaving.
5. Consider additional support: Depending on the size and weight of your loom, you may want to provide additional support to prevent any sagging or bending of the frame. This can be achieved by adding extra brackets or reinforcing the loom with solid blocks or braces.
6. Inspect and retighten regularly: As you use your loom over time, regularly inspect the mounting and connections to ensure everything remains secure. If there are any loosened screws or clamps, retighten them promptly to maintain stability.
7. Optimize your workspace: Arrange your weaving tools and materials in a convenient and organized manner around the loom. This will create an efficient workspace and make your weaving process more enjoyable.
By following these steps and ensuring your loom is securely anchored, you can focus on your rug weaving projects with peace of mind. A stable and secure loom provides a solid foundation for your creativity to flourish, allowing you to weave beautiful and intricate rugs with ease.
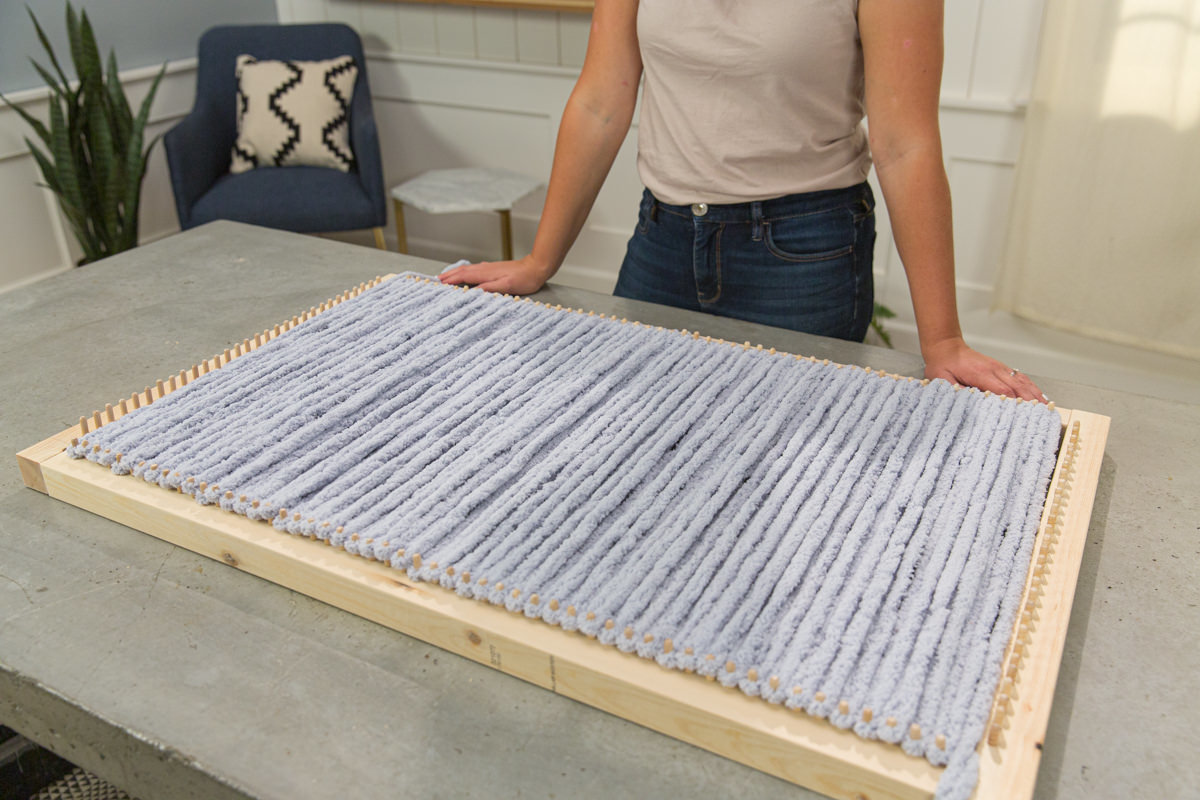
Starting Your Rug Weaving Project
Now that your rug loom is prepared and secured, it’s time to embark on your rug weaving project. Here are some steps to help you get started:
1. Prepare your materials: Gather your chosen weft yarn, shuttle, beater, and any other weaving tools you’ll need for your rug project. Make sure your materials are within reach for easy access during the weaving process.
2. Set up the warp threads: Thread the warp threads through the pegs or tensioning system, starting from the back and bringing them to the front of the loom. Separate and space the warp threads evenly across the weaving surface, securing them onto the bottom beam.
3. Start with a weaving header: Begin your rug weaving project with a weaving header, which is a few rows of scrap yarn or a contrasting color. This helps set the width of the rug and allows for easier weaving without disturbing the warp threads.
4. Begin weaving with the weft yarn: Once the header is in place, start weaving with your chosen weft yarn. Pass the shuttle with the weft yarn through the shed, which is the opening between the warp threads, alternating between over and under each warp thread to create a sturdy weave.
5. Use the beater to secure the weft: After each pass of the weft yarn, use the beater to firmly push the woven row towards the woven section, ensuring a tight and compact weave. This helps create a durable and tightly woven rug.
6. Maintain even tension: Throughout the weaving process, regularly check the tension of the warp threads and make any necessary adjustments. Ensuring even tension is crucial for a consistent and well-woven rug.
7. Create your desired design: As you progress with your weaving project, use different colors, textures, and weaving techniques to create your desired rug design. Experiment and let your creativity guide you.
8. Finish off the rug: Once you’ve reached the desired length for your rug, finish off the weaving by creating a secure and tidy edge. You can use a variety of finishing techniques, such as folding over and stitching the edges or braiding the warp threads.
Starting your rug weaving project is an exciting and creative endeavor. With a properly set up loom and a clear plan in mind, you can enjoy the process of bringing your rug design to life. Be patient, take breaks when needed, and savor the joy of creating a unique and beautiful rug through the art of weaving.
Tips for Beginner Rug Weavers
Embarking on your journey as a beginner rug weaver can be both exciting and challenging. To help you navigate the world of rug weaving, here are some valuable tips to keep in mind:
1. Start with a simple design: As a beginner, it’s best to begin with a simple rug design that doesn’t involve overly complex patterns or techniques. This allows you to focus on mastering the basics of weaving before taking on more intricate projects.
2. Practice good tension control: Proper tension is key to achieving a well-woven rug. Pay close attention to maintaining consistent tension on the warp threads throughout your weaving process, as this ensures an even and professional-looking result.
3. Take breaks and rest your body: Weaving can be physically demanding, so remember to take regular breaks to give your body a chance to rest and prevent strain. Stretch your muscles and relax your wrists to avoid any repetitive motion injuries.
4. Experiment with different materials: Don’t be afraid to try out various types of yarn and materials to see how they affect the texture and appearance of your rugs. This experimentation can lead to surprising and unique results that add depth and character to your projects.
5. Pay attention to color choices: Color selection can greatly impact the overall look and feel of your rug. Consider the mood and ambiance you want to create and experiment with different color combinations to achieve the desired effect.
6. Seek inspiration and learn from others: Explore resources such as books, online tutorials, and weaving communities to gain inspiration and learn from experienced weavers. Joining a local weaving guild can also provide valuable opportunities for shared learning and growth.
7. Embrace imperfections: Remember that every rug you weave is a unique piece of art. Embrace the imperfections and enjoy the organic nature of handmade rugs. These imperfections give your rugs character and make them truly one-of-a-kind.
8. Be patient and persistent: Rug weaving is a skill that takes time and practice to develop. Be patient with yourself as you learn and persevere through any challenges that arise. With each project, you’ll improve and gain confidence in your weaving abilities.
As a beginner rug weaver, it’s important to have fun and enjoy the process. Remember to be gentle with yourself and celebrate each accomplishment along the way. With dedication and a willingness to learn, you’ll soon be creating beautiful rugs that reflect your own unique style and creativity.
Maintaining and Storing Your Rug Loom
Proper maintenance and storage of your rug loom will help extend its lifespan and ensure that it remains in good working condition for years to come. Here are some essential tips for maintaining and storing your rug loom:
1. Regular cleaning: Clean your loom periodically to remove dust, dirt, and any debris that may accumulate. Use a soft brush or cloth to gently wipe down the wood, and avoid using harsh chemicals that could damage the finish of the loom.
2. Check for loose screws and bolts: Routinely inspect the screws and bolts on your loom to ensure they are tightened securely. Loose screws can affect the stability and overall performance of the loom, so tighten them as needed.
3. Lubricate moving parts: If your loom has moving parts, such as ratchets or pawls, lubricate them periodically with a light machine oil. This will help reduce friction and ensure smooth operation.
4. Store in a dry and well-ventilated area: When not in use, store your loom in a dry and well-ventilated space to prevent moisture build-up and potential damage. Avoid storing it in areas prone to high humidity or extreme temperature fluctuations, as these conditions can adversely affect the wood.
5. Protect from direct sunlight: Prolonged exposure to direct sunlight can cause the wood to fade or warp over time. If possible, position your loom away from windows or use window coverings to shield it from excessive sunlight.
6. Cover when not in use: Consider covering your loom with a dust cover or a sheet when it’s not being used. This extra layer of protection will help keep dust and dirt off the loom, preserving its appearance and functionality.
7. Follow manufacturer’s instructions: If your loom came with specific care instructions from the manufacturer, be sure to follow them. This will help ensure that you’re providing the appropriate care and maintenance for your specific loom model.
8. Maintain a record of repairs and adjustments: Keep a record of any repairs, adjustments, or maintenance tasks that you perform on your loom. This will help you track its history and identify any recurring issues that may require attention in the future.
By following these tips, you can keep your rug loom in optimal condition and enjoy many years of weaving. Remember that proper maintenance not only preserves the loom itself, but also contributes to the quality of your weaving projects. Take pride in caring for your loom, and it will continue to provide you with countless hours of creative enjoyment.