
Choosing the Right Materials
When it comes to hand knotting a rug, selecting the right materials is crucial. The materials you choose will not only determine the overall quality and durability of your rug but also impact its appearance and texture. Here are some key considerations for choosing the perfect materials:
- Fiber: The first decision you need to make is the type of fiber you want to use for your rug. There are various options available, such as wool, silk, cotton, or a blend of these. Wool is a popular choice due to its durability and natural ability to hide dirt and stains. Silk adds a luxurious shine to the rug, while cotton offers a soft and lightweight feel. Consider the characteristics of each fiber and choose the one that best suits your desired outcome.
- Yarn Thickness: The thickness of the yarn or thread you use will determine the gauge of your rug. Thicker yarn creates a chunkier, more robust texture, while thinner yarn produces a finer, more detailed pattern. Think about the overall aesthetic you want to achieve and select the appropriate yarn thickness accordingly.
- Color and Dye: The colors you choose for your rug will play a significant role in its final appearance. Decide whether you want to use natural or synthetic dyes. Natural dyes offer a subtle, earthy color palette, while synthetic dyes provide a wider range of vibrant hues. Consider the design and surroundings where the rug will be placed to ensure the colors complement the overall aesthetic.
- Design and Pattern: The design and pattern of the rug will depend on your personal taste and style. Traditional rugs often feature intricate motifs and geometric patterns, while contemporary rugs may incorporate more abstract or artistic designs. Look for inspiration in books, websites, or even create your own unique design.
- Budget: Lastly, consider your budget when selecting materials for hand knotting a rug. Some fibers and dyes may be more expensive than others. It’s important to strike a balance between your desired quality and your budget to ensure a satisfactory outcome.
Remember, the choice of materials will influence the final result of your hand-knotted rug. Take the time to research and consider your options carefully. Investing in high-quality materials will not only enhance the appearance and durability of your rug but also ensure the satisfaction and enjoyment of its future owners.
Preparing the Loom
Before you begin hand knotting your rug, it’s essential to properly prepare the loom. The loom is the frame that holds the warp threads in place, providing a stable foundation for weaving the weft threads and creating the knots. Here are the key steps to prepare your loom:
- Choose the right loom: There are various types of looms available, such as frame looms, table looms, or floor looms. Select a loom that suits the size and complexity of your project. Consider factors like portability, adjustability, and your level of experience.
- Assemble and set up the loom: Follow the manufacturer’s instructions to assemble your loom properly. Ensure that it is stable and level. Adjust the height, tension, and spacing of the warp threads according to your project’s specifications.
- Prepare the warp: The warp threads are the foundation of your rug. They run vertically and create the structure for the knots. Measure and cut the warp thread to the desired length, allowing extra for tying and attaching to the loom. Attach the warp threads to the loom, evenly spacing them and securing them tightly.
- Tension the warp: Proper tension is crucial in maintaining an even weave and preventing sagging or warping. Use the tensioning device on your loom to adjust the tension of the warp threads. Take your time to ensure the tension is consistent throughout the entire warp.
- Finish the warp ends: Once the warp threads are securely attached to the loom, finish the ends to prevent unraveling. You can tie them off or weave them back into the warp. This will create a clean edge and make it easier to remove the finished rug from the loom later on.
By carefully preparing your loom, you set yourself up for success in hand knotting your rug. Taking the time to choose the right loom, properly assemble and set it up, and ensure the tension is correct will contribute to a smooth and enjoyable weaving experience.
Setting up the Warp
Once the loom is prepared, the next step in hand knotting a rug is setting up the warp. The warp threads are the foundation upon which you will weave and create the knots. Here’s how to set up the warp:
- Calculate the number of warp threads: Determine the desired width of your rug and how tightly you want the weave to be. Calculate the number of warp threads needed. Make sure the warp threads are evenly spaced and aligned to achieve a balanced weave.
- Measure and cut the warp threads: Measure the length needed for the warp threads based on the desired length of the rug plus additional length for tying off and finishing. Cut the warp threads to the desired length, ensuring they are all the same length.
- Secure the warp threads: Attach the cut warp threads to the loom using the tie-on method. This involves tying a secure knot at one end and attaching it to the loom. Ensure the warp threads are evenly tensioned and straight.
- Warping the loom: Start by wrapping the warp threads around the loom’s back beam or pegs. Use a warp separator to maintain even spacing between the threads. Continue wrapping the warp threads under and over the front beam or pegs, once again using a warp separator as needed. Repeat this process until all the warp threads are evenly distributed across the loom.
- Tension the warp: Adjust the tension of the warp threads to achieve the desired tightness for your rug. This can be done using the tensioning device on your loom or by manually adjusting the tension by hand. Ensure the tension is consistent throughout the entire warp.
Setting up the warp is an important step in the hand knotting process. Taking the time to calculate the number of warp threads, accurately measure and cut them, secure them to the loom, and achieve the right tension will lay the foundation for a successful rug weaving experience.
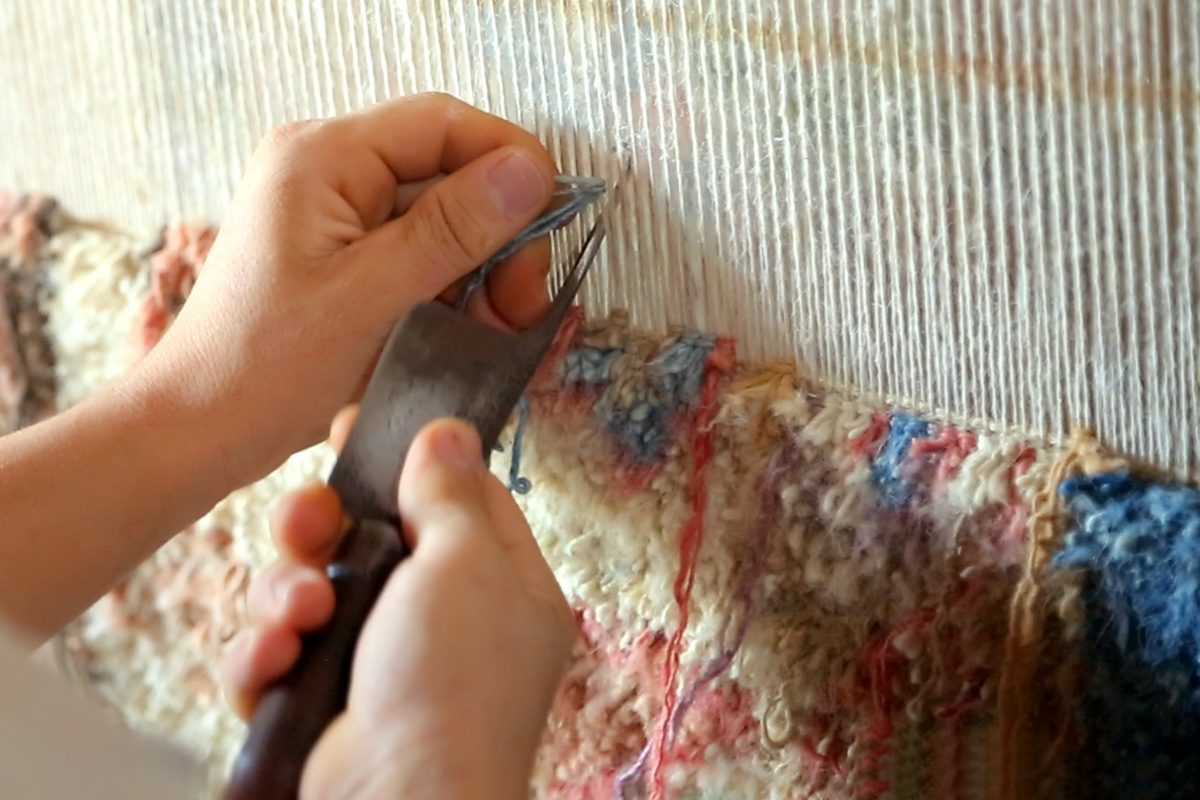
Starting the Knotting Process
With the loom prepared and the warp threads in place, it’s time to begin the knotting process for your hand-knotted rug. Starting the knotting process may seem daunting at first, but with practice and patience, you’ll soon find your rhythm. Here’s how to get started:
- Select your first yarn color: Choose the color of yarn that you want to use for your first row of knots. This can be the main color or a contrasting color depending on your design and preference.
- Thread the needle: Take a length of yarn and thread it through a blunt tapestry needle. Make sure the thread is long enough to comfortably work with but not excessively long to avoid tangling or knotting.
- Create a base knot: Start by taking the needle under the first pair of warp threads. Bring the needle up between the two threads, forming a loop. Pass the needle over the right warp thread and bring it back under the left warp thread.
- Form the knot: With the needle back under the left warp thread, carefully pull the yarn through, creating a knot. Ensure that the knot is secure but not overly tight to allow for flexibility and room to adjust the pile height.
- Continue knotting: Move to the next pair of warp threads and repeat the process, creating a knot with the same yarn color. As you progress, push each knot up against the previous ones to create a tightly woven surface. Remember to maintain an even tension throughout.
- Introduce new yarn colors: If your design requires multiple colors, introduce them as needed. Finish each yarn color by trimming the excess length with a sharp pair of scissors, leaving a small tail to secure later.
Starting the knotting process can be both exciting and challenging. Remember to take your time, focus on creating secure knots, and maintain consistency in tension and spacing. With practice, you’ll gain confidence and see your rug design come to life one knot at a time.
Creating the Design
One of the most exciting aspects of hand knotting a rug is the opportunity to unleash your creativity and bring your design to life. Whether you’re following a predefined pattern or creating your own unique design, here are some essential steps to help you create a stunning rug design:
- Plan your design: Before you start knotting, spend some time planning your design. Consider the overall layout, motifs, and shapes you want to incorporate. Sketch out the design on paper or use design software to visualize and refine your ideas.
- Choose the knotting technique: There are various knotting techniques you can use, such as the Persian knot (Senneh knot) or the Turkish knot (Ghiordes knot). Research different techniques and choose the one that works best for your design and desired outcome.
- Create a knotting guide: Depending on the complexity of your design, it may be helpful to create a knotting guide. This guide can be a chart or a diagram that maps out the specific colors and placement of each knot. It will serve as a reference and ensure consistency throughout the knotting process.
- Consider pile height: Determine the desired pile height for different sections of your design. You can vary the pile height to add texture and depth to your rug. Keep in mind that a longer pile height may require more yarn and time to complete.
- Incorporate texture and patterns: Play with different textures and patterns to add visual interest to your design. You can experiment with different yarn thicknesses or knotting techniques to create raised or textured areas. Incorporate motifs, borders, or geometric shapes to enhance the overall aesthetic.
- Embrace imperfections: Hand knotting a rug gives your design a unique character and charm. Embrace the minor irregularities and imperfections that come with handcrafting. They add an authentic and artistic touch to your finished rug.
Creating the design for your hand-knotted rug is a process that requires careful planning, creativity, and attention to detail. Whether you’re following a traditional pattern or exploring your own artistic vision, enjoy the journey of bringing your design to life with each knot you make.
Knotting Techniques
There are different knotting techniques available for hand knotting a rug, each with its own unique characteristics and methods. Understanding these knotting techniques will help you create the desired texture, pattern, and durability in your rug. Here are some commonly used knotting techniques:
- Persian Knot (Senneh Knot): The Persian knot is one of the most widely used knotting techniques in rug making. In this technique, the yarn is wrapped around two adjacent warp threads and then pulled through the center, creating a single knot. The Persian knot allows for a greater density of knots and results in a more intricate and detailed pattern. It is known for producing a flexible and durable rug.
- Turkish Knot (Ghiordes Knot): The Turkish knot is another popular knotting technique. Similar to the Persian knot, it involves wrapping the yarn around two adjacent warp threads. However, in the Turkish knot, the yarn is pulled between the two warp threads, creating a symmetrical knot with equal projections on both sides. The Turkish knot is known for producing a dense, sturdy, and highly durable rug.
- Jufti Knot: The Jufti knot is a variation of the Persian knot. In this technique, instead of wrapping the yarn around each individual warp thread, the yarn is wrapped around pairs of warp threads. This technique allows for faster weaving, but the rug may be less durable and have a looser texture compared to rugs made with Persian or Turkish knots.
- Tibetan Knot: The Tibetan knot is a technique commonly used in Tibetan rug making. It involves wrapping the yarn around a single warp thread and then looping it back through, creating a firm and dense knot. The Tibetan knot is known for producing rugs with a rich texture and a unique pile structure.
- Flat Weave Knot: The flat weave knot is a technique used to create flat-woven rugs, such as kilims or dhurries. Rather than creating individual knots, the weft threads are woven directly in between the warp threads, creating a flat and reversible design. Flat weave rugs are lightweight, versatile, and often feature intricate geometric patterns.
Understanding these knotting techniques will allow you to choose the most suitable method for your desired rug design. Experimenting with different techniques can lead to unique and visually appealing results. Remember to practice and refine your skills to achieve the best outcomes in your hand-knotted rugs.
Finishing the Edges
After completing the knotting process, it’s important to properly finish the edges of your hand-knotted rug. Finishing the edges not only adds a polished and professional look to the rug but also helps to protect the knots and increase the longevity of the rug. Here are some common techniques for finishing the edges:
- Selvage Binding: Selvage binding is a traditional technique that involves folding and securing the edges of the rug with a sturdy binding material. This can be done using a sewing machine or by hand stitching. Selvage binding not only strengthens the edges but also provides a decorative border that enhances the overall appearance of the rug.
- Whip Stitching: Whip stitching is a simple and effective way to finish the edges of a hand-knotted rug. Using a strong thread or yarn, create a continuous whip stitch along the edge of the rug, catching the warp threads and concealing them. This technique provides a clean edge and prevents the warp threads from fraying.
- Overcasting: Overcasting is similar to whip stitching but involves wrapping the yarn or thread around the edges of the rug in a continuous manner. This technique creates a secure and neat edge while also allowing for more flexibility and adjustment in the finish. Overcasting can be done by hand or with a sewing machine.
- Fringing: Fringing is a classic and decorative way to finish the edges of a rug. It involves leaving a portion of the warp threads exposed and untied at the edge, creating a decorative fringe effect. The fringe can be left as is or braided, knotted, or tasseled for added visual interest.
- Binding Tape: Another option for finishing the edges is to use binding tape. This is a pre-made tape that is stitched or glued to the edges of the rug to provide a clean, uniform finish. Binding tape comes in various colors and materials, allowing you to customize the look of your rug’s edges.
Choose the finishing technique that best suits your rug design, style, and personal preference. Consider the durability, appearance, and overall aesthetic you want to achieve. Properly finishing the edges of your hand-knotted rug not only completes the look of your masterpiece but also adds to its durability and longevity.
Removing the Rug from the LoomOnce you have completed the knotting process and finished the edges, it’s time to remove the rug from the loom. This step requires careful attention to ensure that the rug remains intact and undamaged. Here’s how to safely remove the rug from the loom:
- Prepare the workspace: Clear a clean, spacious area where you can lay out the rug after removing it from the loom. This will ensure that the rug remains flat and protected during the removal process.
- Loosen the tension: Start by releasing the tension of the warp threads on the loom. Gradually loosen the tension, working from one end to the other. This will allow the rug to relax and make it easier to remove from the loom.
- Cut the warp threads: Carefully cut the warp threads at one end of the rug, making sure not to cut any of the knots. Use sharp scissors or a knife for a clean and precise cut. Leave enough length for securing the knots later.
- Roll the rug off the loom: Once the warp threads are cut, gently roll the rug off the loom, moving from one end to the other. Take your time to ensure that the rug is rolled evenly and without any creases or folds.
- Inspect for any adjustments: As you remove the rug from the loom, inspect it for any adjustments or repairs that may be necessary. Look for any loose knots, uneven rows, or imperfections that need to be addressed before proceeding to the next steps.
- Place the rug on a clean surface: Lay the rug out on a clean, flat surface, ensuring that it remains smooth and free from any obstructions or debris. Smooth out any wrinkles or folds gently by hand.
Removing the rug from the loom requires patience and attention to detail. By following these steps carefully, you can safely and successfully remove the rug, ready to move on to the next stages of finishing and showcasing your hand-knotted masterpiece.
Trimming and Shearing the Pile
Once the rug has been removed from the loom and laid out on a clean surface, the next step is to trim and shear the pile. Trimming and shearing the pile is an essential part of the rug-making process as it helps to achieve a uniform and finished look. Here’s how to trim and shear the pile of your hand-knotted rug:
- Inspect the rug: Before you begin trimming and shearing, inspect the rug carefully. Look for any uneven areas, loose threads, or imperfections that need to be addressed. Take note of any spots that may require special attention during the trimming process.
- Secure the rug: To ensure stability during the trimming process, secure the rug to keep it in place. You can use weights or clamps to hold down the edges or enlist the help of a partner to hold the rug taut.
- Trim the excess: Using sharp scissors or a carpet knife, carefully trim any excess pile or loose threads from the surface of the rug. Take your time and work slowly, making small cuts to ensure precision. Be cautious not to cut into the foundation threads or warp threads.
- Shear the pile: After trimming the excess, you may choose to shear the pile for a more uniform finish. If your rug requires a shorter and smoother pile, use electric shears or a hand-held shearing tool to carefully shave the surface of the rug. Work in one direction, making light and even passes across the entire rug. Keep checking the rug’s appearance and adjust the shearing as needed.
- Test the shearing: Periodically test the shearing by running your hand over the surface of the rug. This will help you gauge the desired pile height and ensure consistency throughout. Keep in mind the intended appearance and purpose of the rug as you adjust the shearing process.
- Remove any loose fibers: Once the shearing is complete, gently brush or vacuum the rug to remove any loose fibers or debris. This will give the rug a clean and polished finish.
Trimming and shearing the pile of your hand-knotted rug is a meticulous process that requires patience and attention to detail. Take your time, work carefully, and periodically step back to assess the rug’s overall appearance. By following these steps, you can achieve a beautifully finished rug that showcases the intricate knotting and design.
Securing the Knots
Securing the knots is a crucial step in the hand-knotting process as it ensures the longevity and durability of your rug. Properly securing the knots will prevent them from unraveling and help maintain the integrity of your rug over time. Here’s how to secure the knots:
- Inspect the knots: Before you proceed with securing the knots, carefully inspect each knot along the entire surface of the rug. Look for any loose or weak knots that may need reinforcement or repair.
- Reinforce loose knots: If you find any loose knots, re-tie them using a sturdy thread or yarn. Apply a small amount of fabric glue or adhesive to the base of the loose knot before retying it. This will help secure the knot and prevent it from loosening again in the future.
- Trim excess yarn: Once all the loose knots are repaired or reinforced, trim any excess yarn or thread that protrudes from the back of the rug. Use sharp scissors to carefully cut the excess, making sure not to cut into the knots or the foundation threads of the rug.
- Apply a latex backing: To further secure the knots and reinforce the rug, you may choose to apply a latex backing. Latex backing is a liquid adhesive that can be applied to the back of the rug. It provides additional support and stability to the knots, preventing them from unraveling. Follow the manufacturer’s instructions for applying the latex backing and allow sufficient drying time.
- Finish the back of the rug: Once the latex backing is dry, finish the back of the rug with a woven rug backing or fabric lining. This will protect the knots and provide a clean and professional finish. Secure the backing or lining using fabric glue or by stitching it along the edges.
- Bind the edges: After securing the knots and finishing the back of the rug, you may consider binding the edges for extra reinforcement and a polished look. Use binding tape, fringe, or a decorative edge technique to give your rug a finished and refined appearance.
Securing the knots is an important step in completing your hand-knotted rug. By carefully inspecting and reinforcing any loose knots, trimming excess yarn, applying a latex backing, and finishing the back and edges of the rug, you ensure its longevity and enhance its overall quality.
Cleaning and Maintaining the Rug
Proper cleaning and maintenance are essential to keep your hand-knotted rug looking beautiful and preserving its quality for years to come. Regular care will help prevent dirt accumulation, maintain the rug’s appearance, and extend its lifespan. Here are some tips for cleaning and maintaining your hand-knotted rug:
- Vacuum regularly: Regular vacuuming is crucial to remove dirt, dust, and debris from the surface of the rug. Use a vacuum cleaner with a beater bar or brush attachment and gently run it over the rug, following the direction of the pile. Avoid using excessive force or vacuuming the fringe area.
- Rotate the rug: To ensure even wear, rotate the rug periodically. This will help prevent specific areas from experiencing excessive foot traffic and wear. Aim to rotate the rug every 6 to 12 months, or more frequently for high-traffic areas.
- Spot clean spills: Tend to spills and stains as soon as possible to prevent them from setting into the fibers. Blot the affected area with a clean cloth or paper towel, avoiding rubbing, which may spread the stain. For stubborn stains, consult a professional rug cleaner.
- Avoid direct sunlight: Prolonged exposure to direct sunlight can cause fading and damage to the rug’s colors. Place the rug in areas where it is protected from direct sunlight or consider using window treatments to filter the UV rays.
- Use rug pads: Place a high-quality rug pad beneath the rug to provide cushioning, prevent slipping, and protect the rug’s integrity. Rug pads also help to enhance airflow, which can minimize the risk of mildew or moisture-related issues.
- Professional cleaning: Every few years, consider having your hand-knotted rug professionally cleaned. Professional rug cleaners have expertise in dealing with delicate rugs and can provide a deep cleaning that removes embedded dirt and restores the rug’s vibrancy.
- Avoid heavy furniture: When placing furniture on the rug, use furniture pads or coasters to distribute the weight evenly. This will help prevent permanent indentations and strain on the rug fibers.
- Inspect for damage: Regularly inspect the rug for any signs of damage such as loose threads, unraveling edges, or moth infestation. Address any concerns promptly to prevent further damage and maintain the rug’s condition.
- Store properly: If you need to store the rug, ensure it is clean and completely dry before folding and rolling it. Avoid storing in damp or humid areas. Ideally, use acid-free paper to cushion and protect the rug from creases, and store it in a breathable, dry environment.
By following these cleaning and maintenance tips, you can enjoy your hand-knotted rug for many years to come. Regular care and attention will preserve its beauty, durability, and value, allowing you to continue appreciating the craftsmanship and artistry of your rug.