
Materials Needed
Before diving into the process of making a rag rug weaving loom, gather the following materials:
- Wooden board or plank: Choose a sturdy and durable piece of wood that is at least 1 inch thick and 2 feet long.
- Table saw or hand saw: This will be used to cut the wooden board to the desired size.
- Sandpaper: To smooth out the rough edges of the wooden frame.
- Power drill: Required for making holes in the frame to insert the pegs.
- Wooden dowels: These will serve as the pegs on the loom, so make sure they have a diameter of at least 1/2 inch.
- Warping yarn: Choose a strong, sturdy yarn in a color that complements your rag strips.
- Fabric or old t-shirts: These will be cut into strips and used as the weft threads for weaving the rug.
- Scissors: To cut the fabric or t-shirts into strips.
- Measuring tape or ruler: Useful for measuring the size of the frame and ensuring even spacing between the pegs.
- Cotton twine or string: Used for tying off the ends of the rug and securing the warp threads.
- Optional: Loom stand or clamps: These can be helpful for stabilizing the loom during the weaving process.
It is crucial to gather all the necessary materials before starting to ensure a smooth and efficient weaving experience. Having everything on hand will prevent interruptions and allow you to focus on creating a beautiful rag rug.
Step 1: Choosing Your Loom Size
When it comes to making a rag rug weaving loom, the size of your loom is an important decision. Consider the following factors to determine the right size for your project:
- Space: Assess the available space where you plan to set up your loom. Ensure that the dimensions of the loom will fit comfortably in the designated area.
- Rug size: Determine the size of the rug you want to create. If you’re aiming for a smaller rug, a loom frame that measures around 2 feet by 3 feet would be sufficient. For larger rugs, you may need a loom that measures 3 feet by 4 feet or more.
- Portability: If you anticipate moving or transporting your loom frequently, consider a smaller or collapsible loom design that is easier to handle.
- Customization: Depending on your preferences, you can choose a loom size that allows for various weaving techniques and design possibilities. A larger loom offers more flexibility and creative freedom when it comes to patterns and color blending.
Remember that the size of your loom will determine the maximum dimensions of the rugs you can create. Take your time to evaluate your space, project requirements, and personal preferences before proceeding with the construction of your loom.
Once you have determined the ideal size for your loom, you can move on to the next step, which involves cutting the loom frame to the desired dimensions.
Step 2: Cutting the Loom Frame
Now that you have decided on the size of your rag rug weaving loom, it’s time to cut the loom frame. Follow these steps:
- Measure and mark the desired dimensions on the wooden board or plank. Use a measuring tape or ruler to ensure accuracy.
- Secure the board firmly on a workbench or table. This will prevent it from moving while you cut it.
- Using a table saw or hand saw, carefully cut along the marked lines to create the frame of the loom. Take your time and make smooth, even cuts to ensure a precise result.
- Once the cuts are complete, double-check the dimensions to ensure they match your intended size. Adjust if necessary.
It is essential to handle the saw with caution during this step to avoid any accidents. If you are new to using power tools, consider seeking guidance or assistance from someone with experience.
Once the loom frame is cut to the desired size, you can proceed to the next step, which involves sanding the frame to smooth out any rough edges and create a comfortable weaving surface.
Step 3: Sanding the Loom Frame
After cutting the loom frame for your rag rug weaving project, it is important to sand the frame to create a smooth surface. Follow these steps to ensure a comfortable and enjoyable weaving experience:
- Start by selecting a fine-grit sandpaper, such as 120 or 150 grit. This will help in removing any rough edges or splinters from the wooden frame.
- Hold the sandpaper securely and begin rubbing it along the edges of the frame. Apply gentle pressure and move the sandpaper in smooth, circular motions.
- Continue sanding all sides of the frame, paying extra attention to the corners and edges. Regularly check the frame’s surface for any remaining rough spots and continue sanding until the entire frame feels smooth to the touch.
- Once the sanding process is complete, use a clean cloth to remove any dust or debris from the frame. Make sure to wipe it thoroughly so that no particles interfere with the weaving process.
Sanding the loom frame not only ensures a more comfortable weaving experience but also prevents any potential snags or damage to the fabric strips used for weaving. Taking the time to smooth out the frame’s edges will contribute to the overall quality of your finished rag rug.
With the loom frame now sanded and ready for use, you can proceed to the next step, which involves marking and drilling holes for the pegs that will hold the warp threads in place.
Step 4: Marking and Drilling Holes for Pegs
With the loom frame sanded and prepared, it’s time to mark and drill holes for the pegs that will hold the warp threads in place. Follow these steps:
- Using a measuring tape or ruler, mark evenly spaced intervals along the top and bottom edges of the loom frame. The spacing will depend on the desired density of your warp threads, but a typical distance is around 1 inch between each peg.
- Once the intervals are marked, transfer the markings to the sides of the frame as well. This will ensure that the pegs are aligned properly and the warp threads are evenly tensioned.
- Secure the loom frame in place and use a power drill with a drill bit that matches the diameter of your wooden pegs. Start drilling at each marked point on the frame, making sure to keep the drill perpendicular to the surface.
- Continue drilling holes along both edges of the frame until you have completed all the markings. Take your time and maintain a steady hand to ensure accurate and precise holes.
- After drilling the holes, check each one to ensure that there are no rough edges or splinters that could hinder the movement of the warp threads. If necessary, use sandpaper to smooth any imperfections.
Marking and drilling holes for the pegs is a critical step in creating a functional and sturdy loom for your rag rug weaving project. It allows for the proper alignment and tensioning of the warp threads, ultimately influencing the quality and durability of your finished rug.
With the holes drilled, it’s time to move on to the next step, where you’ll learn how to insert the pegs and prepare the loom for weaving.
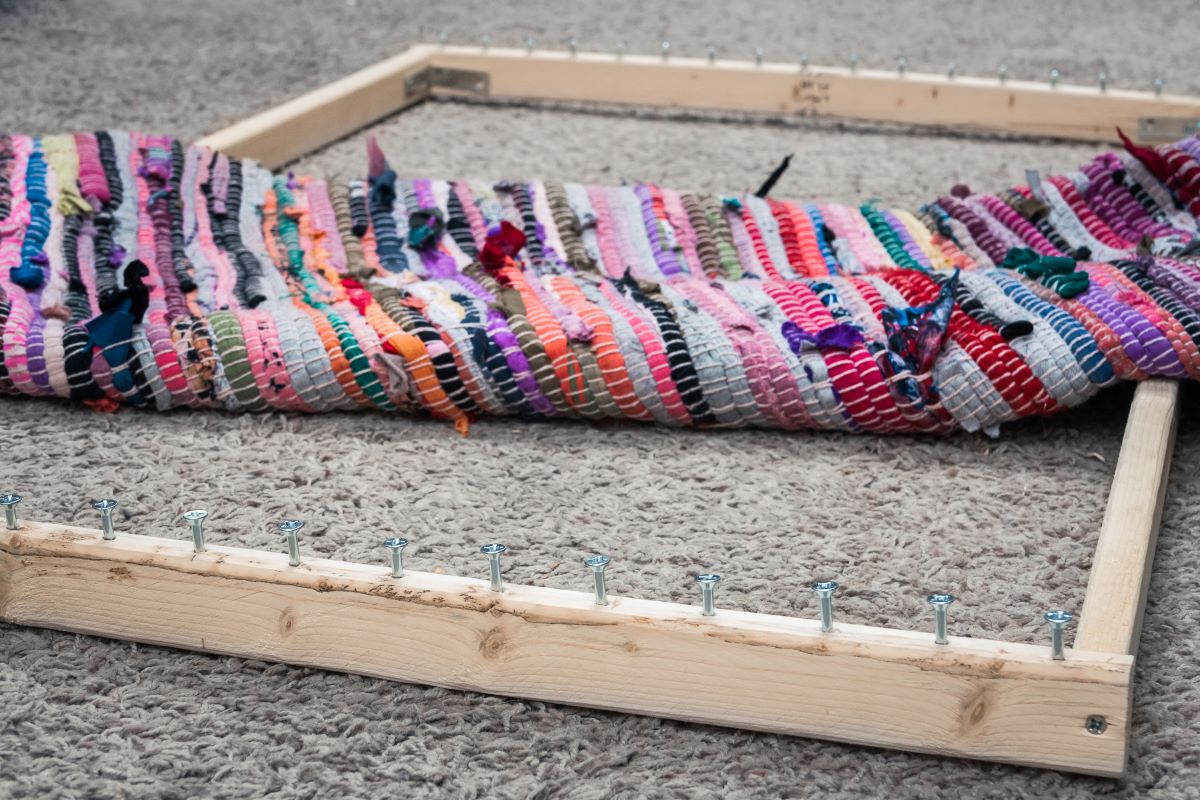
Step 5: Inserting Pegs for Warp Threads
With the holes drilled in the loom frame, it’s time to insert the pegs that will hold the warp threads in place. Follow these steps to ensure a secure and stable foundation for your rag rug weaving:
- Inspect the wooden dowels or pegs to ensure they are smooth and free from any rough edges. Sand them if necessary to ensure a comfortable fit in the drilled holes.
- Starting at one end of the loom frame, insert a wooden peg into the first drilled hole. Push it in until it is securely fitted and does not move or wobble.
- Continue inserting pegs into each drilled hole along one side of the frame, maintaining an even spacing between them. Ensure that each peg is inserted to the same depth as the others to maintain consistent tension on the warp threads.
- Repeat the process on the opposite side of the frame, inserting pegs into the corresponding drilled holes.
- Once all the pegs are inserted, make sure they are aligned and straight. Adjust as needed, ensuring they are evenly spaced and parallel to each other. This will ensure an even tension for the warp threads during weaving.
The inserted pegs serve as anchors for the warp threads, keeping them taut and in place while you weave your rag rug. It is important to pay attention to the alignment and spacing of the pegs to achieve consistent tension throughout your weaving project.
With the pegs securely in place, you can move on to the next step, which involves attaching the warping yarn to the loom to create the foundation for your rug.
Step 6: Attaching Warping Yarn to Loom
Now that the pegs are securely in place, it’s time to attach the warping yarn to the loom. The warping yarn will serve as the foundation for your rug, holding the warp threads in tension as you weave. Follow these steps:
- Choose a sturdy and durable yarn for the warping process. This yarn should be able to withstand the tension applied during weaving. Measure a generous length of yarn, ensuring it is long enough to span the width of your loom frame.
- Starting at one end of the loom, tie one end of the yarn to the first peg on the top or bottom row, whichever is more convenient for you. Make sure the yarn is tightly secured to the peg, ensuring it won’t come loose during the weaving process.
- Bring the yarn across the width of the loom, passing it around the next peg on the opposite row. Continue this process, alternating between the top and bottom row, until you reach the other end of the loom.
- Secure the other end of the yarn to the last peg, making sure it is tightly tied and won’t slip or loosen during weaving. Trim any excess yarn, leaving a small tail for now.
- Once the yarn is secured, gently tug on it to create tension throughout the loom. The yarn should be taut, but not excessively tight, ensuring that it can support the warp threads without sagging.
By attaching the warping yarn to the loom, you are creating a strong foundation for your rug weaving. The tautness of the yarn will ensure that the warp threads are evenly tensioned and provide stability as you weave the rag strips.
With the warping yarn in place, you are now ready to move on to the exciting step of creating the base of your rag rug.
Step 7: Creating the Base of the Rug
With the warping yarn securely attached to the loom, it’s time to begin creating the base of your rag rug. This step involves weaving the initial rows of warp threads to establish the foundation for the rug. Follow these steps:
- Take a strip of fabric or an old t-shirt and fold it in half lengthwise. This will create a loop at one end, which will be used for weaving.
- Insert the looped end of the fabric strip through the space between the first and second warp thread from the bottom, and then pull it through the loop to create a simple knot. This will secure the fabric strip to the warp threads.
- Pull the fabric strip up and behind the second warp thread, then bring it down and behind the first warp thread. This creates a “U” shape with the fabric strip.
- Repeat the process with additional fabric strips, alternating between going up and down the warp threads. This will create a simple over-under weaving pattern, forming the base of your rug.
- Continue weaving the fabric strips in this manner until you reach the desired width for your rug. Ensure the fabric strips are packed tightly against each other to create a solid base.
- As you reach the end of one fabric strip, simply overlap it with the next strip and continue weaving. This will create a seamless transition between strips.
Remember to maintain a consistent tension on the fabric strips as you weave to ensure an even and sturdy base. Take your time and enjoy the rhythmic process of weaving the rug’s foundation.
Creating the base of the rug is an exciting and satisfying step. It sets the stage for the next phase of weaving, where you will add the rag strips to create the colorful and textured patterns of your rug.
Step 8: Weaving the Rag Strips
With the base of your rag rug established, it’s time to bring in the colorful and textured rag strips for weaving. Follow these steps to weave the rag strips into your rug:
- Select a rag strip of your choice, whether it’s a cut piece of fabric or an old t-shirt strip. Fold one end of the strip in half to create a loop.
- Insert the looped end of the rag strip through the space between the first and second warp threads from the bottom. Pull the strip through the loop to create a knot, securing it to the warp threads.
- Bring the rag strip up and over the first warp thread, then go under the second warp thread. Repeat this pattern, alternating between going over and under successive warp threads.
- Continue weaving the rag strip back and forth, using the over-under pattern, until you reach the end of the row. Push the woven strip tightly against the previous row to ensure a solid and compact weave.
- If your rag strip is not long enough to complete the row, simply overlap it with the next strip and continue weaving. Ensure the overlapping area is secure and hidden within the weave.
- Repeat the weaving process with additional rag strips, using a variety of colors and textures to create an interesting and visually appealing pattern.
Experiment with different weaving techniques, such as adding in new colors, creating stripes, or incorporating different textures to add depth and visual interest to your rug.
As you continue weaving, periodically check the tension of the rug to ensure it is even throughout. Adjust the tightness of the warp threads if needed, making sure the fabric strips are snugly woven into place.
Enjoy the creative process of weaving the rag strips, watching your rug come to life with every row you complete.
Step 9: Adding New Rag Strips
As you continue weaving your rag rug, it’s important to know how to add new rag strips seamlessly. Here’s a step-by-step guide to help you seamlessly incorporate new rag strips into your weaving:
- When you reach the end of a rag strip, take a new strip and fold one end to create a loop, similar to the previous strips.
- Insert the looped end of the new rag strip through the last warp thread from the previous row, close to where the previous strip ended.
- Pull the loop through the warp thread and create a knot to secure the new strip in place.
- Continue weaving the new rag strip, following the same over-under pattern as before, seamlessly blending it with the previous strips.
- Make sure to check the tension of the rug as you weave in the new strip, ensuring a consistent and tight weave.
- Once the new rag strip is fully woven, trim any excess length if needed, making sure it seamlessly merges with the rest of the rug.
- Repeat this process whenever you run out of a rag strip, adding new ones as needed to complete your desired design or pattern.
By adding new rag strips in this manner, you can maintain the continuity of your weaving and create a visually cohesive rug. It’s a simple technique that allows you to expand your design possibilities and incorporate a variety of colors and textures.
Remember to handle the rag strips with care and maintain an even tension as you weave. This will ensure that your finished rug is tightly woven and structurally sound.
Continue adding new rag strips until you’ve reached the desired size of your rug. You’re now ready to move on to the final step of finishing off your rag rug.
Step 10: Finishing Off the Rug
After all the weaving is complete, it’s time to finish off your rag rug. Follow these steps to give your rug a polished and professional look:
- Weave a few more rows in the base pattern to create a border at the ends of the rug. This will help secure the loose ends and prevent unraveling.
- Trim any excess fabric or t-shirt strips that extend beyond the border rows, making sure all strands are neatly trimmed and hidden within the weave.
- At both ends of the rug, tie off the warp threads by knotting them together in pairs. This will strengthen the rug’s edges and prevent them from coming undone.
- Once all the warp threads are securely tied off, remove the rug from the loom. Carefully slide the rug off the pegs, making sure not to disturb the weave.
- Inspect the rug for any loose ends or uneven areas. Use a tapestry needle or crochet hook to tuck in any loose threads or weave them back into the rug for a smooth and neat finish.
- Give the rug a final gentle shake or light beating to remove any loose fibers or debris.
With these finishing touches, your rag rug is now complete. Take a step back and admire your handiwork!
Now you can find the perfect spot to showcase your handmade rug, adding a cozy and decorative touch to any room. Enjoy the warmth, texture, and unique charm of your finished rag rug.
Tips and Tricks
As you embark on the journey of making a rag rug weaving loom, consider these helpful tips and tricks to enhance your experience and make the process more enjoyable:
- Prep and organize: Before starting, gather all materials and have them organized and easily accessible. This will save you time and prevent unnecessary interruptions during the weaving process.
- Experiment with color and texture: Don’t be afraid to mix and match different colors and textures of fabric strips to create unique and visually interesting patterns in your rug.
- Save scraps: Instead of discarding fabric scraps, save them for future rag rug projects. They can be repurposed and woven into smaller rugs or used as accents in larger ones.
- Maintain consistent tension: Ensure that the warp threads and weft strips are evenly tensioned throughout the weaving process. This will create a cohesive and sturdy rug.
- Take breaks: Weaving a rug is a labor-intensive process, so remember to take breaks to rest your hands and eyes. This will help prevent fatigue and ensure the quality of your work.
- Experiment with patterns: Explore different patterns by varying the arrangement and placement of the weft strips. This can add a dynamic and artistic touch to your rug.
- Customize your loom: Feel free to modify your loom according to your needs and preferences. Add extra pegs, adjust the size, or even create a collapsible design for easier storage.
- Practice self-care: Engage in proper posture, take breaks to stretch your body, and stay hydrated while working on your rug. This will ensure your comfort and well-being throughout the process.
Remember, making a rag rug is a creative and fulfilling endeavor. Embrace the process and allow yourself to explore your own unique style and techniques. Enjoy the therapeutic nature of weaving as you bring your vision to life.
Frequently Asked Questions (FAQs)
Here are some commonly asked questions about making a rag rug weaving loom:
Q: How long does it take to make a rag rug weaving loom?
A: The time it takes to make a loom depends on various factors, including the complexity of the design and your skill level. On average, it can take a few hours to a full day to construct a basic loom.
Q: Can I use materials other than fabric strips for weaving?
A: Yes, you can get creative with your materials. In addition to fabric strips, you can use yarn, ribbon, or even natural fibers like jute or twine to add texture and variety to your rug.
Q: How do I clean a rag rug?
A: To clean your rag rug, shake it outside to remove loose debris. For spot cleaning, use a gentle detergent and cold water. Avoid using bleach or harsh chemicals, as they can damage the fabric. In some cases, you may be able to hand wash your rug or have it professionally cleaned.
Q: Can I weave different patterns or designs with a rag rug loom?
A: Absolutely! Rag rug looms offer endless possibilities for creating unique patterns and designs. You can experiment with color combinations, stripe patterns, or even incorporate textured elements for added visual interest.
Q: How do I secure the ends of my rug?
A: To secure the ends of your rug, weave a few additional rows at each end in a border pattern. Then, tie off the warp threads in pairs and trim any excess fabric or t-shirt strips. This will create a neat and finished edge for your rug.
Q: Can I make a larger or smaller rug with the same loom?
A: The size of the rug you can make with a loom depends on its dimensions. Larger loom frames can accommodate larger rugs, while smaller frames are suitable for smaller rugs or wall hangings. If you want to change the size of your rugs, you may need to adjust the dimensions of your loom accordingly.
Hopefully, these frequently asked questions have provided answers to some of your inquiries. If you have any additional questions, feel free to reach out for further assistance!