
Choosing the Right Type of Wool
When it comes to making a wool rug by hand, one of the most important considerations is choosing the right type of wool. The type of wool you select will greatly impact the final appearance, durability, and feel of the rug. Here are some factors to consider when making your choice:
- Fiber Type: Wool rugs are typically made from either natural or synthetic fibers. Natural fibers, such as sheep’s wool, provide a luxurious and soft texture while synthetic fibers, such as nylon or acrylic, offer durability and ease of maintenance.
- Wool Grade: Different grades of wool are available, ranging from fine to coarse. Finer wool is softer and more suitable for rugs that will be placed in high-traffic areas or used as decorative pieces. Coarser wool, on the other hand, is ideal for durable rugs that can withstand heavy use.
- Breeds: Different sheep breeds produce wool with varying characteristics. Merino wool, for example, is known for its softness and excellent insulation properties. Other popular breeds include Shetland, Icelandic, and Romney. Consider the specific qualities you want in your rug and choose a breed that aligns with those preferences.
- Color: Wool is available in a wide range of natural colors, as well as dyed options. Think about the color scheme you want for your rug and select wool that complements or enhances your existing decor. Keep in mind that natural-colored wool tends to be more resistant to fading over time.
- Texture: The texture of the wool will greatly contribute to the overall look and feel of the rug. Some wool types have a smooth and silky texture, while others may be more textured or have a slightly coarse feel. Consider the desired texture based on your personal preference and the intended use of the rug.
By carefully considering these factors, you can ensure that you choose the right type of wool for your handmade rug. It’s important to take your time in this step, as the quality of the wool will directly impact the final result and the longevity of your rug. Once you have selected the perfect wool, you can move on to the next step of the rug-making process.
Selecting the Colors and Patterns
A crucial aspect of making a wool rug by hand is selecting the colors and patterns that will bring your creation to life. The right combination of colors and patterns can turn a simple rug into a stunning statement piece. Here are some tips to guide you through the process:
- Consider the Room: Think about the room where the rug will be placed. Consider the existing color scheme and the overall ambiance you want to create. If the room has neutral tones, a bold and vibrant rug can add a pop of color. If the room already has a lot of vibrant elements, a more subdued and complementary rug may be a better choice.
- Balance and Contrast: When selecting colors and patterns, strive for a balance. A rug with too many busy patterns or clashing colors can overwhelm the space. On the other hand, a rug that is too plain or lacks contrast may not make a strong visual impact. Consider the size and scale of the room to ensure the rug fits harmoniously.
- Personal Style and Taste: Your rug should reflect your personal style and taste. Consider your preferences for colors and patterns and choose something that resonates with you. Don’t be afraid to think outside the box and experiment with unconventional combinations. The rug is a reflection of your creativity and individuality.
- Traditional or Modern: Decide whether you want to go for a traditional or modern look. Traditional patterns, such as floral motifs or geometric designs, can add a timeless touch to your rug. Modern patterns, on the other hand, may feature abstract shapes or contemporary designs. Consider the overall style of your home and choose accordingly.
- Sample Swatches: Before making a final decision, it can be helpful to obtain sample swatches of different colored yarns. Place these swatches in the room where the rug will be placed and observe how the colors interact with the surroundings. This will give you a better idea of how the final rug will look and help you make an informed choice.
Choosing the right colors and patterns for your wool rug is an exciting step in the rug-making process. Take your time, consider the factors mentioned above, and trust your instincts. Remember, this is your opportunity to create a truly unique and visually stunning rug that will add warmth and personality to your space.
Gathering the Necessary Materials and Tools
Before you can start making a wool rug by hand, it’s important to gather all the necessary materials and tools. Having everything at hand will make the process more seamless and enjoyable. Here’s a list of essential items you’ll need:
- Wool Yarn: Choose high-quality wool yarn in the colors and textures you desire for your rug. Consider the length and weight of the yarn based on the size of rug you plan to create.
- Backing Material: The backing material provides structure and stability to the rug. Common options include hessian or linen fabric, which can be cut to the desired size.
- Loom: A loom is a framework that holds the warp threads in place while you weave the rug. You can choose from various types of looms, such as lap looms, rigid heddle looms, or floor looms, depending on your preference and budget.
- Shuttle or Rag Rug Tool: A shuttle or rag rug tool will be used to pass the weft threads through the warp threads during the weaving process. These tools help to ensure a consistent and even weave.
- Threads and Needles: You’ll need threads and needles for tasks such as attaching the backing material, securing the edges, and adding any decorative elements like fringes.
- Scissors: Good scissors are essential for cutting the yarn and trimming any excess fabric or threads.
- Markers or Pins: Markers or pins can be used to mark sections or patterns on the loom, helping you keep track of the design as you weave.
- Measuring Tape: A measuring tape will come in handy for ensuring accurate dimensions and keeping your rug symmetrical.
- Books or Online Resources: Look for books or online resources that provide instructions and guidance on hand-weaving techniques specific to wool rugs. These resources can be valuable references throughout the rug-making process.
Having all the necessary materials and tools ready before you start ensures a smooth and efficient rug-making experience. Consider the quality and suitability of each item to ensure the best results. With everything prepared, you’re now ready to dive into the exciting world of hand-weaving and create your own beautiful wool rug.
Getting Started with Hand Loom Weaving
Hand loom weaving is the technique used to create beautiful wool rugs. Whether you’re a seasoned weaver or a beginner, here are the steps to help you get started with hand loom weaving:
- Prepare the Loom: Set up your loom according to the manufacturer’s instructions. Attach the warp threads vertically, ensuring they are evenly spaced and taut. The warp threads will create the foundation of your rug.
- Thread the Shuttle: Take your shuttle or rag rug tool and thread it with the yarn that will be used for the weft. The weft runs horizontally across the warp threads and is woven over and under them to create the pattern.
- Create the Header Row: Start by weaving a header row, which helps to secure the warp threads in place. Weave the weft yarn across the loom, going over and under each warp thread. Repeat this process for the entire width of the loom.
- Weaving the Rug: Once the header row is complete, you can begin weaving the rug. Use the desired pattern and colors of yarn to create the design. Pass the shuttle or rag rug tool through the warp threads, going over and under in a consistent pattern. Use a beating tool or your fingers to push each weft row tightly against the previous rows for a sturdy weave.
- Changing Colors or Patterns: If you want to change colors or patterns within the rug, simply cut the yarn and tie a new color or pattern in its place. Weave the new yarn in the desired pattern, making sure to secure the loose ends for a neat finish.
- Finishing the Weave: When you have reached the desired length for your rug, weave a final header row to secure the weft threads. Cut the weft yarn, leaving enough length for tying and securing the loose ends.
- Finishing the Edges: Once the weaving is complete, trim any excess fabric or threads from the edges of your rug. Use a needle and thread to stitch the edges to prevent fraying and give your rug a polished look.
- Removing from the Loom: Carefully remove the completed rug from the loom, ensuring that all warp threads are still intact. Cut the warp threads at the top of the loom, leaving enough length for tying knots or adding fringe.
- Final Touches: With the rug off the loom, you can add any desired finishing touches, such as fringe or tassels. This will add texture and a decorative element to your handmade wool rug.
Hand loom weaving requires patience and practice. As you become more experienced, you’ll have the opportunity to experiment with different patterns, colors, and techniques to create unique and personalized rugs. Enjoy the process and let your creativity flourish as you weave your own beautiful wool rug.
Setting Up the Loom
Before you can start weaving your wool rug, it’s essential to properly set up your loom. The setup process may vary depending on the type of loom you have, but here are the general steps to guide you:
- Assemble the Loom: Follow the manufacturer’s instructions to assemble your loom. Ensure that all the parts are securely connected and the loom is stable. If necessary, tighten any bolts or screws to avoid any movement during weaving.
- Choose the Warp Length: Determine the length and width of your desired rug and calculate the amount of warp thread needed. Cut the warp thread to the appropriate length, ensuring you have extra length for tying knots and finishing the edges.
- Attach the Warp Thread: Tie one end of the warp thread to the bottom bars or pegs of the loom. Begin threading the warp thread through the loom in a continuous and even manner, keeping the tension consistent. Guide the thread through the appropriate slots or holes, depending on your loom’s design.
- Secure the Warp Threads: Once all the warp threads are threaded through the loom, secure the top ends. Depending on your loom, this may involve tying knots, looping the threads through additional pegs, or using clamp-like devices. Make sure the warp threads are evenly spaced and parallel to create an even weave on the rug.
- Tensioning the Warp: Proper tension is essential for an even and stable weave. Adjust the tension of the warp threads using the tensioning mechanisms provided with your loom. Ensure that the tension is balanced throughout the width of the rug, making any necessary adjustments as needed.
- Check the Loom Alignment: Take a moment to ensure that the loom is properly aligned. Check that all the warp threads are straight and parallel to each other, with no loose ends or crossed threads. This will help maintain an even tension and avoid any weaving issues.
- Thread the Heddles or Rigid Heddle: If your loom has heddles or a rigid heddle, thread the warp threads through them. This step is essential for creating the shed, which allows the weft thread to pass through easily during weaving.
- Thread the Reed: If your loom has a reed, thread the warp threads through the dents of the reed, evenly distributing them across the width of the rug. This step helps maintain the spacing and tension of the warp threads during weaving.
- Double-Check the Setup: Before starting to weave, double-check that everything is set up correctly. Ensure the tension is even, the warp threads are straight, and the shedding mechanism (if applicable) is functioning properly. Make any necessary adjustments to ensure a smooth weaving experience.
Setting up the loom correctly is crucial for a successful weaving process. Take your time to understand your specific loom’s instructions and make sure to follow them closely. With a properly set up loom, you’re now ready to dive into the weaving process and bring your wool rug to life.
Preparing the Wool for Weaving
Before you begin weaving your wool rug, it’s important to properly prepare the wool yarn. The preparation process ensures that the yarn is clean, smooth, and ready for weaving. Here are the steps to prepare your wool for weaving:
- Inspect and Sort: Start by inspecting the wool yarn to ensure it is free from any dirt, debris, or tangles. Sort the yarn by color or shade, organizing it for easy access during the weaving process.
- Wash or Clean: Depending on the type of wool yarn you have, you may need to wash or clean it before weaving. Follow the manufacturer’s instructions on how to properly wash or clean the yarn. This step will remove any oils, dyes, or residues present in the yarn.
- Dry Completely: After washing or cleaning, allow the wool yarn to dry completely. Hang it in a well-ventilated area or lay it flat on a clean surface. Ensure that it is fully dry before moving on to the next step.
- Wind into Balls or Skeins: Once the wool is dry, wind the yarn into balls or skeins for easy handling during weaving. You can use a yarn winder, a swift, or simply wind it by hand. Make sure the balls or skeins are secure, preventing tangles or snags during the weaving process.
- Test and Adjust the Thickness: Check the thickness and consistency of the yarn. Depending on the desired texture and density of your rug, you may need to adjust the thickness of the yarn. You can do this by combining multiple strands or splitting thicker yarn into thinner sections.
- Straighten and Align the Fibers: If you notice any fibers that are twisted or tangled, gently straighten and align them. This will ensure that the yarn glides smoothly through the warp threads during weaving, resulting in a neat and even weave.
- Organize and Label: Once your yarn is prepared, organize it by color or shade, keeping it easily accessible for your weaving project. Label the balls or skeins if needed, to help you remember which colors or patterns you plan to use.
- Keep the Yarn Dust-Free: To prevent your wool yarn from getting dusty or dirty during the weaving process, store it in a dust-free container or cover it with a clean cloth when not in use. This will help maintain the cleanliness and quality of the yarn.
By following these steps to prepare your wool yarn, you’ll ensure that it’s in the best possible condition for weaving. Taking the time to properly prepare the wool will result in a smoother weaving process and a high-quality finished rug.
Learning Basic Weaving Techniques
Learning the basic weaving techniques is essential to successfully create a wool rug by hand. These techniques form the foundation of your weaving skills and allow you to create various patterns and textures. Here are some key weaving techniques to get you started:
- Plain Weave: Plain weave, also known as tabby weave, is the simplest and most commonly used weaving technique. It involves weaving the weft thread over and under each warp thread in a consistent pattern. This creates a tight and even weave.
- Twining: Twining is a technique where two weft threads are twisted around adjacent warp threads. It creates a strong and durable weave, often used for the selvage edges of the rug. It can also be incorporated into the design for decorative purposes.
- Basketweave: Basketweave is a variation of the plain weave technique. Instead of weaving the weft thread over and under each warp thread, it alternates between weaving it over two and under two warp threads. This creates a checkerboard-like pattern, adding texture to the rug.
- Pile Weave: Pile weave involves creating loops or knots on the surface of the rug to add a plush and textured pile. One popular pile weaving technique is the “tufting” method, where loops are created using a special tufting tool. This technique can be used to create intricate patterns and designs on the rug.
- Inlay or Floats: Inlay or floats are decorative elements woven into the rug by floating additional yarn on the surface. This can be done by carrying the decorative yarn behind the ground weft threads and weaving it in at specific points. Inlay adds visual interest and can be used to create patterns or motifs.
- Pattern Weaving: Pattern weaving involves incorporating specific patterns or designs into your rug. It can be achieved by using different colored yarns, varying the density of the weft threads, or following a predetermined pattern chart. Experiment with different pattern weaving techniques to create unique and visually appealing rugs.
- Beat the Weft: After each row of weaving, use a beating tool or your fingers to firmly press the weft threads against the previous rows. This ensures a tight and secure weave, giving your rug stability and durability.
- Experiment and Explore: Don’t be afraid to experiment and explore different weaving techniques. Mix and match patterns, textures, and colors to create your own unique style. The more you practice and try new techniques, the more skilled you’ll become at weaving intricate and stunning wool rugs.
Learning these basic weaving techniques will provide a strong foundation for your rug-making journey. Practice them with patience and precision, and soon you’ll be able to create beautiful and intricate designs using different weaving techniques.
Creating Different Weave Patterns
One of the exciting aspects of making a wool rug by hand is the ability to create different weave patterns. By varying the way the weft threads intersect with the warp threads, you can achieve a wide range of patterns and textures. Here are some common weave patterns to explore:
- Herringbone: Herringbone weave creates a distinctive V-shaped pattern that resembles the bones of a fish. It is achieved by alternating the direction of the weft threads after weaving a few rows. This pattern adds visual interest and texture to your rug.
- Twill Weave: Twill weave creates diagonal lines on the surface of the rug. It involves weaving the weft thread over multiple warp threads and then under the next set of warp threads, creating a diagonal effect. Twill weave allows for a variety of patterns, such as houndstooth or chevron.
- Lace Weave: Lace weave incorporates open spaces between the woven threads, creating a delicate and airy pattern. This is achieved by skipping certain warp threads or using a finer weft thread. Lace weave adds a light and elegant touch to your rug.
- Jacquard Weave: Jacquard weave is a complex weaving technique that allows for intricate designs and patterns. It involves using a special loom or attachments that manipulate individual warp threads, enabling the creation of detailed motifs, images, and complex patterns.
- Stripes and Color Gradation: Experiment with creating stripes or color gradation in your rug by alternating different colored weft threads. This can be done by weaving smaller sections of different colors or gradually changing the colors as you weave each row. Stripes and color gradation add visual interest and can enhance the overall design of your rug.
- Textured Weave: Explore adding texture to your rug by incorporating techniques such as loops, loops, knots, or twists in the weft. These techniques create raised or three-dimensional elements on the rug’s surface, adding depth and tactile appeal.
- Experiment and Combine: Don’t hesitate to combine different weave patterns within your rug. Mix and match patterns to create unique designs or use different patterns for different sections of your rug. This allows you to showcase your creativity and create truly one-of-a-kind rugs.
Creating different weave patterns is a fantastic way to add visual interest and personality to your wool rug. Don’t be afraid to experiment and let your imagination run wild. The possibilities are endless, and each pattern you create will make your rug a unique work of art.
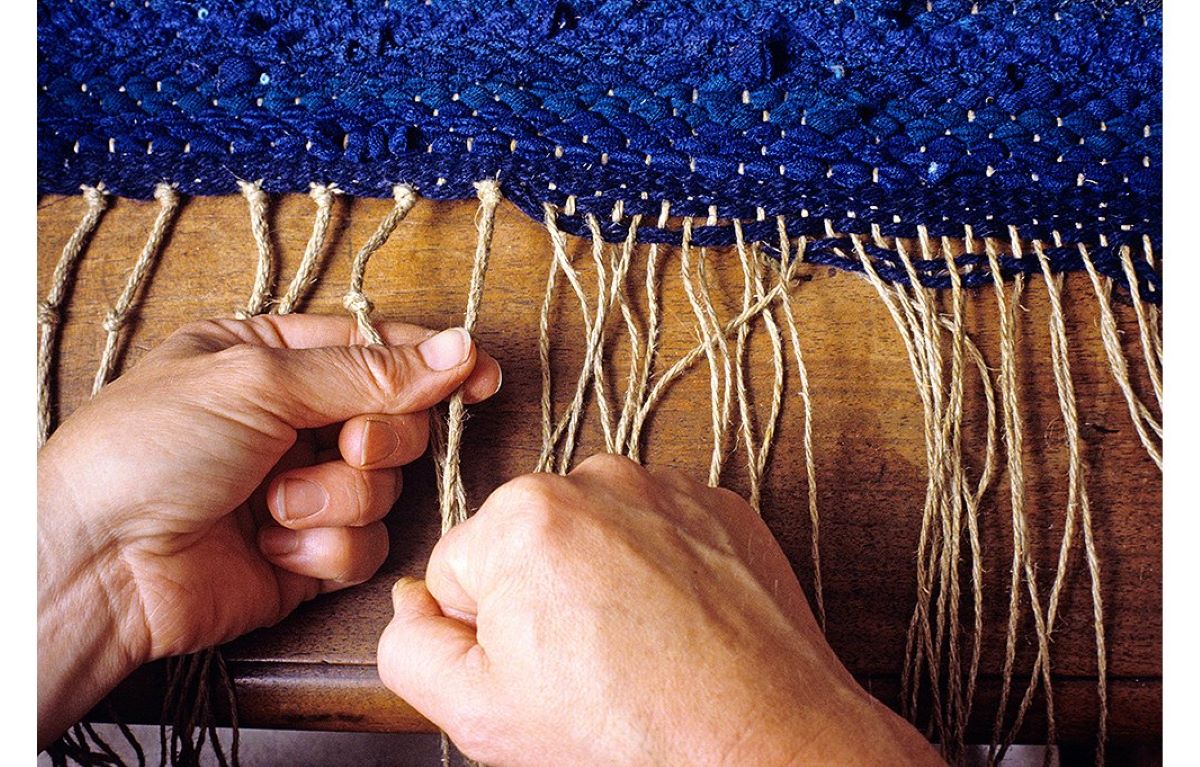
Adding Fringe or Tassels to the Rug
Adding fringe or tassels to your handmade wool rug is a wonderful way to accentuate its beauty and add a touch of elegance. The fringe or tassels not only enhance the overall aesthetic appeal but also provide a finished look to the edges of the rug. Here’s how you can add fringe or tassels to your rug:
- Measure and Cut: Determine the desired length of the fringe or tassels and cut pieces of yarn accordingly. Make sure to cut the yarn slightly longer than the desired length, as some length will be lost during the attachment process.
- Divide into Bunches: Separate the cut yarn into small bunches, with each bunch containing several strands. The number of strands per bunch will depend on the thickness and fullness you want for the fringe or tassels. You can experiment with different numbers to achieve the desired effect.
- Attach the Fringe or Tassels: Working on one side of the rug at a time, fold a bunch of yarn in half to create a loop. Insert a crochet hook or tapestry needle through the edge of the rug, catch the loop, and pull it through. Then, pass the ends of the yarn through the loop and gently tighten to secure. Repeat this process at regular intervals along the edge of the rug until the entire side has fringe or tassels.
- Trim the Fringe or Tassels: Once all the fringe or tassels are attached, trim them to an even length. Use sharp scissors to create a clean and neat edge. You can opt for a straight cut or give the fringe a tapered or pointed look, depending on your preference and the style you want to achieve.
- Comb or Brush the Fringe or Tassels: After trimming, comb or brush the fringe or tassels gently to remove any tangles or unevenness. This step helps give the fringe or tassels a polished and uniform appearance.
- Secure the Knots: To make the fringe or tassels more secure and prevent unraveling, you can apply a small drop of fabric adhesive or use a needle and thread to sew a few stitches at the base of each attachment point. This will help maintain the integrity of the fringe or tassels over time.
- Optional Embellishments: If desired, you can add decorative elements to the fringe or tassels, such as beads, charms, or small fabric strips. Experiment with different embellishments to personalize your rug and make it truly unique.
By adding fringe or tassels to your handmade wool rug, you can elevate its appearance and give it a distinct and polished look. Enjoy the process of attaching and trimming the fringe or tassels, and take pride in the finished product – a beautifully adorned wool rug that adds charm and character to any space.
Finishing Touches and Finalizing the Rug
After completing the weaving and adding any desired fringe or tassels, it’s time to put the finishing touches on your handmade wool rug. These final steps will ensure that your rug is durable, presentable, and ready to be enjoyed. Here’s what you need to do:
- Inspect and Repair: Carefully examine the rug for any loose threads, weak areas, or irregularities. If you notice any issues, use a needle and thread to stitch up loose threads or reinforce weak spots. This will enhance the longevity and durability of your rug.
- Block the Rug: Blocking is the process of wetting the rug and carefully stretching it into its desired shape and dimensions. This helps even out the weave and ensures that the rug lies flat and square. Follow the manufacturer’s instructions for blocking, or consult online resources for specific techniques.
- Trim Excess Warp Threads: If there are any remaining warp threads beyond the edge of the rug, trim them neatly. Be careful not to cut any of the weft threads in the process.
- Steam or Press: If needed, steam or press the rug to eliminate any wrinkles or creases. Use a steamer or iron on a low-heat setting, and be cautious not to expose the rug to excessive heat, which can damage wool fibers.
- Vacuum or Clean: Vacuum your rug to remove any loose fibers or debris. Avoid using a vacuum cleaner with a beater bar, as it may pull or damage the wool fibers. If necessary, clean the rug according to the manufacturer’s instructions or seek professional cleaning services.
- Showcase the Rug: Find the perfect spot to showcase your handmade wool rug. Lay it on the floor, hang it on a wall, or use it as a decorative accent piece. Ensure that the rug is properly positioned and secured to prevent slippage or accidents.
- Care and Maintenance: To keep your rug in optimal condition, make sure to follow proper care and maintenance practices. Regularly vacuum or shake the rug to remove dust and dirt. Rotate the rug periodically to minimize wear in high-traffic areas. Attend to any spills or stains promptly by blotting them gently with a clean cloth and using appropriate cleaning methods.
- Appreciate and Enjoy: Step back and take in the beauty of your finished rug. Appreciate the time, effort, and creativity that went into its creation. Enjoy discovering the comfort and warmth it brings to your space, as well as the admiration it may receive from others.
By completing these final steps, you’ll ensure that your handmade wool rug is in its best possible condition and ready to be cherished for years to come. Take pride in your creation and bask in the satisfaction of a rug well-made.