
Setting the Time on a Casio Analog Watch
A Casio analog watch is a classic timepiece that exudes elegance and sophistication. To ensure that it always displays the correct time, you need to adjust it properly. Here’s a step-by-step guide to help you set the time on your Casio analog watch.
1. Locate the crown: The crown is a small dial on the side of the watch. It is used to adjust the time and date. Find the crown and make sure it is in the normal position, which is the closest position to the case.
2. Pull out the crown: Gently pull out the crown to the first or second position, depending on the specific model of your watch. The first position is for adjusting the date, while the second position is for adjusting the time.
3. Rotate the crown: Turn the crown clockwise or counterclockwise to set the correct time. Keep in mind that most Casio analog watches operate on a 12-hour format, so ensure that you set the hour hand to the appropriate AM or PM designation.
4. Set the date (if applicable): If your Casio analog watch has a date display, you can adjust it by continuing to rotate the crown in the first position. Turn the crown until you reach the correct date.
5. Push in the crown: Once you have set the time and date, push the crown back in to its original position. Make sure it is securely pushed in to prevent any water or dust from entering the watch.
6. Verify the time: To make sure you have set the time correctly, compare it with a reliable time source, such as your smartphone or a trusted clock. If necessary, repeat the steps to adjust the time until it is accurate.
Setting the time on your Casio analog watch may vary slightly depending on the model, so it’s always a good idea to consult the user manual for specific instructions. With proper time-setting, your Casio analog watch will continue to add a touch of style and functionality to your everyday life.
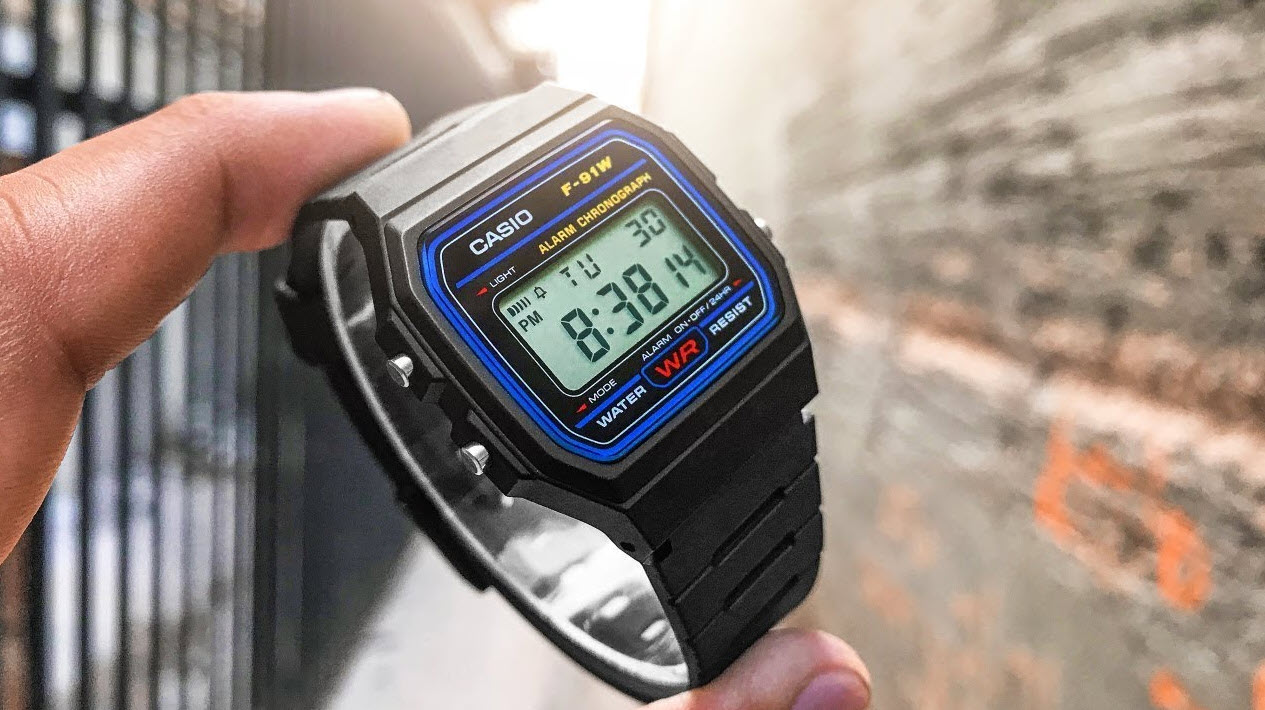
Adjusting the Time on a Casio Digital Watch
If you own a Casio digital watch, you have a timekeeping tool that offers precision and convenience. Whether you need to change the time due to daylight saving, travel, or any other reason, adjusting the time on your Casio digital watch is a straightforward process. Here’s a step-by-step guide to help you get it done.
1. Locate the mode button: The mode button is usually found on the bottom left-hand side of the watch face. Press it to access the time-setting mode.
2. Enter time-setting mode: Once you press the mode button, the display will show the current time. Keep pressing the mode button until you see a blinking symbol indicating that you have entered the time-setting mode.
3. Select the desired time component: In time-setting mode, you’ll typically have the option to adjust the hour, minutes, seconds, and even the date. Use the buttons or the digital crown, if applicable, to select the specific time component you wish to change.
4. Adjust the time: Once you have selected the time component, use the buttons or the digital crown to increase or decrease the value. Continue adjusting until you reach the desired time.
5. Save and exit: After setting the time, press the mode button again to save the changes and exit the time-setting mode. The watch will then display the newly adjusted time as you normally wear it.
Remember that Casio digital watches often have additional features such as alarms, timers, and world time settings. To avoid accidentally changing these settings while adjusting the time, be sure to pay attention to the specific button sequences and instructions provided in the user manual.
Setting the time on a Casio digital watch is a skill that will come in handy whenever you need to keep your watch synchronized with the correct time. By following these easy steps, you’ll be able to adjust the time on your Casio digital watch quickly and accurately.
Updating the Time on a Casio World Time Watch
A Casio World Time watch is designed for globetrotters and individuals who frequently travel across time zones. These watches boast the functionality of displaying multiple time zones simultaneously, making it convenient to keep track of time anywhere in the world. To update the time on your Casio World Time watch, follow these simple steps.
1. Access the time-setting mode: Look for the mode button on your watch, usually located on the bottom left-hand side of the watch face. Press the mode button repeatedly until you find the time-setting mode.
2. Select the city or time zone: Once in the time-setting mode, use the buttons or digital crown, if applicable, to scroll through the available city codes or time zones. Find the city or time zone that corresponds to your current location or the one you wish to set the time for.
3. Adjust the time: After selecting the desired city or time zone, use the buttons or digital crown to adjust the hour, minutes, and seconds if necessary. Some Casio World Time watches may also allow you to adjust the date at this point.
4. Save and exit: Once you have set the time for the specific city or time zone, press the mode button to save the changes and exit the time-setting mode. The watch will then display the updated time for the selected location.
Casio World Time watches often feature additional features, such as daylight saving time settings or automatic time syncing through radio waves or GPS signals. To make the most of these functions, consult the user manual to ensure that you correctly configure them according to your preferences.
By updating the time on your Casio World Time watch, you can effortlessly stay in sync with the different time zones you encounter during your travels. The convenience and functionality of a Casio World Time watch make it an excellent companion for frequent flyers and global adventurers.
Changing the Time on a Casio G-Shock Watch
Casio G-Shock watches are known for their durability, reliability, and rugged design. These timepieces are packed with features that cater to outdoor enthusiasts and individuals with an active lifestyle. If you need to change the time on your Casio G-Shock watch, follow these simple steps.
1. Access the time-setting mode: Look for the mode button, usually located on the bottom left-hand side of the watch face. Press and hold the mode button until the watch enters the time-setting mode.
2. Select the time component: Once in the time-setting mode, use the buttons or digital crown, if applicable, to select the specific time component you wish to change. This may include the hour, minutes, and seconds.
3. Adjust the time: After selecting the desired time component, use the buttons or digital crown to increase or decrease the value. Keep adjusting until you reach the correct time.
4. Save and exit: Once you have set the time, press the mode button to save the changes and exit the time-setting mode. Your Casio G-Shock watch will now display the updated time.
It’s important to note that Casio G-Shock watches often have additional features, such as alarms, timers, and world time settings. These features may require specific button combinations or menus to access and adjust. Consult the user manual of your specific G-Shock model to fully understand and utilize these additional functions.
Changing the time on a Casio G-Shock watch is a simple process that ensures your watch stays accurate and reliable. The robust construction of G-Shock watches, coupled with their precise timekeeping capabilities, make them the perfect choice for rugged adventurers and outdoor enthusiasts.
Setting the Time on a Casio Solar Watch
A Casio solar watch combines the convenience of solar-powered technology with stylish design and accurate timekeeping. These watches harness the power of light to charge their batteries, eliminating the need for frequent battery replacements. If you need to set the time on your Casio solar watch, follow these simple steps.
1. Activate the power-saving mode (if applicable): Some Casio solar watches have a power-saving mode that conserves energy when the watch is not exposed to light for an extended period. If your watch has this feature and it is activated, deactivate it before proceeding to the time-setting mode.
2. Access the time-setting mode: Look for the mode button, usually located on the bottom left-hand side of the watch face. Press and hold the mode button until the watch enters the time-setting mode.
3. Select the time component: Once in the time-setting mode, use the buttons or digital crown, if applicable, to select the specific time component you wish to change. This may include the hour, minutes, and seconds.
4. Adjust the time: After selecting the desired time component, use the buttons or digital crown to increase or decrease the value. Keep adjusting until you reach the correct time.
5. Save and exit: Once you have set the time, press the mode button to save the changes and exit the time-setting mode. Your Casio solar watch will now display the updated time.
It’s worth noting that Casio solar watches typically have a power reserve feature, which allows them to continue functioning even in low light conditions or when not exposed to light for an extended period. However, to ensure optimal performance, it’s recommended to expose your Casio solar watch to sunlight or bright artificial light regularly.
Setting the time on a Casio solar watch is a straightforward process that ensures your watch remains accurate and reliable while reducing the need for battery replacements. The combination of solar power technology and precise timekeeping makes Casio solar watches an eco-friendly and practical choice for watch enthusiasts.
Adjusting the Time on a Casio Quartz Watch
A Casio quartz watch offers precise timekeeping with the help of a quartz crystal oscillator. These watches are commonly known for their accuracy and reliable performance. If you need to adjust the time on your Casio quartz watch, follow these simple steps.
1. Access the time-setting mode: Look for the mode button, typically located on the bottom left-hand side of the watch face. Press the mode button repeatedly until you find the time-setting mode.
2. Select the time component: Once in the time-setting mode, use the buttons or digital crown, if applicable, to select the specific time component you wish to change. This may include the hour, minutes, and seconds.
3. Adjust the time: After selecting the desired time component, use the buttons or digital crown to increase or decrease the value. Keep adjusting until you reach the correct time.
4. Save and exit: Once you have set the time, press the mode button to save the changes and exit the time-setting mode. Your Casio quartz watch will now display the updated time.
Sometimes, Casio quartz watches also have additional features, such as a date display or multiple time zones. To adjust these features, simply follow the specific instructions provided in the user manual.
It is important to note that Casio quartz watches are battery-operated. If you notice that your watch is consistently losing or gaining time, it may be time to replace the battery. Refer to the user manual or consult a professional technician for battery replacement.
Adjusting the time on a Casio quartz watch is a quick and straightforward process. The accurate timekeeping and reliability of Casio quartz watches make them a popular choice for individuals who value precision and functionality.
Synchronizing the Time on a Casio Wave Ceptor Watch
A Casio Wave Ceptor watch is a timepiece that relies on radio-controlled technology to ensure accurate and precise timekeeping. These watches receive radio signals from atomic clocks around the world, allowing them to automatically adjust to the correct time. To synchronize the time on your Casio Wave Ceptor watch, follow these simple steps.
1. Find a location with a clear reception: Casio Wave Ceptor watches rely on radio signals to synchronize the time. Move outdoors to an open area or near a window to maximize the chances of receiving a strong signal.
2. Enter time-setting mode: Look for the mode button on your watch, usually located on the bottom left-hand side of the watch face. Press and hold the mode button until the watch enters the time-setting mode.
3. Activate the automatic time synchronization function: In the time-setting mode, look for the “RX-S”, “DCF”, or “WV” symbol on your watch’s display. This indicates that the watch is attempting to receive the radio signal for automatic time synchronization. Wait for a few minutes to allow the watch to receive the signal.
4. Confirm successful synchronization: Once the watch has successfully received the radio signal, the time on your Casio Wave Ceptor watch will automatically adjust to the correct time. The watch will typically display an indicator or a confirmation message on the screen to indicate successful time synchronization.
If your Casio Wave Ceptor watch is unable to receive the radio signal due to factors such as interference or distance from atomic clock transmitters, you can manually initiate time synchronization by pressing the dedicated “receive” or “manual” button, following the specific instructions provided in your watch’s user manual.
Notably, some Wave Ceptor models can synchronize with multiple radio wave transmitters, enabling accurate timekeeping even when traveling across different regions.
A Casio Wave Ceptor watch offers the convenience of automatic time synchronization, ensuring that your watch always displays the precise time. By following these simple steps, you can keep your Casio Wave Ceptor watch perfectly in sync with atomic clocks around the world.
Updating the Time on a Casio Bluetooth Watch
A Casio Bluetooth watch allows you to connect to your smartphone and enjoy a wide range of advanced features, including automatic time synchronization. With the push of a button or a simple command through a companion mobile app, you can update the time on your Casio Bluetooth watch effortlessly. Here’s how to do it.
1. Ensure Bluetooth connectivity: Make sure that your Casio Bluetooth watch is paired and connected to your smartphone via Bluetooth. Consult the user manual or the manufacturer’s website for instructions on how to set up the Bluetooth connection if you haven’t done so already.
2. Open the companion app: Launch the dedicated mobile app that corresponds to your Casio Bluetooth watch model on your smartphone. If you have not yet downloaded the app, search for it in your phone’s app store and install it.
3. Access the time setting feature: Within the app, locate the time setting feature or menu. It is typically labeled as “Time Sync” or “Update Time”. Tap on the feature to initiate the time update process.
4. Enable automatic time synchronization: In many cases, the time on your Casio Bluetooth watch will automatically update when it is connected to your smartphone via Bluetooth. If this feature is enabled, your watch will sync with the time displayed on your smartphone.
5. Manually update the time (if necessary): If the automatic time synchronization feature is not enabled or if you prefer to manually update the time, follow the prompts within the app to adjust the time on your Casio Bluetooth watch. Use the provided options to set the correct hour, minutes, and seconds.
6. Confirm the time update: Once you have adjusted the time, confirm the changes within the app to synchronize the new time with your Casio Bluetooth watch. The watch will display the updated time as per your smartphone’s clock.
It’s important to note that the exact steps and available features may vary depending on the model and companion app of your Casio Bluetooth watch. Refer to the user manual or additional online resources specific to your watch for detailed instructions.
With the convenience of Bluetooth technology, updating the time on your Casio Bluetooth watch is a seamless process. Enjoy accurate timekeeping and additional features that enhance your overall timekeeping experience.
Changing the Time Format on a Casio Watch
A Casio watch often provides the option to customize the display format of the time. Whether you prefer a 12-hour or 24-hour format, changing the time format on your Casio watch is a simple process. Here’s how to do it.
1. Access the time-setting mode: Look for the mode button on your Casio watch, usually located on the bottom left-hand side of the watch face. Press the mode button repeatedly until you find the time-setting mode.
2. Select the time format option: Once in the time-setting mode, use the buttons or the digital crown, if applicable, to find the option that allows you to adjust the time format. This option might be labeled as “12H” or “24H” to indicate the 12-hour or 24-hour format respectively.
3. Change the time format: Depending on your watch model, you may need to press a button or rotate the digital crown to toggle between the available time format options. Keep adjusting until you select the desired time format.
4. Save and exit: After changing the time format, press the mode button to save the changes and exit the time-setting mode. Your Casio watch will now display the time in the selected format.
It’s important to note that some Casio watches may have additional settings related to the time format, such as the ability to display the day of the week or the month in addition to the time. Refer to the user manual specific to your watch model for detailed instructions on accessing and adjusting these settings.
Changing the time format on your Casio watch allows you to personalize your timekeeping experience according to your preference. Whether you prefer a traditional 12-hour format or the simplicity of a 24-hour format, Casio watches provide the flexibility to adapt the display to your liking.
Troubleshooting Common Issues with Casio Watch Time Adjustments
While Casio watches are known for their reliability and accuracy, occasionally, you may encounter issues when adjusting the time. Here are some common problems that may arise during the time adjustment process and troubleshooting steps to help you resolve them.
1. Incorrect time setting: If the time on your Casio watch does not match the desired time after adjusting it, double-check that you followed the correct time-setting procedure. Make sure you have selected the correct time component (hour, minutes, or seconds) and adjusted it accordingly.
2. Non-responsive buttons: If the buttons on your Casio watch are not responding when trying to adjust the time, ensure that you are in the correct mode for time setting. Some watches require you to be in the specific time-setting mode to make any adjustments.
3. Incorrect time zone: If you have a Casio watch with world time features and the time is not displaying correctly for your current location, check that you have selected the correct time zone. Consult the user manual for instructions on how to adjust the time zone setting.
4. Weak radio signal reception (for radio-controlled watches): If you have a Casio watch that receives radio signals for time synchronization, ensure that you are in an area with a clear reception. Move near a window or go outdoors to improve signal quality and allow your watch to receive the radio signal successfully.
5. Battery-related issues: If your Casio watch is running slow or the time adjustments are not holding, it may be due to a low battery. Check the battery level and consider replacing it if necessary. Consult the user manual or contact a professional technician for battery replacement.
6. Consult the user manual: If you are facing difficulties with time adjustments specific to your Casio watch model, it’s always helpful to refer to the user manual provided. The manual typically contains detailed instructions and troubleshooting tips for your specific watch model.
If you have tried the troubleshooting steps above and are still experiencing issues with adjusting the time on your Casio watch, it may be necessary to contact Casio customer support or seek assistance from a certified Casio watch technician.
By identifying and resolving common issues with time adjustments, you can ensure your Casio watch continues to provide accurate timekeeping and a seamless user experience.